Author: James Williams
Installing the Canvas
We will begin basting in the canvas now, working in even more shape as we go along. You’ll notice that neither the canvas nor the forepart want to lie flat on the table. The human body is not flat, so why would a coat be flat?
Keep this in mind as you’re basting in the canvas. Keep one hand underneath the canvas as you go, making sure the shape is supported as you baste.
To begin, lay the canvas on the table, with the coat, right side up, on top. The canvas should extend about 1⁄2” past the edge of the wool, giving us some room for error as we baste.
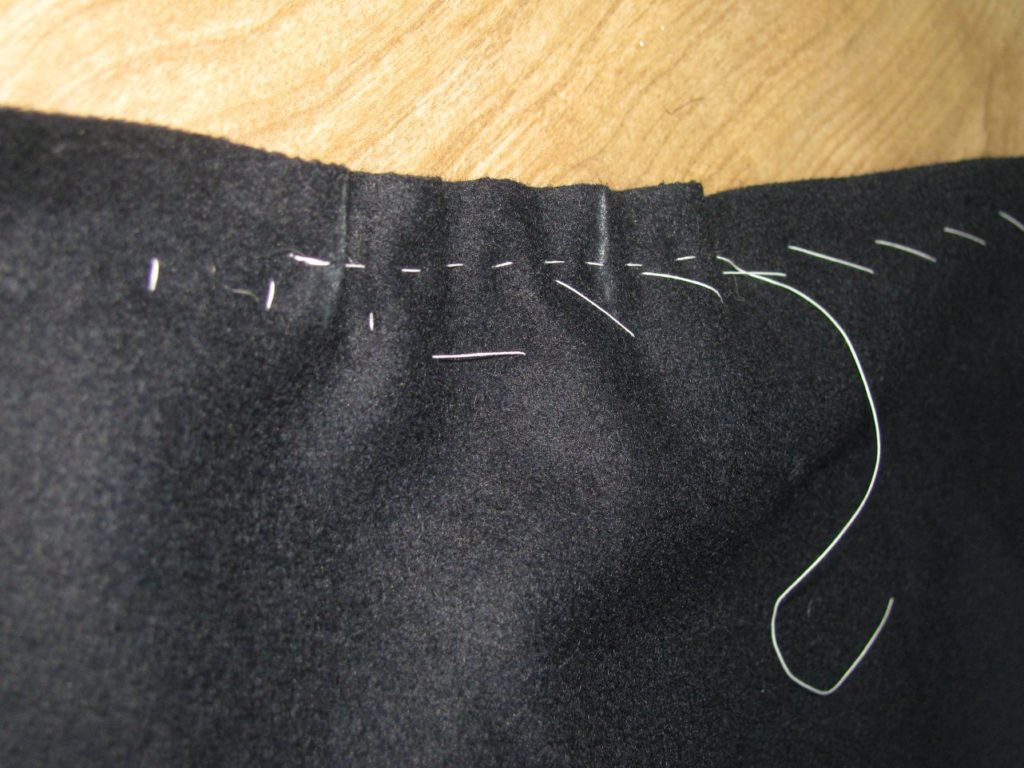
Start by basting from about an inch or two away from the top of the shoulder, down the center of the coat, ending one inch above the waist.
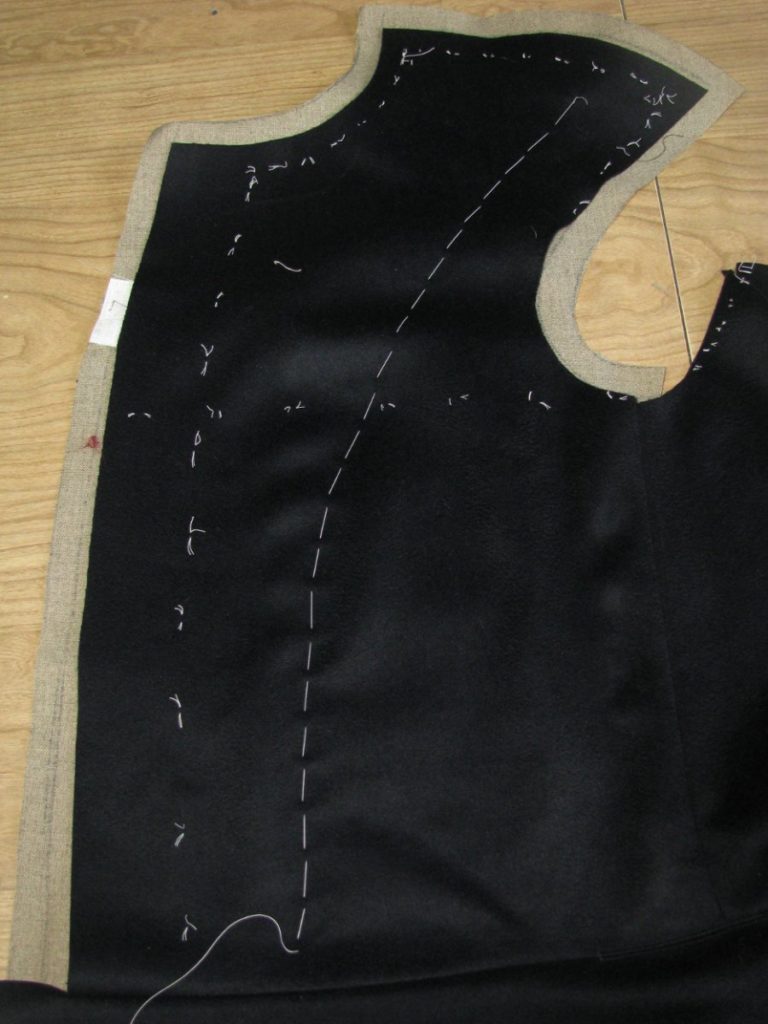
At the waist, baste toward the edge of the coat, stopping at the tailor tacks on the front of the coat. Then follow the front upwards, smoothing the fabric toward the edge as you go.

Keeping one inch away from the inlays, baste across the neck and shoulder, ending where you originally started.

Baste from the bottom of the scye, down along the edge of the canvas, to one inch above the waist, cutting across to meet the other basting you put in.

Finally, baste around the armscye, about a half inch from the edge. Also baste the rest of the waist line from the tailor tacks to the center front.

At this point, hold up the garment, being careful to support it fully to prevent unwanted stretching, and ensure that there are no ripples or unwanted fullness in the coat front. If there is, remove the basting and try again.
When you are satisfied, carefully trim the extra canvas from the edges of the coat along the center front, neck, shoulder, and armscye.
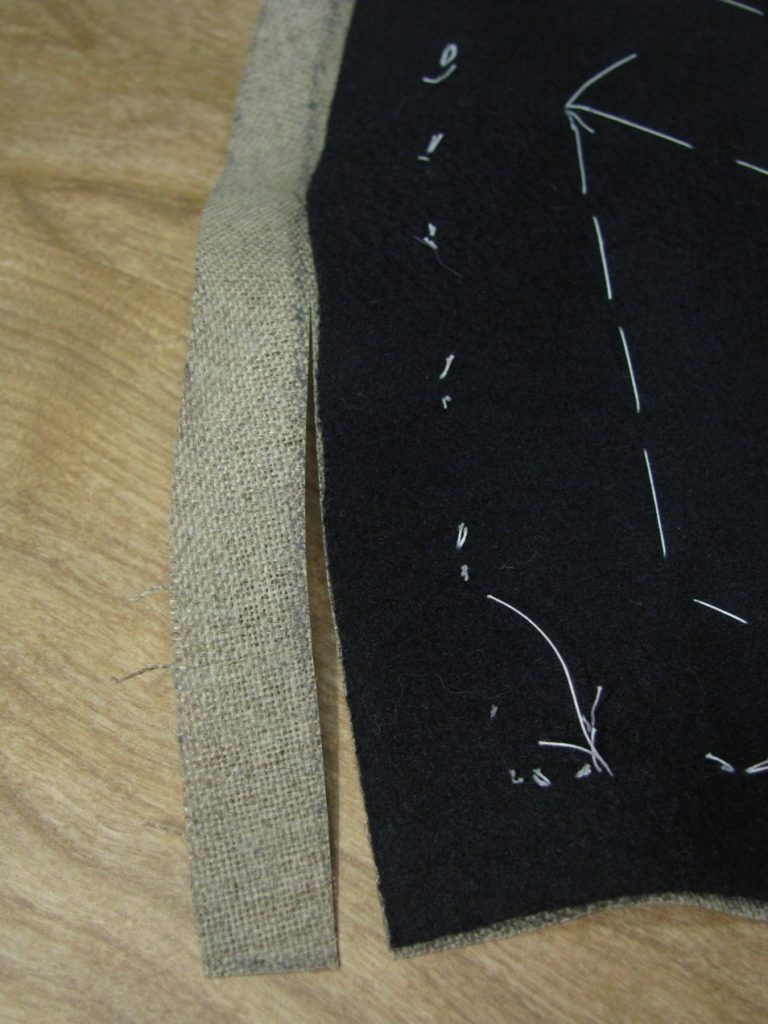
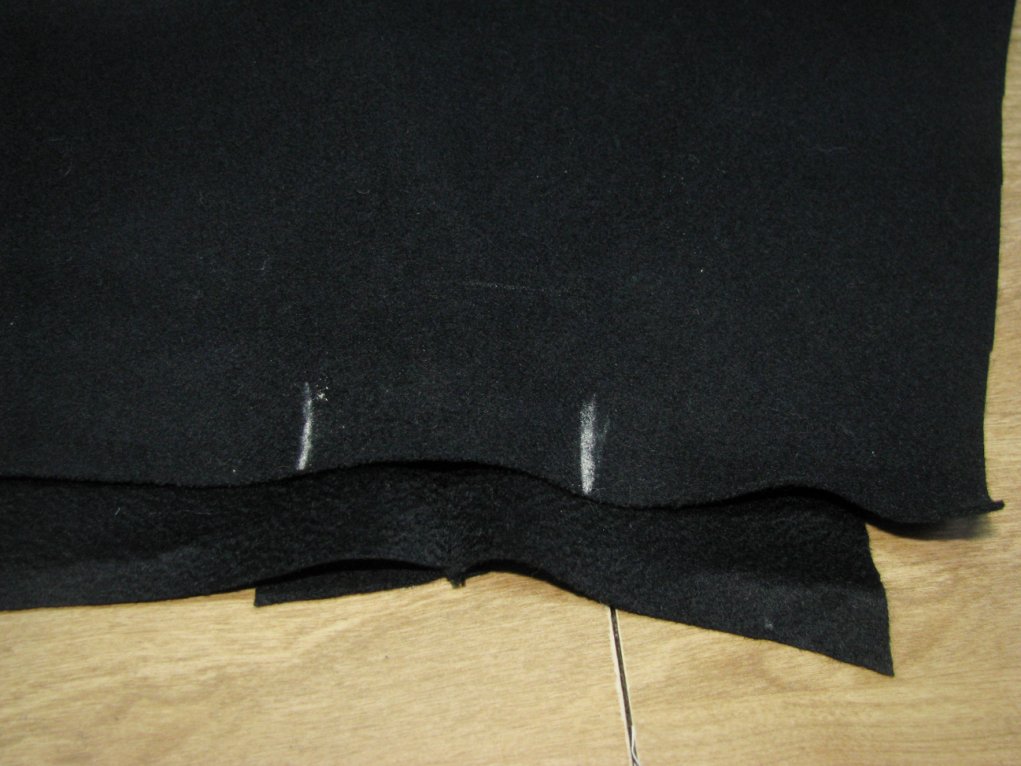
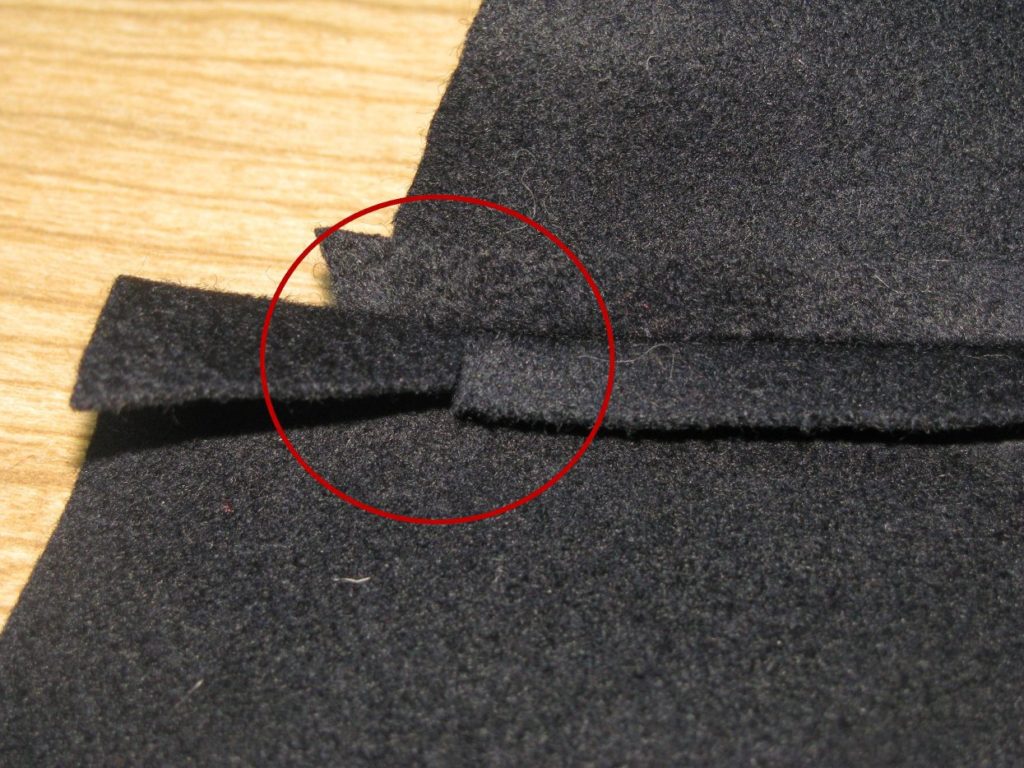
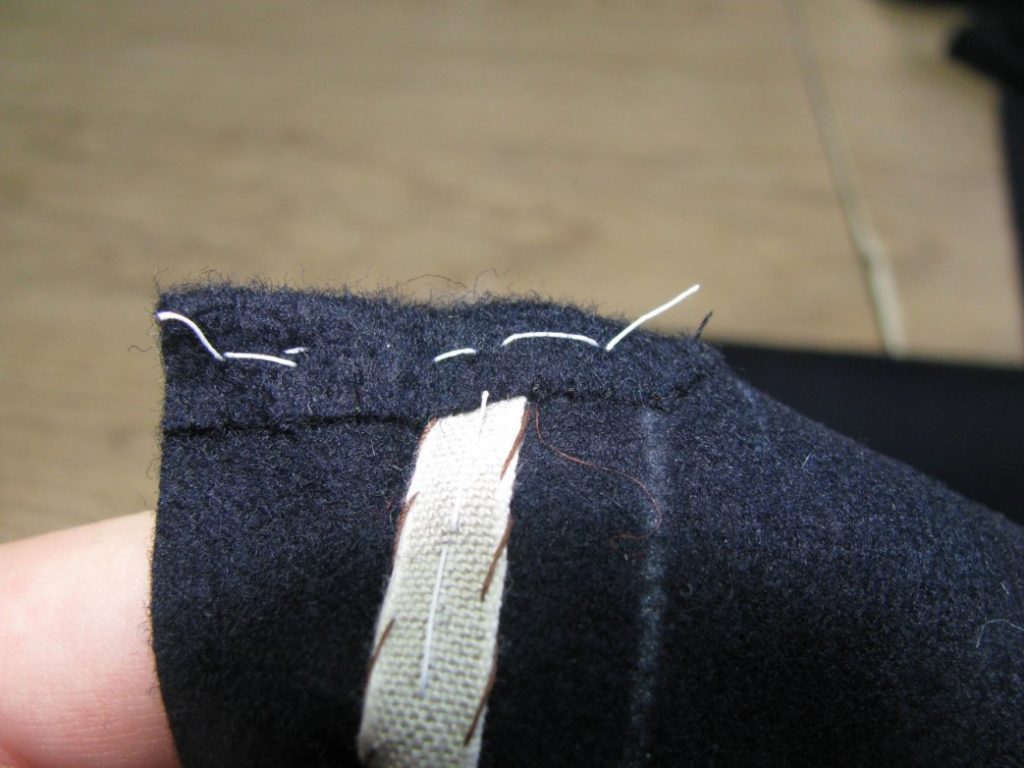
Turn the coat to the inside, and observe the waist seam. There should be about an inch extra inlay, which will need to be trimmed off carefully. The canvas edge needs to lay perfectly even with the waist seam.
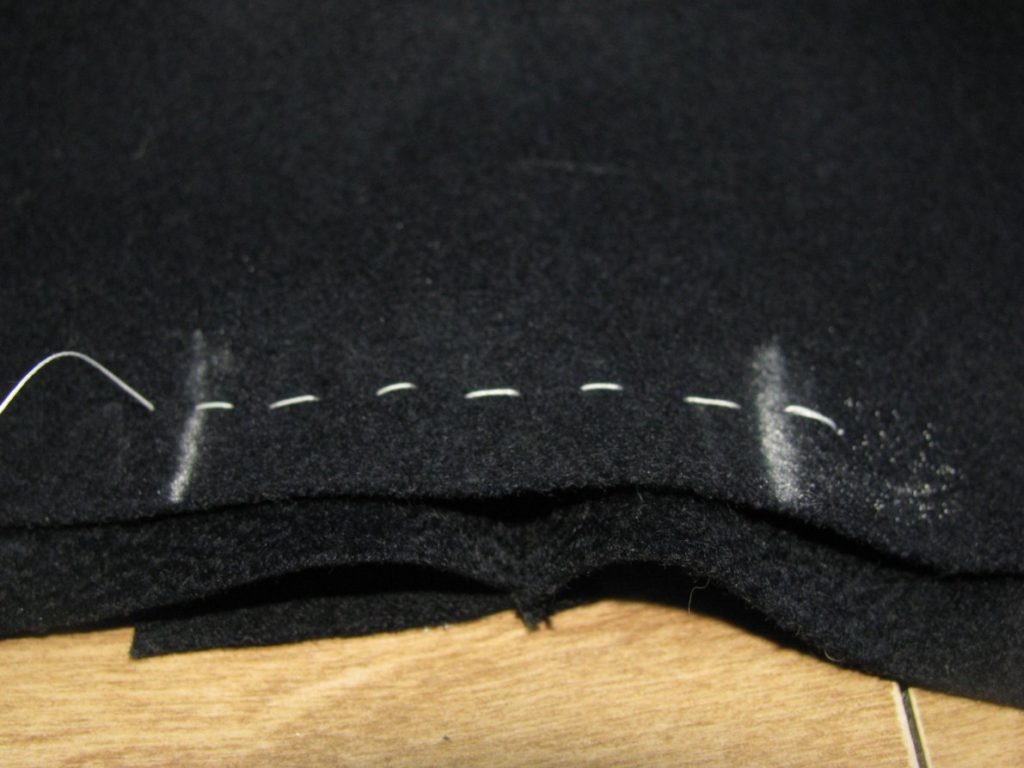
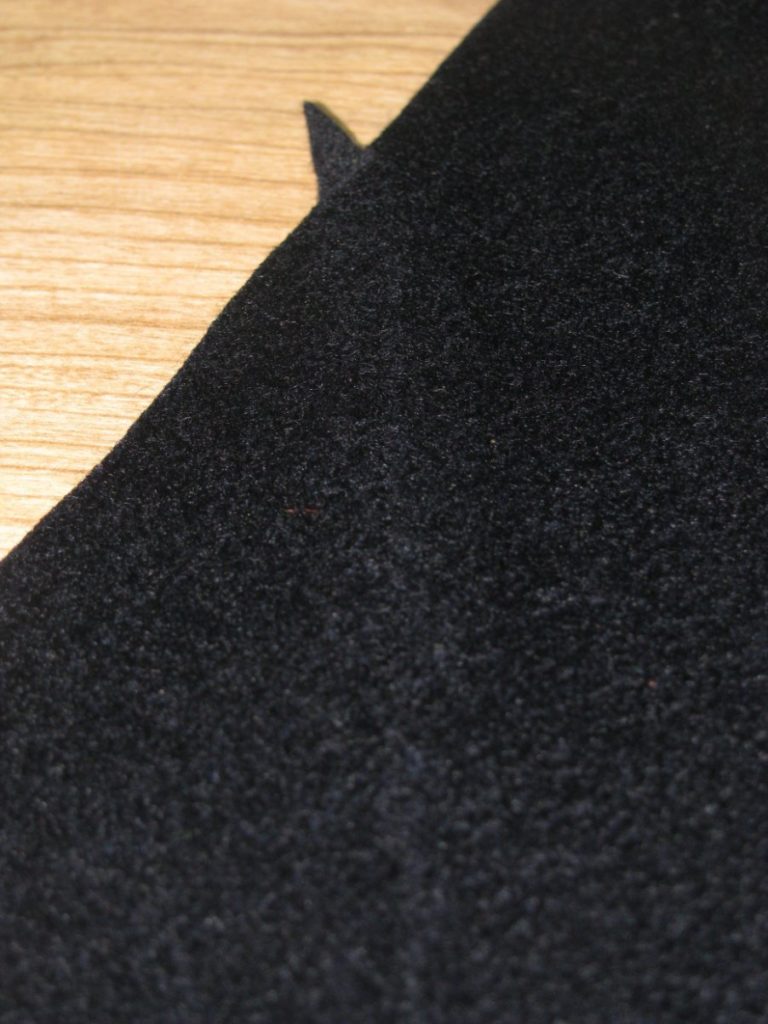
With your scissors in the ‘ditch’ of the waist seam, carefully cut away this extra canvas. Cut a little bit at a time, and check between each cut that you are cutting accurately. If you cut too much away, the coat front will be pulled upwards and give an unsightly appearance. It’s okay to leave about 1/16 inch extra canvas. The extra fullness in the canvas will keep the wool in shape.
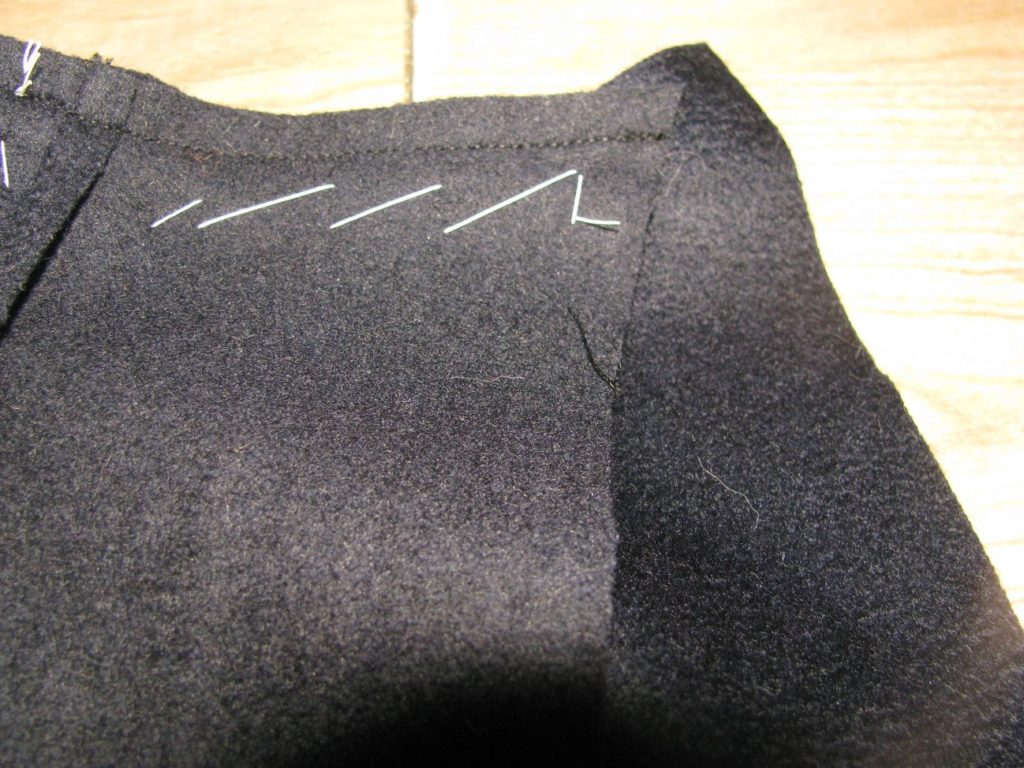
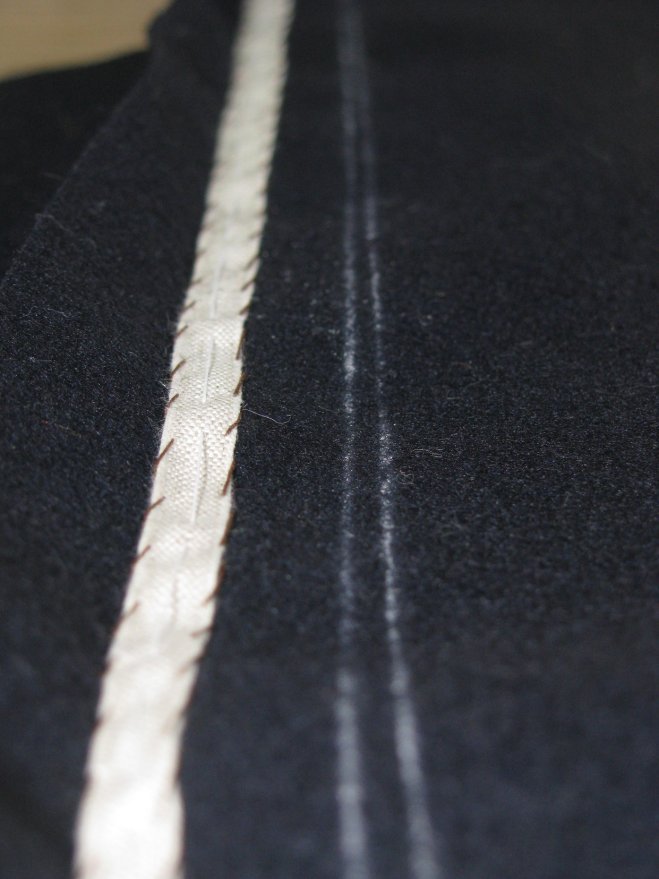
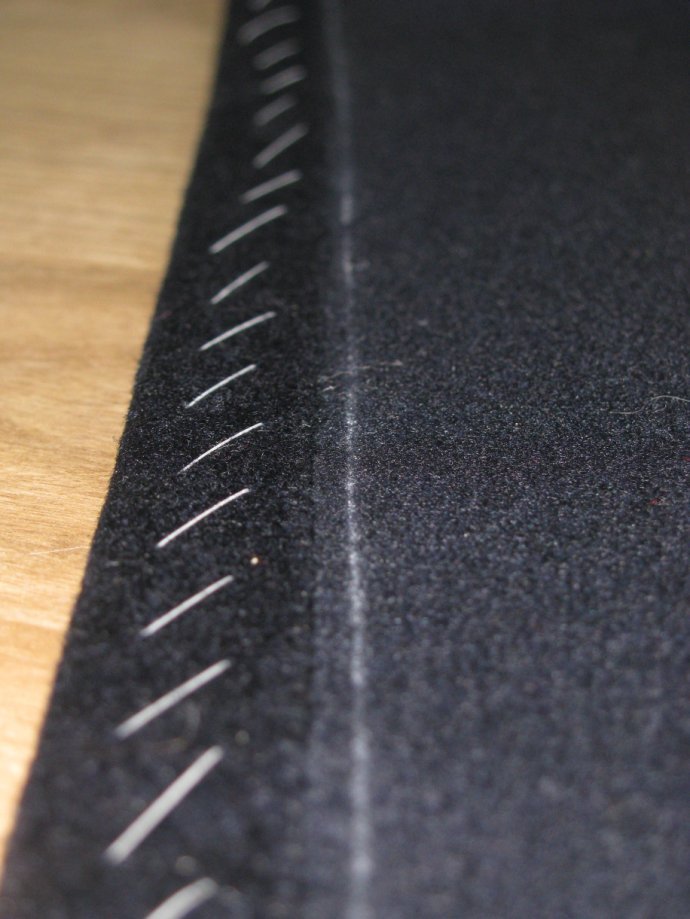
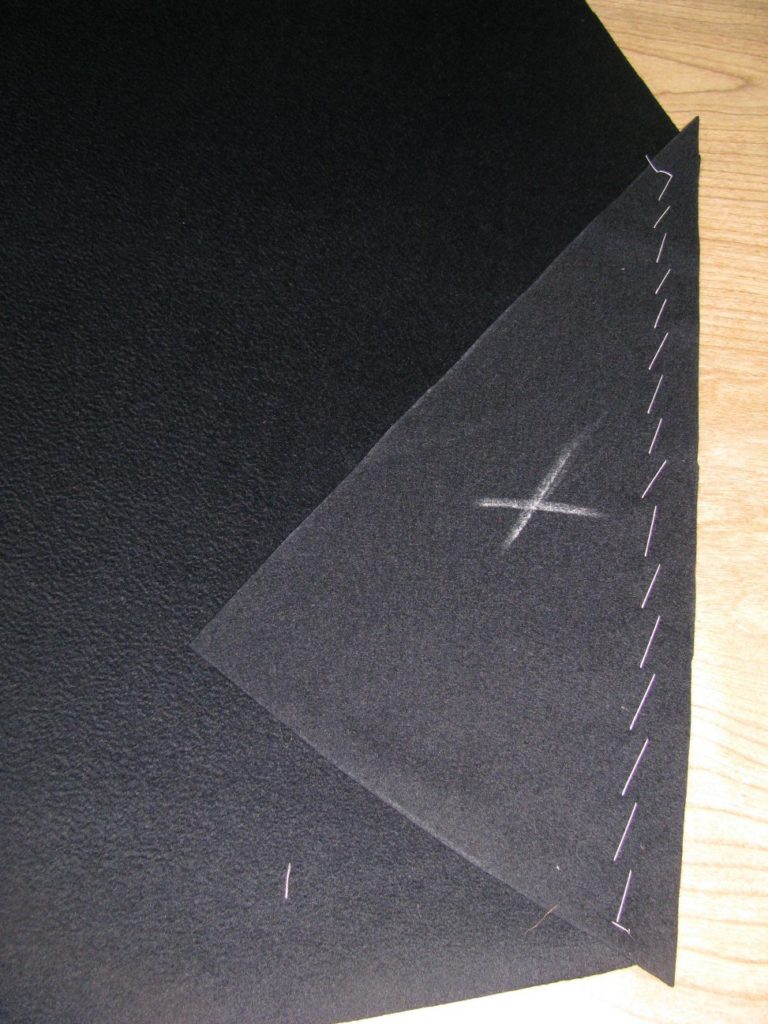
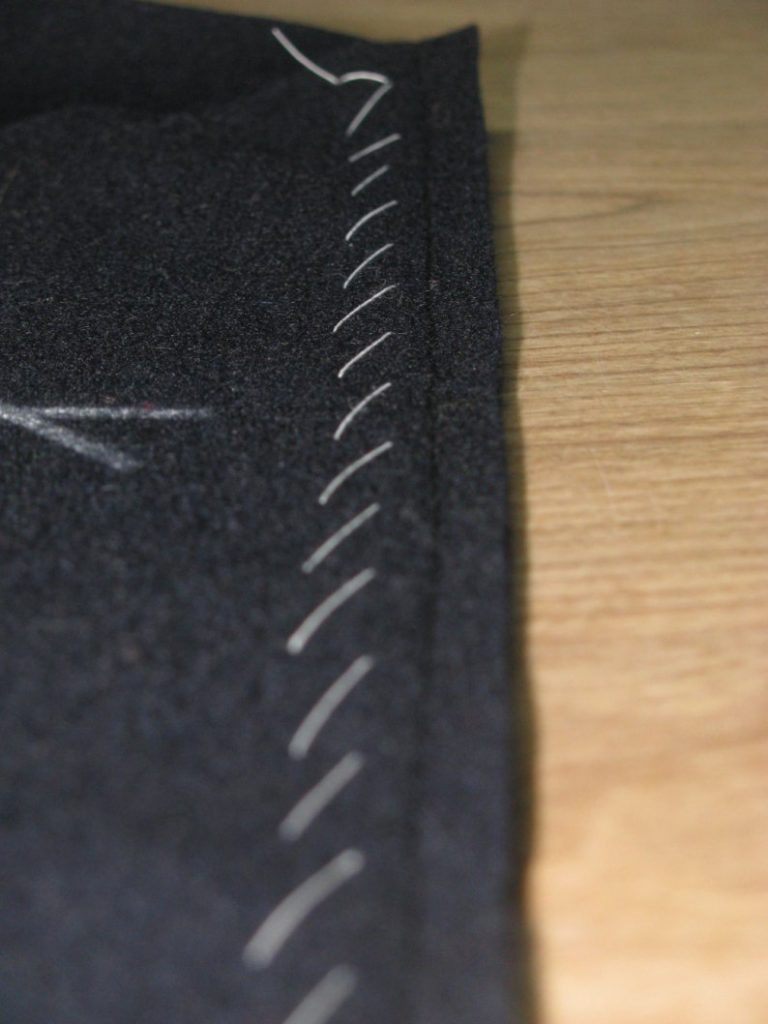
Using a cross stitch, secure the canvas to the waist seam of the coat. This will hold it permanently in place. Stitch from the inner edge of the canvas, to about two inches from the center front, where the tailor tacks are. You can use the basting stitches holding the canvas in place as a guide.

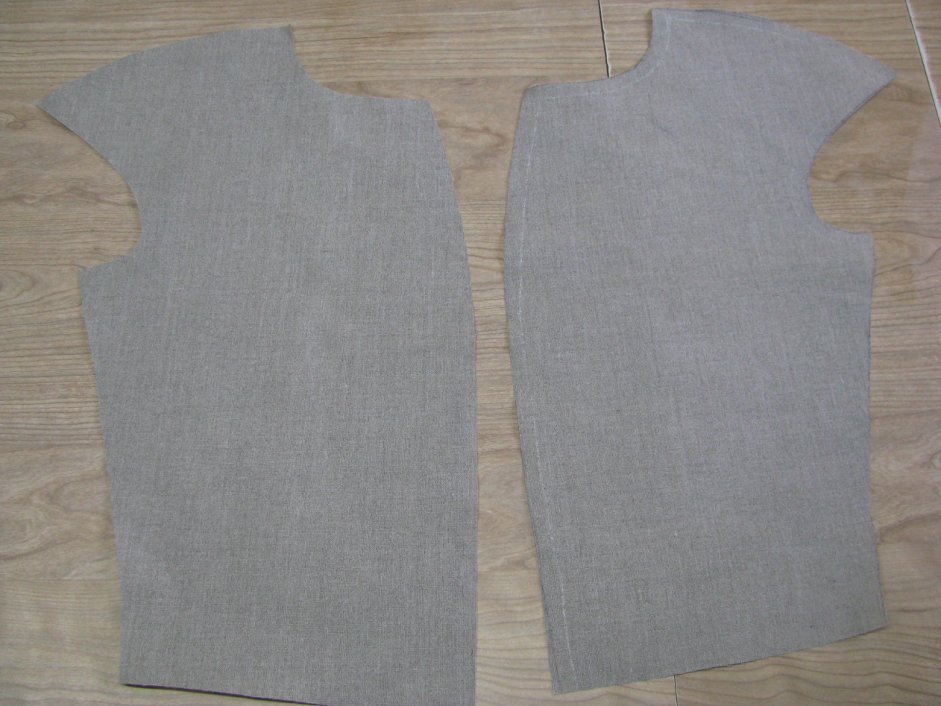
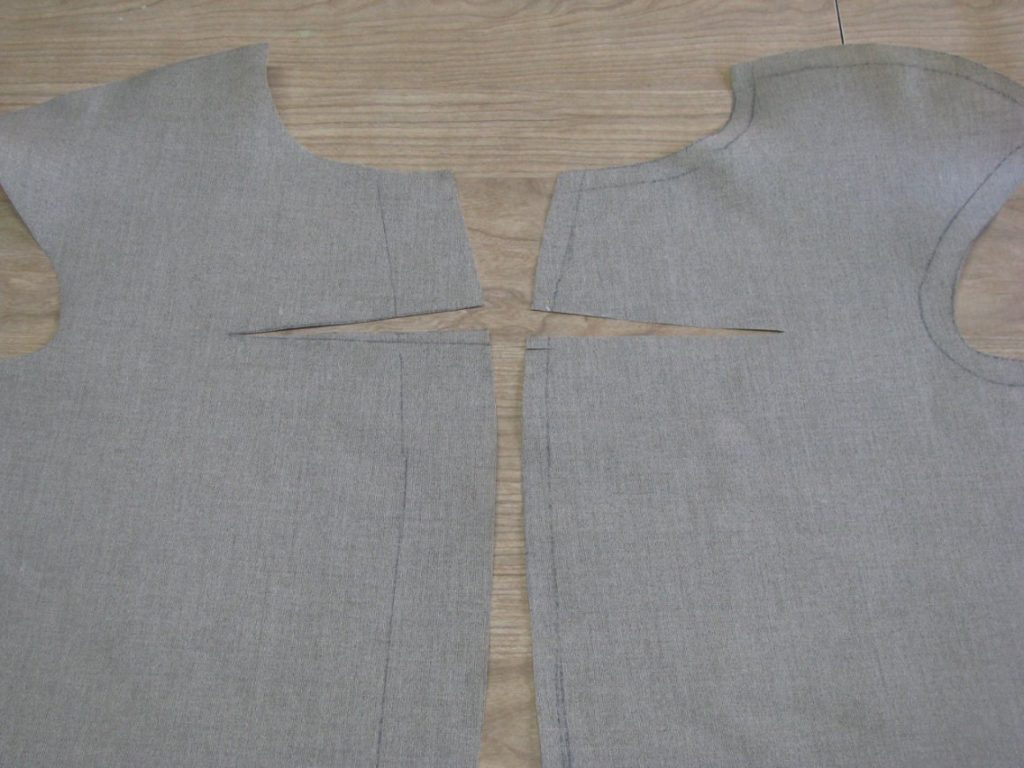
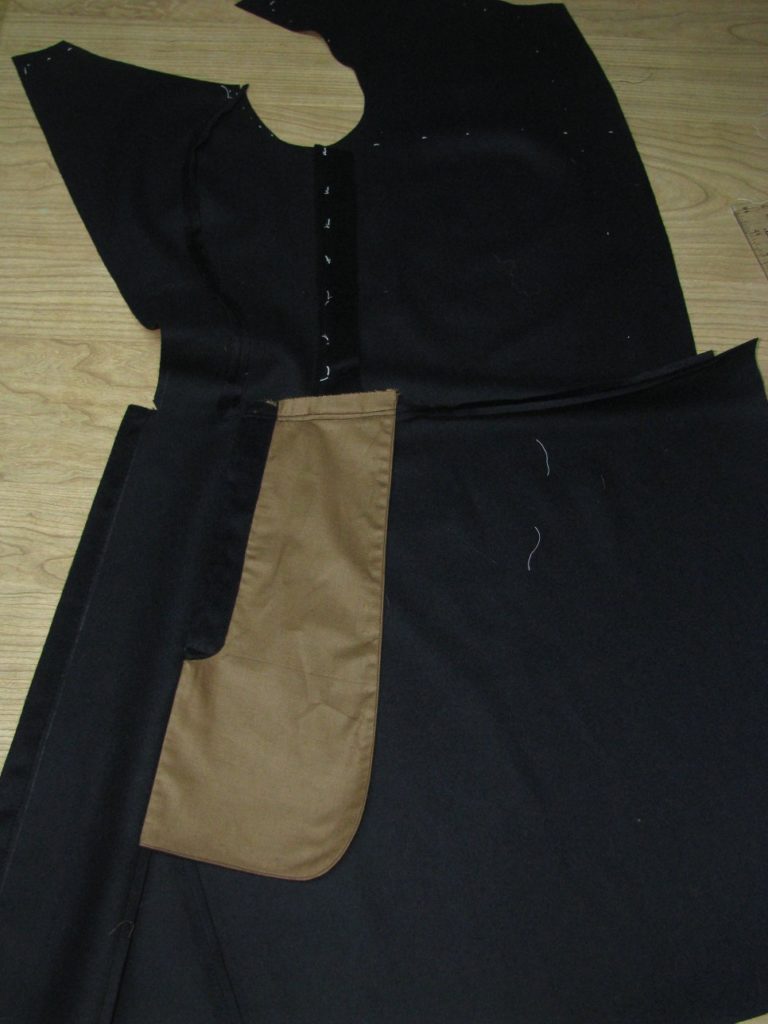
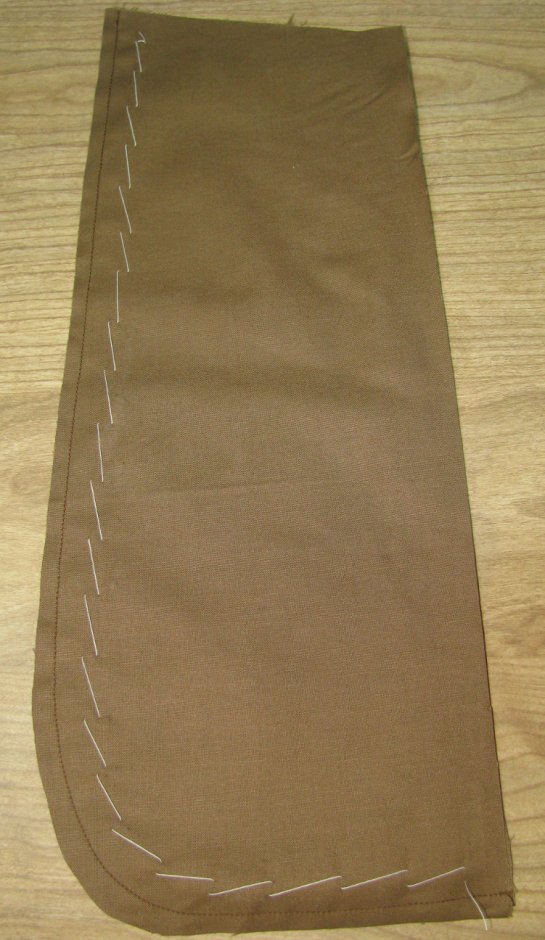
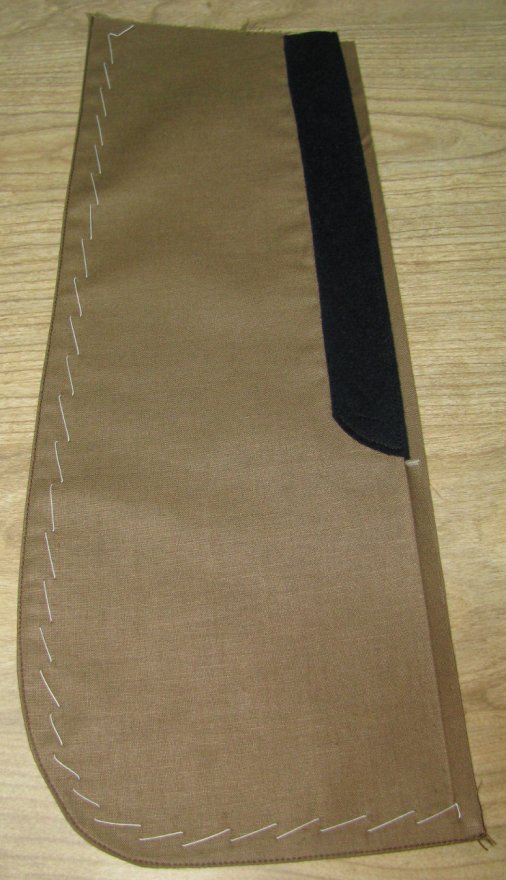
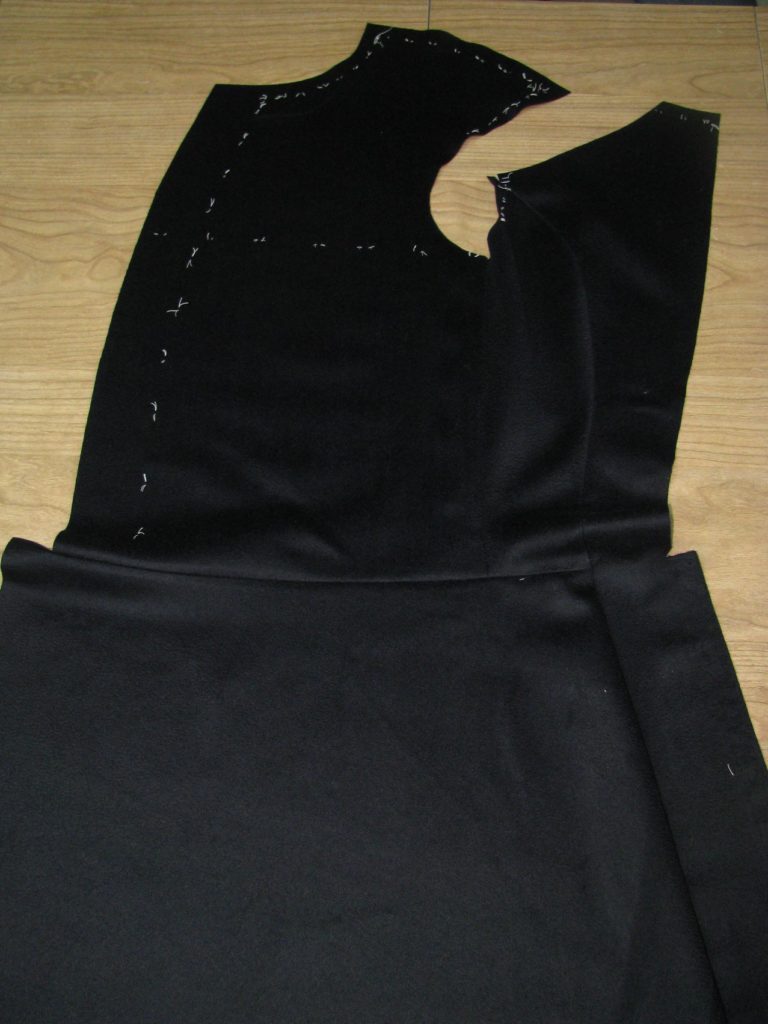
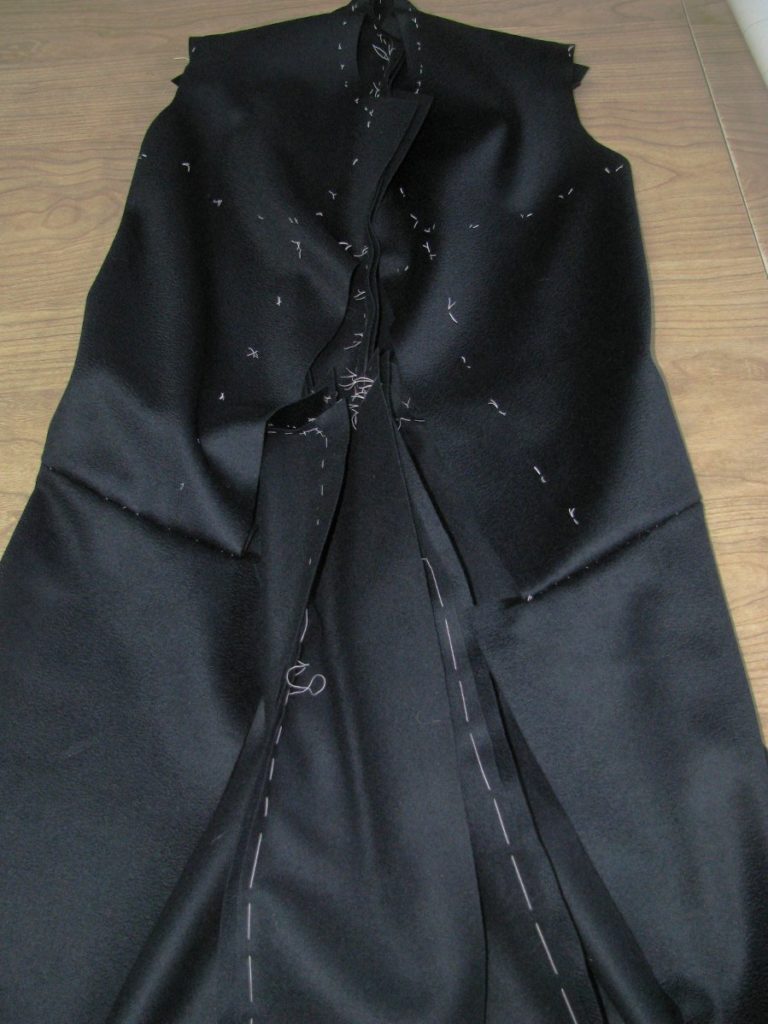
At this point you should have two halves of the coat completed, with pleat pockets and canvas installed. Here is the progress so far:
Cutting the Canvas
The canvas has a very large affect on the final appearance of a coat. It provides shape and support for the garment. The shape of the canvas will mimic the shape of the coat we created through ironwork, making it more permanent.
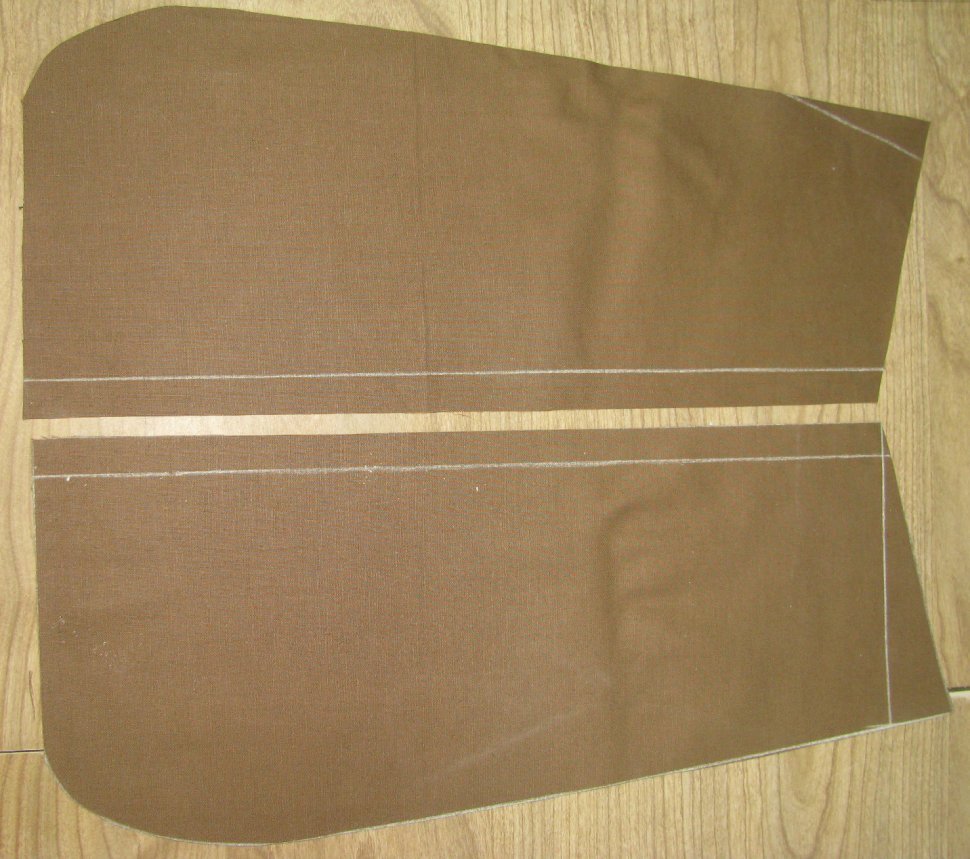
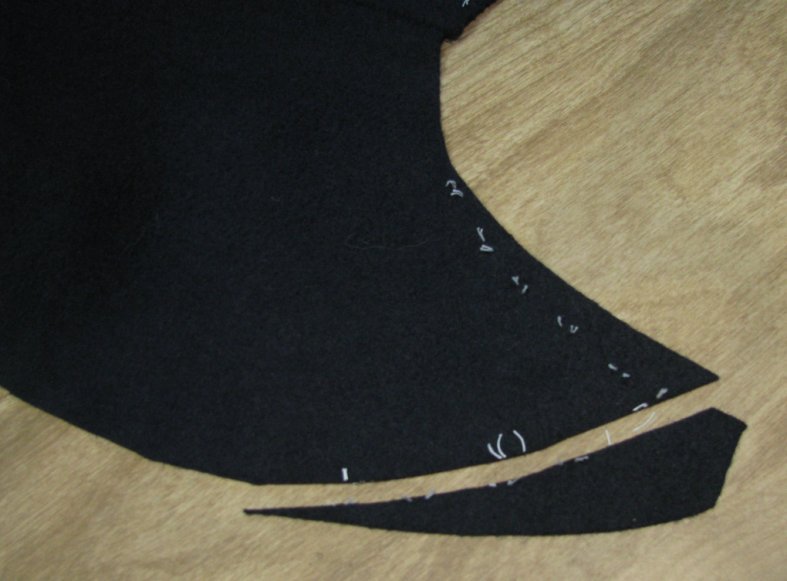
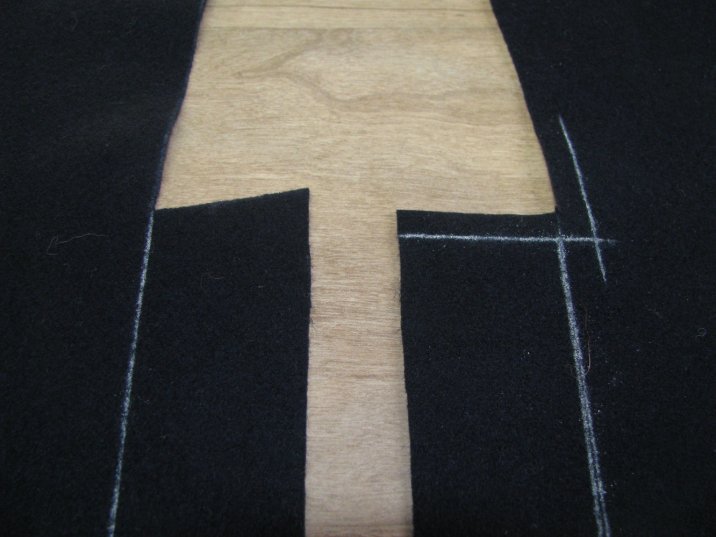
Lay the forepart pattern on your canvas, making sure the grain lines are lined up. Next, trace around the entire forepart with chalk, except for the side seam. The canvas does not extend all the way to the side seam. Instead, it extends in a concave line from a point about an inch away from the top of the side seam, to about halfway along the waist line, as shown.
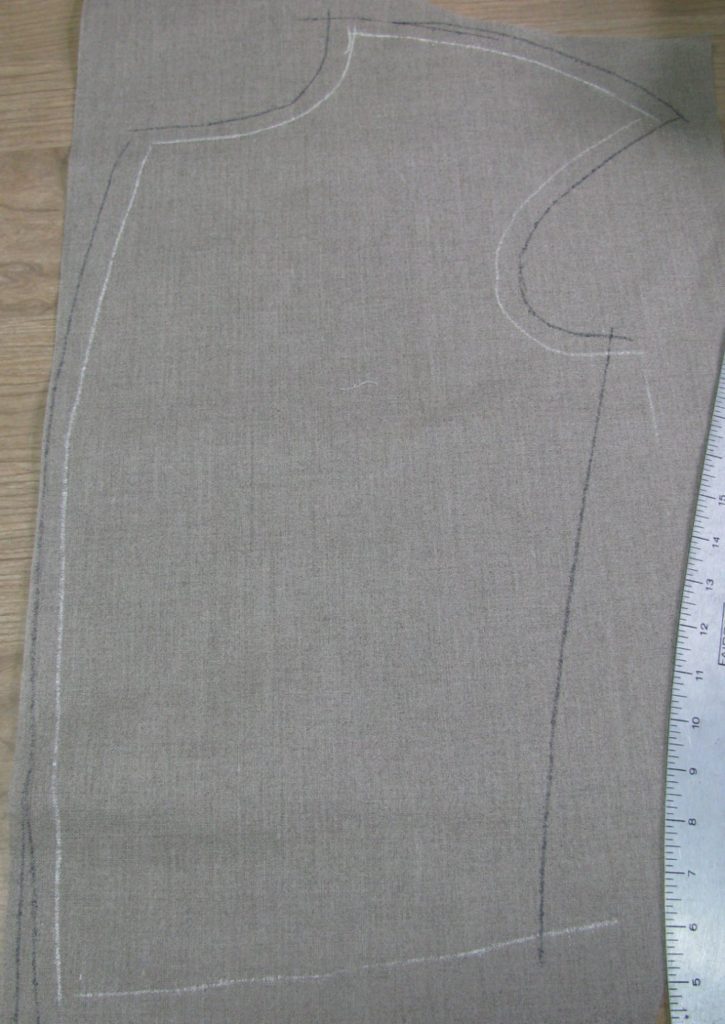
Next, add a half inch allowance all the way around, except for the side seam. This is to give you some room for error when basting on the canvas later, as they rarely line up perfectly.
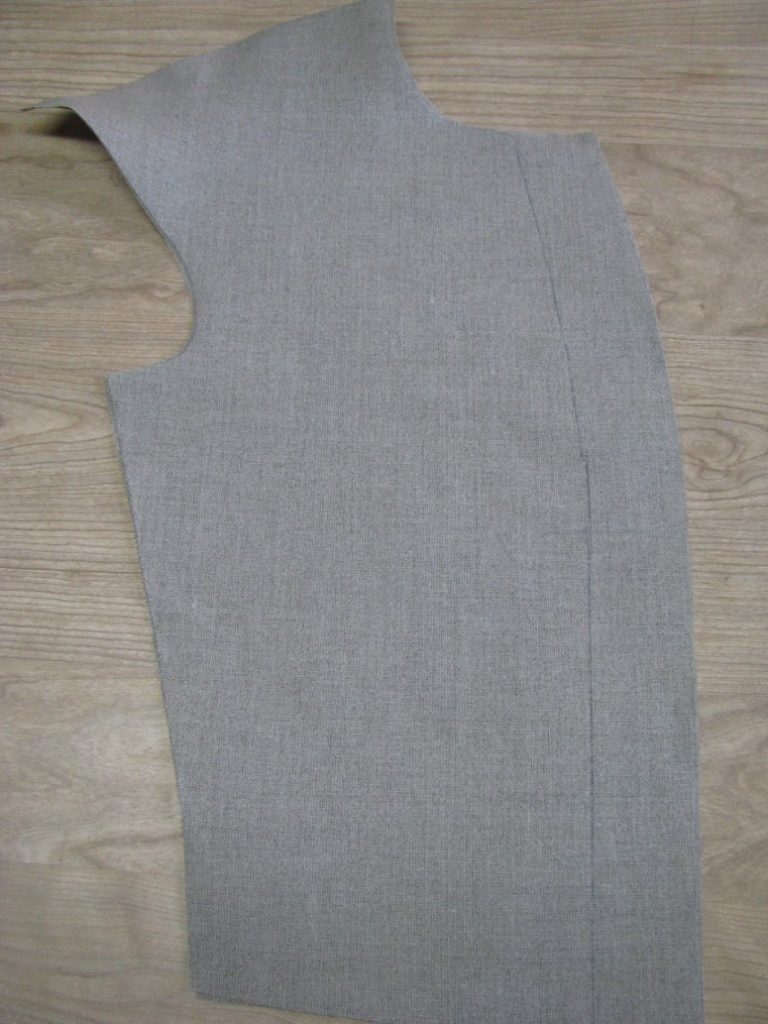
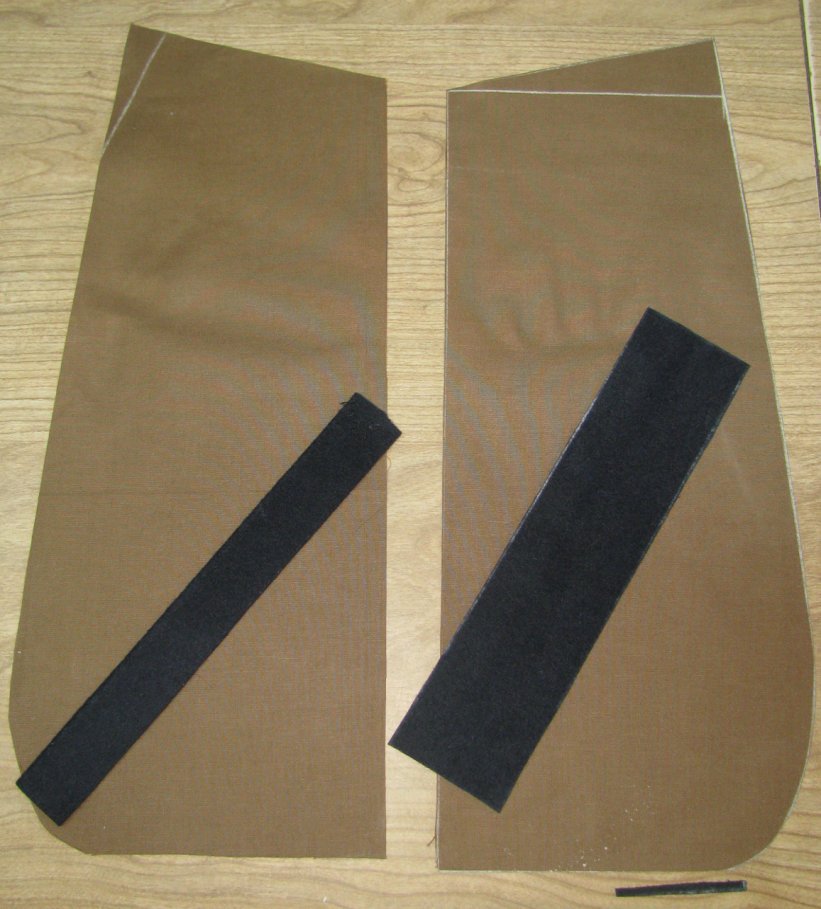
Begin by laying your canvas pieces out as shown. You may want to mark the wrong sides for future use, though it doesn’t matter which side is up at this point, as long as they are mirrored.
Perform ironwork on the armscye, shoulder, and neck, exactly like you did on the forepart itself.
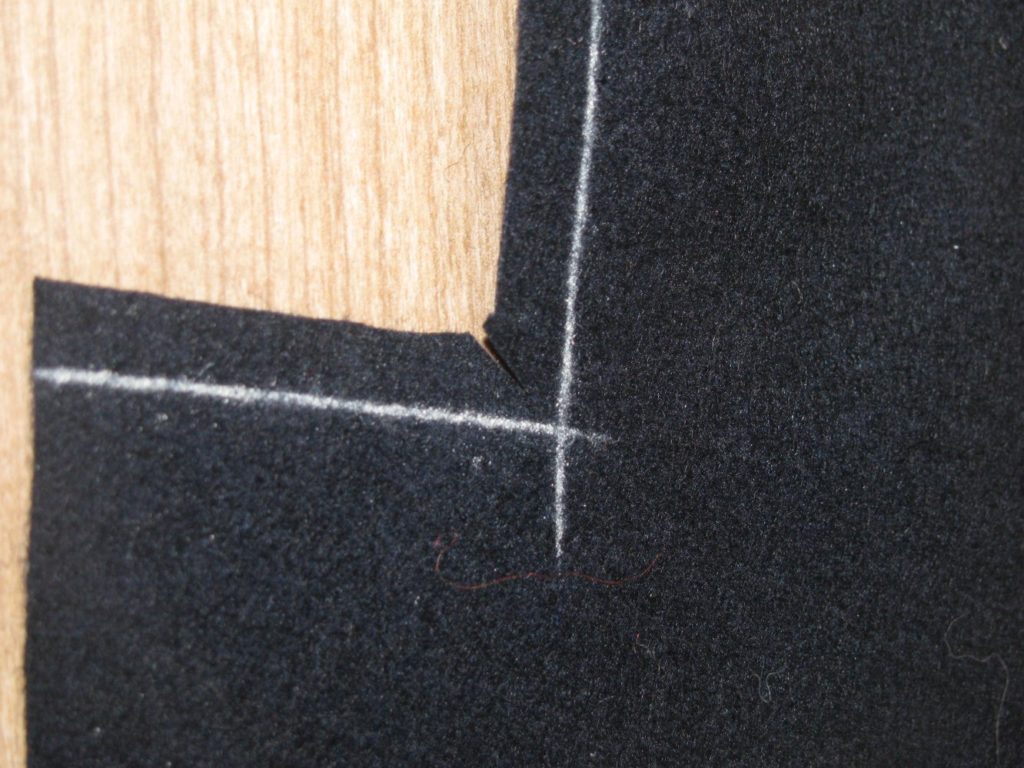
Mark a line two inches in from the center front. This is to roughly correspond with the marking threads on the front of the coat.
Darts must be placed in front of the coat, taking out a total amount equal to that which you shrunk from the front of the forepart. Each dart must be no larger than a half inch, and the total amount taken out should be no more than one inch, as for the forepart. For example, if I shrunk away 3⁄4 of an inch in the forepart, I would make two darts, each 3/8 of an inch wide.
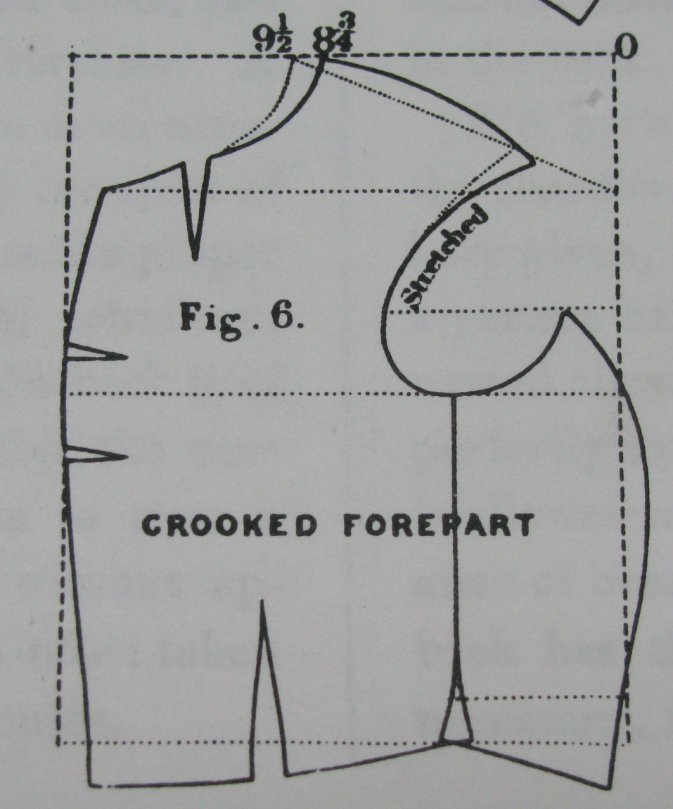
In my case, I only needed to shrink out a half inch, so I will put one half inch dart in the canvas. Determine the location you want the darts, by finding the most curved section of the center front. Devere shows us his recommended locations in his 1866 manual.
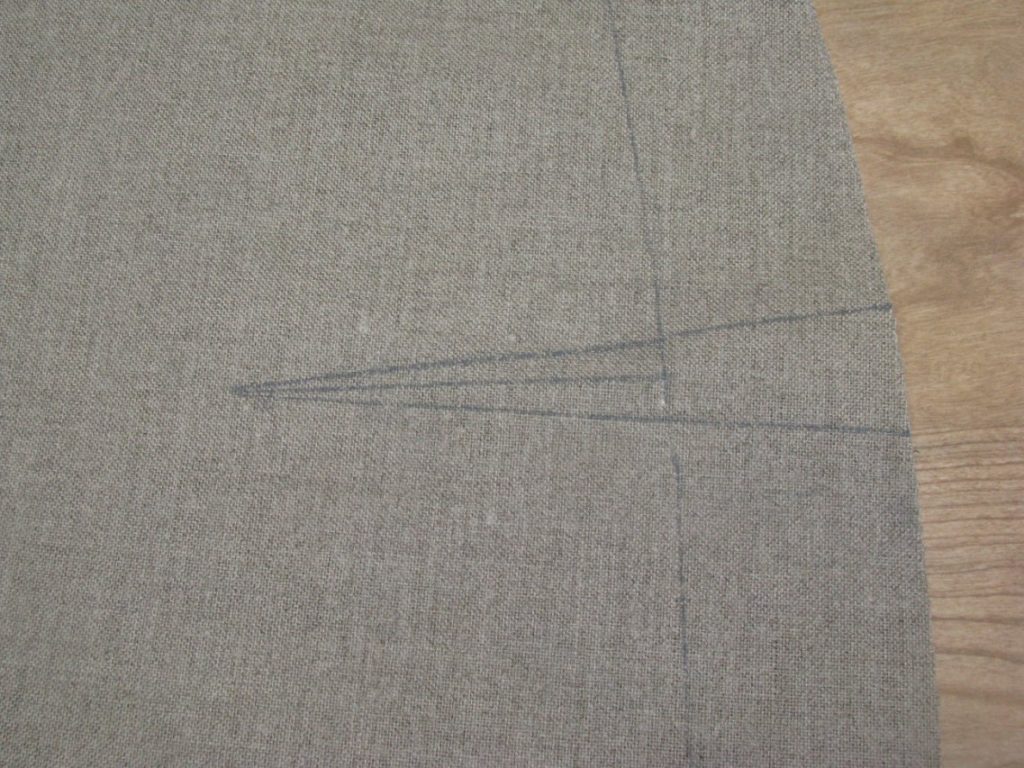
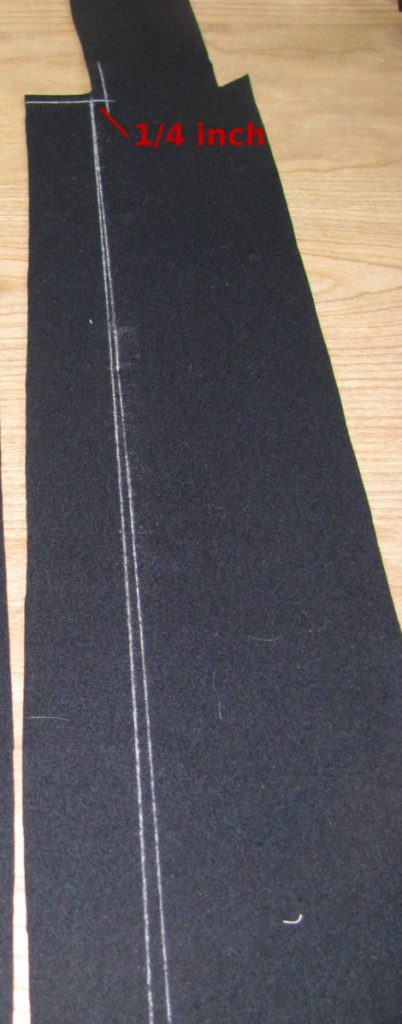
Start by drawing the center construction line of the dart at a right angle to the marking line you made two inches from the edge. The line should be about three inches long. Mark half the dart width to each side (in my case, 1⁄4”), and connect, forming a triangular dart as shown. The two outer lines should extend all the way to the edge of the canvas.
What this is doing is ensuring the dart is the proper width at the center front line, instead of the very edge of the coat. If you measure the dart from the edge of the coat instead, you will find the dart is too small, and have little affect on the coat’s shape.
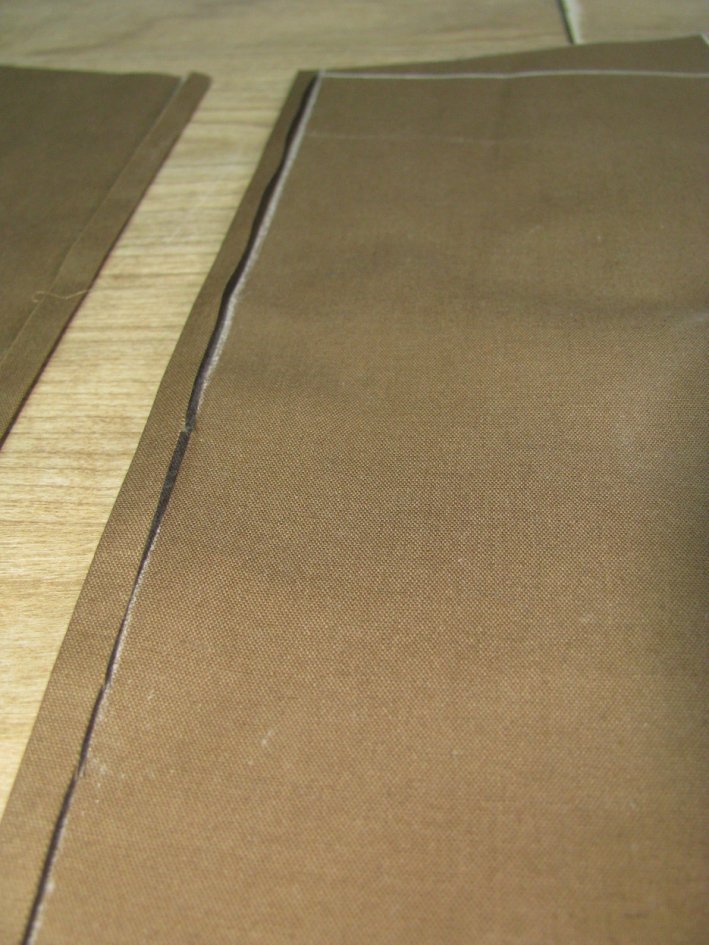
Now place both canvas pieces together, and cut out the darts at the same time, on the inner edges of the chalk marks. You are cutting directly on the seam lines, as having a normal seam in the canvas would be too bulky.
Here is a new method I learned very recently to sew the darts together in a traditional manner. This proves that there is always something new to learn in tailoring, no matter what your experience.
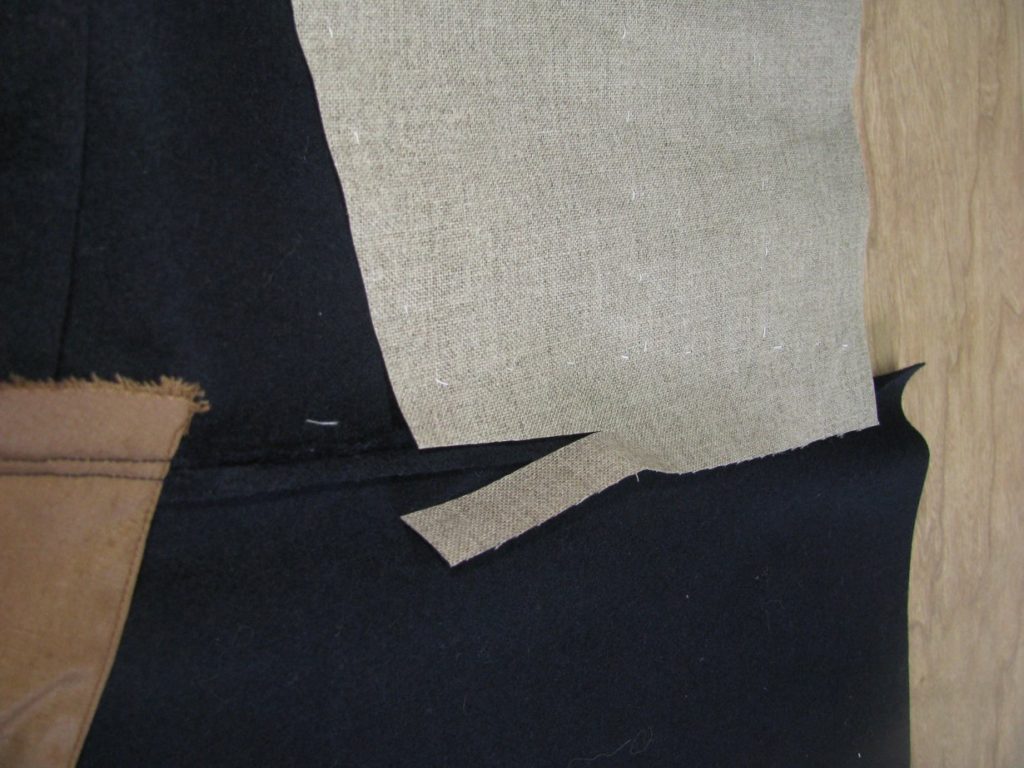
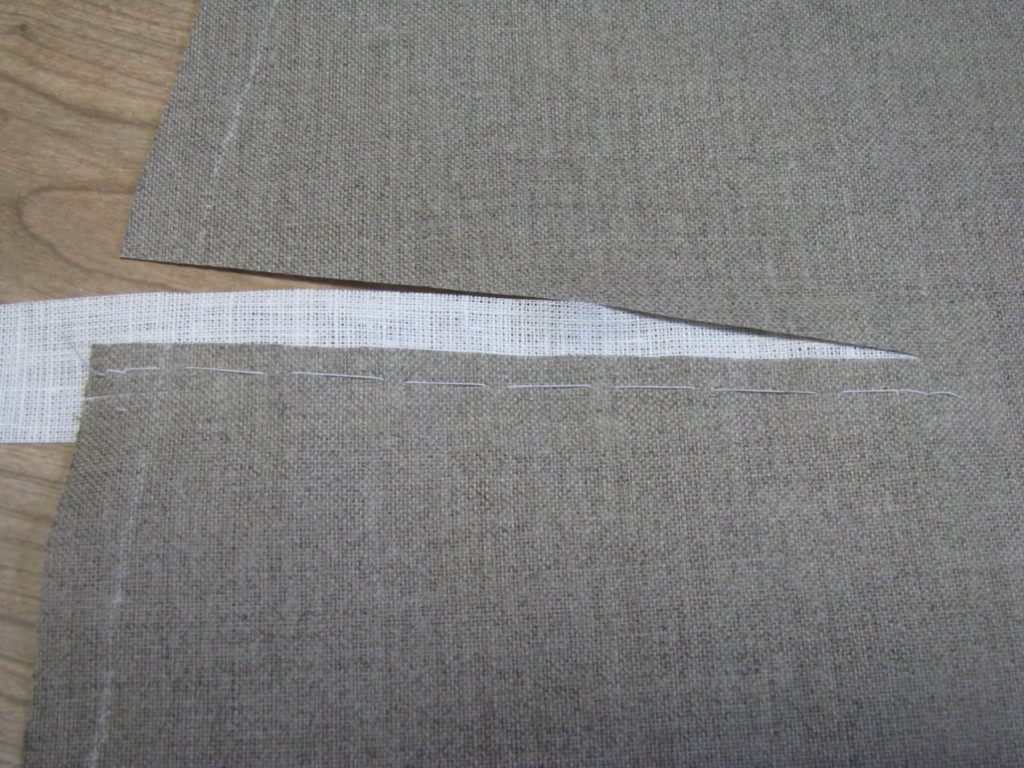
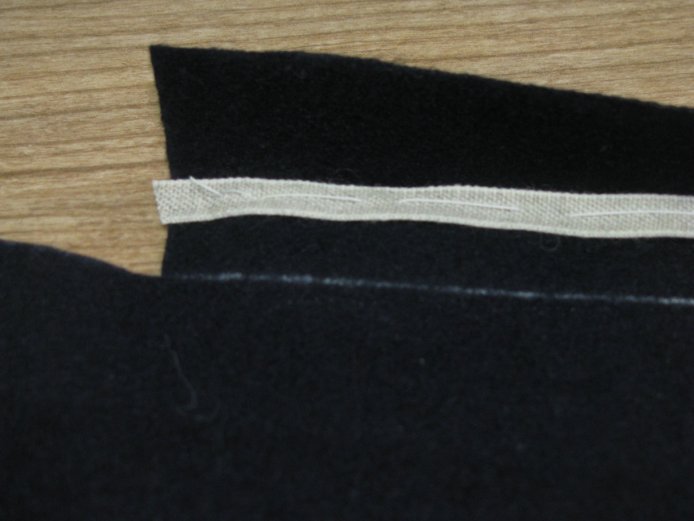
Cut a strip of linen 1 inch wide, by about 1 inch longer than the total length of your dart. Stretch this lengthwise with your iron to prevent and unwanted stretching or shrinking later on.
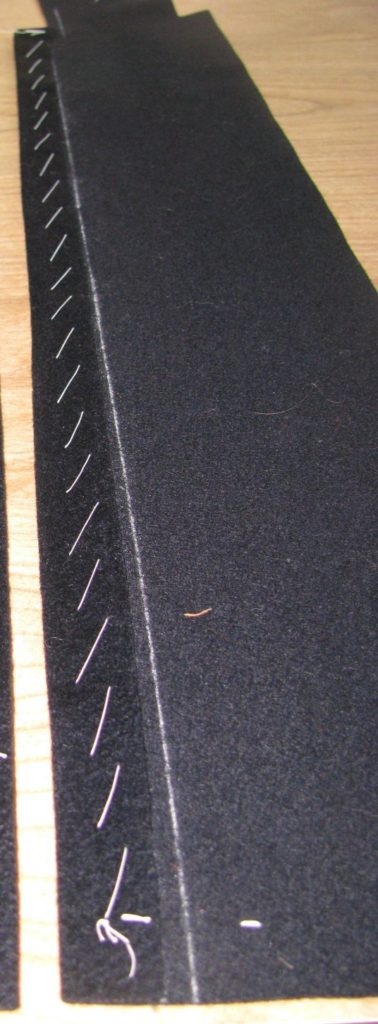
Baste one edge of the dart to the bottom half of the linen. The edge of the dart should follow the grain line, and be as close to the middle of the canvas as possible.
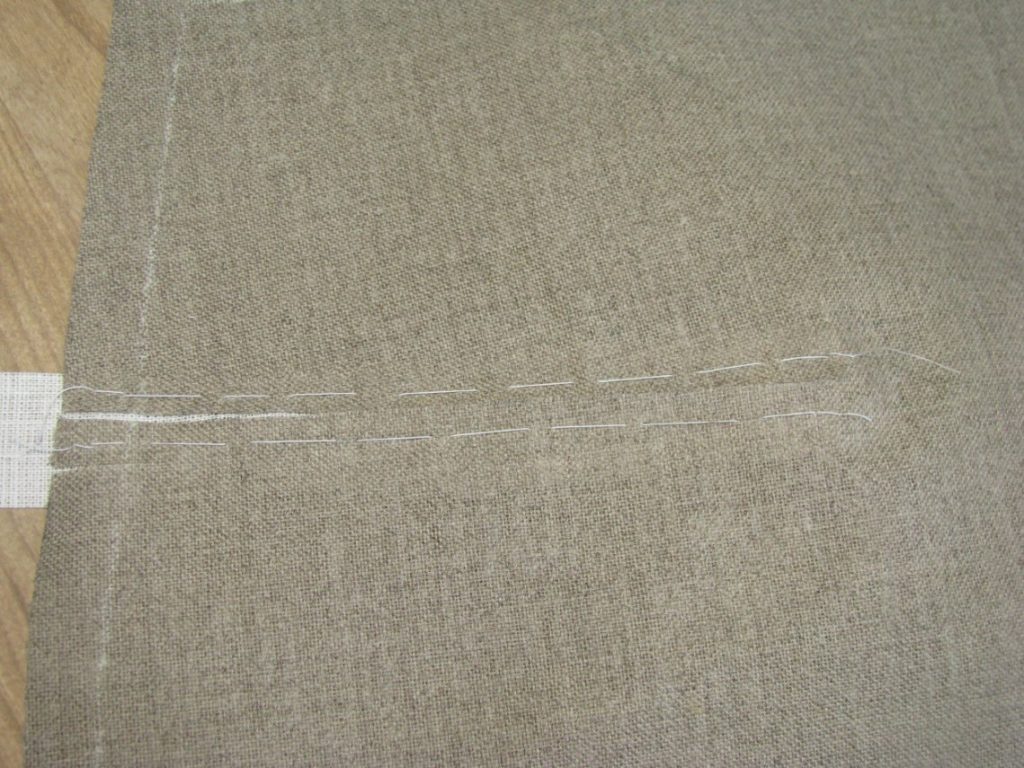
Baste the other edge of the dart on to the linen, butting the canvas edges closely together, but not overlapping.
If you end up making the darts too large, you will end up with too much shaping in the front, and have a very ‘womanly’ look to the coat. If this happens, you can reopen the dart and insert a piece of scrap canvas, sewing it down along the edges of the dart. This will save you from having to cut another set of canvases. Then redraw new darts and continue as before.
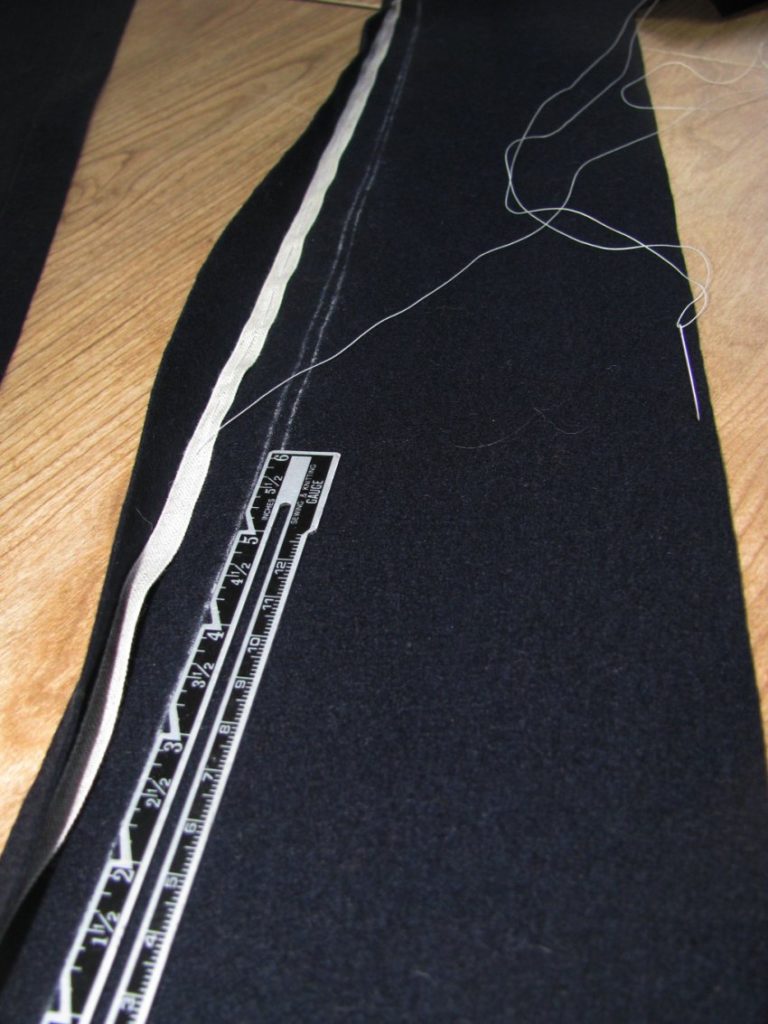
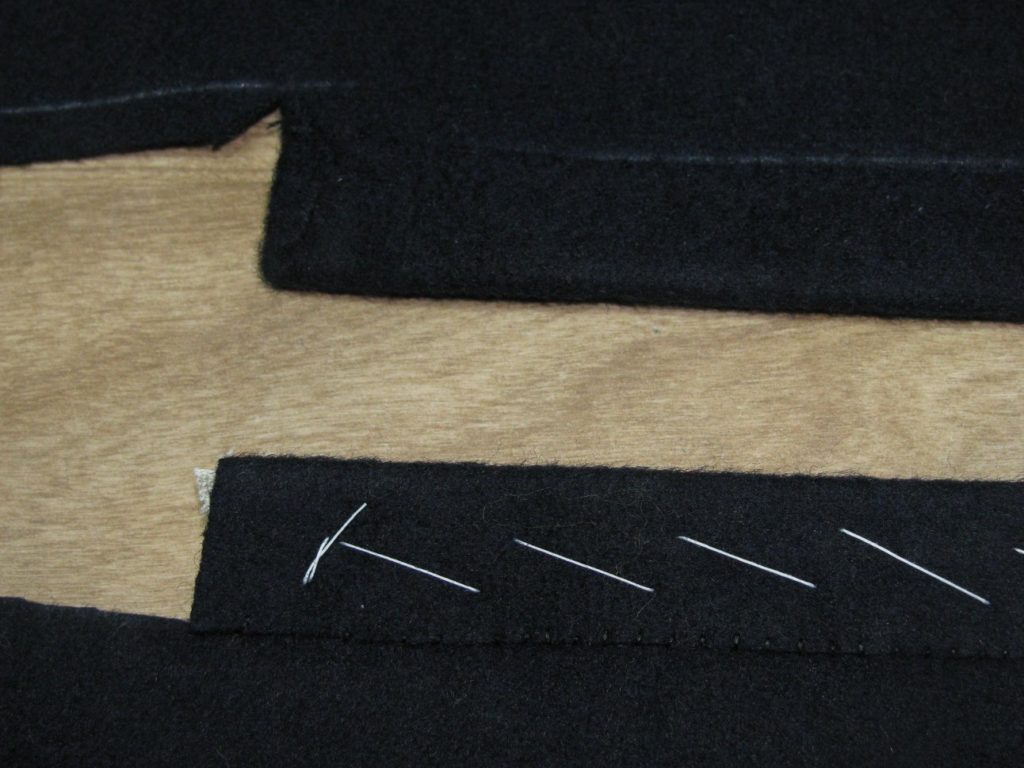
Using a padding stitch on the linen side, stitch up the middle of the linen, catching both edges of the dart underneath. Hold the canvas so that the dart is pointing out in front of you, and hold the needle right to left as you insert it in the canvas.
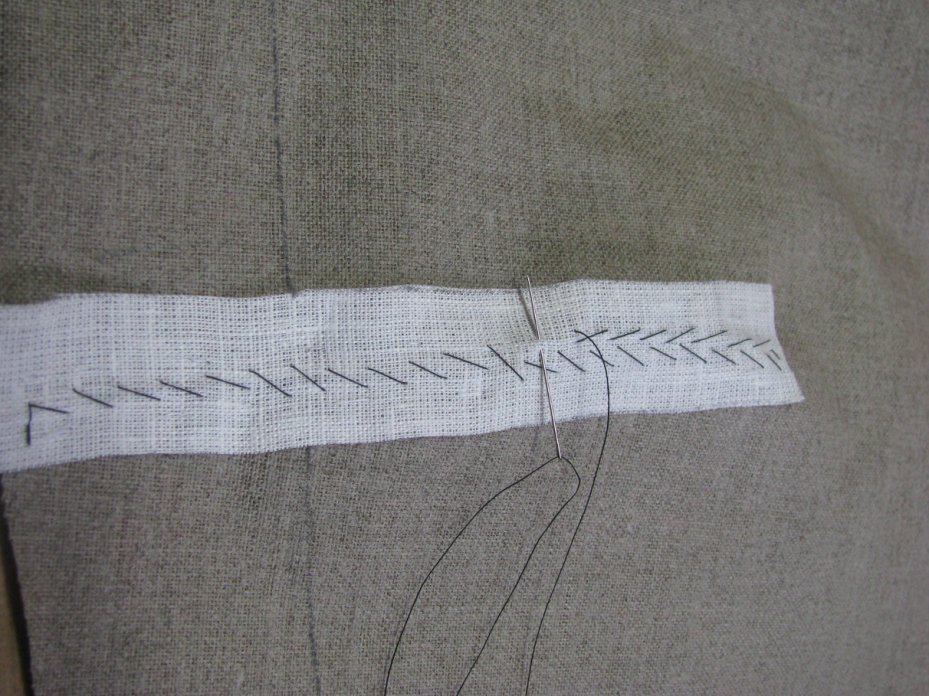
When you get to the end, don’t rotate the canvas, just start sewing back towards you, the needle going the same way. The second row should be to one side of the first row, and then you will keep working until you fill up that half of the linen.

Then start on the other half of the linen in the same manner. When completed, you should have several rows of nice stitching, holding the canvas firmly in place. Repeat on the other dart if applicable.
Prior to this method, I had been using a machine stitch to hold everything in place. And prior to that, when I first started tailoring, I would sew the darts with the same method as used for the outer wool fabric, creating a thick bulky seam. It’s nice to look back on your own work to see the progress you have made.
Installing the Plait Pockets
Lay the coat on the table right side up, and turn over the back piece so that the wrong side is up. Place the pocket, facing side down on top of the back. The top edge of the pocket should lie flush with the top of the pleat inlay.

Starting at 1/16 inch below the facing, baste the pocket in place from that point, to the bottom of the pocket. Start with a few stitches in place to ensure that this point below the facing will not move at all.
Then just above the middle, start basting towards the top. However, you need to move the bottom facing piece out of the way of this basting, so that it does not get caught in the seam.

Now sew the pocket down along the edge, using a 5/16” seam. This is just a smidge wider than normal, and will hide the seam line you created when sewing the back piece to the skirt. When you get to the middle, where the facing is close to the seam line, take care not to actually catch the facing, but come as close as you can to it. If you do accidentally catch it, you’ll have to unpick the stitches and try again.

Remove the basting stitches, and press the pocket away from the body as shown. Don’t forget to press the underside beneath the facing. Keep the pocket in this position for the next step.

Now baste the facing to the body of the coat, so that it will not move. At the bottom of the facing, sew a stay stitch to secure the bottom of the pocket mouth, and give it some extra strength.
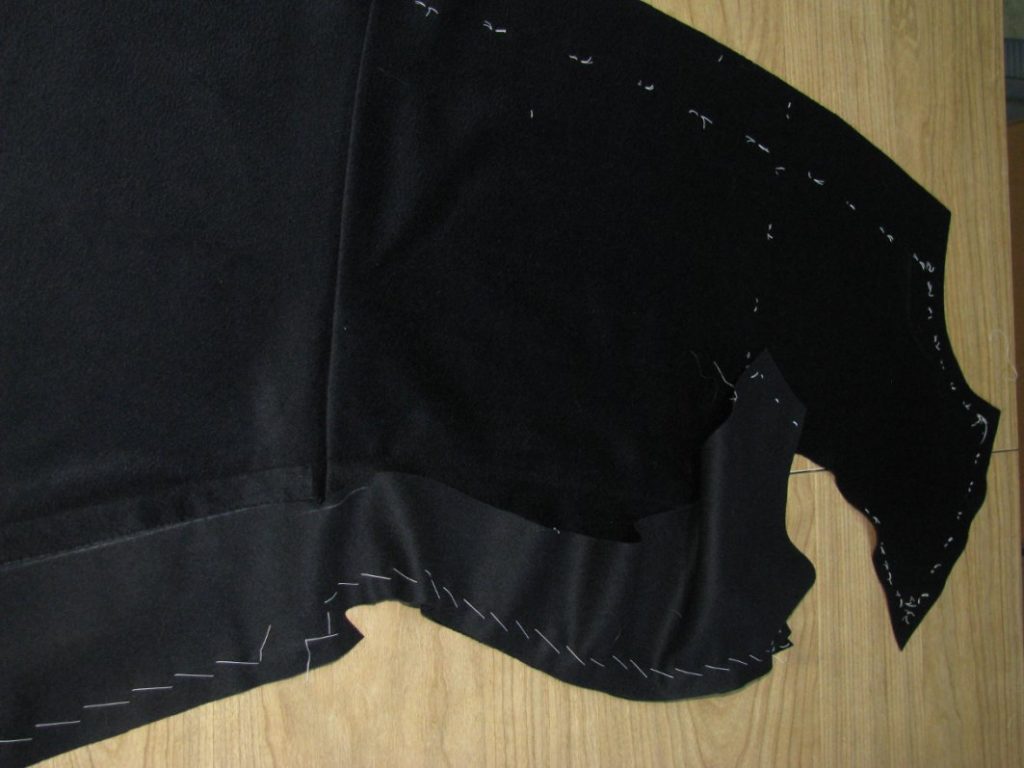
Open the coat completely now so that the wrong side is up, as pictured. Adjust the pleats so that they lie evenly. You may want to baste the pleats in place to make the next step easier. I haven’t only because I’ve done this so often. Notice how the top of the pocket follows the curvature of the waist seam. If we had cut the pocket straight across at the top, it wouldn’t have reached the seam at this step, and created a lot of tension in the coat.
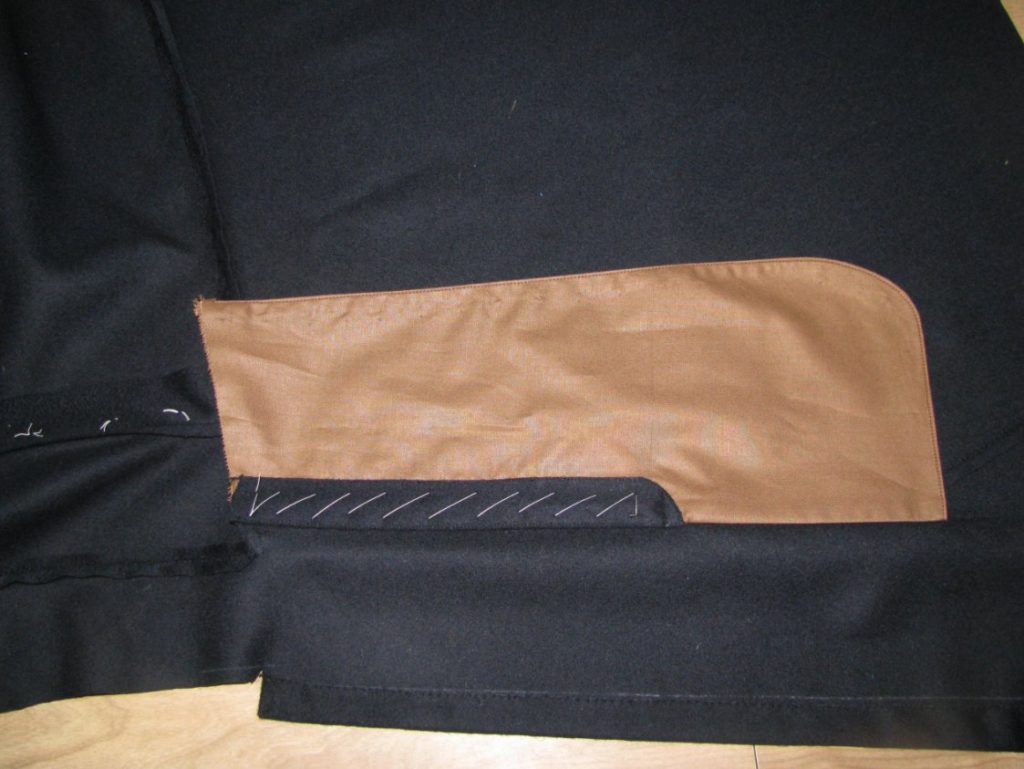
Baste across the top of the pocket, making sure the edges are quite secure. You don’t want any movement during the next step, which is very difficult under the best of circumstances.

From the outside of the coat, mark the points on the waist seam corresponding with the ends of the pocket and facing. Using the presser foot as a guide, sew a box stay, 1/8 inch from the waist seam, from chalk mark to chalk mark. When you get to the point where the waist seam meets the side seam, there is a lot of bulk. Take your time, turning the wheel by hand. At the ends, turn at 90 degree angles and complete your rectangular box. The end with the facing is also difficult to sew. Use a size 100 needle for best results.
This is very visible on the finished coat, so make sure it comes out right. Don’t be afraid to unpick the stitches and try again, however difficult. The results will be worth the extra effort. And again, you may use a side stitch by hand here, if desired.
At this point, the pockets are completed! Remove all basting stitches, and give a good press from the wrong side before moving on to the canvas.
Plait Pocket Construction
Place your pattern on your brown polished cotton, lining up construction line A – B with the grain. I find that by rotating the pattern piece for the second pocket, you can save some space. You will need two pockets, for a total of four pieces. Keep the pocket halves together after they are cut out.
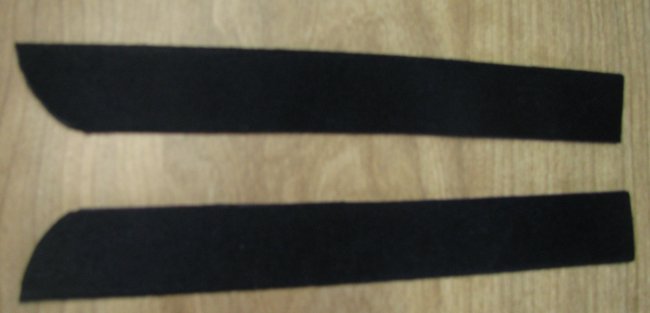
For the facings, cut out a 2 by 8 1⁄2 inch rectangle of wool. Make sure the grain is lined up, and the nap is facing downwards.
After cutting, press each facing precisely in half, right side out. You may want to baste the halves together first to ensure accuracy and avoid movement from the iron.
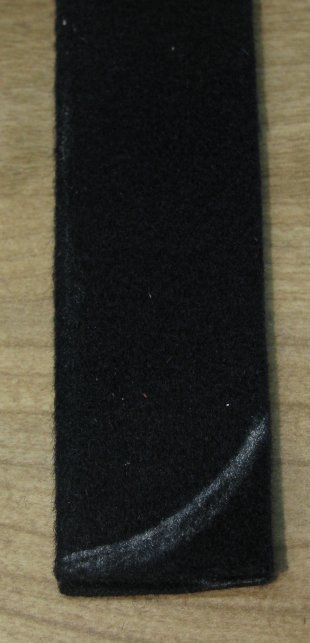
Check to see which end is the bottom, by running your hand along the nap. At the bottom, using a french curve, chalk a small curve, starting at the bottom of the folded edge, running up about an inch to the cut edges. Lay both facings on top of each other, and trim along the chalk line, ensuring each piece is identical.
Pocket Construction
To begin construction, take the top halves of each pocket, and set aside the bottom halves so that you do not get them mixed up. As we go step by step, you should be doing both halves at once, the second half being a mirror image of the first.
On the wrong side, measure out a line 1⁄2 an inch from the edge, along the A – B line of the pocket.
Fold and press over the fabric so that it just meets this line.
Take a facing and insert the pocket between the folded layers. Ensure that the pocketing is snug into the fold of the facing. Baste carefully, checking as you go, that this is still the case.
Starting at the top of the outer edge, machine sew a line of top stitching, 1/8 inch around the facing. At the bottom, I recommend turning the sewing machine wheel by hand for maximum control. If you wish, this top stitching may also be done by hand, using a side stitch.
After top stitching, press the facing well to remove any excess that may have entered into the facing while sewing. Press both sides.
At the bottom of the facing, draw a small mark on the folded edge of the pocket fabric, directly below the facing. Snip the seam allowance to the fold, but no further, and press the bottom of the pocket open again.
Now place the pocket backs and fronts right sides together, and baste along the outer edge. Make sure each piece lies completely flat, with no tension. Then sew a 1⁄4 inch seam along this edge, using brown cotton thread. Remove the basting stitches, press to set the stitches, and at the bottom curve, trim the seam allowance to 1/8”.
Turn the pockets right side out, and baste just around the outside edge. As you are basting, hold the bottom piece under by 1/16th of an inch, to keep it hidden from view. Then top stitch a mere 1/8 inch from the edge, using the sewing machine foot as a guide. Alternatively, use a side stitch to finish the pocket by hand. Remove the basting stitches. At this point, the pocket construction is completed.
Drafting the Plait Pockets
Begin by drawing a vertical line 14 inches long. On the right, or bottom of the pocket, square out another line 6 to 7 inches wide. These numbers are both variable according to how long your skirt is, and how large your coat is, but this is a good starting point. Also include the seam allowances in this measurement, so an extra 1/2 inch total.

On the left, or top of the pocket, draw a line square across that is about 1/2″ to 1″ smaller than the bottom width. Connect the two end points with another line, extending this line past the top of the pocket.

At the top, extend the first line about 1 inch, and redraw the top line at an angle.

At the top and right sides, add curves to each. This will add fullness to the pockets, and allow them to hang freely without affecting the drape of the skirts.

Again at the top, add a dart to the pattern. This should be placed roughly in the middle of the pocket. The construction line of the dart comes down vertically about 2 to 4 inches. The total width is 1/2 inch. Finally, redraw the top seam so that the seams of the dart agree in length.

Finally, round the bottom outer corner to give a pleasing look and make it easier to retrieve items from the pocket.

Constructing the Body Halves
Now that the back vent facing is complete, it is time to construct the body of the coat. This is much the same as when you made the full muslin, though we will go into slightly more detail now.
Side Body to Forepart
At this point, any unused inlays at the bottom of the forepart and side body should be trimmed off. If you made any adjustments, such as lengthening the skirt, then make sure you have marked that and do not trim off that area.

Begin by basting the side piece to the forepart, lining up the edges of the side piece to the edges of the tailor tacks. You should have stretched both of these seams by about 1⁄4 inch, and they should agree in length at this point. Sew with a back stitch or machine stitch, and press both sides to set the stitches. I suggest using a seam roll to press the top two thirds of this seam, as it will add a little more shape. At the bottom third, where the pieces spring out to make room for the hips, you will need to use a tailors ham.
The Skirt
If you have not placed any darts into the skirt, it is then necessary to full some of the fabric at the hip area of the skirt. Place the skirt, right sides together, onto the forepart assembly, and make note of where the side seam is. Make a chalk mark on the skirt, one inch behind where the side seam would be, and 2 inches in front.
Take up just the skirt. Using basting thread, start with two back stitches in place, just to the outside of the first mark. Make small, even running stitches just to the other mark, and snip the thread, leaving at least 6 inches extra.
Place the skirt again on the forepart assembly. Flip it over so that the forepart is on the top. The back edge of the side seam should extend 1⁄4 inch – the seam allowance width – into the inlay we gave to the skirt when drafting. It should not follow the spring upwards, however, but instead continue in a line with the rest of the skirt.
Baste this point in place, then turn over the whole assembly so the skirt is on top again. Baste until you get to the first chalk mark, using the padding type basting stitch for strength. When you hit this mark, gently pull on the thread you previously basted in, gathering in 1⁄2 to 3⁄4 an inch of fabric. Baste this down carefully so that the fullness remains evenly distributed. Feel free to use back stitches if necessary. The basting should be 3/8” away from the edge, to stay out of the stitching line later.
Continue basting the rest of the skirt in place. You should have about 1 inch extra at the center front of the skirt, which will be used later to self-face the skirt in the front.
With the skirt side up, carefully shrink out the fullness you put in. The iron should not extend more than 1⁄2 from the edge of the fabric, or you will shrink out all of the fullness, thus rendering all that work you did useless.
Sew the waist seam, skirt side down, from the front edge of the forepart, to the back edge of the side piece. Press to set the stitches on both sides. Open up the seam allowances on the wrong side, carefully using a tailor’s ham to press the curved areas. Press the right side.
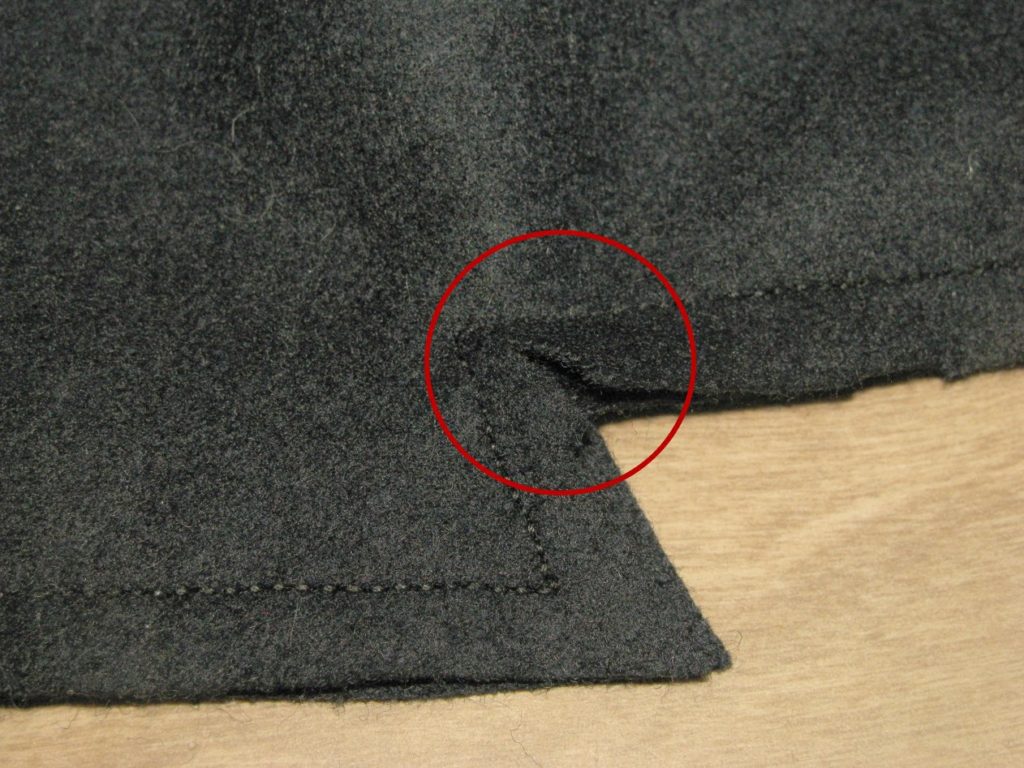
On the back of the skirt seam allowance, carefully make a small snip in the seam allowance, 3/8 in from the edge of the back of the side body. This will enable the skirt inlay to lay upright instead of being folded over in a seam allowance, thus helping to make the back pleat area thinner.
Back Piece
Trim off the inlay at the top of the side body at the outside edge only, if you did not need it. With right sides together, line up the back piece to the skirt and forepart assembly. You can place a pin at the waist area to help hold it if you wish.
Line up the top of the side seam to the top of the back seam, making sure the side piece extends by an amount equal to the seam allowance. Baste in place 3/8 inches away from the edge, gently easing the back piece into the side piece. The pieces should line up correctly if you did your fitting stages and muslins correctly. Any mistakes should have been caught by now.
Continue basting the skirt to the back skirt. At the bottom, the front skirt should meet the back skirt at the inlay marks, but if not, it’s not a huge problem. It means that you stretched the skirt while making up though, so just be aware of it. Any length discrepancies will be dealt with later.
Now sew the seam with the back side down. This helps manage the fullness of the upper back area.
When you get to the waist line, determine how wide you want the pleats to be. Regulations stated no pleats, but you do need to have at least a 1⁄4 inch pleat (also known as a false pleat), to leave room for the pockets. If you are doing the 1⁄4 inch pleat, you’ll turn in at the waist and sew just a quarter of an inch before turning 90 degrees to finish sewing. It’s a good idea to chalk the line to ensure a straight seam. Trim off the extra fabric, leaving a 1/4 inch seam allowance.
If you wish to have the full pleats, continue sewing 1⁄4 from the edge, as you did in the muslin.
After sewing, clip the seam allowance of the back piece just above the point where you spring out for the pleat area. This enables you to press the upper back seam properly.
Press both sides to set the stitches. Press from the wrong side to open the seam, and press from the right side. Be sure to use a tailor’s ham at all times this upper back seam, as it is very important for fit. If you press it flat, you’ll shrink out all the ease that is there and end up with a ruined coat.
At the pleat area, press the pleat back. I generally press to one inch below the buttoning point, where all three pieces meet. If you’ve done everything correctly, there should be only four layers at this point. It took me a while to figure out this step. I remember having 6 or more layers here while I was learning. Hopefully the instructions have been clear enough to help you get to this point with less trouble. If not, please let me know. At this point you should have two nearly identical halves of a coat.
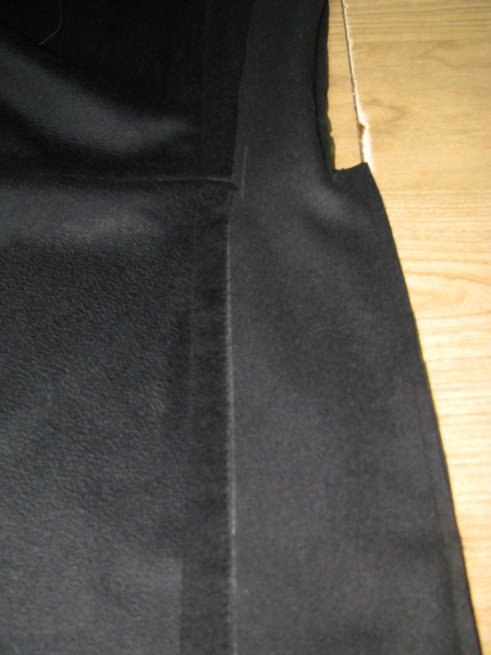
Rear Facings
I’ve always considered this step as the ‘first’ step in constructing a coat, as all the technical and fitting issues are finally behind us. As such it’s also one of my favourite steps. We are going to commence construction of the tail facings, which protect the edge of the garment from wear, and give some weight and body to the area as well.
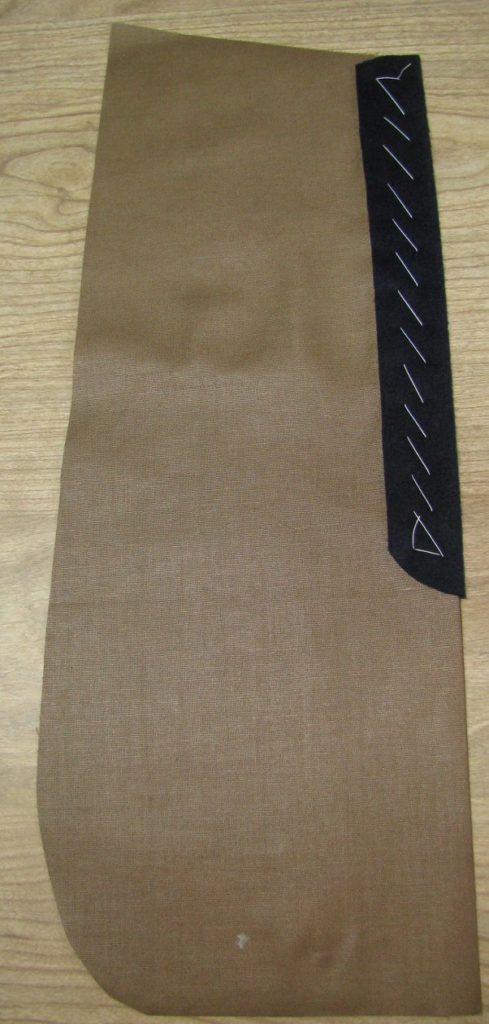
Begin by laying both back pieces, right side up, as shown. The left side should overlap the right. Take this left piece, and set aside the right piece. It’s important because each side is constructed slightly differently. The following steps all pertain to the left side.

Turn the left side of the back so that the wrong side is facing up. Trim away the inlays around the waist area and center back, if you did not need them. If you made any adjustments to this area, then trim only the excess amount.
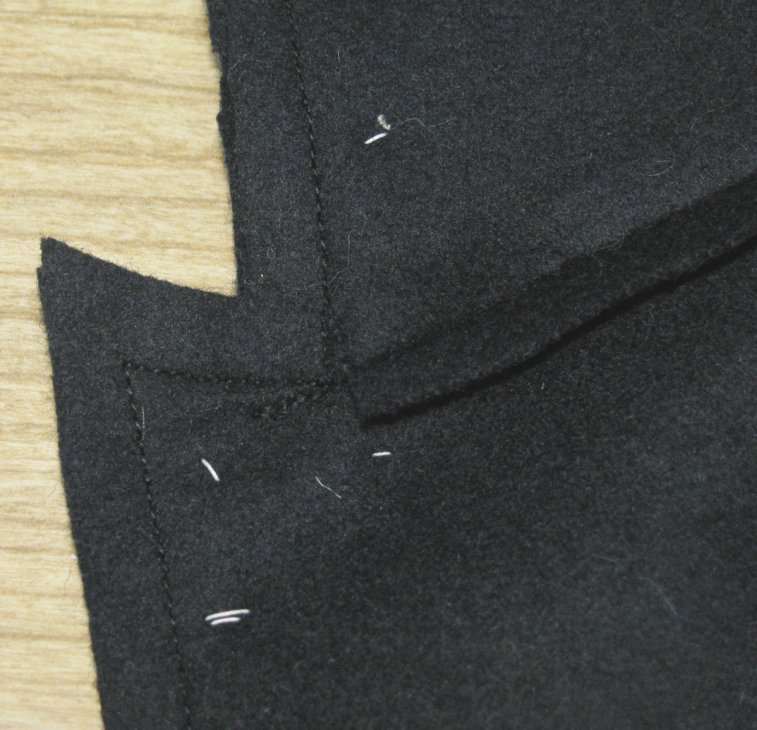
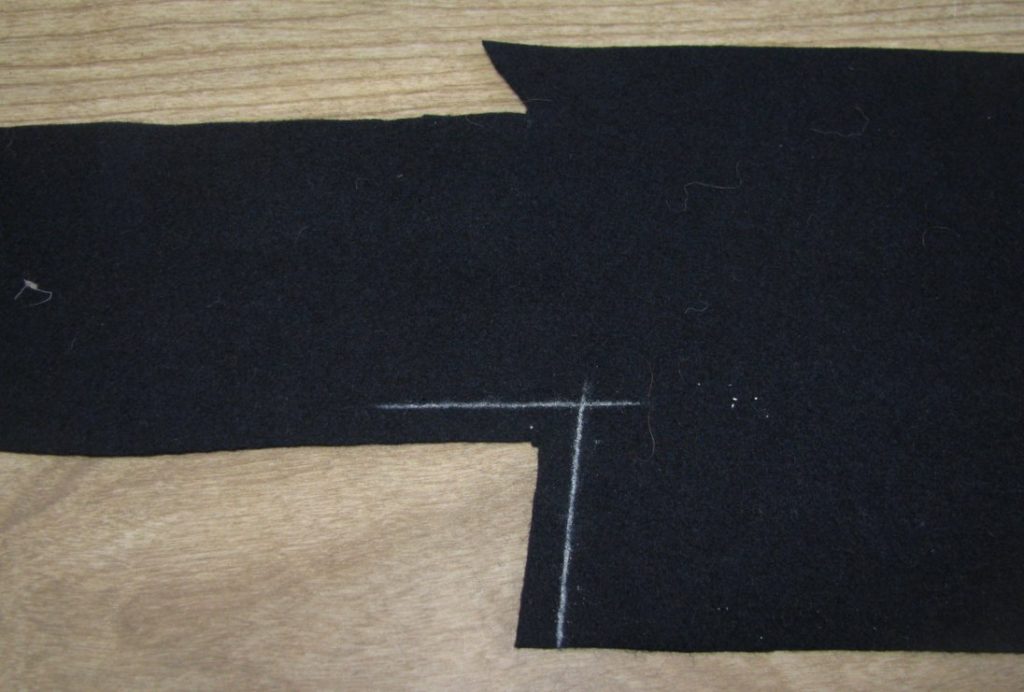
Measure and chalk a 1⁄4 inch line at the bottom of the center back, and across the top of the center back vent, as shown. Again, make sure you are working on the left side of the coat before you continue. Make a small cut from the corner of this area to the intersection of those two lines, as shown. The cut should be made just to the lines, not extending into it, as the chalk has a width to it, remember.
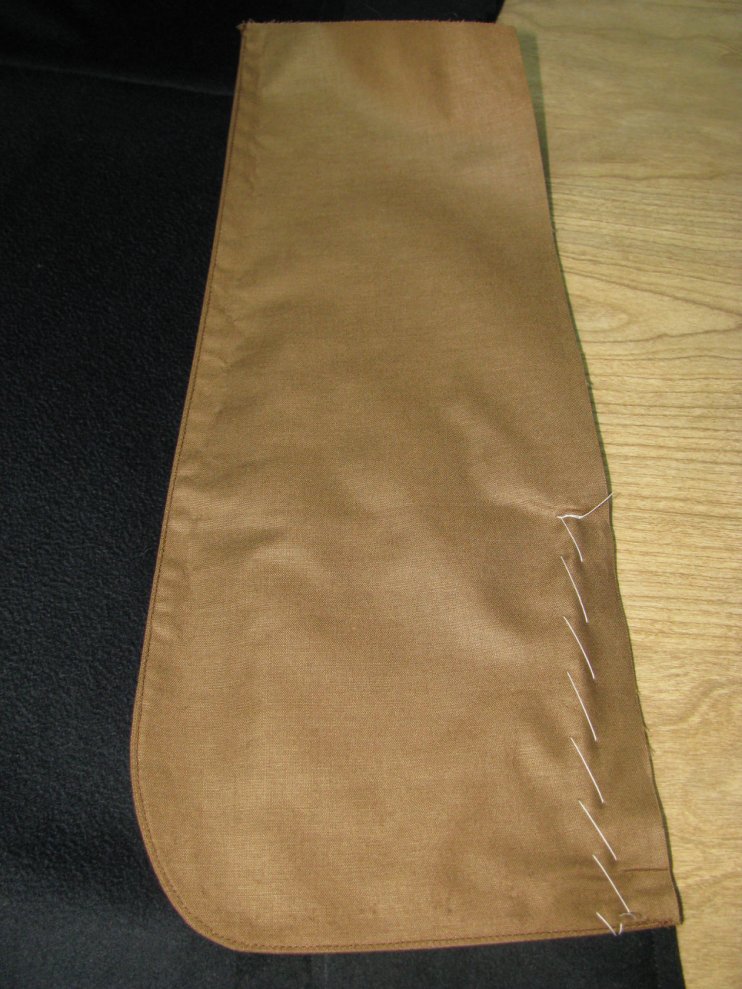
Next, mark a vertical line extending from the top of the back skirt to the bottom. I generally make this 1 3⁄4” wide, because the fabric will be folded to this point to make a 7/8” facing. This is adjustable though depending on your size. Generally, the line should be made 1⁄4 inch away from where the center back seam line will be.
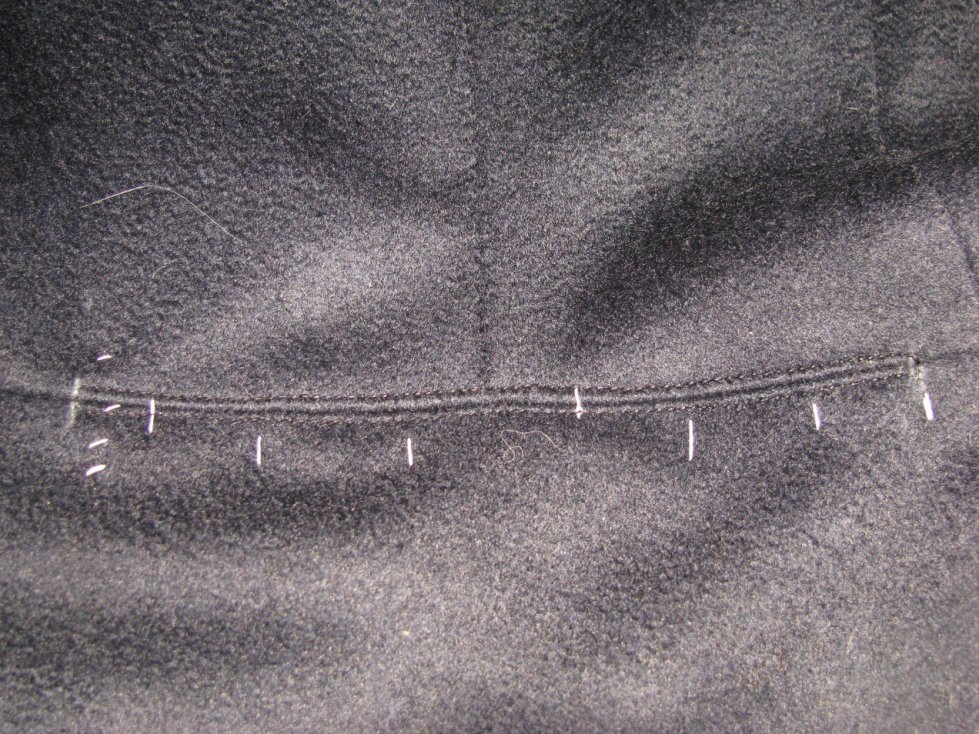
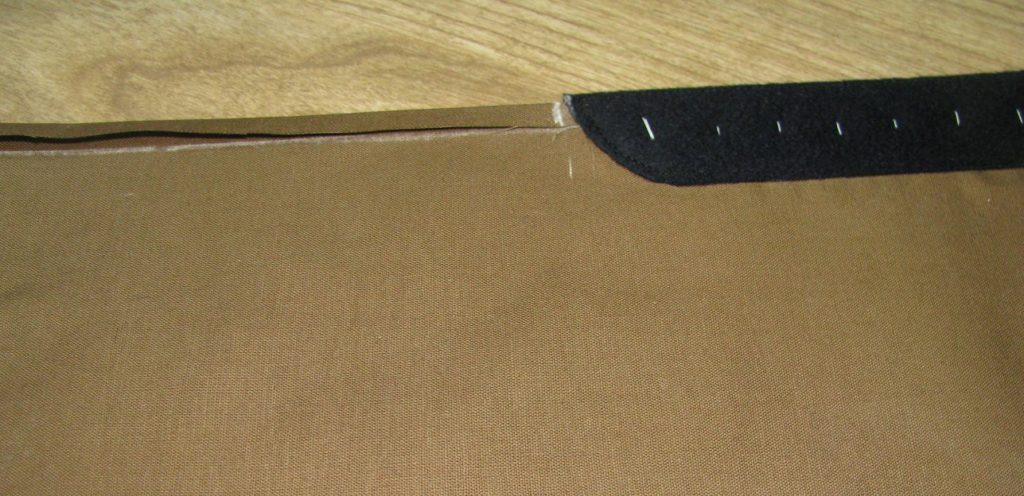
At the top, baste over the fabric 1⁄4 of an inch, and press carefully. Then baste the fabric along the center back over itself, so that the edge lines up with the vertical line you just drew. Baste carefully. There will be a little fullness at the top, because you don’t want the facing to extend above the top of the vent. Press this fold as well, gently shrinking out the fullness.
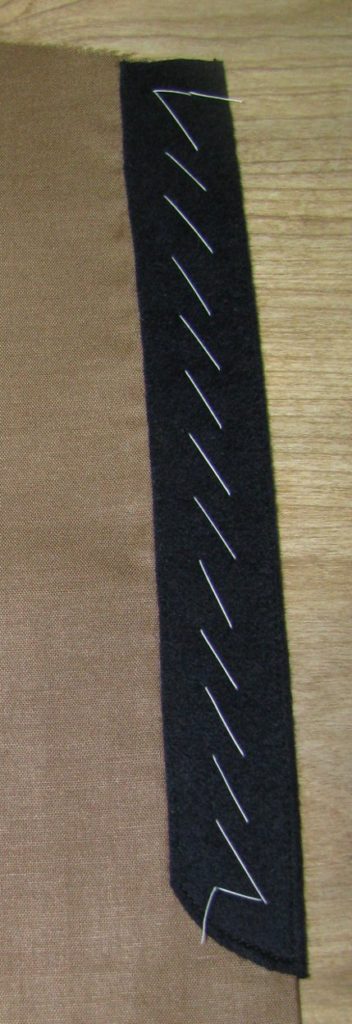
At this point, remove all basting stitches, and unfold the facing. You should have a nice crease along the edge, and top of the back vent. Use this as a guide to baste in the linen stay tape.
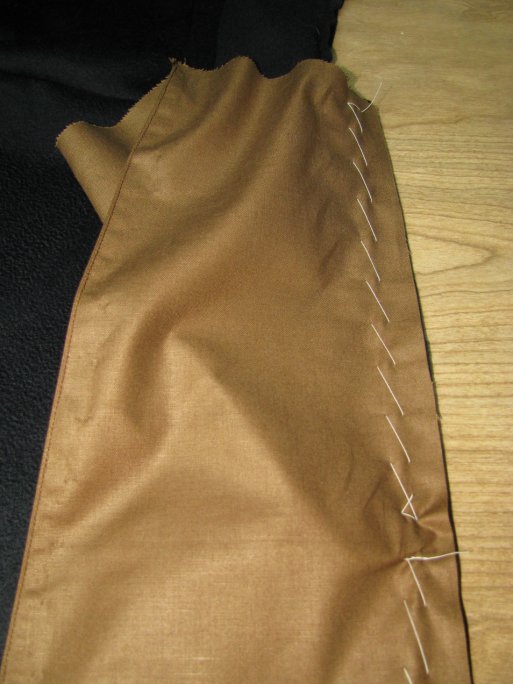
The tape should be placed right along this crease, starting at the top. Start with a back stitch with your basting thread to hold it in place at the top, and hold the tape where you want it as you baste.
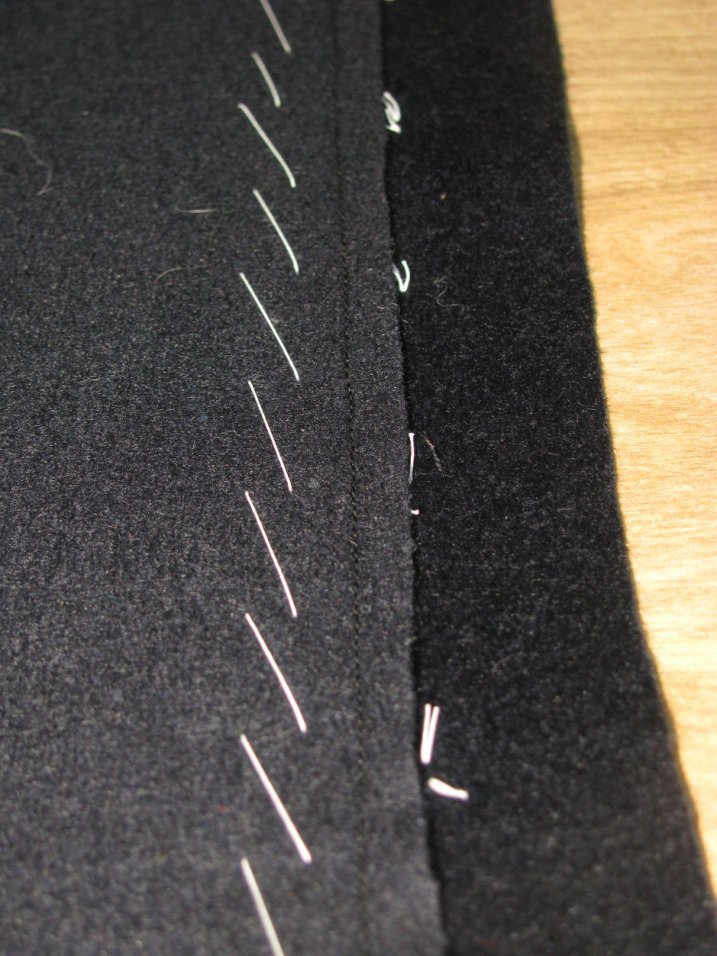
About 8 inches from the bottom, make another backstitch in place. From this point on, hold the tape a little tight compared to the fabric until you get to the bottom. The tape should be about 1⁄4 inch tighter than the fabric, which is distributed equally along the 8 inches, as you baste. At the bottom, end with another backstitch in place. The stay tape should be trimmed 1/8 of an inch above the inlay at the bottom.
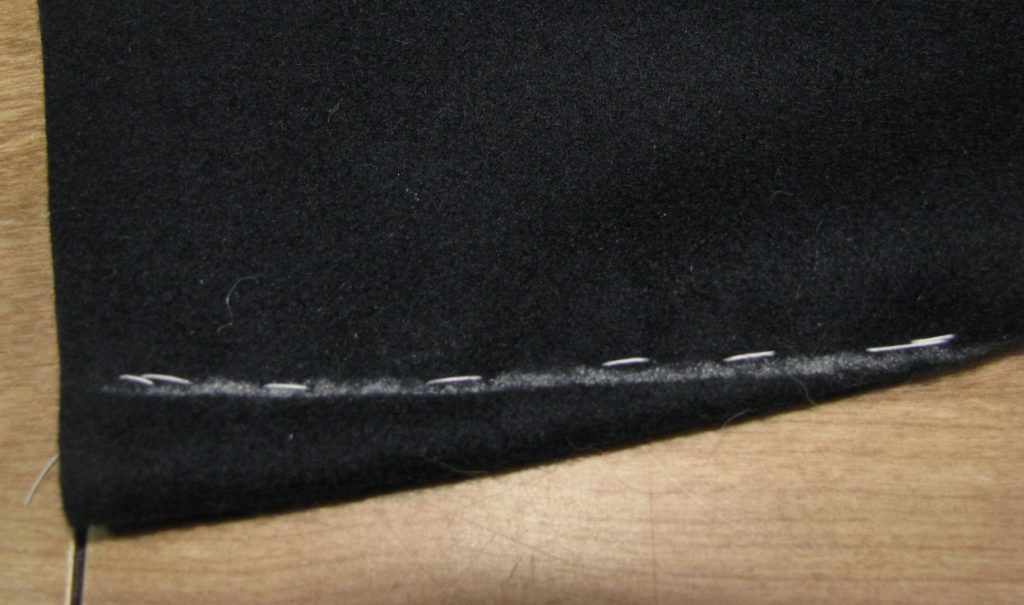
The stay tape is then slip stitched into place, making sure the stitches do not show through to the right side.
Baste the top of the vent closed again, and fell it down by hand,using 8 to 10 stitches per inch. These stitches should not appear on the right side of the fabric, and should be just little pinpricks on the wrong side of the facing. Catch only a few threads in the facing as you go.
Next, baste the facing closed again, and fell this as well, as just described.
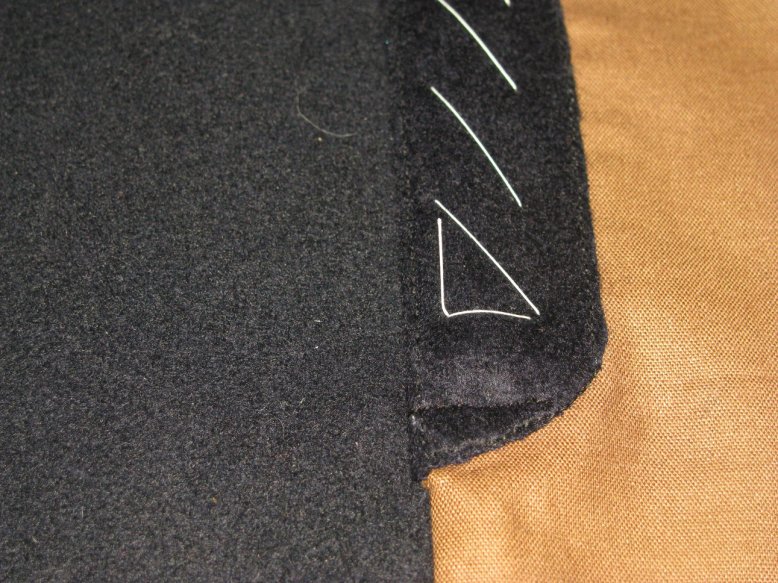
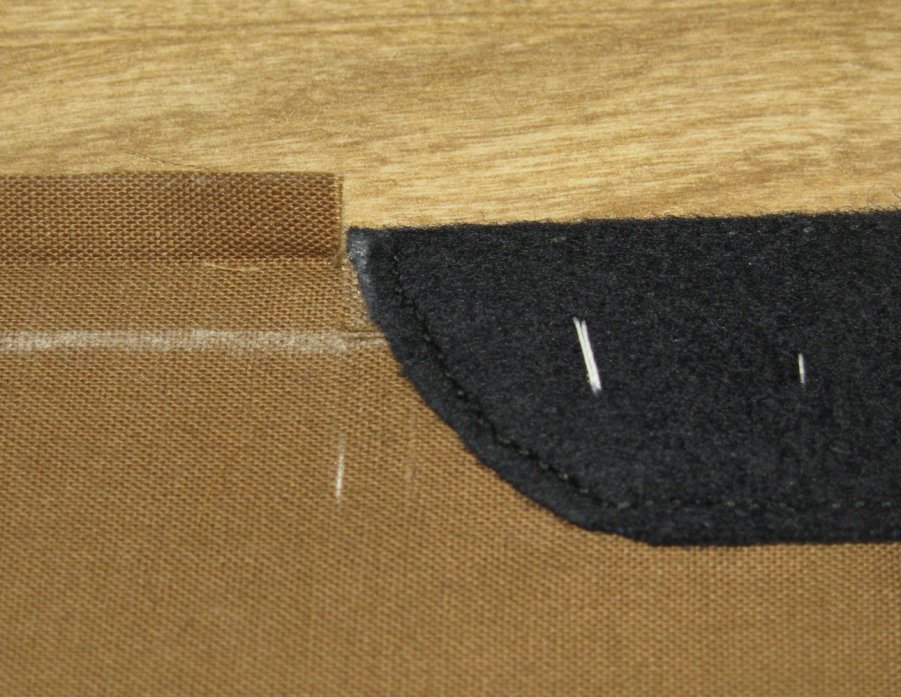
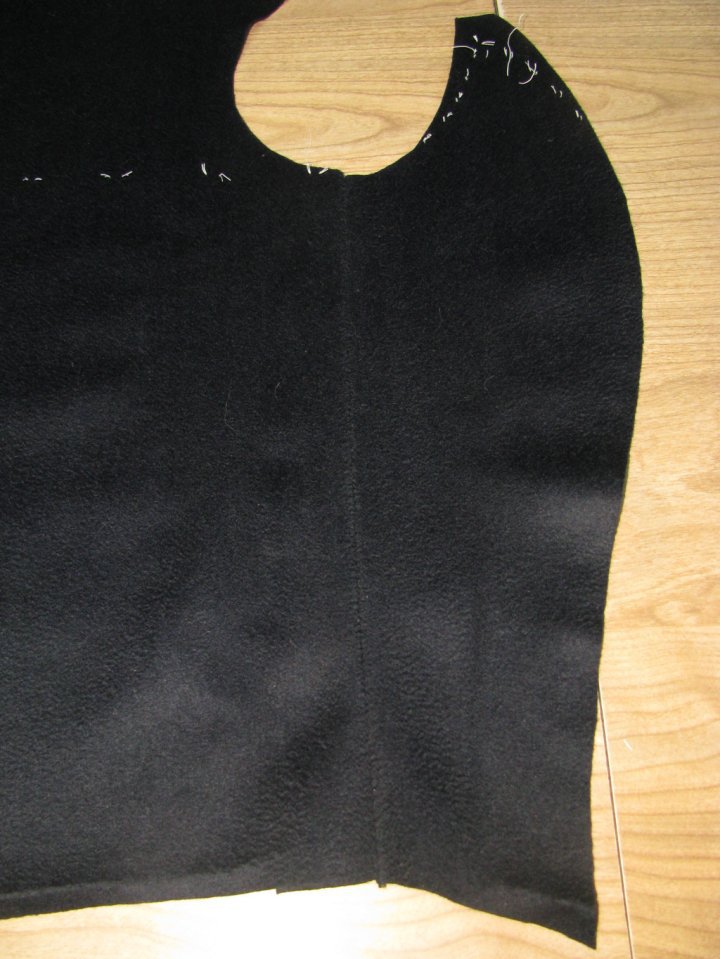
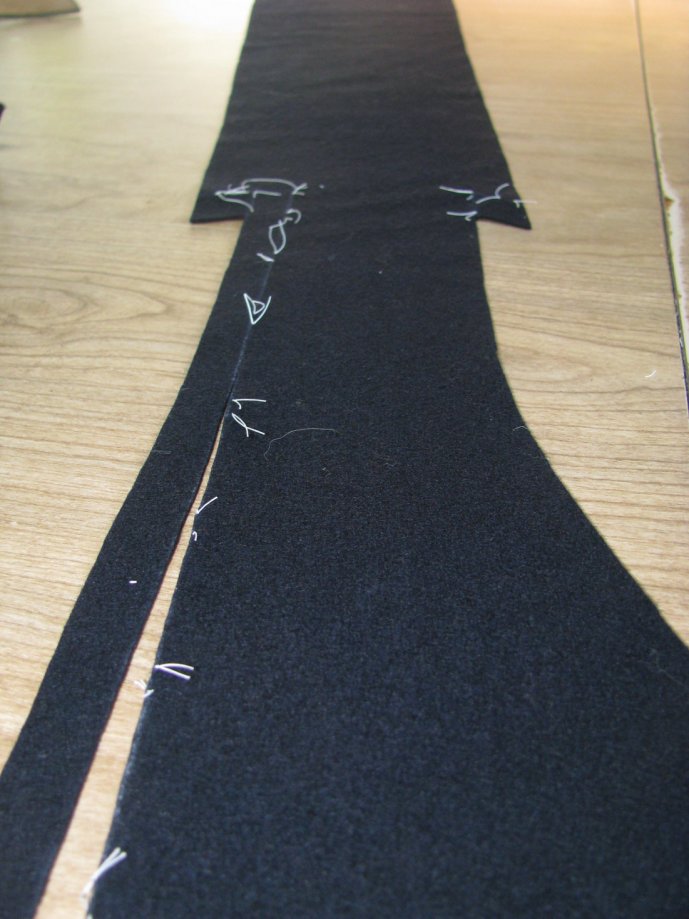
Finally, press the facing from the right side on a flat surface, to remove any wrinkles and puckering. Do not press any further than the edge of the facing, because there should be a slight fullness here from holding the stay tape tighter. This is the same principle as when shrinking the front of the forepart. The result should be a back tail piece that curves slightly inward, and helping to avoid sticking out away from the body.
Pick up the right back piece. This time, do not make the cut, but proceed to making the 1 3⁄4 inch vertical line. Baste over along just this edge, insert the stay tape, and fell just as with the left side. It’s okay if the stay tape extends above the top of the vent a little.
The result should be two back pieces with facings, that are different only at the top of the back vent. This will add strength to the back vent, as we’ll see in a later step.
First Fitting
Congratulations, you’ve made it to your first fitting intact! The main things to check for at this fitting are the same as at the beginning of this module. If you need to make adjustments, do so now by marking the amount you need to take in or out with chalk (just draw a line), and then removing the basting stitches, and rebasting. Remember, you need to leave room for the padding and lining, so don’t fit the front too tightly. Be mainly concerned that the back hugs the back closely, that there are no unsightly creases or folds, and that all seam lines are in their proper place.
- Make sure you have lowered the waist seam of the pattern, as was the style in the 1860s. When you do that, the fabric then comes over the hips, so make sure there is a bit of spring added to the pattern.
- Try putting a belt on while you are wearing the coat. The bottom edge of the buckle should lay just above the point where the buttons will be. That’s where the skirt, back piece, and side pieces all meet.
- Ensure that the center front of the coat meets up and touches, without excessive tightness. If necessary, add to the front as previously discussed.
- Finally, make sure the front of the waist doesn’t dip down too much, and that the fronts of the coat do not fall away. If they do, raise up the front of the waist slightly (you can just use pins to test), and if that fixes the problem, you may leave it for now. Please post photos of this stage, for critique and helpful hints.
One important aspect of a good fitting coat is having a correctly balanced coat. Remember that balance is the length of the front compared to the back. As you are fitting your coat with the basted skeleton fitting, take a look at the front of the coat. Do the fronts swing away from each other? If so, temporarily remedy this by pinning the center front of the forepart until the fronts are even. Just take out an inch or maybe more as if you were putting in a dart.
Next, measure how much you had to take in to make the fronts hang evenly. If it was more than one inch, you’ll have to raise the waist seam manually. For example, if you had to pinch the front seams up 2 1⁄2”, the waist must be raised 1 1⁄2”. The remaining inch will be shrunk away with ironwork in the next step. Please keep in mind that 1 1⁄2” is just an example, and exaggerated. Hopefully you won’t have to take in that much. If the amount needed to balance the fronts is one inch or less, this can be achieved by ironwork alone.
The waist seam is raised by subtracting the amount from the bottom of the forepart. The skirt length remains the same.
Removing the Basting Stitches
After you have made all necessary corrections during the fitting, make sure you have marked the new seam lines with chalk, and that they all agree with each other. For example, the waist seam in front should be raised up equally if necessary. At this point, you will remove all of the basting pieces, and press the seam allowances flat again if necessary. Be sure not to undo your careful ironwork on the forepart though.
The Skeleton Baste
Darts
On the wrong sides, on both the skirts and forepart, mark the darts in chalk, carefully tracing the thread tacks you put in. If you don’t have any darts, then you may skip this step. Next, baste the darts, starting with a couple of stitches in place to hold, then using the basting stitch. Make sure the stitching aligns with the chalk lines on both sides of the dart as you sew.
The Skeleton Baste
At this point, you will baste together all pieces of the garment by hand, to test for fit one last time. Normally, in a skeleton baste, the tailor would baste in the padding, linings, and collar as well. Since you have yet to learn how to construct these pieces, we will forgo them for now. On your next project, you may put them in.
This is done just the same way as for the full muslin, except to not clip any seams. Treat the marking threads as the edge of the cloth, the inlays are there in case you need room.
When you are basting together the center back seam, sew from the top to 1/4″ inch past the bottom of the inlays at the waist seam.
Then you can get a good idea if the opening is at the correct height or not. Press each seam as you go, but only lightly. And when sewing each seam, stop when you hit the marking threads. You don’t want to include the inlays in the seam, as they are not technically part of the coat at this point.
The Skirt
Now we will actually commence construction, starting with the skirt. Find the small triangular pieces you cut. Also be sure you have separated the two skirt pieces by cutting carefully on the fold line. Next, figure out which side is longest on the triangular piece, and line it up, right sides together, to the skirt piece. It may take some fiddling to figure out which piece goes where, but I assure you, they will line up, providing you added double the seam allowance when cutting.
After they are lined up, baste together carefully, making sure there is no fullness on either side. Then, sew, using a 1⁄4” seam allowance, with either a backstitch, or machine stitch. If using the sewing machine, I recommend about 12 stitches per inch. Remember that machines of the period could not so backwards, so no back-tacking! Instead, leave about 4 inches of extra thread at the ends, pull the threads to one side, and tie in a secure knot. Remove the basting stitches.
Now, press the seam, using the following technique. After pressing, snip off the little triangular pieces that form at either end of the seam allowance.
Pressing Technique and Opening Seams.
The first rule of pressing is to not move the iron up and down the seam, as this has a tendency to stretch the seam and throw it out of shape. Begin by laying the pieces, still right sides together, on the ironing board. Go over with a hot iron, with steam, and press the seam. Flip both pieces over, and repeat this process. What this is doing is setting the stitches, which will give us a tighter press of the seam.
Next, open up the seam from the wrong side, and press the seam open. Take your time, and do just a small section at a time. Hold the iron for a few moments, remove, then press with a heavy goose iron, or clapper, to really set the seam. We’re trying to avoid that rolled look to the seams that one so often finds, especially in coats made of heavy fabric.
Turn the fabric over to the right side. Using a scrap of fabric as a press cloth, go over the seam again, with the steam iron, then the clapper or goose iron. When using the clapper, you may want to put the fabric seam on a hard surface such as a piece of wood. Make sure to use a press cloth whenever pressing the right sides of fabric, to prevent shine and imprinting the shape of the iron.
If you have the problem of the seam allowances showing through to the right side, press the seams with a piece of cardstock underneath each of the seam allowances.