Author: James Williams
Drafting the Forepart
Moving now onto the forepart draft, square a line down from 0. This can be anywhere to the left of the back piece depending on how much room you have on your paper – I moved it over a bit to make things a little clearer.
Square down from 0 the following points:
- 4 graduated inches from 0 for the shoulder angle and neck point.
- 7 1/2 graduated inches from 0(this should already be marked from the back and hopefully correspond) for the armscye width.
- 10 graduated inches from 0 for the bottom of the armscye and width of the chest.
These next points can be followed if you kept the 17 1/4 graduated inches for the natural waist length – if you altered that to correspond to your actual measurement skip this section and follow the next diagram. These points help form the side body.
- 18 1/2 graduated inches from 0.
- 19 3/4 graduated inches from 0 should already be marked from the back.
- 21 3/4 from 0 for the bottom of the side body.
If you did alter the waist length, simply measure out the following points from the natural waist line instead. This should help ensure all the lengths agree with each other.
- Measure up 1 1/4 graduated inches.
- Measure down 2 graduated inches.
Square out and mark the following widths:
- 10 1/4 graduated inches from 0 for the shoulder point.
- 17 1/2 graduated inches from 0 for the overall width. Square down from 17 1/2.
- 16 graduated inches from 4 for the neck point. This may be altered later to adjust the width of the lapels.
- 1 1/2 graduated inches from 7 1/2 for the side body point.
- 6 3/4 graduated inches from 7 1/2 for the width of the armscye.
- 4 3/4 graduated inches from 10 for the bottom of the armscye. Square this line all the way across.
- 5 3/4 graduated inches from 18 1/2 for the bottom of the side body seam.
- 16 1/2 graduated inches from 19 3/4 for the waist opening.
- In the opposite direction on this same line, measure 2 1/4 graduated inches from 19 3/4.
Now we’ll draw some more construction lines to aid in drawing the various curves. Draw lines from:
- 10 1/4 to 4 for the shoulder seam.
- Measure the back shoulder seam from 7 1/2 to 1/2 (along the straight construction line). Apply this exact measurement from 10 1/4 to find X.
- 16 to 10 1/4 for the neck seam.
- X to 6 3/4 to 4 3/4 to 1 1/2 for the armscye.
- 16 to 17 1/2 to 16 1/2 to the bottom corner of the draft for the front of the coat.
- 4 3/4 to 5 3/4 for the side seam. Continue the line through 5 3/4 to the waist line to aid in drawing out the curves in the next step.
Square out the following lines to find the depths of the curves:
- First find one-third of the distance from 10 1/4 towards 16. Square in 1 1/8 graduated inches.
- From the center of 10 1/4 to X, square out 5/8 of a graduated inch.
- From the center of X to 6 3/4, square in 1/2 of a graduated inch.
- From the center of 6 3/4 to 4 3/4, square in 7/8 of a graduated inch.
- From the center of 4 3/4 to 1 1/2, square in 3/4 of a graduated inch.
- On the main construction line from 0, measure 4 graduated inches below 7 1/2. Square out 3/4 of a graduated inch.
- At the bottom of the side seam from 4 3/4 to 5 3/4, where it intersects the waist line, mark 1/2 of a graduated inch on either side. You could extend this to 3/4 if you find you need a bit more room.
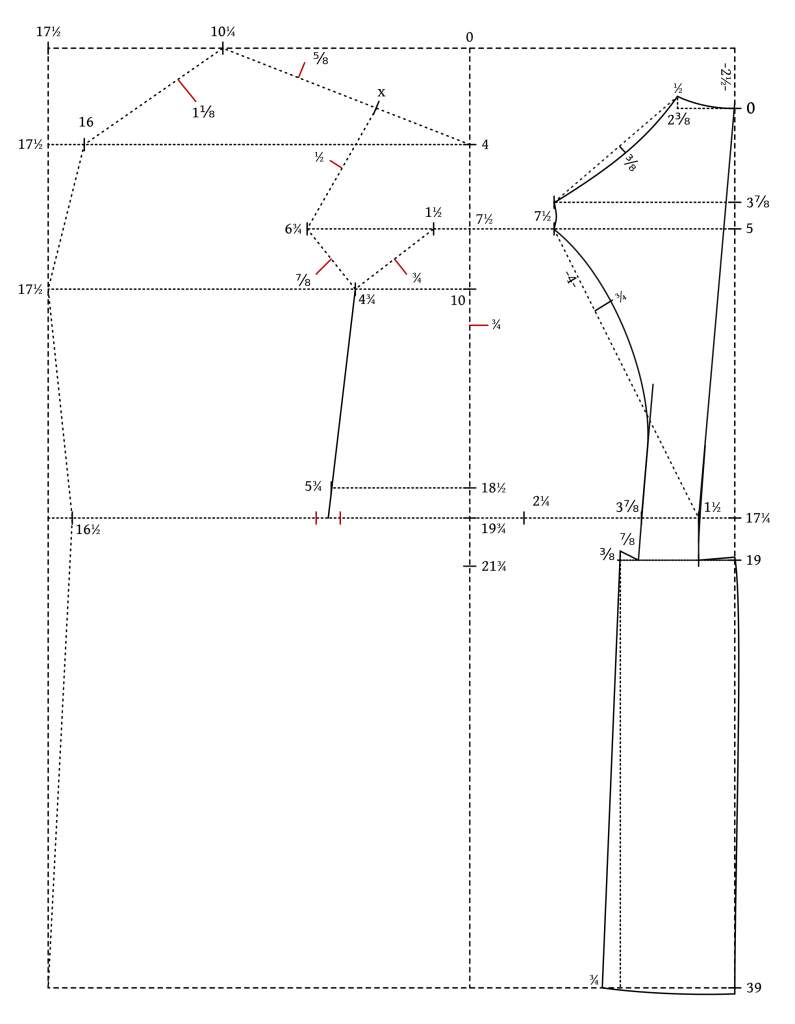
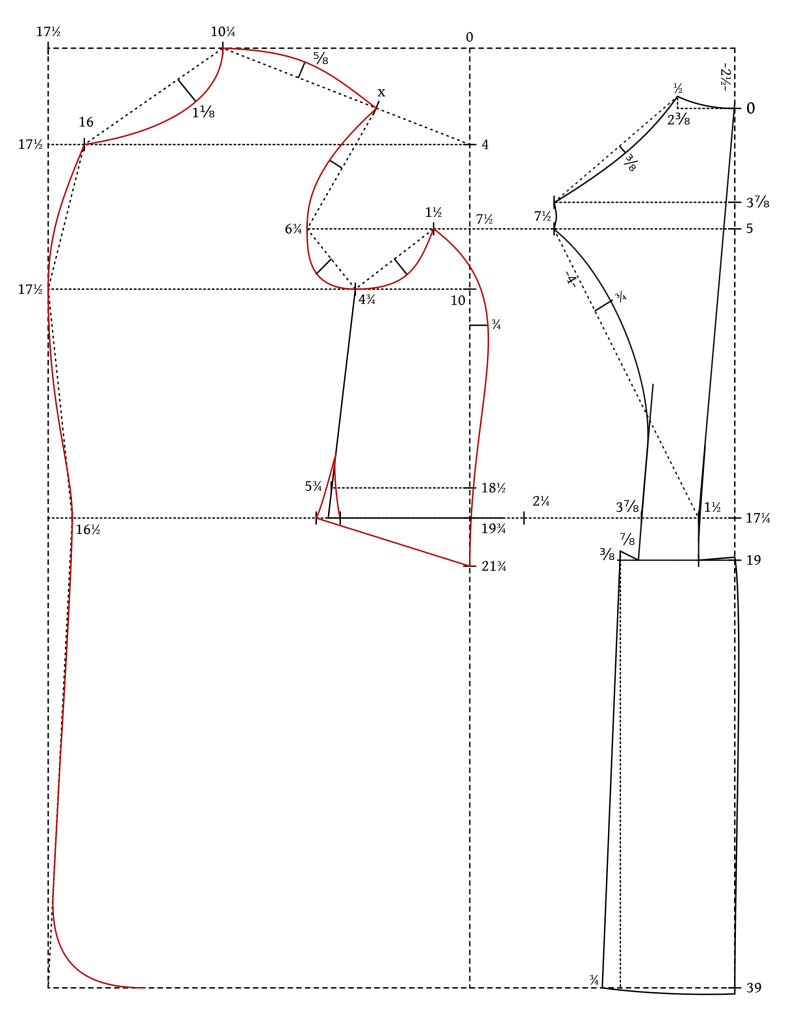
Now draw the following curves.
- Shoulder seam from 10 1/4 through 5/8 to X.
- Armscye from X through 6 3/4 — 4 3/4 — to 1 1/2.
- Neck seam from 10 1/4 through 1 1/8 to 16.
- Shape the front edge with a graceful curve from 16 through 17 1/2 and 16 1/2. The curve reverses direction at the waist.
- Draw the side body seam from 1 1/2 through 3/4 to 21 3/4. It’s a compound curve again and kind of reverses direction just above 18 1/2, though it’s not actually running through points 18 1/2 and 19 3/4.
- At the bottom of the side seam, an inch or so above 5 3/4, draw to curves to the points on the waist line to help spring out the waist and make room for the hips. This is a little confusing as the curve on the left is for the side body and the curve on the right is for the forepart.
- Complete the bottom of the forepart by drawing a straight line from the left point beneath 5 3/4 to 21 3/4.
- Finally, for the curved bottom edge at the center front, measure equal distances from the main intersection – I did 4 graduated inches. The draw a curve as shown. Using a plate or something round can be helpful here.
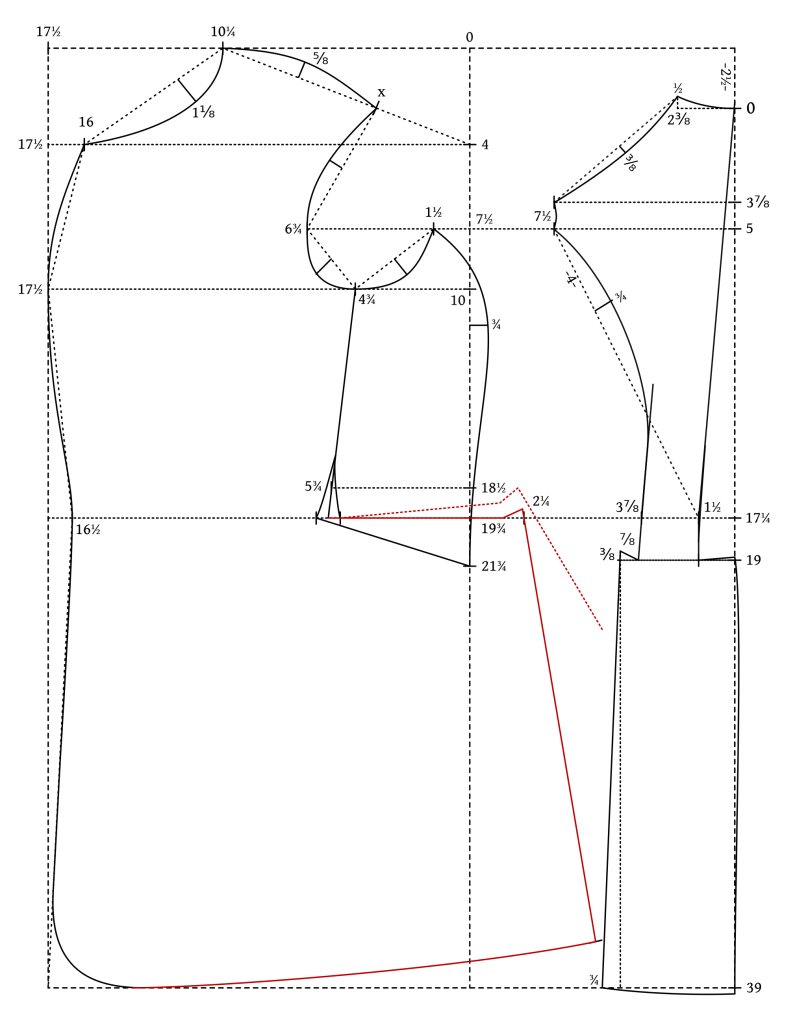
To finish off the main part of the draft, we’ll finish up the front skirt.
- Draw a line from the bottom of the side seam where it curves to the right (it’s along the waistline so it’s technically already drawn) to 2 1/4.
- Spring up the last 7/8 of the line by 3/8 graduated inches as shown to match the spring in the back waist.
- Draw a line down from 2 1/4 at a similar angle to that shown – about 30 degrees from vertical is a good starting point. Make this line the same length as the corresponding seam on the back skirt. You’ll probably get some overlap of the forepart onto the back but it’s nothing to worry about – easy to copy each piece onto a separate sheet of paper.
- If you want or need more fullness in the skirt you can raise that first skirt line up by about 1/2 graduated inch and spring out the back skirt seam even more as necessary.
- Finish up the draft by drawing a very slightly curved seam along the bottom edge of the skirt. It should be at 90 degrees to the back of the skirt and taper gracefully into the curve at the center front.
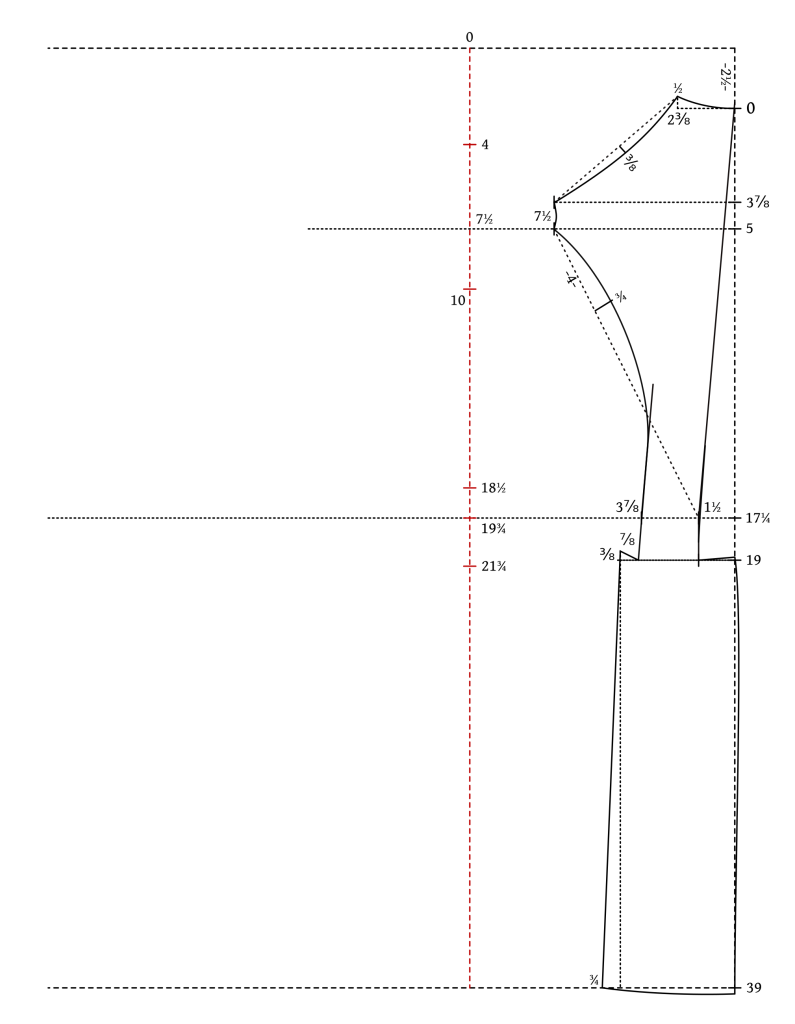
Drafting the Back
We’ll begin drafting, as usual, with the back of the coat. First, draw a square horizontally and vertically. This should be wide enough to fit the coat and the a little longer than the total length, but of course you can simply extend the lines if necessary later on.
All measurements should be in graduated inches, corresponding to your chest size, unless otherwise noted. Also, I’m using dashed lines here to denote construction lines but in practice I just use a solid pencil line for everything.
From the intersection, measure 2 1/2 graduated inches down and mark 0. The back lengths are all measured from this 0 point rather than the intersection.
- 3 7/8 graduated inches from 0 for the rear shoulder point.
- 5 graduated inches from 0.
- 5 graduated inches from 0.
- 17 1/4 graduated inches from 0 for the natural waist. I highly recommend checking this to your actual measurement in inches just to compare the two.
- 19 graduated inches from 0 for the dropped waist common during the 1860s.
- 39 graduated inches from 0 for the total length of the jacket. Devere gives 39 here but it’s quite likely too long, especially for larger chest sizes, so use your actual measurement here.

Now we’ll square lines across from each of those points and mark the following distances.
- 2 3/8 graduated inches from 0. Then square up 1/2 graduated inches as shown for the back shoulder/neck point.
- 7 1/2 graduated inches from 3 7/8 for the width of back.
- 7 1/2 graduated inches from 5 for the bottom of the armscye. This line also forms the front armscye so you can extend it further as shown.
- 1 1/2 and 3 7/8 graduated inches from 17 1/4 for the back width of the waist.
- 1 1/2 graduated inches from 19.
- Square across from 39 for the bottom of your draft.
Now we’ll add some construction lines to make drawing the curves a little easier.
- Draw a line from 0 to 1 1/2, extending it straight down to the line at 19. This forms the center back with a slight amount of ‘spring’ below the waist.
- Draw a line parallel to the line from 0 – 1 1/2, from 3 7/8. This is more of a guide for forming the back curve but does form the other side of the back at the waist.
- Back near the top, draw a line from the 1/2 mark to the top 7 1/2 mark for the shoulder curve.
- From the lower 7 1/2 to 1 1/2, draw a line to aid in drawing the back curve.

These next two small lines give the depths of each curve.
- Find the center of the shoulder seam and square a line inwards 3/8 of a graduated inch.
- On the line from 7 1/2 – 1 1/2, measure 4 graduated inches from 7 1/2 and square inward 3/4 of a graduated inch.
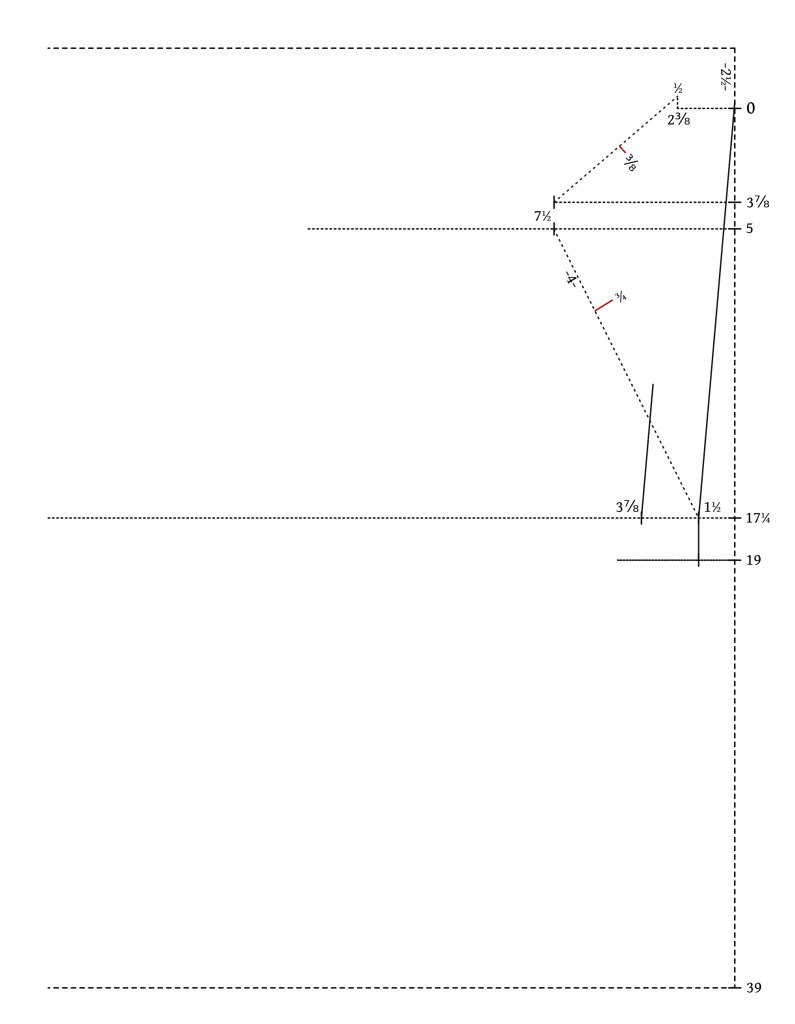
With the construction lines drawn, we can add in the curves now.
- From 1/2 – 0 draw a curve for the back neck.
- Draw a curve from 7 1/2 through 3/8 to 1/2 for the shoulder seam.
- From 7 1/2 to 7 1/2 draw a very slight curve for the back of the armscye.
- From the lower 7 1/2 through 3/4 to through 3 7/8, draw a curve, straightening the curve as it hits the construction line and continuing straight to line 19.
- Finally, add a very shallow curve at 1 1/2 near the waist just to soften the angle a little.
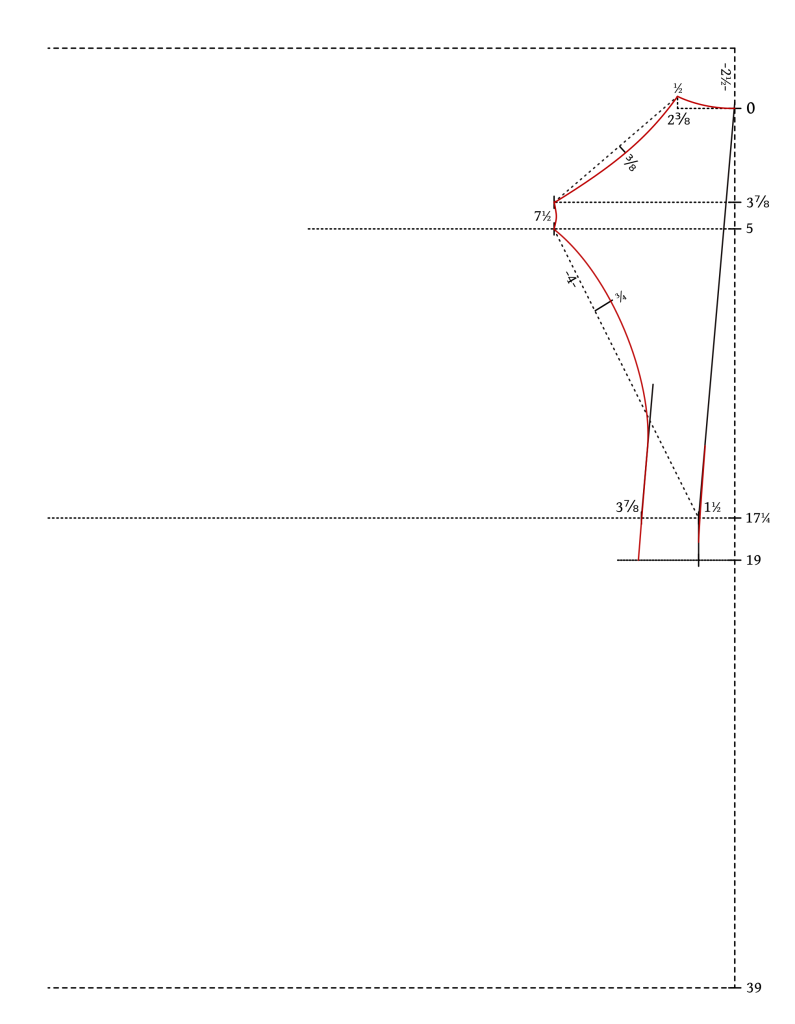
Finally, we’ll finish up the back piece with the skirt area.
- At the top of the skirt near 19, ‘spring out’ the top about 1/8 of a graduated inch at 19.
- From 19 to 39, give a very slight curve, deeper near the top half, to the center back of the skirt. When the back skirt is made up, it will give the appearance of being a straight line, ideally, as it goes over the curve of the seat.
- Again at line 19 at the side seam area, mark a line at line 19, 7/8 of a graduated inch past the construction line coming from 3 7/8. Also spring up here 3/8 of a graduated inch.
- Measure the width of the skirt at line 19. Add 3/4 of a graduated inch to the bottom width of the skirt at 39.
- Redraw the side of the skirt from 3/8 to 3/4 as shown.
- Finally, draw a slight curve to the bottom, ensuring that the angle at 3/4 is at 90 degrees, as well as at 39.
Supplies
Here’s the list of supplies you’ll need for this project.
- Pattern / Poster Paper (available in craft stores or some office supply stores).
- Quilting Ruler
- Tape Measure
- Pencil
- French Curves or bendable Drafting Ruler (both are optional)
- 1 – 2 yards Cotton Muslin and Thread for sewing
Graduated Rulers
To make your pattern the appropriate size, you’ll need to print out the ruler corresponding to your chest size. The rulers can be found on the main page of this course.
Fitting and Alterations
A waistcoat, with only a few seams, is one of the easiest garments to fit. After you have constructed your toile, try it on, and look for any excess fabric, or pulling. This will help you decide on the adjustments to be made on the pattern.
At the waist, is the waistcoat loose or tight? Try to determine by how much, either by measuring or rock of eye (estimating). Any alterations at the waist can be added at the back side seam and the center front. Since waistcoats from the 1860s almost always had a belt in the back for adjustment, I usually make the side seam in the back vertical, just to give some extra room to grow into.
Then examine the back neck for the balance. Once you’ve learned this you’ll be staring at the back of other people’s coats to see how their balance is. If the balance is too long, you’ll see horizontal folds just under the collar or neck area. And if the balance is too short the back of the vest will pull way from the neck – you see this often if someone has a stooped posture.

As everybody is different, it’d be impossible for me to go over every possible variation. So, if you’d like help with your fitting, please share in the support community a photo of your pattern from the top down, as well as photos of you wearing the waistcoat from the front, sides, and back, and I’ll help you with the alterations as best I can.
Muslin Toile
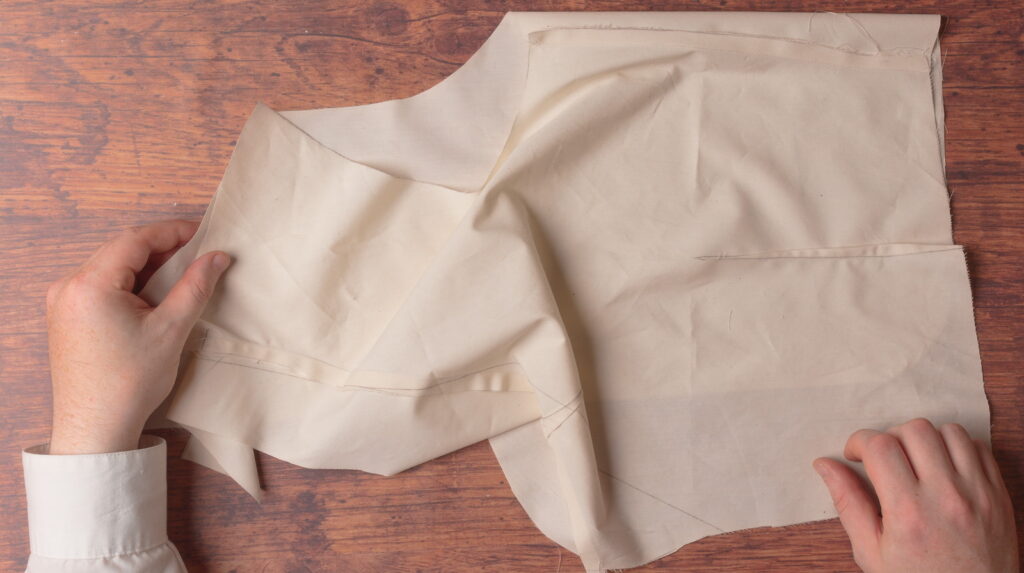
With the pattern cut out you can cut out your cotton muslin to make a toile for fitting purposes. Please refer to the video for more detailed construction.
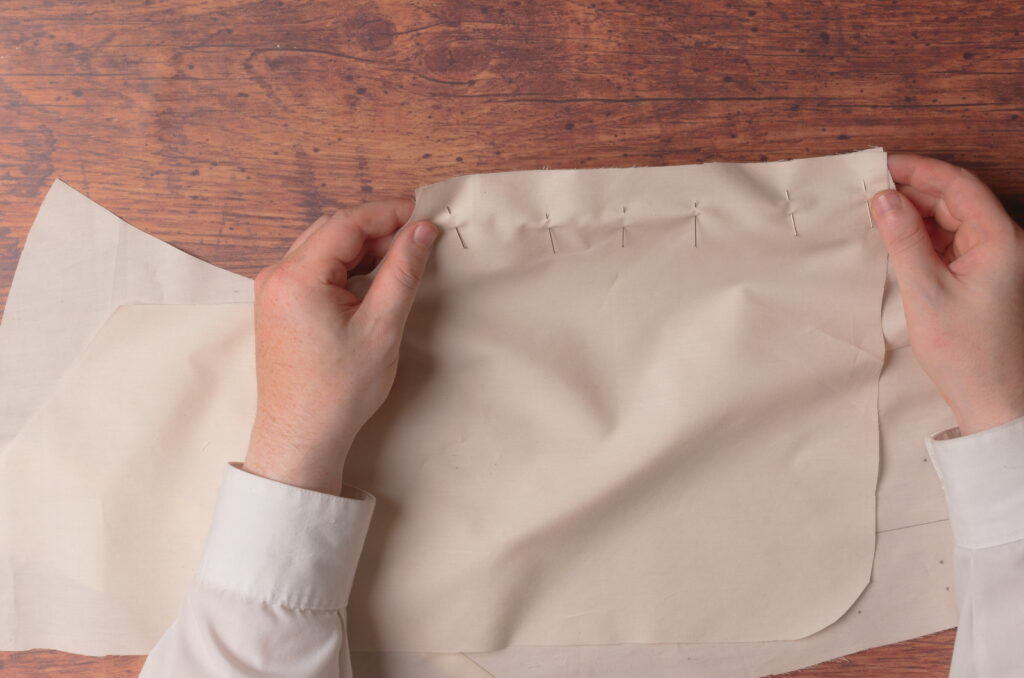
First, cut out your fabric with the center back placed on the fold, following the grain alignment marks for both front and back. Any darts are simply marked but are not cut out. Mark an ‘X’ on the wrong side of each piece to help keep everything in order.
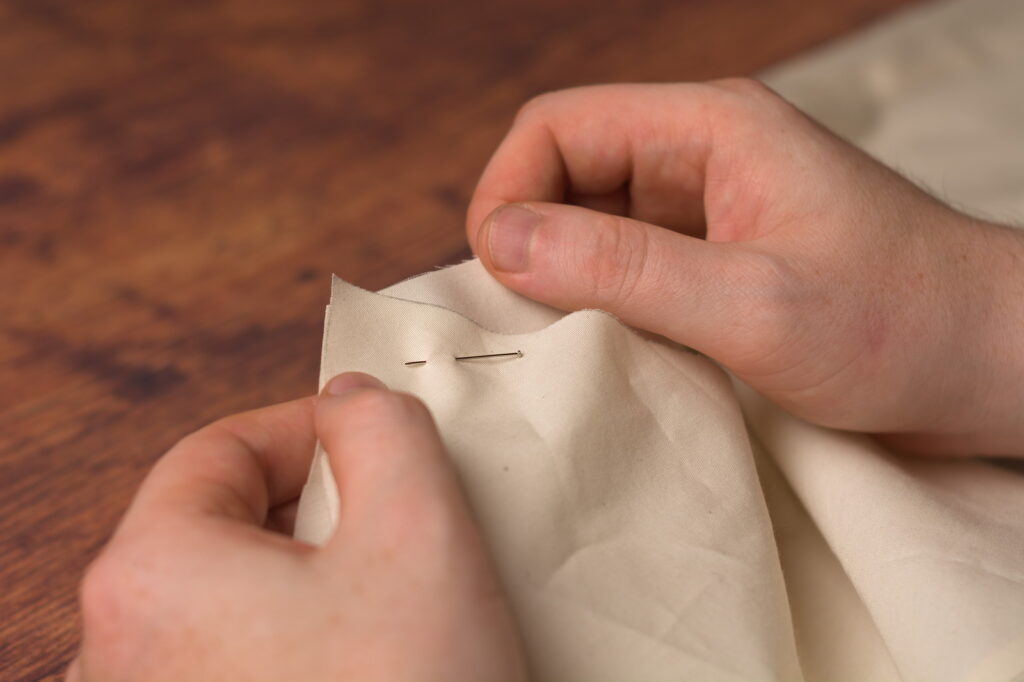
Next, if you’re using any darts, it’s time to close them up while the pieces are still separate and easier to deal with. Fold the dart in half lengthwise, right sides together, aligning the chalk marks on both sides as best you can.
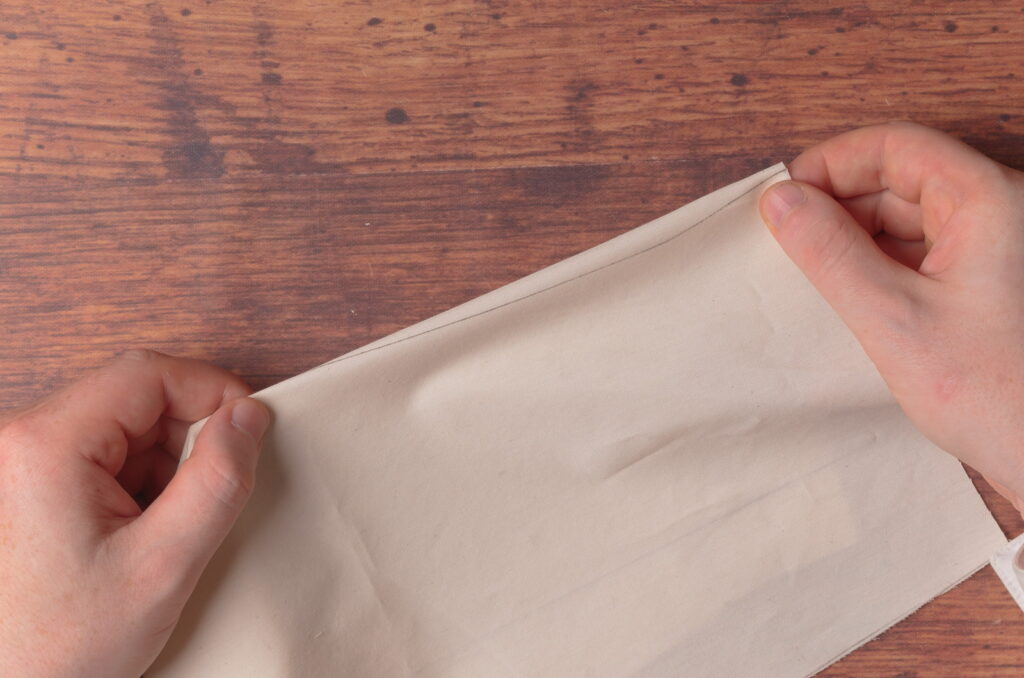
Pin the dart closed.
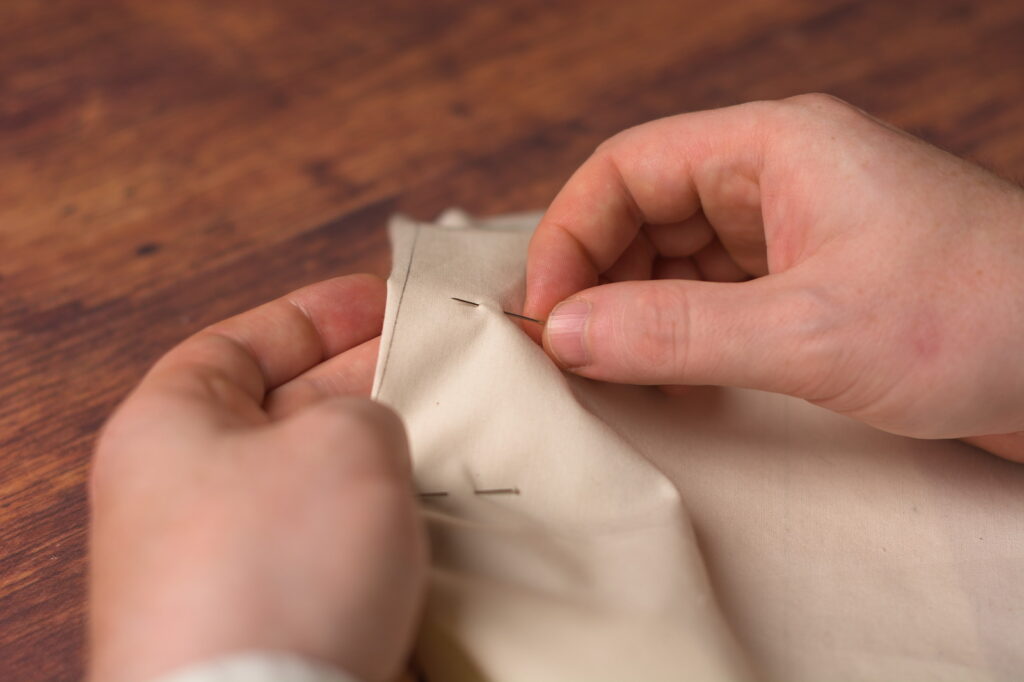
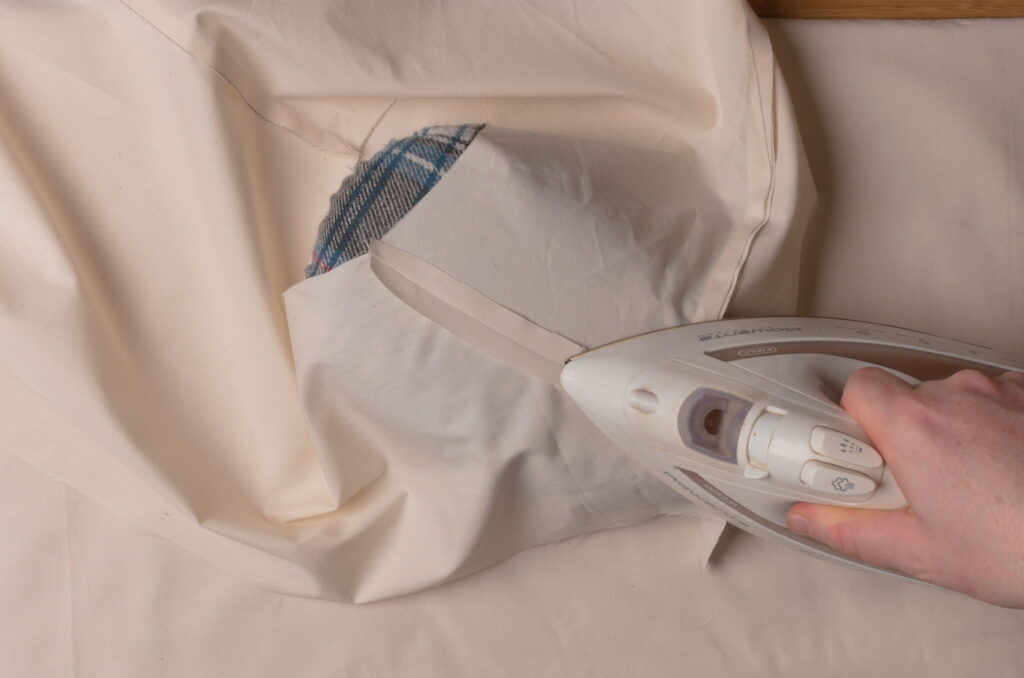
Sew the dart closed from the bottom of the dart towards the tip, opposite of what I did in the photo, for best results. Follow the outside of the chalk line as closely as you can.
Press the dart to one side.
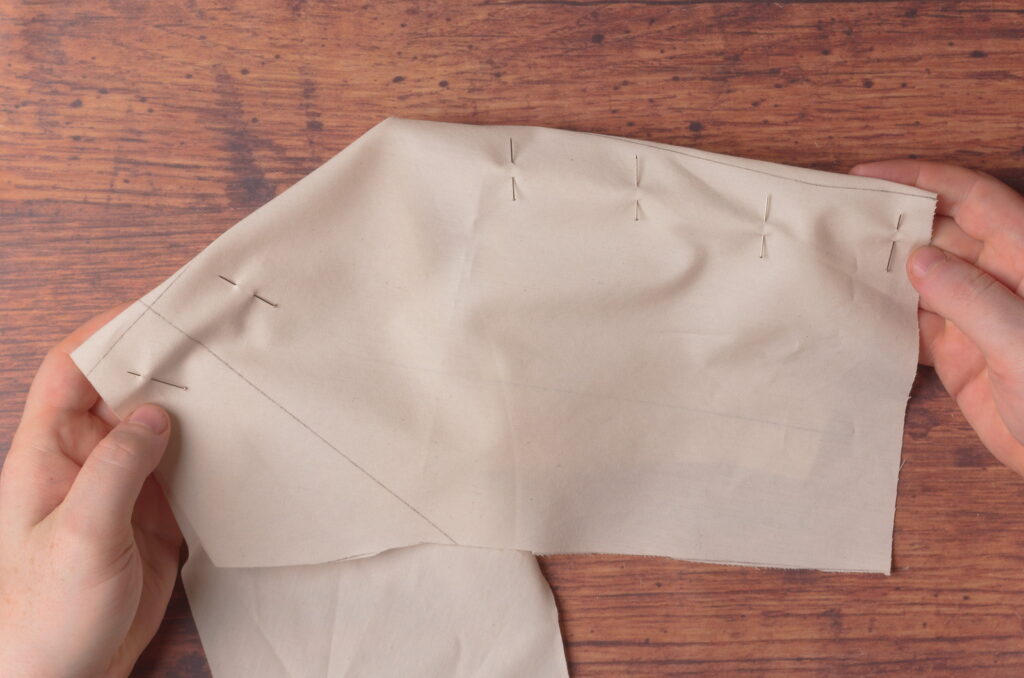
Pin the side seams together.
Also pin the shoulder seams, aligning the seam allowances carefully.
At both ends of the shoulder seam you’ll end up with a little overlap due to the angles of the neck and armscye. Just keep the 3/8″ seam allowance aligned.
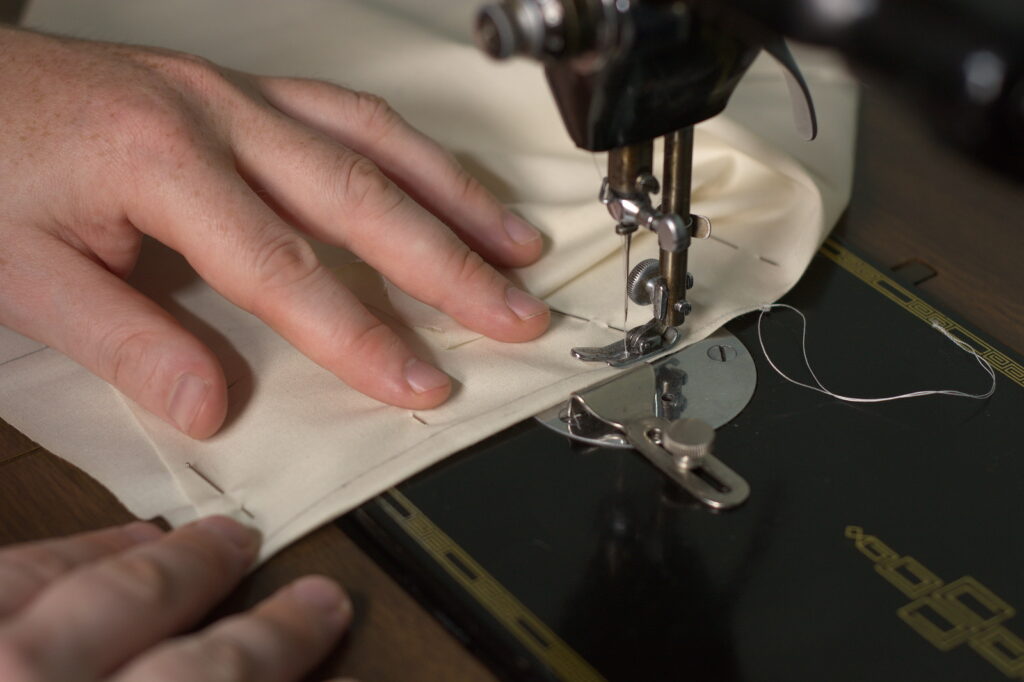
Sew the shoulder seams and side seams closed with a 3/8″ seam allowance.
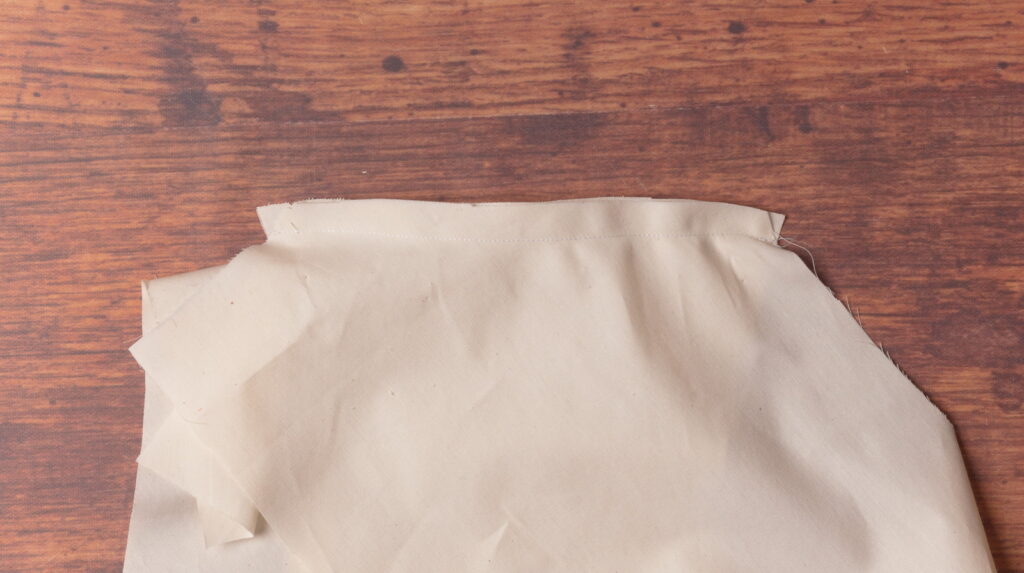
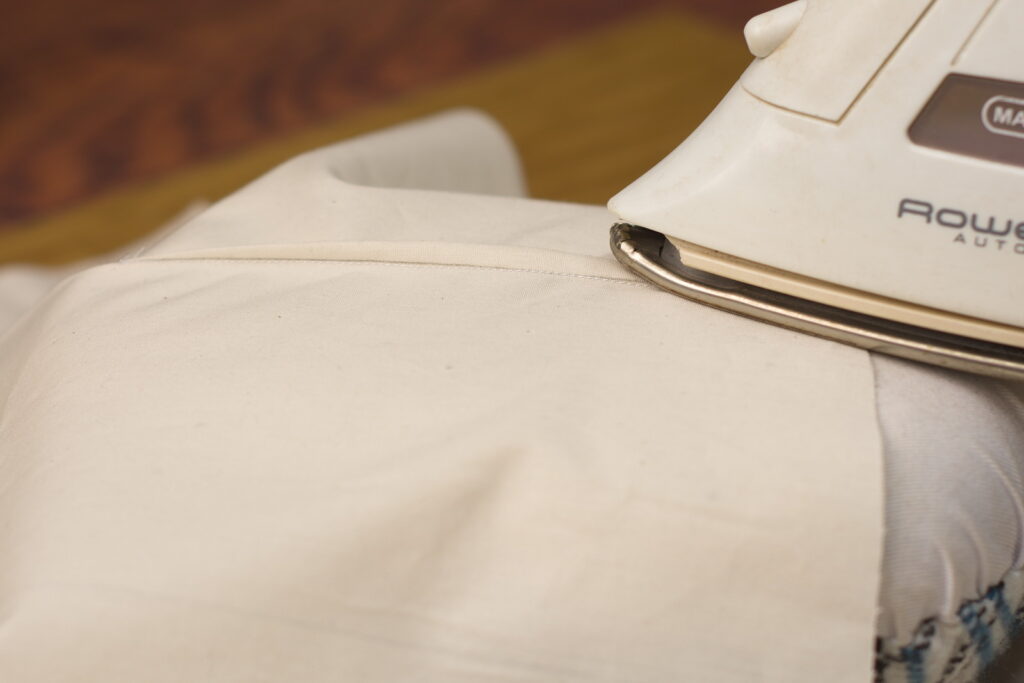
Press open the shoulder and side seams. It’s helpful to use a tailor’s ham for the curve of the shoulder seam if you have one.
And that completes your waistcoat toile. Go try it on to see how it fits!
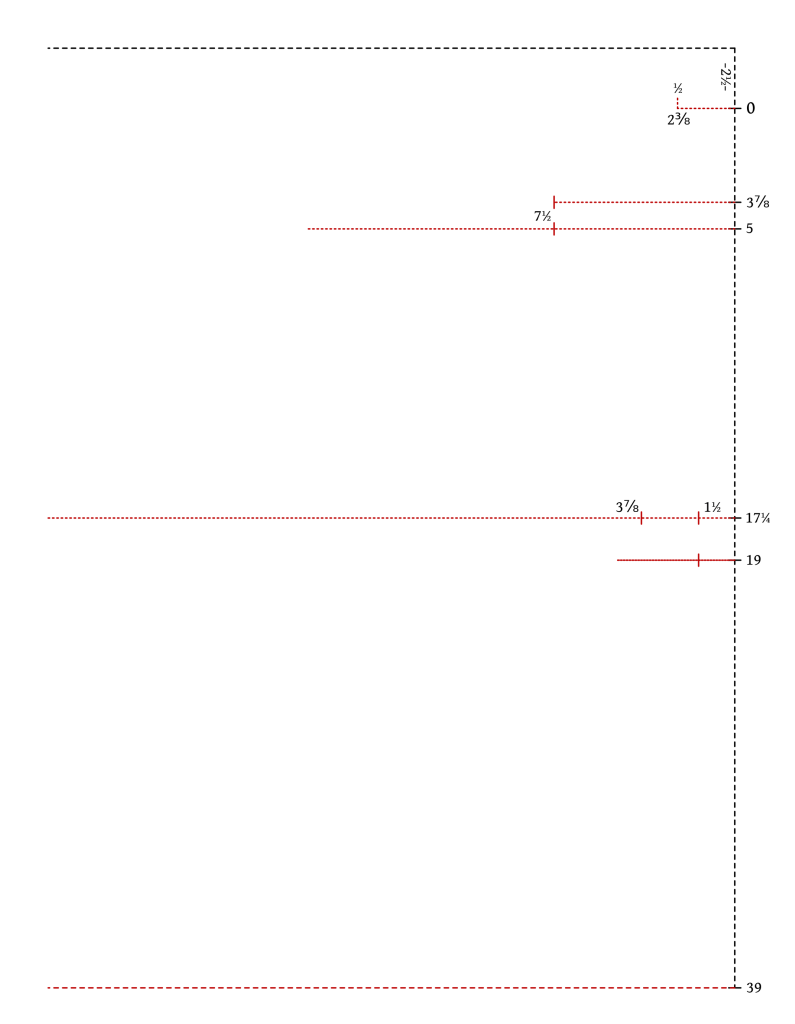
Checking your Measurements
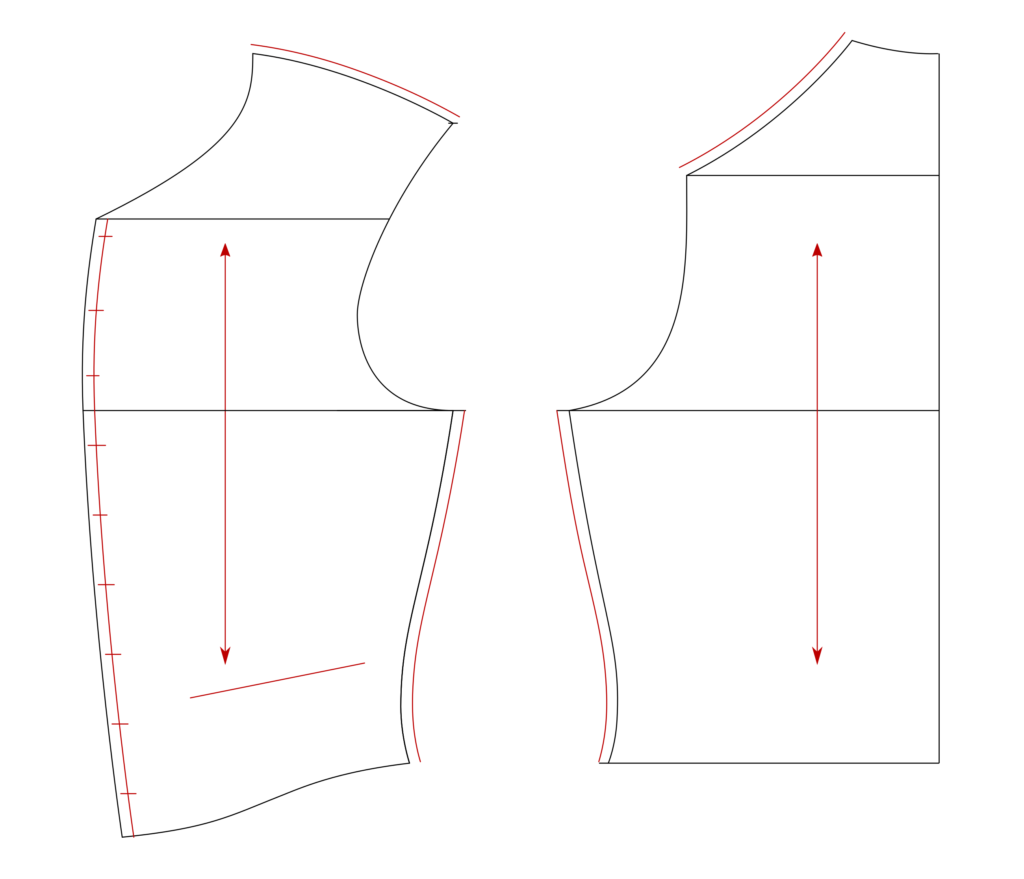
Before cutting out your pattern (or after if you forget!), it’s a good idea to check your measurements one last time. Here I’ve got them all laid out for you in one diagram. Remember that you want to measure without including the seam allowances. Also, keep in mind that any pattern is just a start – it takes fitting to perfect the pattern, especially if you are a beginner, and don’t be afraid to start completely from scratch if necessary. The next pattern will be all the better. When you’re comfortable enough with your draft, you can go ahead and cut it out – be sure to keep the seam allowances!
Darts
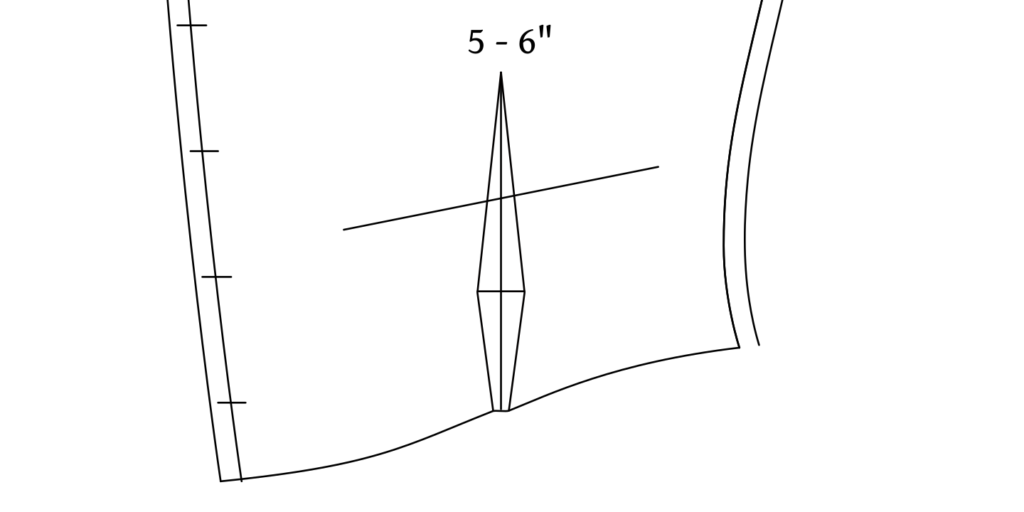
If you have a very athletic build, you may be able to add a dart to the front for additional waist suppression and more shape. These darts should only be added if your waist measurement is at least 6″ smaller than your chest measurement.
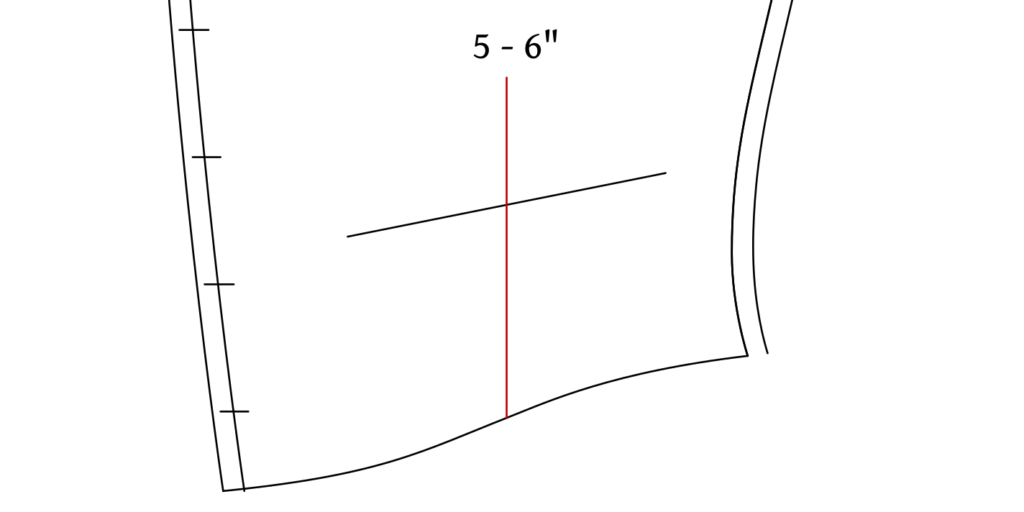
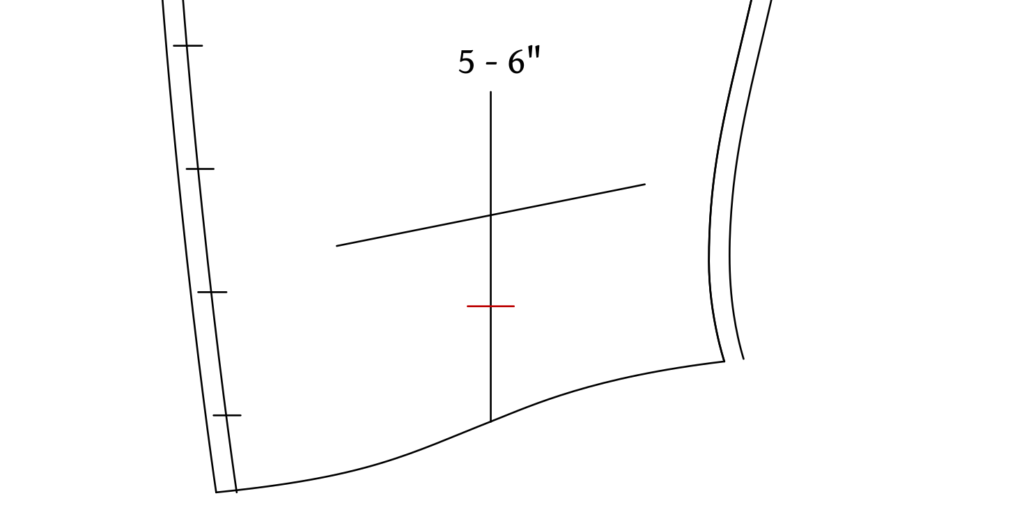
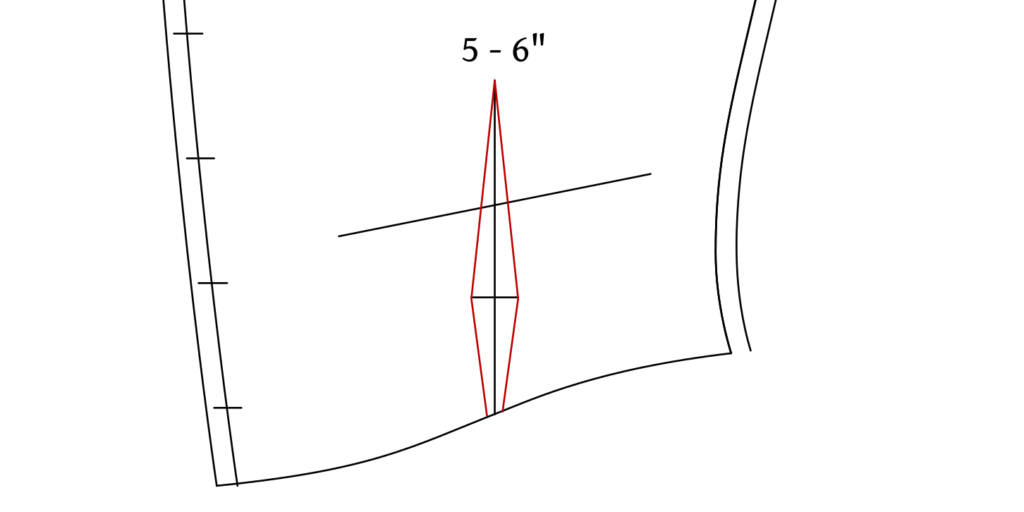
First, determine the position and length of your dart, usually at the middle of the front waist, and extending through the pocket vertically, about 5 – 6″ in length.
Next, about two inches from the bottom, or where the natural waist would be, determine the width of your dart. This is best done by checking the length of the waist across the two pieces, comparing it to your actual waist measurement, and taking out from between 1/2″ to 1″ total at this position in the dart. You’ll have to use your best judgement as to how much to take out in the darts, as compared to the side seams, but feel free to ask me for advice here.
Now connect the points of the dart. I usually make the bottom about 1/4″ wide, or 1/8″ on either side of the construction line, but again that depends on how wide you’ve made the fullest part of the dart.
Finally, I like to lower the waist seam at the back edge of the darts, just to make the lengths equal. It helps a bit when making up the waistcoat, otherwise you end up with a jagged looking bottom edge before turning, and can run out of seam allowance if you’re not using an inlay.
Adding Seam Allowances
With your draft done, you’ll need to add a few seam allowances to make sure it fits properly. Since this is only going to be a muslin toile for fitting purposes, I typically add seam allowances only at the shoulders and side seams. I’d recommend 3/8″ (actual inches) here, as it gives more room to work with than 1/4″ as well as prevents fraying, while at the same time not being quite as bulky as a full 1/2″.
Now, you do have a choice to make here. You could add the seam allowances directly to your pattern and cut everything out afterwards – this does break apart your original pattern however. Or you can copy the outlines and waist / chest lines to a fresh sheet of paper and add the seam allowances to that so as to preserve your original pattern for future use. It’s up to you and one way isn’t really more difficult than the other – it’s more how you prefer to work.
Use your quilting ruler to add the seam allowances to the shoulder seams and side seams.
Here’s a simplified view of the pattern so far after adding seam allowances at the shoulders and side seams. I’ve also added some vertical lines to indicate the grain of the cloth – just makes it easier to keep track of when cutting everything out.
Along the front edge I added the position of the buttons. These are 3/8″ (graduated or not) inches from the edge. The top button is about 1/2″ from the top, the lowest button is about an inch from the bottom. Then I just spaced the buttons evenly from top to bottom for a total of nine.
Finally, although it’s out of the scope of this course, I added a pocket along the bottom of the front just for reference. It’s about 5 graduated inches long, and roughly follows the waist construction line about 3 – 4″ above that.
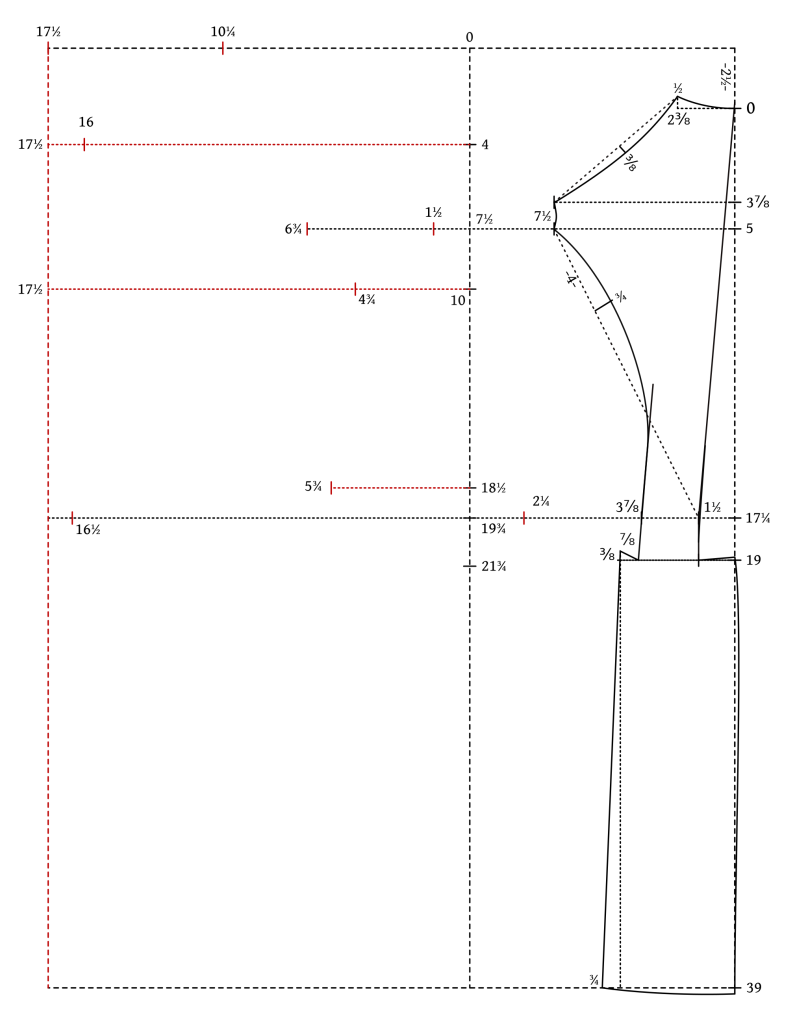
Drafting the Front
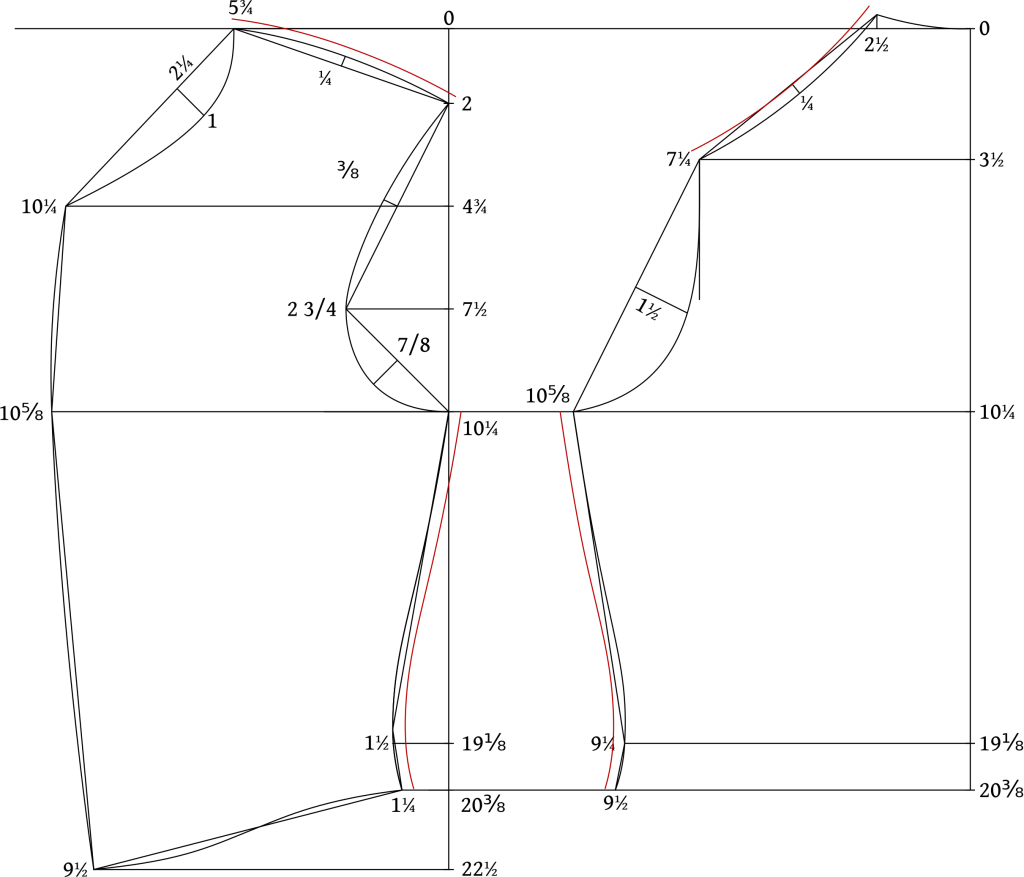
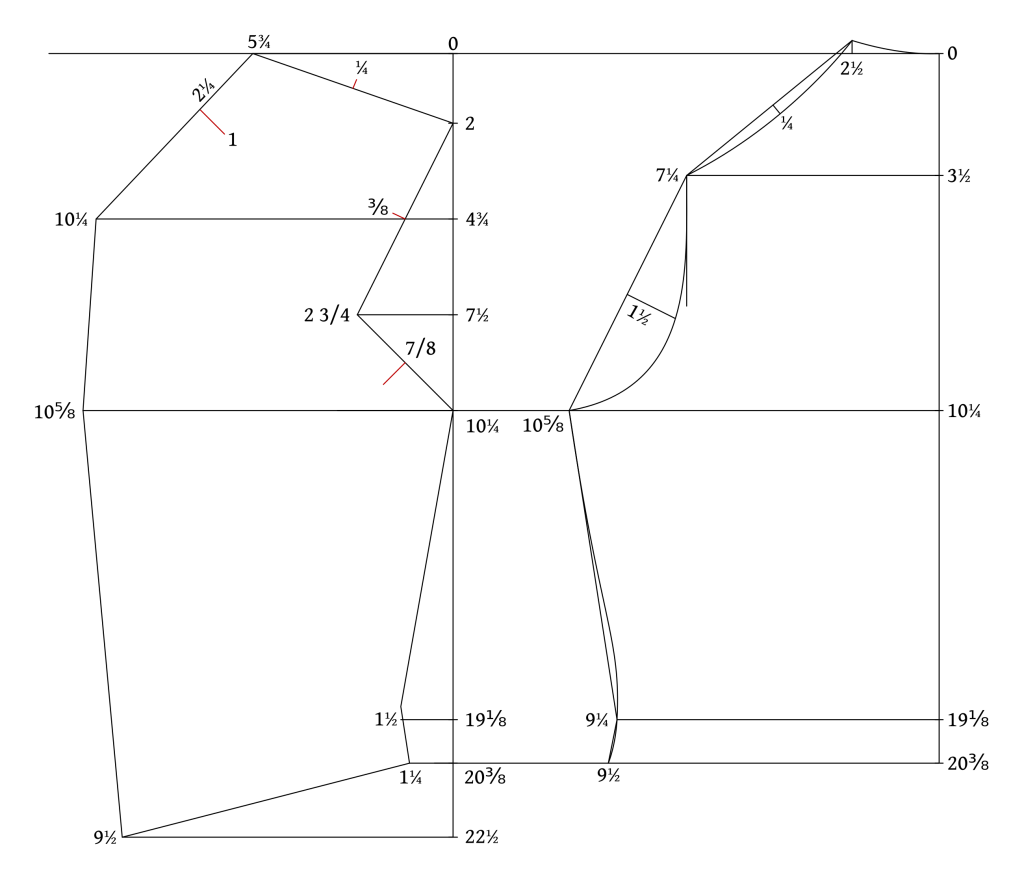
With the back completed, we can move on to drafting the front of the waistcoat, or forepart.
Begin by drawing another vertical line about 2 – 3 inches away from the back piece – just to give yourself room to work with. Mark the following points from 0 in graduated inches.
- Mark 0 at the top.
- 2
- 4 3/4
- 7 1/2
- 10 1/4
- 19 1/8
- 20 3/8
- 22 1/2
Square across from these points as before – some of the lines you may have already drawn if you extended them far enough from the back. Then measure out the following distances.
- 5 3/4 from 0
- 10 1/4 from 4 3/4
- 2 3/4 from 7 1/2
- 10 5/8 from 10 1/4
- 1 1/2 from 19 1/8
- 1 1/4 from 20 3/8
- 9 1/2 from 22 1/2
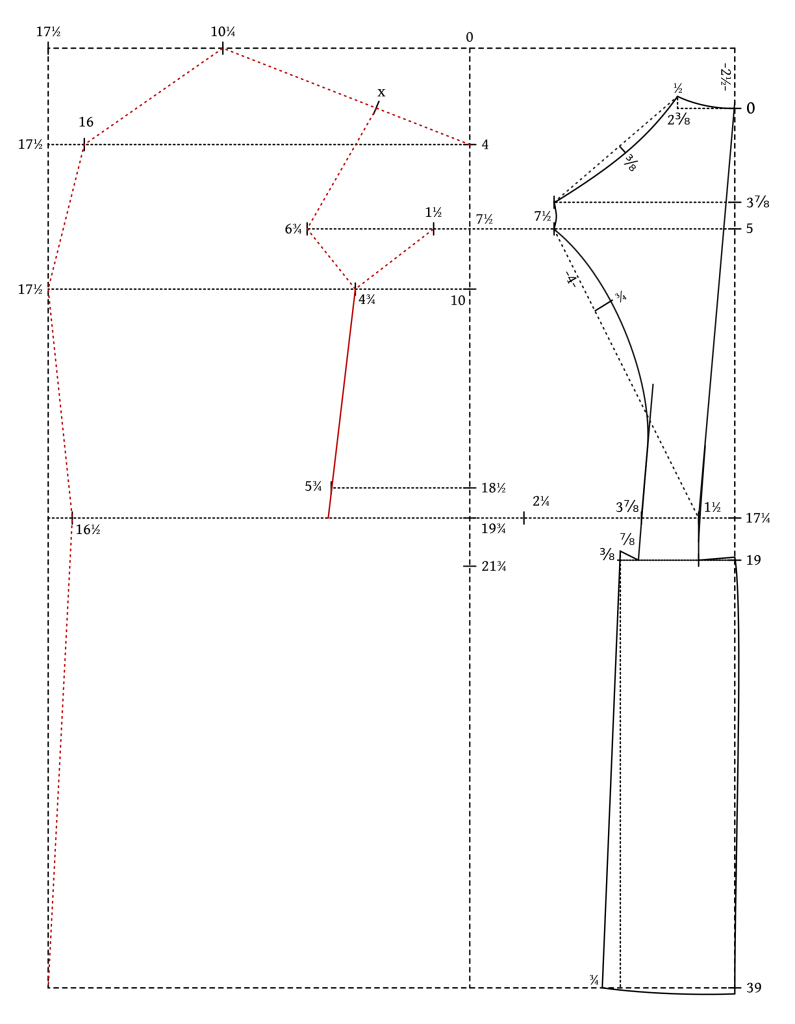
Draw in the construction lines connecting the following points to aid in drawing the curves.
- 5 3/4 to 2 for the shoulder.
- 2 to 2 3/4 for the front armscye.
- 2 3/4 to 10 1/4 for the bottom armscye.
- 10 1/4 through 1 1/2 to 1 1/4 for the side seam.
- 1 1/4 to 9 1/2 for the waist seam.
- 9 1/2 through 10 5/8 to 10 1/4 for the center front.
- 10 1/4 to 5 3/4 for the neck seam.
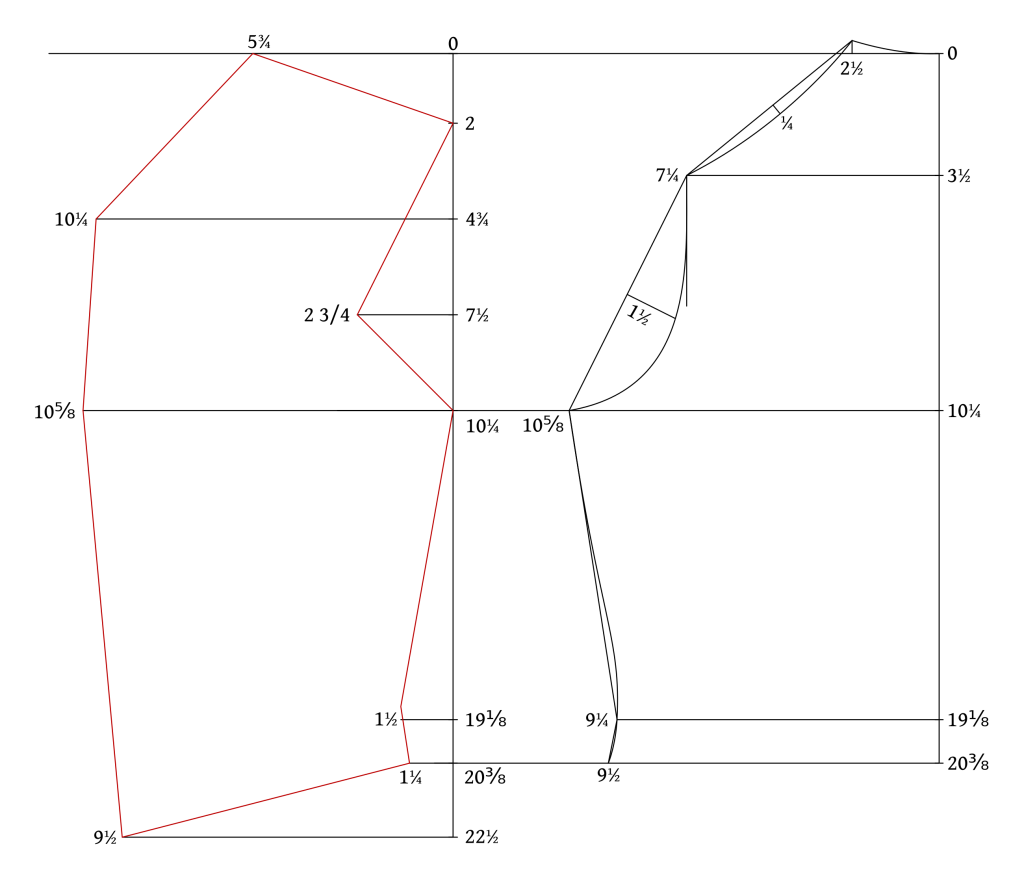
To find the depth of the curves:
- Measure 2 1/4 graduated inches from 5 3/4 along the neckline. Square in 1 inch for the curve of the neck.
- Find the center of 5 3/4 to 2. Square out 1/4 graduated inch.
- Find the center of 2 to 2 3/4. Square in 3/8 graduated inch.
- Find the center of 2 3/4 to 10 1/4. Square in 7/8 graduated inch.
Finally, draw in the curves as shown:
- 5 3/4 to 2 forms the shoulder seam. Should be a shallow curve.
- 2 through 2 3/4 to 10 1/4 for the armscye. At 2 3/4, the curve should be close to vertical – that will help you with the shape of the curve.
- 10 1/4 through 1 1/2 to 1 1/4 for the side seam. This forms an ‘S’ curve very similar to the side seam of the back, just in the opposite direction.
- 9 1/2 to 1 1/4 for the waist seam. I like to first find the midpoint between the two. Then draw in a very shallow ‘S’ curve as shown. It should almost form a right angle with the center front.
- 9 1/2 through 10 5/8 to 10 1/4 for the center front.
- 10 1/4 through 1 to 5 3/4 for the neck seam. The curve starts out very shallow at 10 1/4 and deepens after 1. The curve should be just about vertical as it heads into 5 3/4.
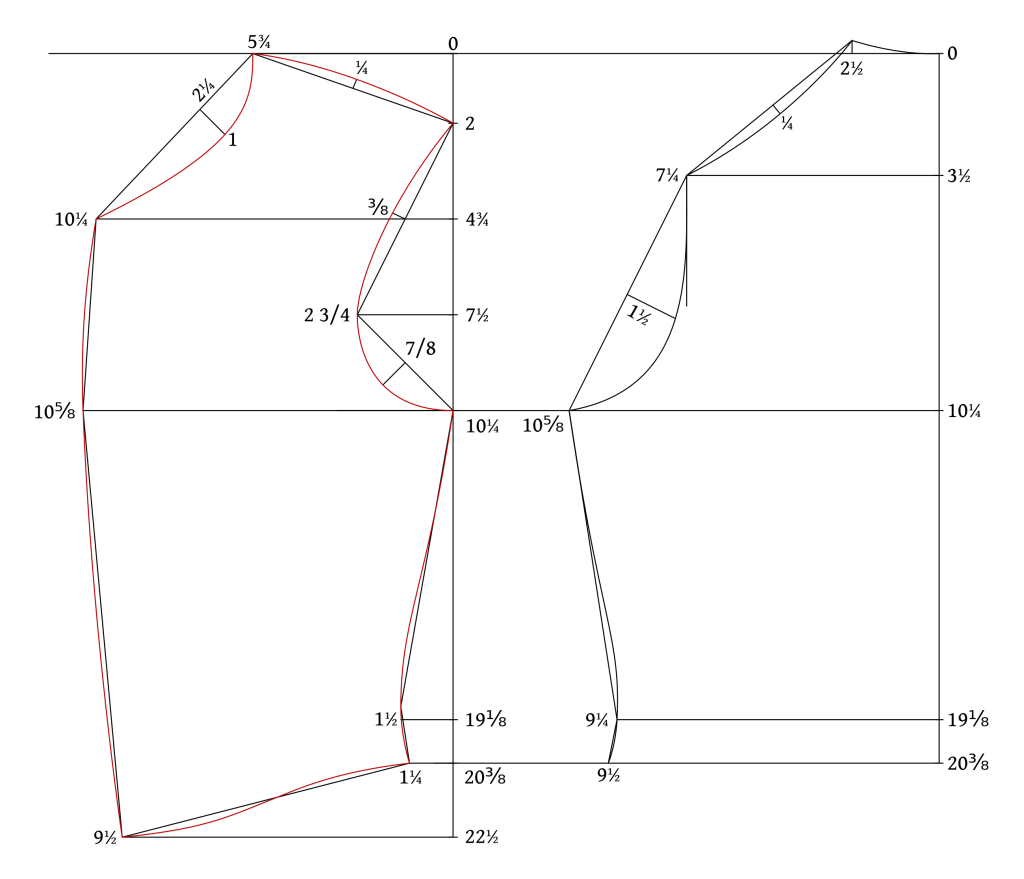
This completes the draft itself. Next we’ll add seam allowances and double check the measurements one last time.
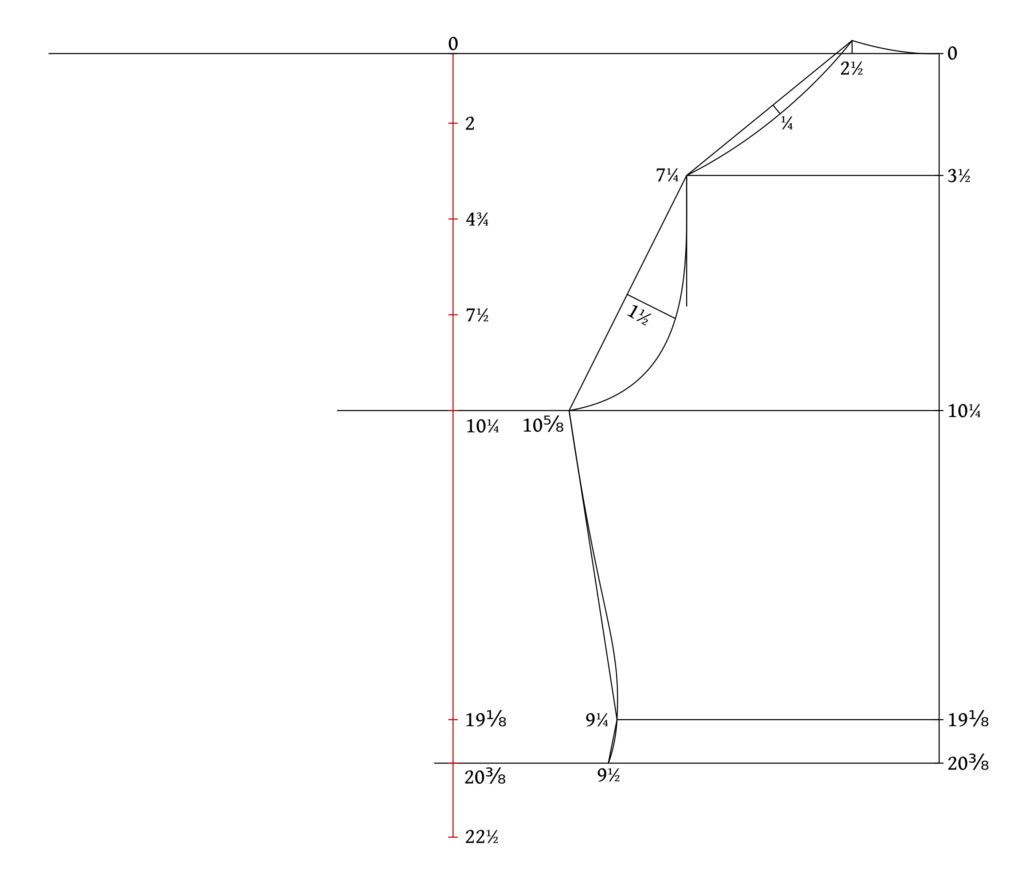
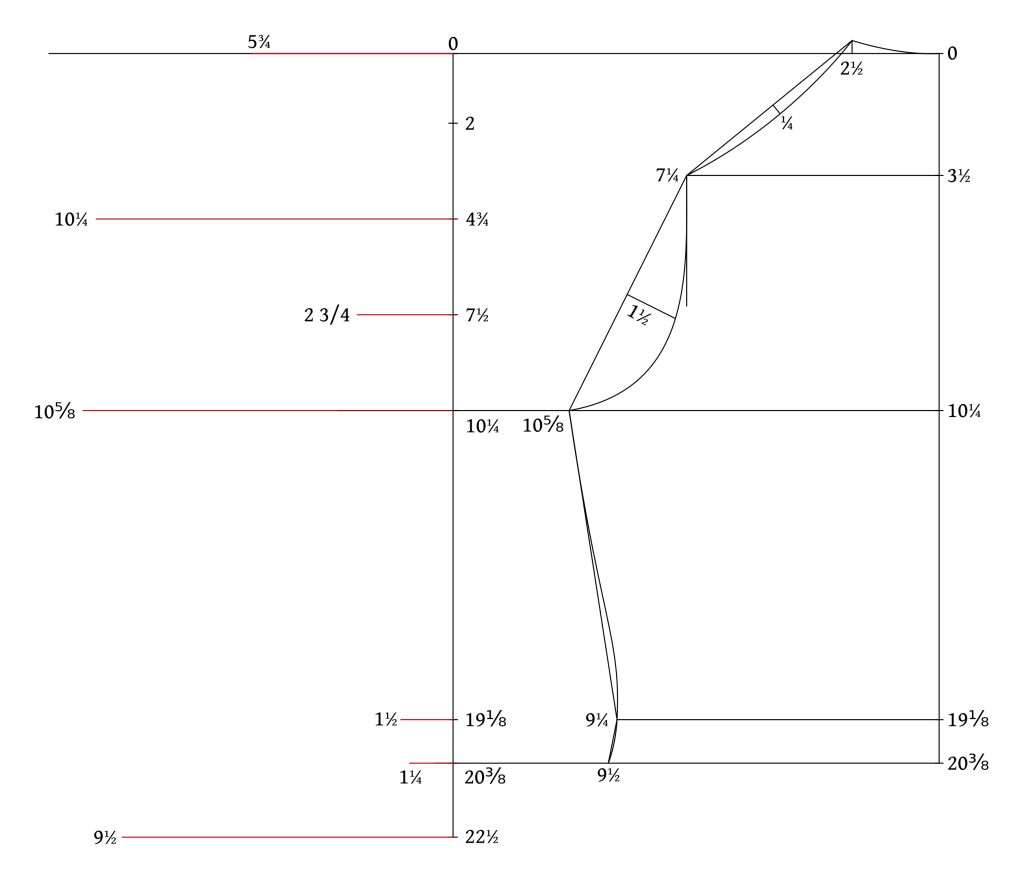
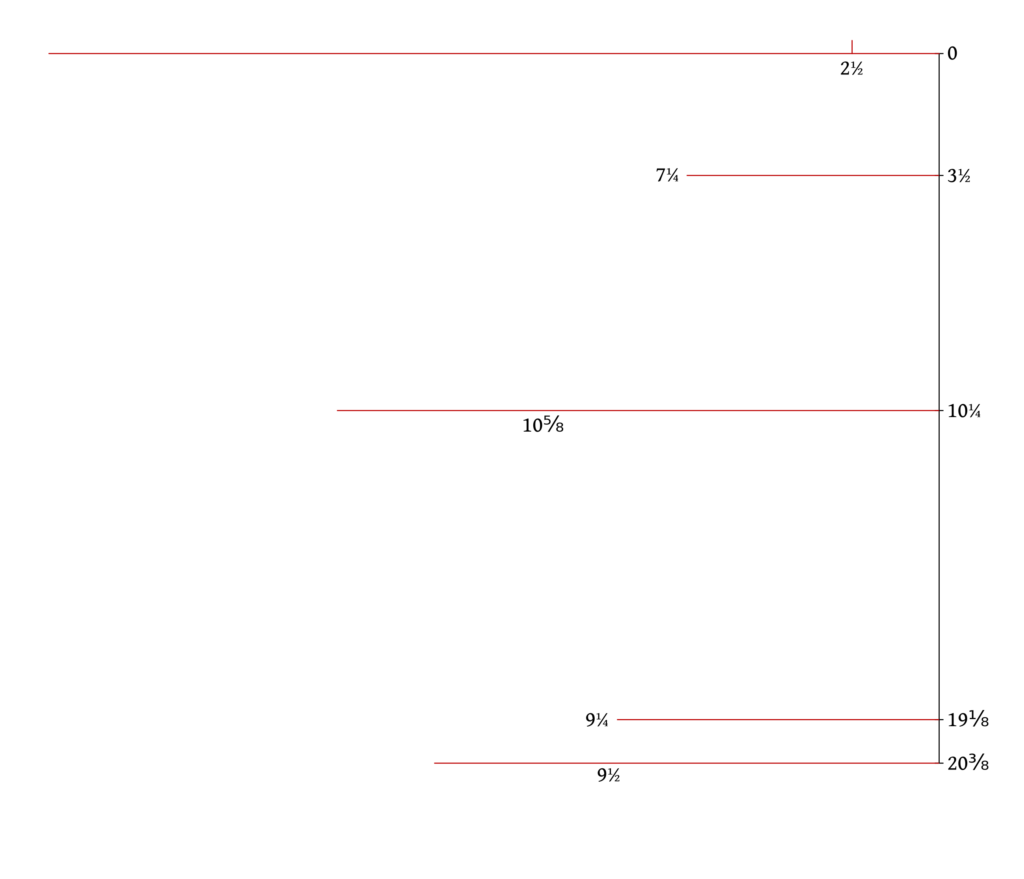
Drafting the Back
Before drafting, lay out your paper on the table. You’ll want to have a big enough piece to be able to fit the entire draft.
The draft is started by drafting a vertical line along the left edge – this will become the center back. Mark 0 at the top and then using the graduated measure corresponding to your chest measurement, lay out the following points, measuring from 0.
- 3 1/2
- 10 1/4
- 19 1/8
- 20 3/8
You can measure from 0 to 20 3/8 and compare that to your back length measurement. As long as it’s within an inch or two, I’d go with what the pattern says. If it’s off by more than that, you may run into issues – let me know your measurements and how far you’re off and I may be able to see what’s going on.

Now square out, or draw a line at a 90 degree angle, from each of those points you just measured out. From 0 and a few of the other points, feel free to extend the lines further as shown (the length doesn’t matter yet) so you can use the same lines for the forepart.
From each of the squared out lines, measure in graduated inches the following lengths. I usually just make a little mark at each of the distances.
- 2 1/2 from 0
- 7 1/4 from 3 1/2
- 10 5/8 from 10 1/4
- 9 1/4 from 19 1/8
- 9 1/2 from 20 3/8
Now connect the points you just drew with construction lines as follows. These lines help to determine the curves in the next step.
- at 2 1/2, square a line upwards 3/8 graduated inches for the neck curve.
- Connect 2 1/2 to 7 1/4 for the shoulder.
- At 7 1/4, square down a line to about halfway towards the next line.
- Connect 7 1/4 to 10 5/8 for the armscye.
- Connect 10 5/8 to 9 1/4 to 9 1/2 for the side seam.
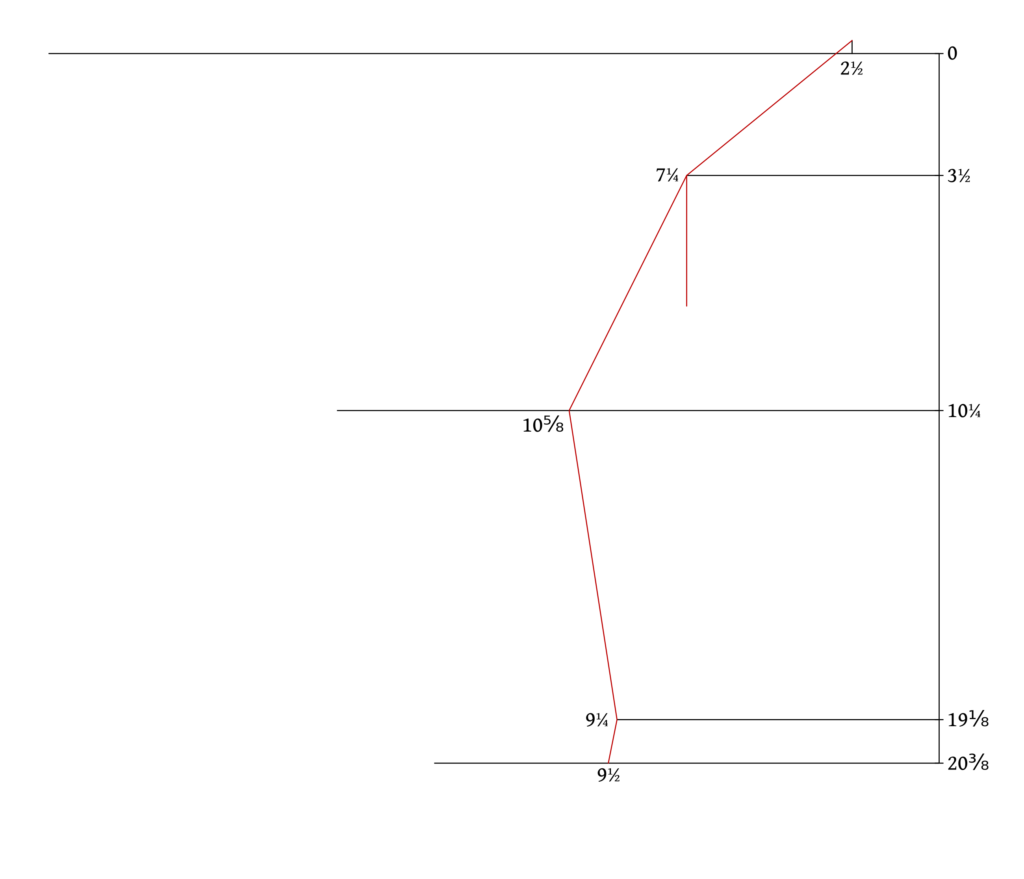
Next up, we need to add two small construction lines to find the depth of the curves.
- Find the center of line 7 1/4 to 2 1/4 (remember you raised that 3/8). Square in 1/4 graduated inch.
- Find the center of line 10 5/8 to 7 1/4. Square in 1 1/2 graduated inches.
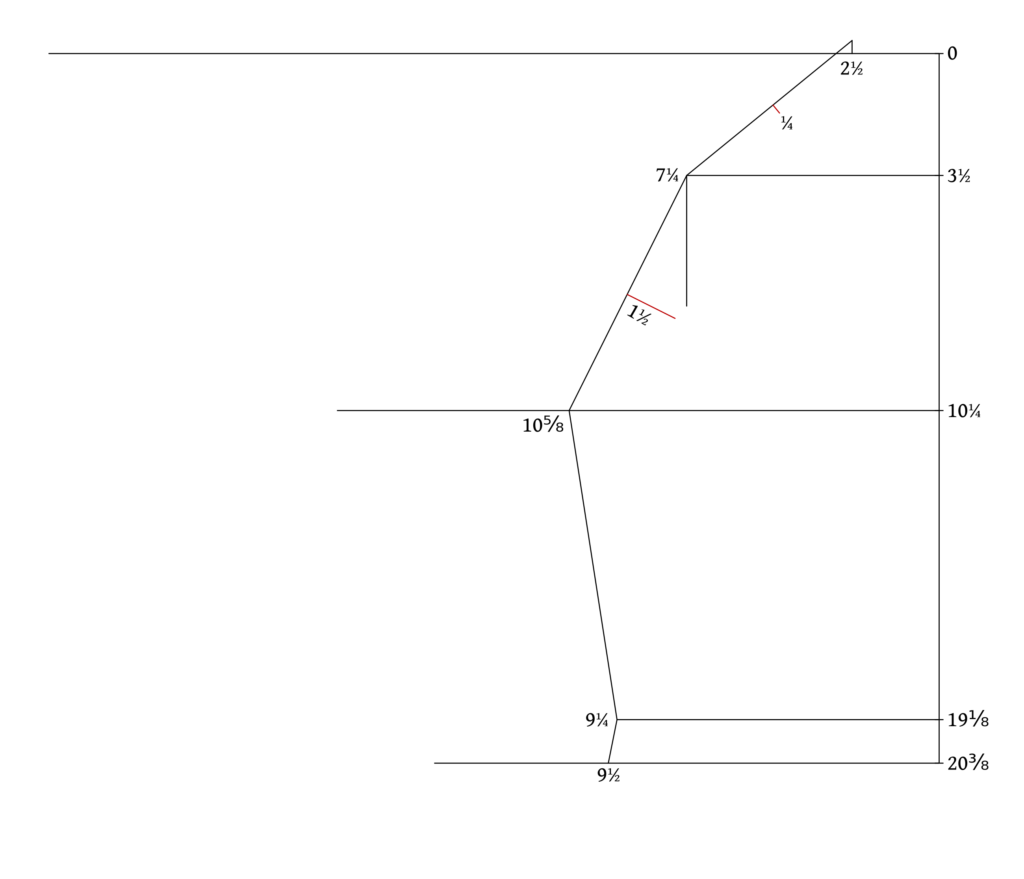
Finally, draw in the curves as shown using your preferred method – a French curve, bendable drafting ruler, or free hand.
- Draw in the neck curve from 2 1/2 to 0.
- Draw the shoulder seam from 7 1/4 through 1/4 to 2 1/2 with a shallow curve.
- Draw the armscye from 10 5/8, rather deeply through 1 1/2, becoming vertical as it meets the vertical construction line.
- Draw the side seam from 10 5/8, beginning about halfway down, curving through 9 1/4 to 9 1/2. It forms a sort of very shallow ‘S’ curve.

And that completes the draft for the back piece. You can compare the draft to your actual measurements as follows to make sure you’re on the right track.
- 3 1/2 to 7 1/4 should be approximate to half of your back width measurement.
- 10 1/4 to 10 5/8 should be about half of your chest measurement.
- 0 to 20 3/8 should be close to your back length measurement.
- 20 3/8 to 9 1/2 should be half your waist measurement.
If somethings within an inch or two I’d leave it and continue on to see what happens. If there’s a larger discrepancy, please share your measurements and a photo of your pattern in the community and I’ll have a closer look at it for you.