Month: September 2019
Neckpoint Alterations
The neck is not a measurement taken in Devere’s system, but perhaps it should have been. When drafting, the neck is drawn in proportion to Breast size. However, when you get to larger sizes, starting at around size 46, this drafting method starts to break down. A correction is to take half the difference between the proportionate neck and your own neck measurement, and correct the pattern as shown in the diagram. This will give you a closer fitting collar and front.
For example, if you have a size 48 chest, use the following formula. 14.5 is the proportionate neck size:
14.5 * (48 / 37.5) = 18 5/8
Check that against your actual neck measurement, say 16 5/8. The difference between 18 5/8 and 16 5/8 is 2. Take half of that measurement, since we only draft one side, and move the neck point in that amount as shown, and rotate the center front curve backwards.
Misfits
Shoulder Piece too Backward
Sometimes called Forepart too Crooked. This error in the cut, causes the front edge of forepart to droop or fall away, which is one of the defects most frequently met with. The coat fits well otherwise, but when unbuttoned, the front part is seen to fall away. When buttoned, the crease edge and the neck appear too long. This may sometimes happen even when the cut is perfectly correct, if the workman has stretched the neck in making up, or (which is the same thing) has put on the collar too long.
If the fault is in the cut, the best way is to join a corner on the shoulder piece, and then cut it straighter and shorter, as shown. If the fault arises from the making up, it will be best to take out a fish in the neck seam as shown.

Shoulder Piece Too Straight
When the shoulder point of forepart is brought too forward, the coat will crease at the front of scye, which seems to require hollowing out a little; and the coat will also appear too tight at the neck, and at the back of waist.
The most natural way of correcting this, is of course to take back the shoulder point as shown, but this cannot be done unless (which rarely happens) there has been a laying in left at the top of scye. Fig. 4 shows another plan, which consists in hollowing out the front of scye, and bringing back the diameter of arm to its proper width, by taking out a under the arm, gradating to nothing at the hip. This will of course have the effect of narrowing the chest, and if the coat is to be worn buttoned, the buttons must be taken forward to compensate it.
The two misfits that we have just described, will never be found in any pattern drafted by our system, unless it has been carelessly made up. Workmen are very careless about the neck stretching, and to obviate this, we advise all cutters to cut out the collars to the proper length, as explained on plate 25, and to tack a piece of stay tape round the neck seam, which is not to be removed until the time for putting on the collar.
All the misfits that we are now about to describe, both in the Forepart and Back, may be termed faults in the balance, and are caused by cutters attempting to draft without the measures of Bust and Curve. When these measures are not taken, it is a mere chance if the coat has the proper balance, and any error in the balance, however small, produces a corresponding defect in the garment. No amount of care, or of knowledge and experience of structure, can compensate for the chance of error, which arises from neglecting to take the two simple measures called bust and curve.

Shoulder Piece too Long
This error like fig. 3, causes the front edge to fall away when the the coat is worn unbuttoned. Besides this, it does not touch at the back part of waist, and forms a long fold in front of the arm. When buttoned, the coat fits well at the back, but creases all across the chest, on account of the extra length of shoulder piece.
The most natural way of remedying this fault, is to shorten the shoulder piece, as shown by fig 5, but this can not be done if there is no laying in at the top part of the armhole. Again if the garment is finished, this manner of alteration becomes impossible, as the lapel cannot be shortened. The coat therefore, must then be corrected as shown on Fig. 6, C, by joining in a piece at the bottom of the scye, sewing the side piece higher up, and cutting off the extra length at the bottom of forepart.

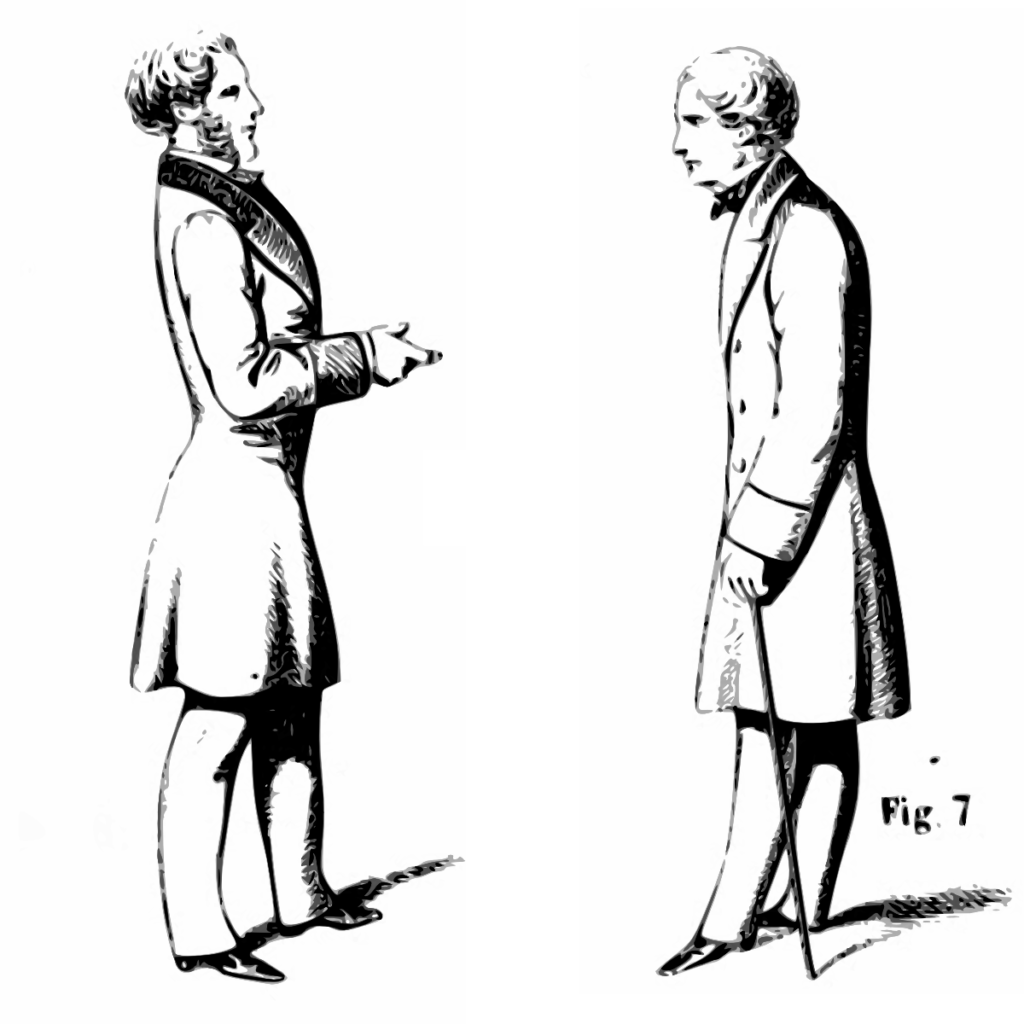
Shoulder Piece too Short
This error causes the front to draw up, and to be very tight on the chest and round the armhole, and has the same effect, whether the coat is buttoned or not.
If there has been a good laying in left at the neck and top of the shoulder, this misfit is easily corrected, as shown by fig. 7. If not, the correction D, shown on fig. 8, will do equally well. Lower the bottom of scye in the forepart, stitch the side piece lower, and cut superfluous length at the bottom of side.

Back too Long
This misfit is easily distinguished from all others. The fronts fit perfectly well buttoned or unbuttoned; but the back forms creases crosswise, between the shoulders and at top, and with the fingers a large fold can be formed across the back, between the shoulders.
The back might be shortened, as shown on E, fig. 1, but as this plan reduces the width of back stretch, it can only be used if the back is too wide as well as to long. The correction E, shown by fig. 2, will have the same result, and is that which is generally the most suitable.
Lower the back a little at top; lower the side point, and sew the back lower with the side piece, cutting it across at the waist, to separate the back skirt, and removing the extra length from the bottom of back.

Back too Short
When the back is too short, and the coat is unbuttoned, the shortness of the back drags the front edge backward, the bottom of back stands out from the body, and appears as if the coat was immensely too large at this part. It also drags a little at the shoulder, and in front of the scye. If the coat is buttoned, it will fit tolerably well at front, but the neck seam is too low behind, the collar stands out from the neck, and the back is instantly seen to be deficient in length.
The proper way of correcting this fault, is of course that shown on fig. 3, but as this can hardly ever be done, the correction indicated by fig. 4 must be made. Join in a piece, so as to raise the side point (or else cut fresh side bodies), and lower the notch at waist, so as to give more length to the back, of course cutting off the bottom of front skirt, to compensate for the necessary shortening of the back skirt.

Variations in Shoulders
The changes that are met with in the form of shoulders, require corresponding alterations to be made in the form of the scye. These changes seem at first rather complicated, but will be found very easy to understand, when classified under the three heads of Depth, Height, and Width.
Louis Devere
Depth of Scye
The depth of the bottom of scye may be more or less, if the shoulder is high or low, large or small. It’s place is ruled exactly, by the measure of Side.

It might sound counter-intuitive, but a close fitting armscye will be both more comfortable and give you more flexibility than a looser armscye. Take a look at a modern coat, for instance. Unless it is very well made, you will find it has a very deep armscye, and when you lift your arms, the sides of the coat will go with it.
On a coat with a properly fitted armscye, the fabric will go right up to the armpit. When you lift your arms, the coat has nowhere to go, so will remain at your sides.
Height
The slope of the line which rules the shoulder seam, varies according as the shoulders are high or low, because this slope of this line is always ruled at double the Slope measure, starting from 0 along the construction line. It sometimes is found not to be the same in the right and left shoulders of the client; when it varies, this part of the pattern must be drafted separately for each client.

Width
The scye may be more forward or backward, if the shoulders are large or small, forward or backward. The exact position of the front of scye is ruled by the measure of Diameter, starting from the side point, which is always kept at a fixed base.

Changes in Fashion
Neck Point Higher or Lower
This is an alteration often required by fashion; care however must be taken not to fall into extreme degrees, either of raising or lowering it. It should rarely be higher than 3, or lower than 5 inches.

This is one of the most important areas to fit correctly, as it is in the front of the coat and noticed most easily. The Neckpoint should come just to the top of the sternum, the bone at the base of your neck. Too high and you’ll get unsightly folds along the front of the coat. Too low and you’ll have a gaping hole at the neck area.
On a coat with lapels, for example most civilian coats, this is adjustable, depending on how high you want the gorge line (where the lapel meets the collar) of the coat to be.
Back Wide or Narrow
The back if required may be made wider or narrower, provided that the same quantity which is added to or taken off from it, be compensated for in the side body, by either taking off or adding on equal quantities at the corresponding places, as shown on the diagram.
Back Neck Wide or Narrow and Back Scye High or Low

As a general principle it will not matter if the places of the shoulder and side seams are varied, provided always that the quantity taken away from one piece is added to the other. For instance, the back neck may be wider, provided we make the shoulder strap of the forepart shorter to agree with it.
The back scye may also be higher or lower, provided that a corresponding alteration is made in the side body, so as always to keep the side point on a level with the bottom of back scye. We must say, however, that these changes in the position of seams, should never be carried to extremes. There are certain places for the seams, which have been found by long experience to be those most suited for them, and these cannot be much deviated from in close fitting garments, without in some degree deranging the harmony of the cut.
Long and Short-Bodied Structures
Almost every coat will also need alteration in the length, if not for fit, then for fashion. Some people, such as myself, have longer torsos and require additional length.
And in general, coats were lengthened by an inch or so around the waist so as to be more fashionable.
The bottom of square being ruled by the length of back, (which is always taken as 1 1⁄2 less than the curve measure), the pattern will become of itself suited for the client, whether he is either a long or short bodied structure, or proportionate.
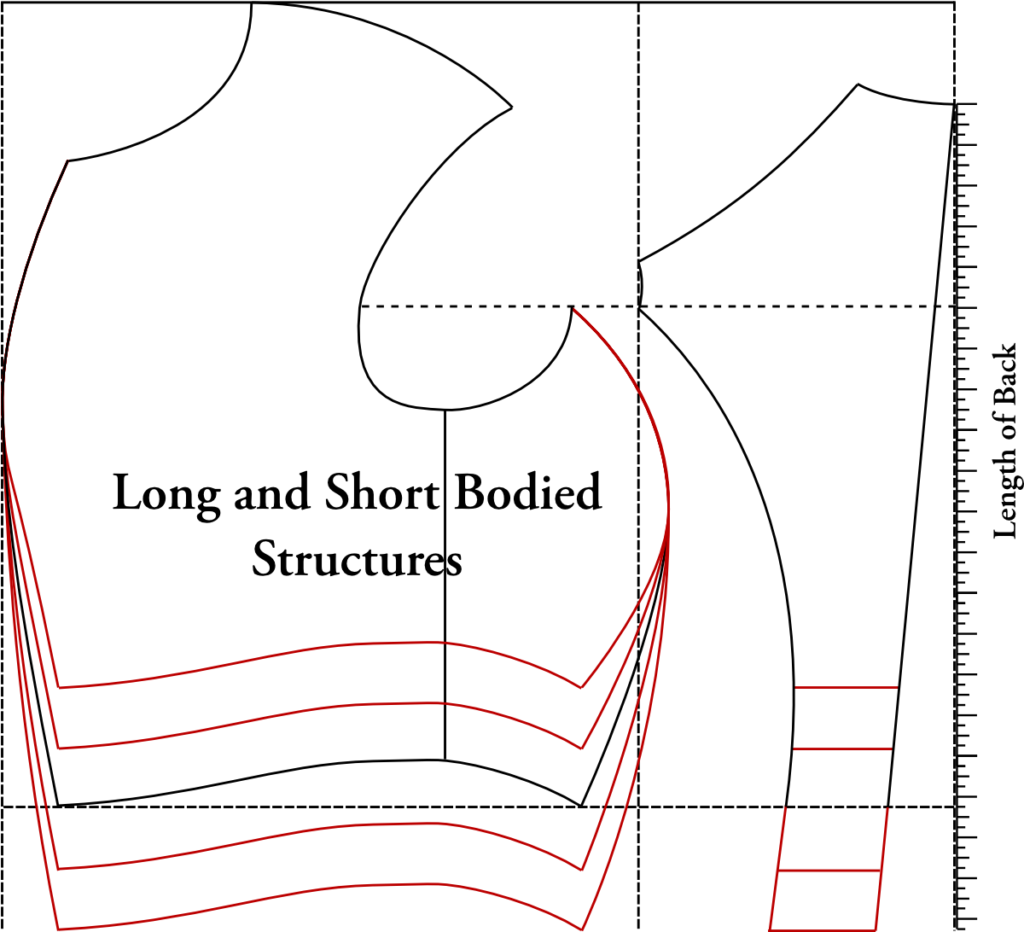
Long Waists
The draft of the long waisted back and forepart, is made in the regular square, and consists in simply prolonging all the seams, any required quantity below the natural waist. For this lengthening, the front edge and side seams must be slightly sprung out, so as to make them parallel to the sides of the square. The seam under the arm must also be sprung out more or less, according to the prominence of the hips; this will, of course, make the forepart and side body lay over each other at the bottom, and they must be cut seperate before laying the pattern on the cloth.
The figures at the bottom of the diagram, give an average or medium degree of lengthening. It will be seen that if the back is lengthened 2, the side body must be lengthened 2 3/8, or 2 1⁄2, because 3/8 or 1⁄2 an inch extra should always be allowed at this part, for the seam of back plait. The lengthening of the forepart, is usually a little less than that of the back
For Coats of the 1860s Period
During the 1860s, it was the fashion to extend the waist slightly below the natural waist. On a uniform, this is particularly important because you need to leave room for the belt to be placed just above the buttons. In the back, I’ll often lower the waist even further to ensure the plait buttons fall directly beneath the belt.
Whether for a uniform or a civilian frock coat, this is a very important step in order to get a period correct coat. Follow the measurements as shown in the diagram for a good basic fit.

Thin and Stout Waists
Adjusting for thin or stout waists is one of the most common alterations I come across. It’s so easy to make the pattern a little tight across the waist, for example.
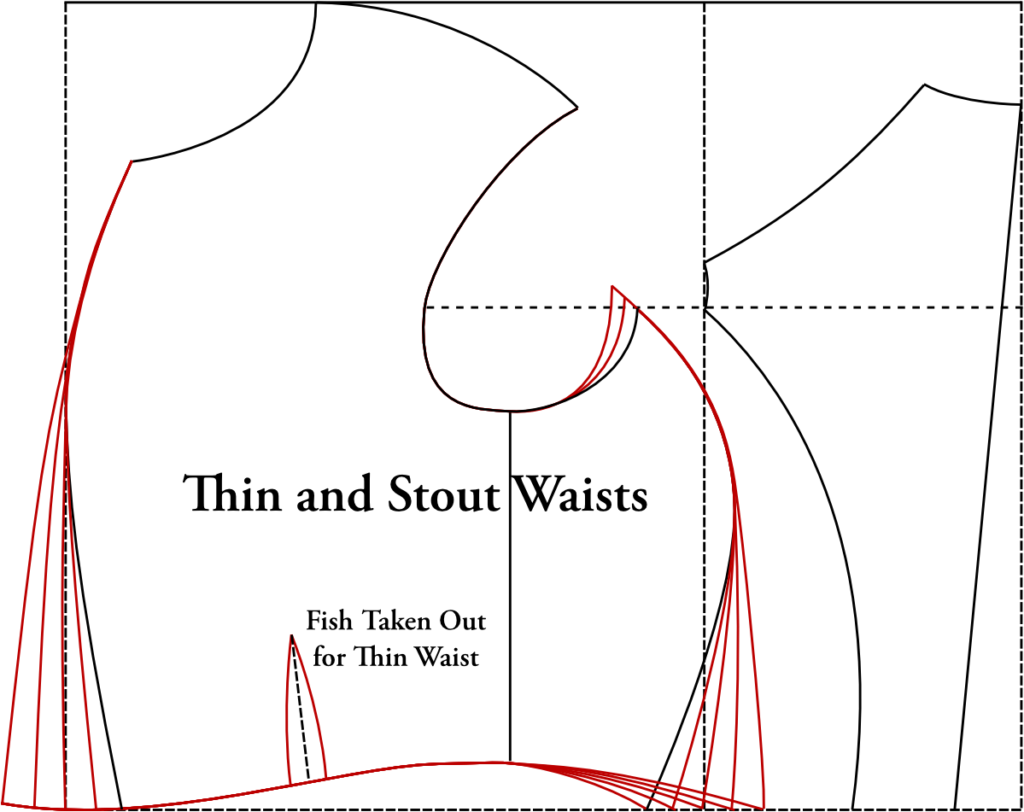
In the proportionate man, the waist is 3 less than the breast—if the difference is more than this, the waist is thin; if less, it is stout. For the thin waist, the front edge and side seams are drawn as for the proportionate structure, and the waist is diminished as required, by taking out a fish in the waist seam. If the waist is stout, it is drafted correct at once, by giving half the measure in front and half the back, starting from the middle of waist. For Very Stout waists the side point must be raised up and also advanced a little, as shown in this diagram.
Balance
Balance is the most critical aspects of a good fitting coat. Have you ever noticed that the majority of reproduction coats fall away at the front? This is due to defects in the balance, which is affected by both the cut, the ironwork done (or not done) and the construction process. Balance is the difference between the relative lengths of back and forepart, and is ruled by the difference which exists between the measures of bust and curve.
Stooping and Erect
For the stooping man, fig 2, the difference between the measures of Bust and Curve, becomes less than for the proportionate structure, and this difference being placed at the corner ofthe square, causes the back to be much longer in comparison to the forepart. Besides this the chest will become flatter, and the side seam of forepart rounder; which alterations are made by the the supplementary measures.
N.B. In cases where the man is very stooping, we may also take the shoulder point a little forward, never more than 3/8, and lower the neck seam a little, as shown by the interrupted line on fig. 2. This will improve the fit for these extreme cases, from the manner in which the straight cut in the forepart requires making up.
For the Extra-Erect man, the back becomes shorter compared with the forepart, because the balance or difference between the measures of Bust and Curve, is more for than the Proportionate Structure. The supplementary measures also cause the chest to be made rounder, and the side seam plainer.
For Extremely Erect men, we may assist the fit, by taking back the shoulder piece and raising the neck seam a little – see the dotted line. But these variations in the place of the shoulder point, should only be made in extreme cases, and should never exceed 3/8 of an inch.
As a general rule in drafting for the Stooping and Extra erect structures, we may say: make the chest flatter and the side seams rounder for stooping men, and give more round to the chest and less to the side seam of forepart, for Extra erect ones. This may be carried out in a slight degree for those builds, even when the supplementary measures have not been taken.”
Louis Devere
In Practice
When checking for this on your toile, check the back of the neck. If you see folds of fabric at the back of the neck, you drafted with too much back balance. Take a pin and pin out the folds you see, and measure the amount that is pinned. Then take that amount and deduct it on your draft as shown.
If there is no extra fabric, but a gap shows at the back of the neck, then you drafted for too erect a figure. Measure the distance it is off, and add that to the draft as shown.
In both cases, this is due to being inaccurate when taking your bust and curve measurements. In time you will become more accurate, and be able to compensate as you draft.
Use of the Supplementary Measures
Now that you’ve completed the close fitting wrapper, it is now time to try it on and check for fitting issues. Throughout this section, we will go into detail with each problem you may encounter along the way.
You will learn how to adapt your pattern to some of the variations encountered in the human body. With experience, you’ll learn how to read the body, and anticipate the changes needed while you draft. While learning however, it’s best to take things step by step. I suggest reading through, and noting which problems you can see on your draft as you find them.
Use of the Supplementary Measures
If you have had any misfits while trying on the close fitting wrapper, the first step you should take is to use the supplementary measures to check your draft, and correct when necessary. If the measurements are within half an inch of the draft you made, I recommend leaving the draft as it is, and correcting during the fittings if necessary.
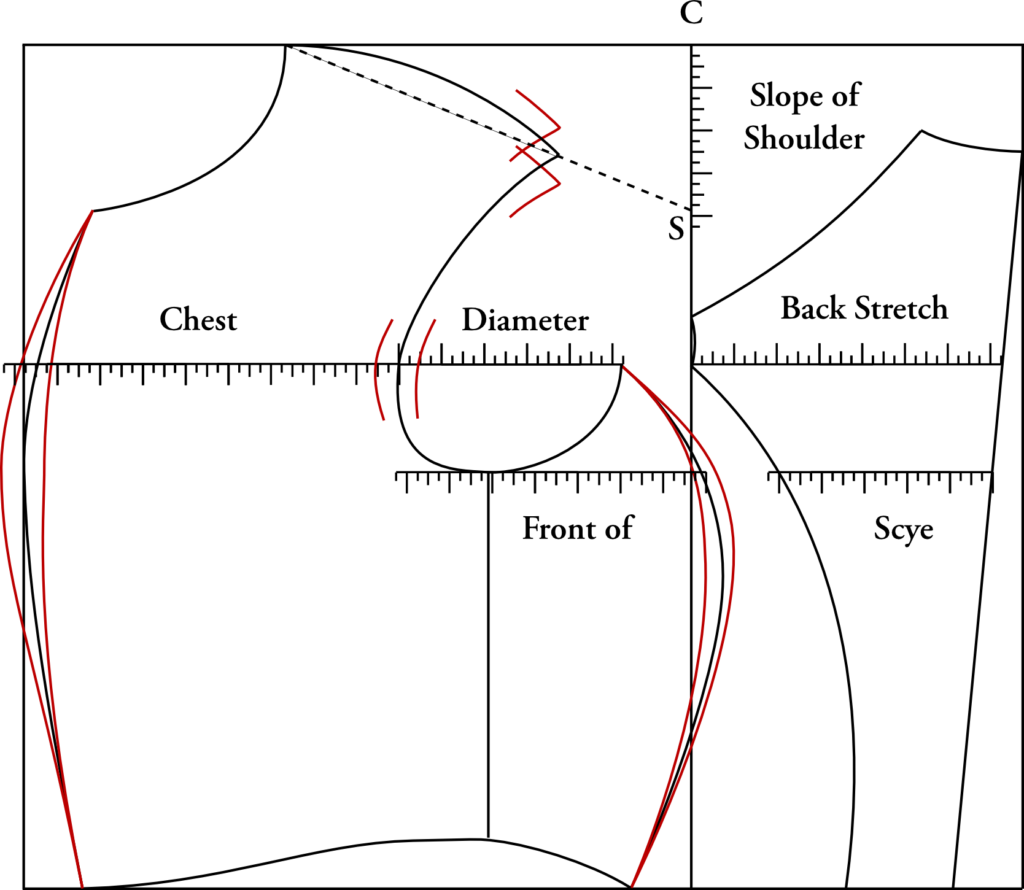
Back Stretch
Apply the measure of Back Stretch to see if this part requires widening or narrowing, which will very rarely be the case.
I always check this measurement, just to make sure I’m in the ballpark with the width of the back. One common mistake in reproductions is to see a back that is too wide, with folds of fabric forming over the shoulders at the back.
Diameter
Starting from the side point, apply the measure of Diameter, and take the front of scye forward or backward if required.
This measurement checks that the armscye is the correct diameter for the arm. If your client has built up muscles from exercising, for example, this will need to be checked.
Front of Scye
If the measure of Front of Scye is more than the Back Stretch and Diameter added together, give more round to the side seam of the forepart. If the Front of Scye measures less than these two measures, give less round to the side seam.
This combined with the previous measurement is a way of checking the armscye position, since two measurements are used. This measure is useful if your client complains that the armscye is too tight in the front. You may see a fold of fabric at the front of scye, and this will help get rid of that. Make sure you perform the ironwork first before correcting this, however, as the ironwork affects the fit of the armscye.
Chest
Starting from the front of scye at its corrected place, apply the width of Chest; and make the front edge rounder or flatter if required.
You will have noticed the roundness of the chest while drafting – while that is very good, too much or too little roundness will make the ironwork very difficult to perform.
Slope of Shoulder
Correct the slope of shoulder, by marking downwards from C to S, double the length of the Slope measure, so as to make the shoulder seam more sloping for low shoulders, and less sloping for high shoulders.
Many people have a dropped shoulder on one side or the other. If this is the case, you will need to apply this measurement, ending up with two different patterns for the right and left sides. It’s a bit more work, but worth the effort.
After the pattern has been corrected, it will be as accurate as possible, and will have every point subject to variation positioned according to your custom measurements. We have now to show how this system of drafting adapts itself, without any trouble or difficulty, to all the changes of conformation which are met with in the human body. We shall therefore take each structure separately, and show how the application of the measures, causes the alterations in the pattern required for each build.
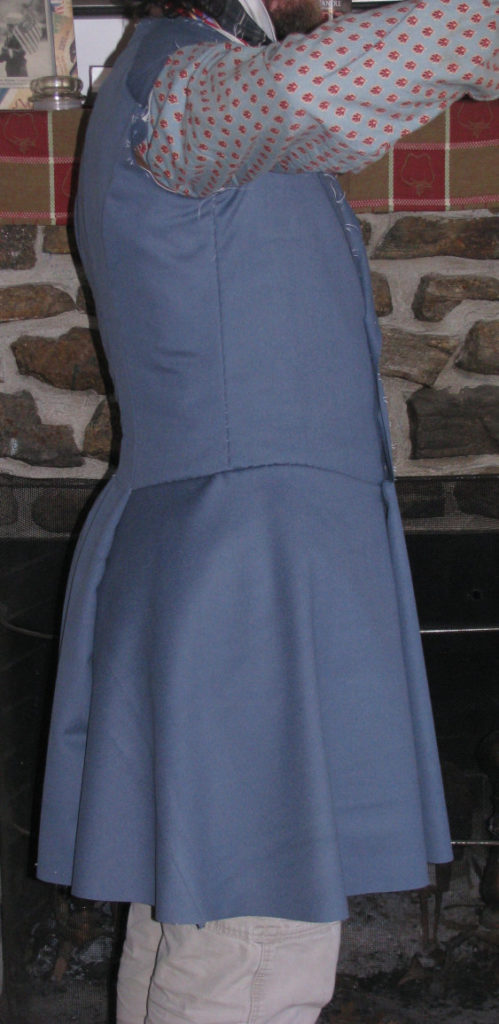
Constructing the Toile
Take up the side pieces, and lay them on top of the fronts, lining up the side seams as shown. About the only time I use pins is in constructing the toile, so you may pin these pieces together as shown.
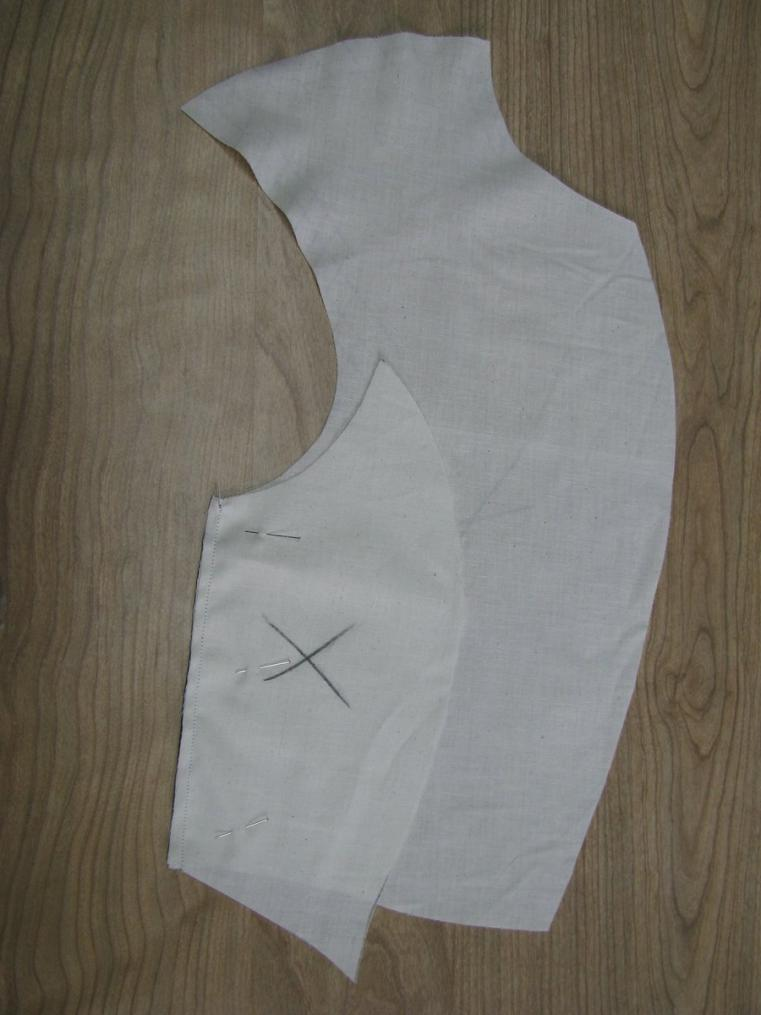
Make sure right sides are together. The X’s should be on the outside. Sew the seam, and press open afterwards.
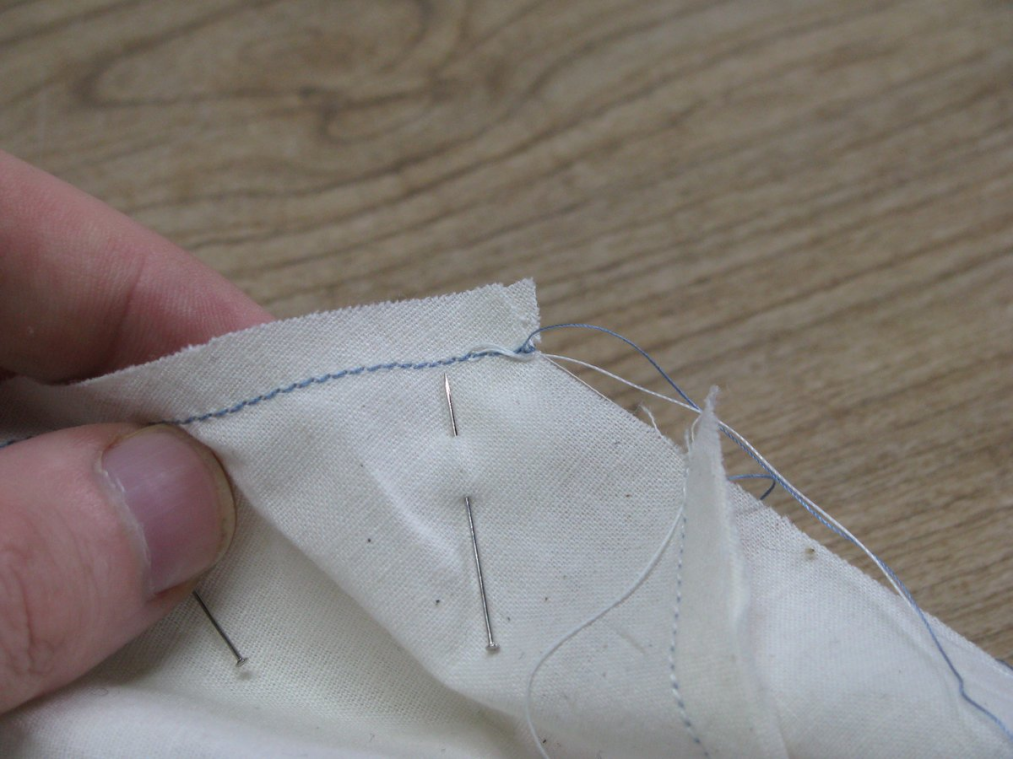
Next, with right sides together, line up the side piece with the back piece. This is a complicated seam to line up properly. At the points where G and Q are from the draft, the side piece should extend the length of the seam allowance, 1⁄4 inch. At the bottom, the side piece should be 1⁄4 to 1⁄2 inches below the end of the curved back seam. Pin these two points together. Then starting from the top, ease the two layers together, pinning as you go.
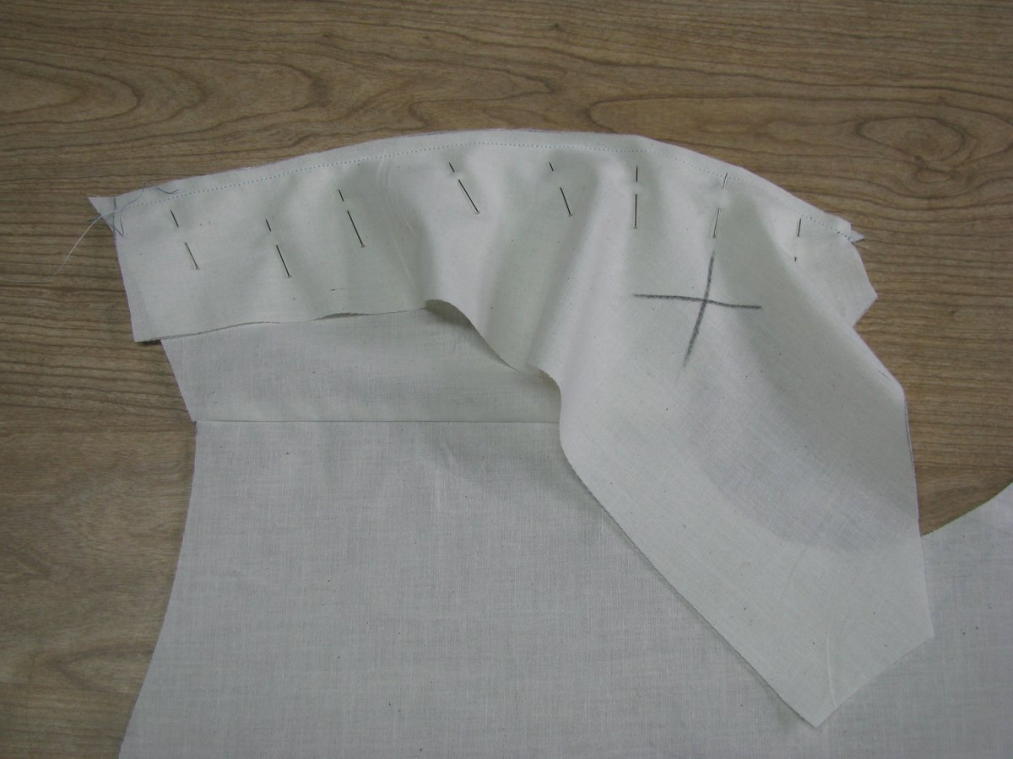
It’s a little tricky at first, but that’s why we’re practicing. Then carefully sew this seam, with the side seam down. When sewing, the fullest side of the fabric should always be facing down. Carefully arrange the curved seam over a tailor’s ham, and lightly press. When that’s done, line up the shoulder seams, again, right sides together. You’ll notice that the back is a little wider than the front. This gives a little ease for the shoulder blades. You should pin the ends, then pin the middle, and then add two more pins in between, for a total of five pins. Ease the fabric in as you go, then carefully sew the pieces together.
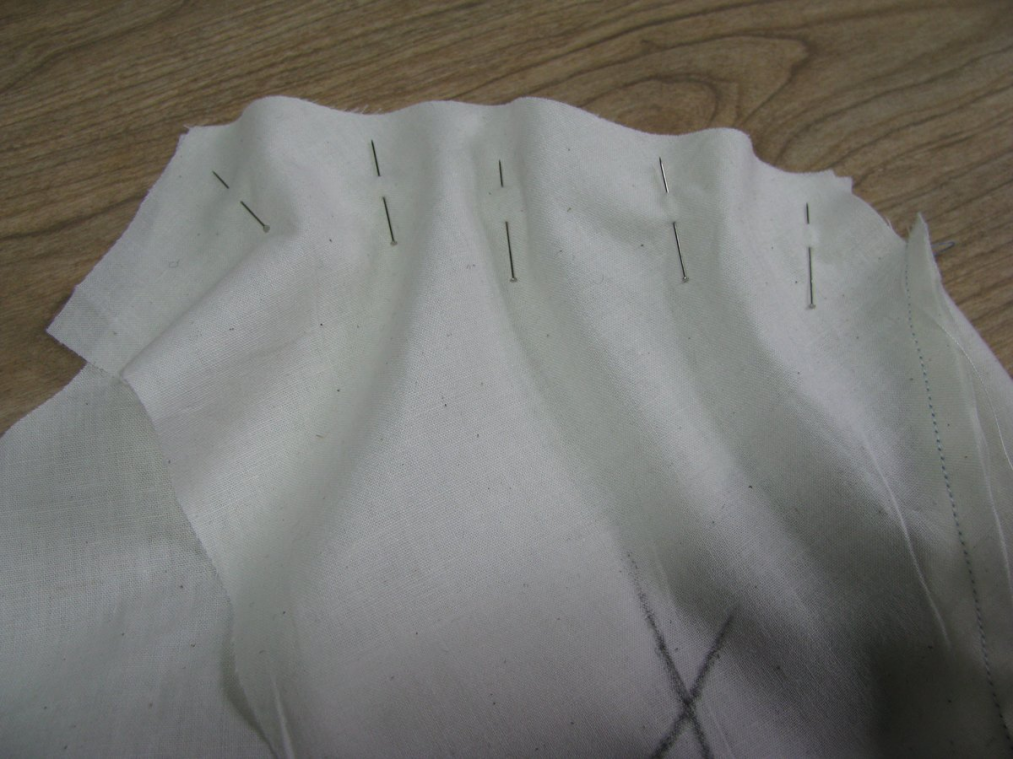
Note in the close up photo how the edge of the fabric is offset. This is so the seam allowances meet at the appropriate spot, 1⁄4 inch in from both.
Finally, take both halves of the wrapper and pin them along the center back seam, right sides together, and sew.
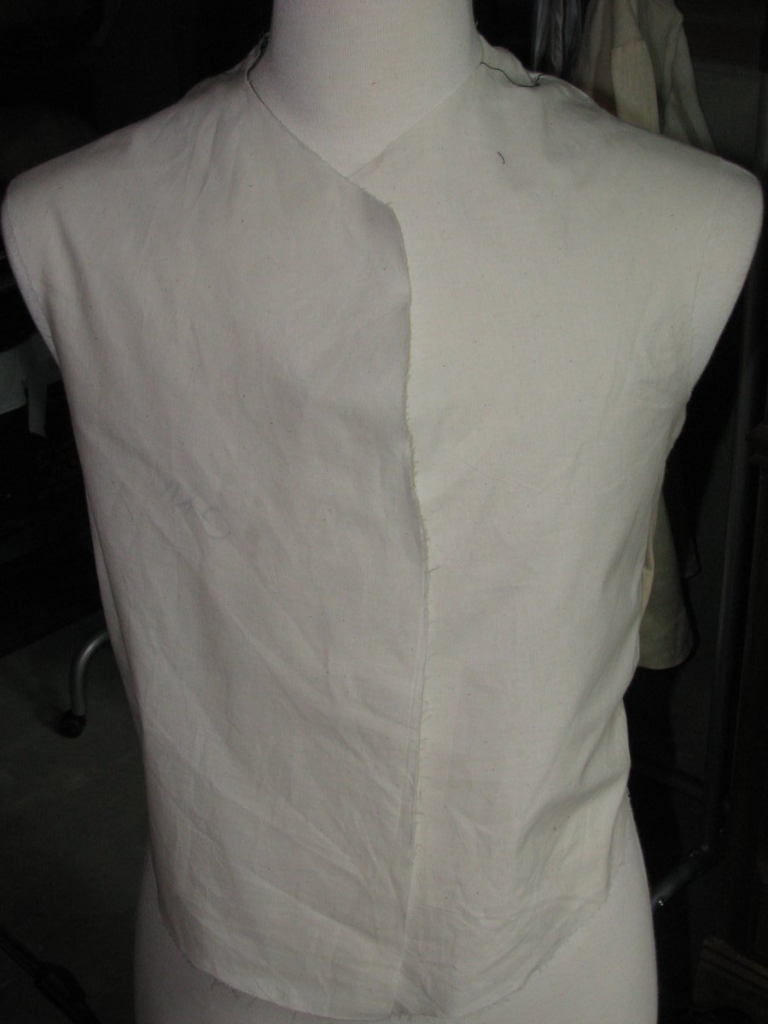
You have now completed your toile. Please try it on and take photos from the front, back, and side, and post them on the forum for a critique of the fit.
Ironwork
Before you do any sewing, you must do a little ironwork. Ironwork involves stretching or fulling (shrinking) the fabric in certain areas, and is part of what sets tailoring apart from other methods of sewing, such as dress making. We will go into more detail of this when we do the ironwork on the actual wool, but for now, just follow along.
The areas to stretch are marked in the photo with hash marks. We will refrain from any fulling for now, as cotton does not shrink well with the iron. When stretching, both pieces of fabric should be together, so as to ensure the pieces are stretched the same amount. When stretching the cotton muslin, don’t pull too hard. A very slight pressure is all that is necessary.
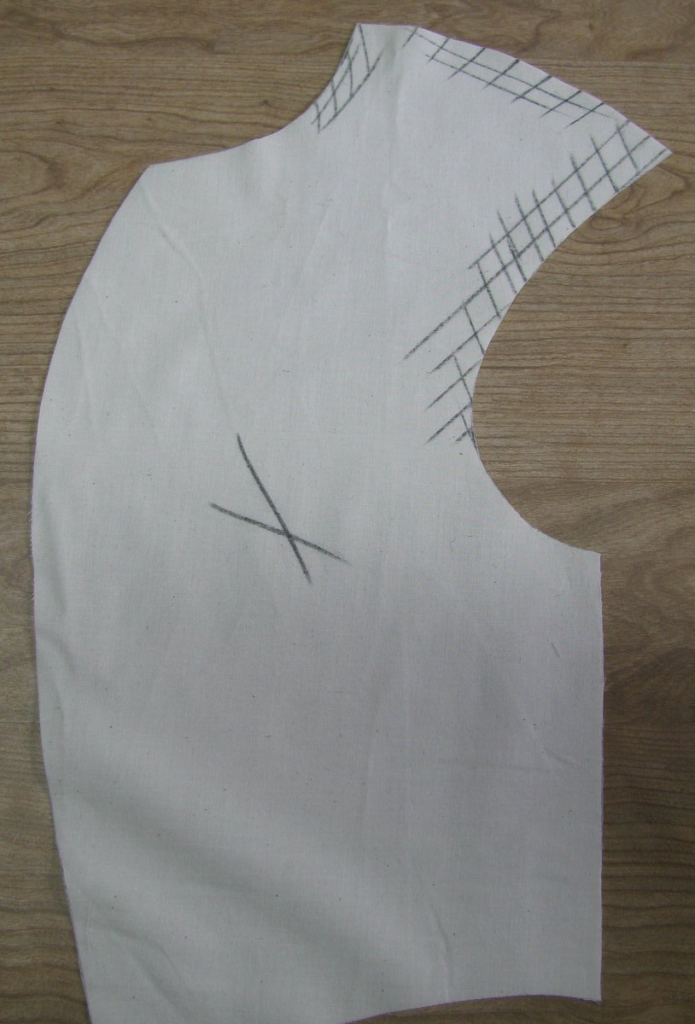
Begin with stretching the armscye, about 3⁄4 of an inch. Hold the fabric by the shoulder point and pull the fabric with the iron. Next, give a good stretch to the top of the shoulder seam, about 1⁄2 inch total. Finally, carefully stretch the neck starting just at the hollow near the top.
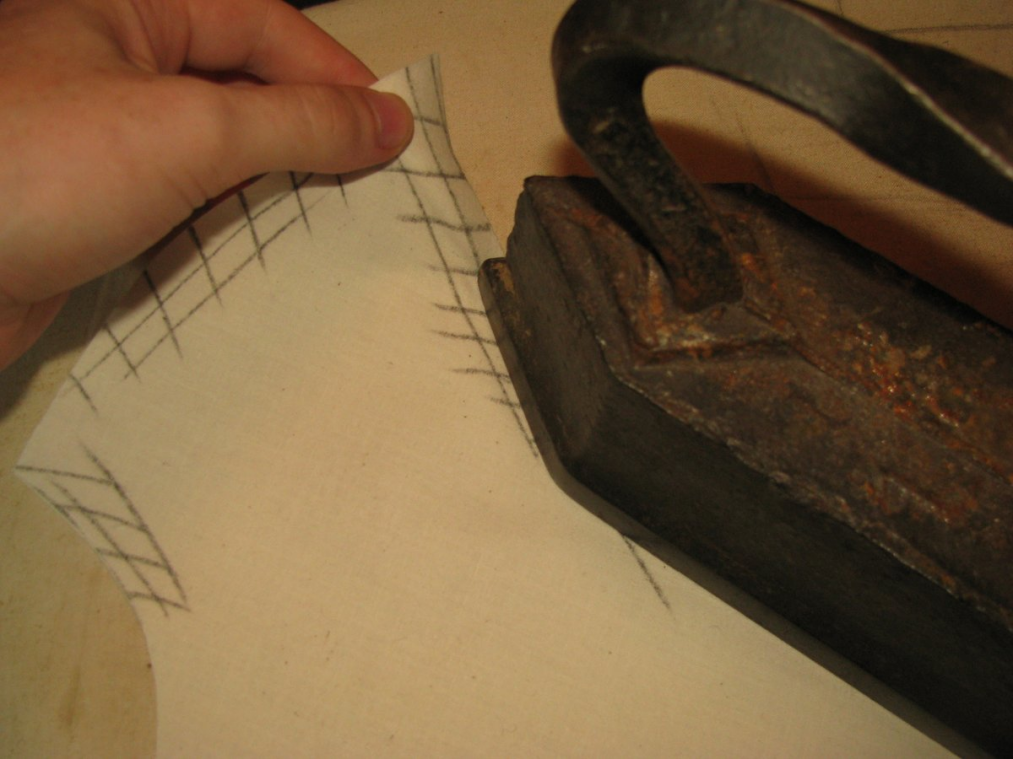
The results are shown in the following photograph. You can see a convex shape has been formed over the shoulder and scye.
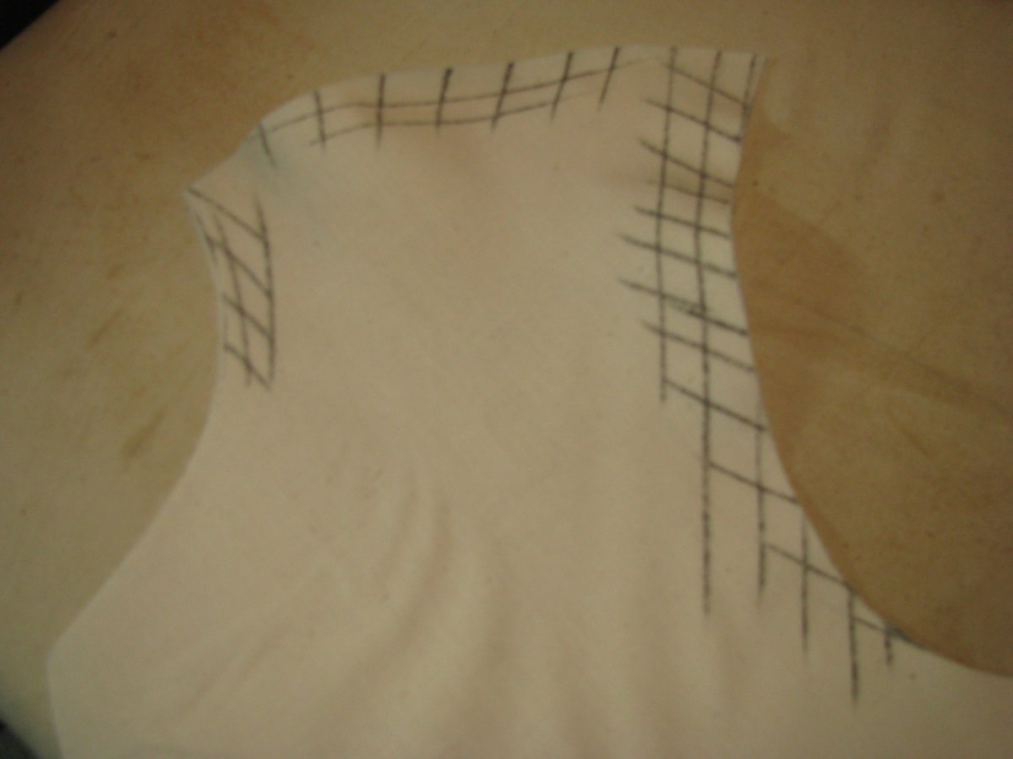
This ironwork has the effect of helping impart shape into your garment, as well as helping to provide a better fit. Linen and cotton are not workable with the iron, however, so we will be learning how to take that into account.