Month: September 2019
Skirt Fullness
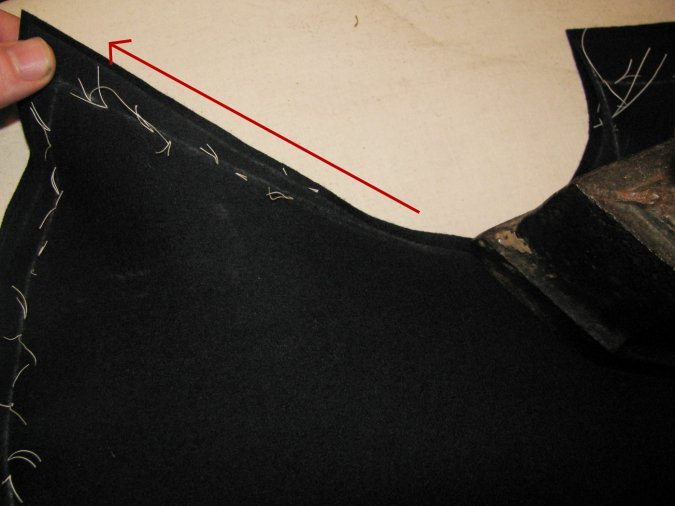
As you are trying on your full completed muslin, check out the back of the skirt. Does it hang straight down, or does it spread apart at the back vent? Also, take a look at the hips. Does the fabric seem a little tight here, giving a pulled or strained look? If any of these cases is true, you will need to add some fullness to the skirts, and perhaps some fishes (darts).
To create more fullness, instead of rising three graduated inches from point 0 in the skirt draft, rise up 4 1⁄2 to even 6 graduated inches, and also give more spring to the back seam, as shown. You can give up to 45 degrees of spring, instead of the standard 30, if desired. This will give the coat plenty of room in the seat area, and the skirt will drape nicely.

Darts in the Skirt
If you are adding spring to the skirts, as above, it is also advisable to add in one or two small darts, depending on how much fullness you want. The main dart needs to lay directly underneath the where the side seam will be. To figure this out, lay the side piece of your pattern onto the skirt pattern, ‘right sides’ touching.
Mark the point where the seam allowance of the side seam begins. Then measure out to the left 1/2 inch. From the midpoint of those two points, on the skirt waist line, draw a line about 2 to 3 inches long, and connect the three points, creating the main dart.

If you wish to have a second dart, it needs to be centered under the side piece, i.e. between the first dart, and the inlay of the skirt where it springs up. Make this dart 1/2 inch wide, and about half an inch shorter than the first dart. After these are drawn on your pattern, they are cut out directly on the lines you just drew, which will be the seam line of the dart. Note that the above diagram gives several skirt styles – feel free to experiment with them.
Drafting the Skirt
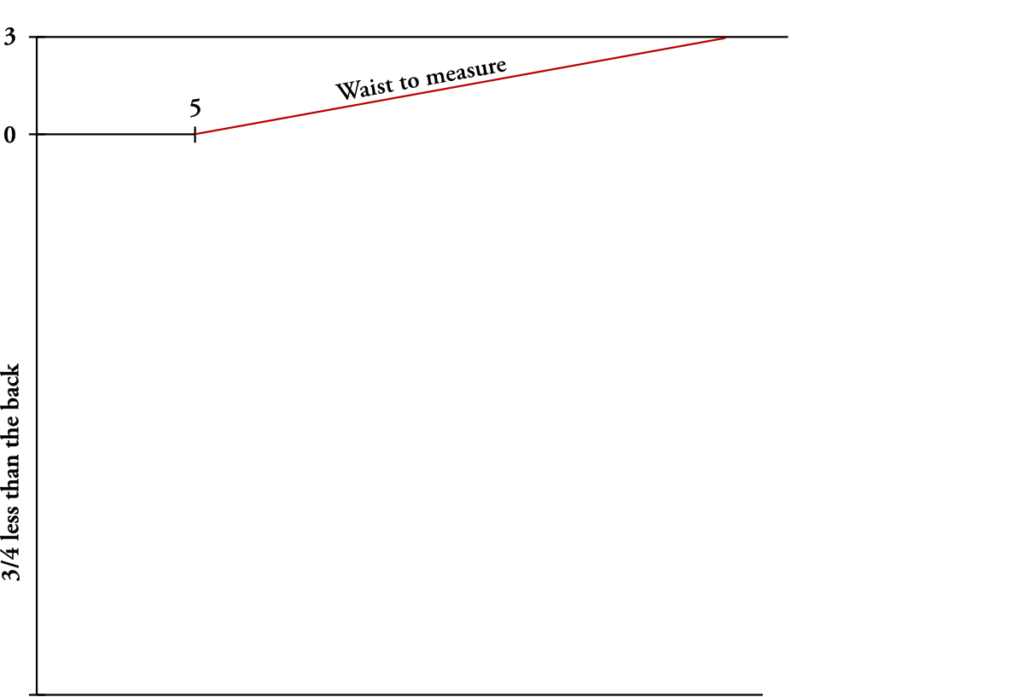
To draft the main skirt, start by drafting a vertical line on the left side of the paper. Mark point 0 near the top, for the placement of the waist seam.
Rise up 3 graduated inches, and mark that point for the fullness of the skirt.
Finally, measure down 3/4 common inches less than the length you used for the back. In my case, I’m using 17 3/4 inches.

Square across from the three points. The top and bottom lines aren’s measured at this point, but measure 5 graduated inches on the line from point 0. This line gives us room for the Lapel, the turn-in (facing), and one inch extra in case of error.

Measure from point 5 up to the construction line from point 3, the waist to measure (half the full waist, remember).
At the point where the waist line meets the construction line, draw a vertical construction line as shown. Length is not important, you just need to be able to register your protractor against the line.

Measure a 30 Degree angle using your quilters square or protractor, and draw a line equal to the length of the back skirt – in my case 18 inches.

Draw the bottom of the skirt, staying with the construction line for about a third of the distance, then gradually curving up to meet the side point.

The waistline is now curved as shown, dipping about 3/4″ from the waist construction line.

On the side seam, an inlay is added for the skirt plate. This should be 7/8″ wide to match the back skirt, and spring up at the top.

Finally, a 1/4 inch seam allowance is added to the top. The skirt draft is complete.
The Back Skirt
It is now time to draft the skirts, completing the draft of the coat body. To begin, make sure you have plenty of space on your paper, as the skirt can get quite large. We will start with completing the back skirt, as it’s length determines the length of the main skirt.
I generally have the skirt fall to two or three inches above the knee, but this is a matter of preference and following the styles of the period you are reproducing.
The Back Skirt
Begin by tracing the back piece onto a fresh sheet of paper, making sure you have room underneath to draft the skirt. Orienting the pattern sideways is a good way to ensure this. Also copy the construction line, and extend it, as shown. If you subtract the “Length of Back to Hip Buttons” from “Length to Bottom of Skirt”, you will find how long to extend this construction line. In the sample draft, I am assuming a length of 18 inches. Measure from the waist construction line (that is now vertical in the diagram).

Next, measure 7/8″ graduated inches on the waistline, and mark that as shown for the plait. Now measure the entire distance from that mark, down the waistline to the horizontal construction line. Keep a note of that for the next step.

At the bottom of the skirt, the length should be 3/4″ graduated inches wider than at the waist line, and is drawn square with the main construction line.

Draw a straight line representing the side seam, extending about a half inch past the waistline, as shown.

Draw two short lines ‘springing out’ from the waistline as shown.

Here is the completed draft of the back. Note no seam allowances have been added yet. An optional step is to shape the center-back seam of the skirt into a slight curve – 1/4″ depth at the fullest point. This will allow you to give some extra shape in the skirt later on.

The Roll Line
The roll line can be placed according to how wide and deep you want the lapel to be. Start at point L at the shoulder, and draw a straight line to the desired location at the front of the lapel. It is this point on the lapel that can be drawn higher or lower. Again, study your photo, fashion plate, or original for inspiration.
It’s also a good idea to mark your button placement beforehand, as they can affect the location of the roll line. Place the top button parallel with the top of the lapel, about half an inch below the top, and the bottom button right on the seam line. Space out the other buttons evenly according to how many you want. Buttons should be 3/8 to 1/2 an inch from the edge of the coat. The placement of the roll line should be about half an inch above one of the buttons, to leave room for the lapel to roll freely.
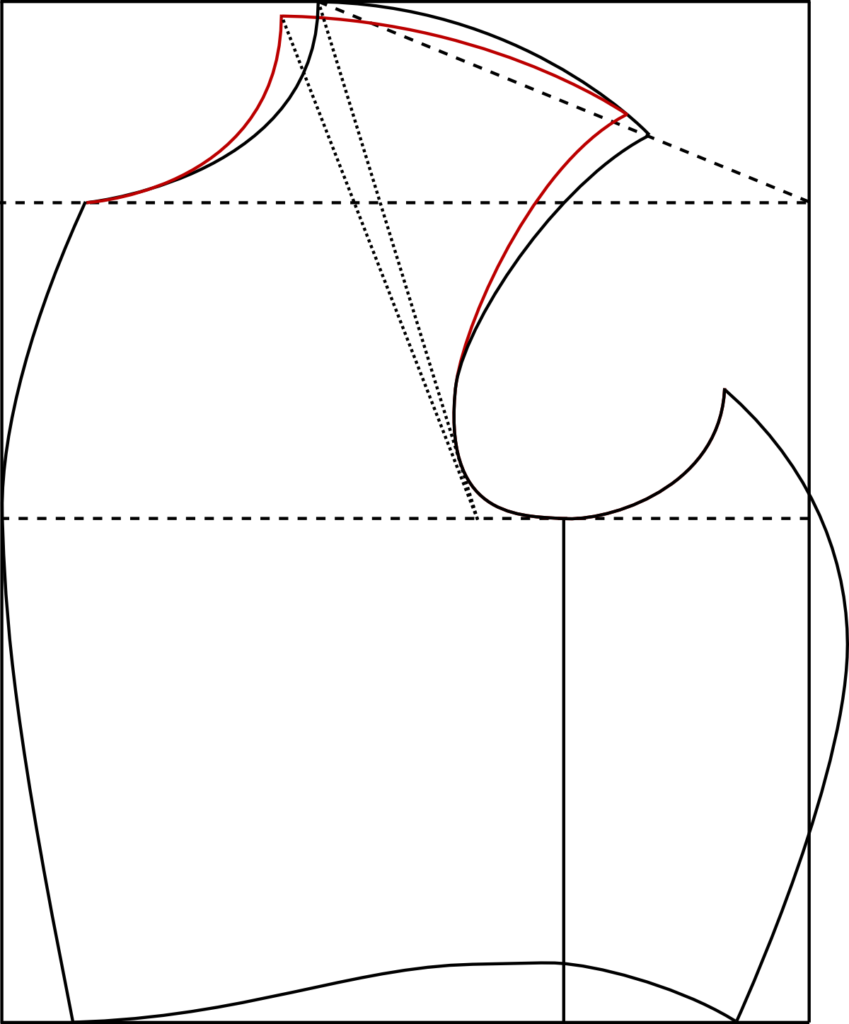
One thing that Devere doesn’t mention, is that the distance of the curved front on the forepart is greater than the straight line on the inside of the lapel. For this reason, the roll line will not match up if you leave it as is.
To fix this, raise the roll line about 1/4″ on the inside edge of the lapel, as shown by the solid line. This should fix any problems of alignment and when the dart is closed up, the two lines should join up. Do the same at the gorge dart, raising about 1/8 of an inch.
This roll line is something you should experiment with. After you have sewn the muslin together, try the roll line you drafted. If you don’t like the appearance, you can move the line up and down as you’re wearing it, and then transfer it to the pattern when you are happy.
The Gorge Dart
The gorge dart is very important for the correct fit of a coat based on Devere’s patterns. While it will give some additional degree of fullness to the front of the coat, it’s main function is to help straighten the shoulder point – especially if we just crookened it again with the armscye dart.
The lapel dart will move the shoulder point forward, as well as remove some of the extra ease that will appear in the front chest area of the coat when buttoned. If you’ve made a coat with Devere’s drafts before, and haven’t put in the lapel dart, you’ll be familiar with this problem.
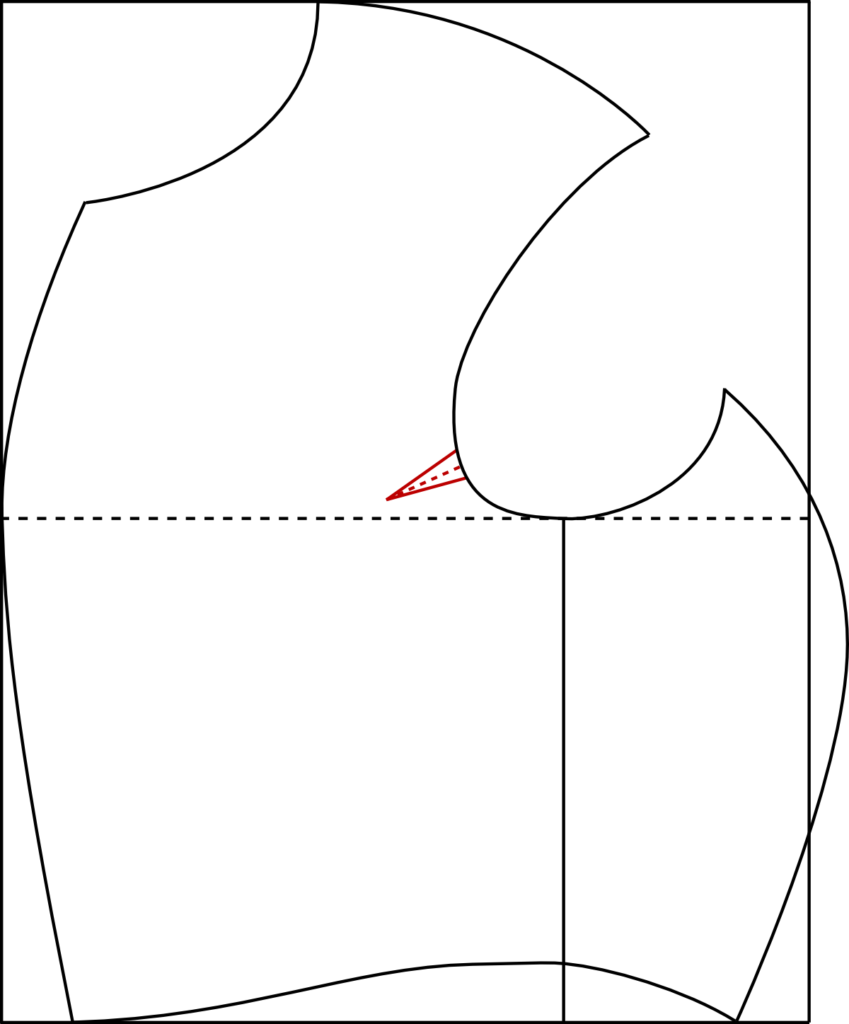
First, about 2 inches from the neck point, draw a line parallel with the construction lines. This line should be about three to four inches long.
At the top, on the neck line, measure over 1/4 inch from the line in both directions. Then connect each point to forum a sharp triangle – the gorge dart.
Because the sides of the dart are of unequal length, you may want to raise the lower side by about 1/8 to 1/4 inch to match. If you forget to do this, you’ll still have an opportunity to correct it with inlays, as I’ve done.
The dimensions given are a rough guide. You may find you need to adjust it slightly during the fitting, but this is a good place to start from. Cut the dart out of the paper pattern directly on the lines. The lines you drew were the seam lines.
The Lapel Dart
Also shown in the previous image is the lapel dart, which is already drafted for us. The right side of the lapel and the curved edge of the forpart come down from the neck, meeting at around the chest line. These lines indicate the seam lines as well.
Single and Double-Breasted Lapels
The Lapel – Double Breasted
We will begin the completion of the coat body draft by drafting the lapel. This particular style of lapel is for a double breasted frock coat, known as a cut-on lapel. This simply means that the lapel is cut separately from the forepart, and sewn on.
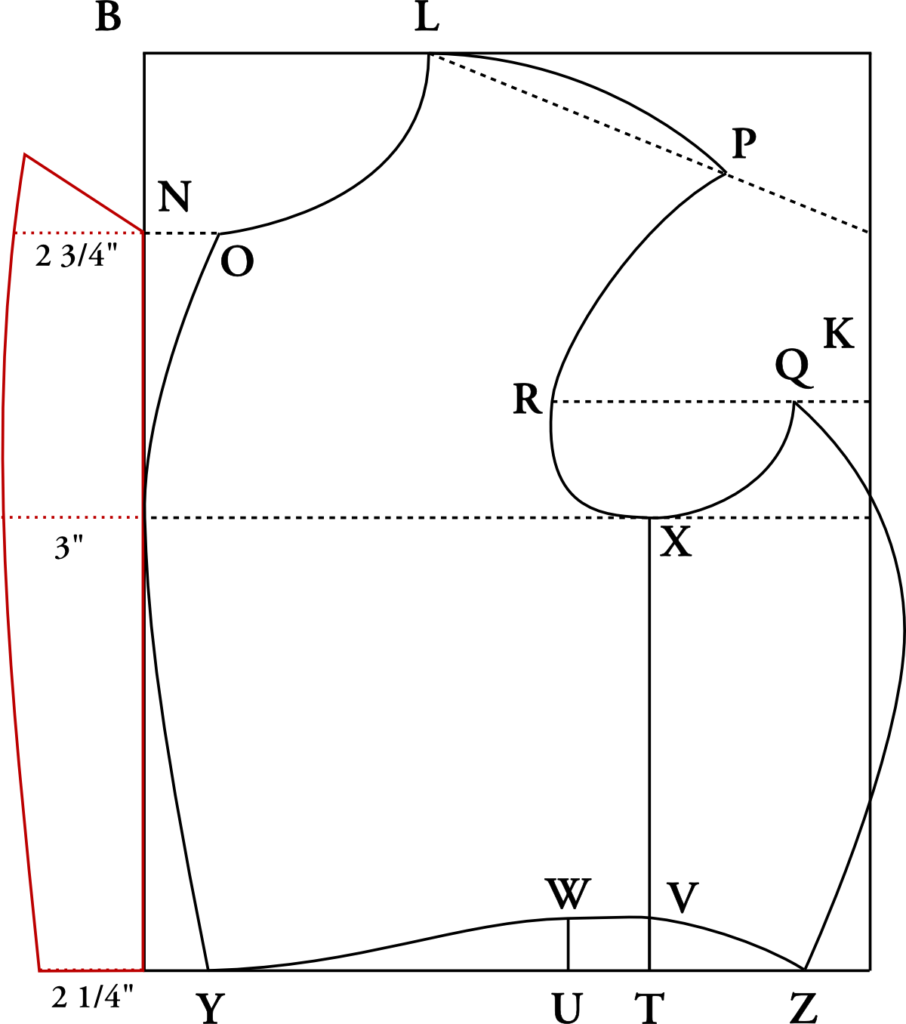
To begin drafting, mark the height of the lapel from point N to the bottom of the drafting square.
Next mark out the widths: 2 3⁄4 graduated inches at the top from N; 3 graduated inches from the chest line, and 2 1⁄4 graduated inches at the bottom.
The outer edge of these three points are connected with a graceful curve.
At the top, extend the curve as much as necessary to get the shape you desire, then draw a straight line diagonally at the top, connecting to N.
The top angle is variable according to fashion. You should study the photo or fashion plate you are copying, and try to match that as best you can.
The Lapel – Single Breasted
For drafting a single breasted coat, with a grown on (the lapel is connected to the coat body) lapel the following instructions are followed. This involves less sewing, since the lapel is already attached to the coat front.
From the construction line at point N, measure out 2 graduated inches for the top of the lapel.
At the chest line, measure out 2 1⁄4 graduated inches from the center front.
Draw a graceful curve connecting these three points, extending a little above the top point as desired. Shape the top of the lapel as shown, according to your fashion needs.
At the top of the coat, a large dart is formed from the center front at the neckpoint, down to where the coat meets the lapel, and straight up to the top of the lapel.
At the waist, measure 1 1⁄2 graduated inches inches, and extend the waistline to meet the rest of the coat as shown.
Linen or Silk Coats
Due to the nature of linen, silk, and cotton, ironwork is not possible. These fabrics do not hold their shapes when stretched, making any efforts fruitless. To account for this, changes must be made in the pattern itself.
Devere’s basic coat draft is made with what’s called a crooked shoulder. If the coat is left like this without ironwork or other corrections, you’ll get folds of fabric along the front of the shoulder, and the coat will hang open at the fronts. You may have noticed this on reproductions you’ve seen, as well as some lesser quality originals.
To fix this, first move the point where the shoulder meets the armscye over 3⁄4 graduated inches. The point should stay on the original shoulder line – it’s just being moved over. At the other shoulder point, where it meets the neck seam, you must move this over 3⁄4 graduated inches as well. However, this point must also be lowered about 1⁄4 inch. If you measure from the front of the scye at the chest line, to the original shoulder point, and to the new shoulder point, they must be the same. If you don’t drop the shoulder point, this will be off, and you will have an ill fitting coat.
Armscye Dart for Other Fabrics
Another benefit of ironwork is the shape that is added to the coat. The shaping will give a very close fitting armscye, and produce roundness in the chest.
Since we are not able to perform the ironwork on linen, silk, or cotton, darts must be used in its place. Beginning at a point at the fullest point of the bottom front armscye, draw a construction line about 2 1⁄2 graduated inches long, as shown by the dotted line. At the base of this line, at the armscye, mark 1⁄4 inch on either side of the dotted line, and connect these two points to the other end of the line, forming your dart. These are the actual seam lines where you will sew later on.
Iron Work for Wool Coats
Ironwork seems very intimidating to most people, as very few tailors, save the bespoke tailors on Savile Row, and some others, still practice it. The style of ironwork done in the period is almost unheard of. I know it was one aspect of tailoring that took me years to figure out. I didn’t have anyone to just show me though, and had to learn it through books and lots of practice.

It’s a good idea to do most of the stretching on your muslin wrapper. Even though it will not stay permanently, it will give you a better idea of how the final fit will be. Shrinking will not work on the cotton muslin, so you’ll have to train your eye to recognize the adjustments needed.
If you skip the ironwork, you’ll end up with long vertical folds near the shoulder and front of scye, and the chest will not be full enough to contain the padding we will be inserting. The front of the coat will drape open, a problem often seen.
The following text comes from Practical Tailoring, The Art and Craft Simply Explained for the Student and Apprentice, by J. E. Liberty. He gives the clearest instructions for ironwork I have found yet.
Shrinking to Shape.
The material should be laid on the board and a little water applied with the fingers of the left hand, the part to be shrunk being nearest the worker. Place the iron first at the back of the material at a part where the shaping will begin, and working it from right to left and towards the front, work round the part being shrunk with the fingers of the left hand while the iron is moving. It will be seen that the shrunk section probably has one or two small pleats formed by trying to shrink too much at once, and these should be smoothed out by putting a little water on the creases and passing the iron over them. It should not be necessary to go over the shrunk part more than twice to obtain the shape required, as too much shape will not hold in the cloth, and should be taken out be seams in the cutting of the garment.
Stretching.
In stretching the process is similar to that used in shrinking, except that the material is worked out instead of in. It should be remembered that in shrinking into shape, the material will, after a time, return to its normal shape, but with stretching, it seldom, if ever, does ; also that to obtain length by stretching naturally reduces the width, and this must be allowed for in cutting.
Forepart
We will begin our ironwork by taking up the forepart, and stretching the front of the armscye. The total amount of stretching should be about 3⁄4 of an inch. Hold the fabric at the shoulder point, and put pressure down with the iron, stretching as you go. Both layers of fabric should be stretched at the same time, to ensure they are stretched equally.
Next, stretch the shoulder seam, about a quarter inch total. This is one of those steps not explained in any book, but learned only through practice and critical thinking. If you measure the distance from the edge of the shoulder seam, and compare that to the edge of the back shoulder seam, you will see they are equal. If you add a seam allowance to that, there is no problem getting them to line up. This is what the majority of produced patterns do. Remember, we did not add a seam allowance, so instead, measure the distance of both seams, 1/4” from the edge. You’ll find that the back seam is 1⁄2” to 3⁄4” longer. By stretching the front shoulder seam, and shrinking the back shoulder seam, this distance is reduced, and the seams line up much closer. Now, stretch the hollow point of the neck seam only, about a 1/4” as well. This gives a little more shape to the shoulder area, and helps the neck hug the body more closely. Stretch the side seam as well, about 1/4”. This is not shown by Devere, but necessary to get the seam to line up with the side piece.
The center front needs to be shrunk, now. Notice how the center front is curved. You will need to shrink this carefully so that it is turned almost into a straight line. Please see the video for a demonstration of this and the other techniques.
Sidebody
The goal of the ironwork on the side piece, is mainly to impart more shape into the coat. In this step you are basically folding the fabric over, and stretching the seams, while shrinking the middle. It will take some practice, but you will get it. Try not to crease the middle of the piece as you’re doing the ironwork, as it’s hard to get rid of.

The following is a description from The Art of Garment Making, by Phillip Dellafera.
Fold the sidebodies as indicated, then proceed by shrinking away all the ‘loose’ material that will show itself at the waist. This work must be done carefully, until a nice hollow is formed at the waist; it will then be seen that the outer edges will have become slightly stretched. This is exactly what is required, and it will be found that a well-defined waist is obtained by adopting this method.
Sometimes this effect is obtained by slightly stretching the seams in a downward direction only. This, of course, will certainly help to get the desired shape; but the best plan is to shrink the centre of the side body, which will automatically give the extra length to the seams.
Also, stretch the bottom of the side piece slightly, again about 1⁄4”.
Here’s a video of the entire process showing the ironwork I usually do on a frock coat.
The Crooked Cut
Devere’s system of drafting gives us what is called a ‘crooked’ style of coat. What this means is that the distance of the neckpoint from the front of scye is greater than say, a coat cut from today’s patterns.
Notice how the first draft, from the 1840s, is extremely crooked in the shoulder.
Next, we see Devere’s draft, which still has the crooked shoulder, but not as severe.
Finally, there is a draft from Rundschau, 1959, a German cutting magazine still published today, showing the straight cut shoulder.

The benefit of the crooked cut is that when properly worked up with the iron, you will get a closer fitting armsye, and more fullness in the chest. This gives us the period ‘pigeon-breasted’ look that is so often missing from reenactor’s impressions. Compare your store-bought patterns, if you have them, to your draft from Devere’s, and see if the shoulder is similarly crooked. Because the shoulder is so crooked, it must actually be straightened either with the ironwork – in woolen coats only – or by a series of darts in the paper pattern, which in turn will give us the shape and fit we are looking for.
Adjustments to the Toile
Now that you have read through all of these fitting and alteration problems, take a close look at your toile, and pick out any errors you may find. You can’t catch all of them with just the basic toile, so there may be a few to catch in the next fitting stage. For now, focus on making sure the following fit correctly.
Center Front
Make sure the fronts meet. The fronts at the chest level will overlap slightly due to the curvature of the front. Measure the distance that the front is off at the waist, and add or subtract half that amount on the draft, as shown for Thin or Stout waists. Check the neck measurement, subtracting if necessary from the draft as shown.
Long or Short Bodied
Measure how long the pattern should be lengthened or shortened, and make the appropriate corrections on the draft. The fabric should come down to about an inch below the waist, rise up a little for the hips, and lower again in the back. I suggest lowering the back a little extra, to make room for the belt above the plait buttons.
Balance
Check the back neck. If the balance is too long in the back, there will be folds behind the neck. If too short, there will be a gap. Measure the distance it is off and make the appropriate corrections on the draft.
Please post photos of yourself from the front, side, and back if you would like help in fitting. The better quality the photos the easier it is to correct things. If there are corrections to be made, make those on your original pattern, trace to a new sheet of pattern paper, and cut out and construct a new toile to test your alterations.