Category: Unlined Linen Paletot
Measurements
The first thing to do in preparation for making a coat is to take good, accurate measurements. Since this is more of an introduction to coat making, I’m going to simplify the measurements as best I can to make it easier for you to get started right away.
All measurements should be taken over what you will wear underneath this coat, if possible. That’d mean a period shirt, trousers, and waistcoat if you have them. If not, I’d recommend adding maybe an inch to your measurements if just measuring over a regular shirt, for example.
A good idea for beginners is to tie a length of twine or ribbon around the natural waist so that all of your measurements are referenced from the same points. This should be tied around the waist at about the level of the naval.
While it’s possible to measure yourself – I do it all the time – for beginners I’d recommend having someone measure you if you can. If all you’ve got is your self, that’s fine too! You’ll just have to contort your arms into various positions while trying to keep your body as straight as possible.
And in general, try to keep your body relaxed in its natural position when taking the measurements. Don’t try to stand extra erect like a dashing officer if you don’t stand like that in real life, for example.
With that all said, on to the measurements!
Measurements
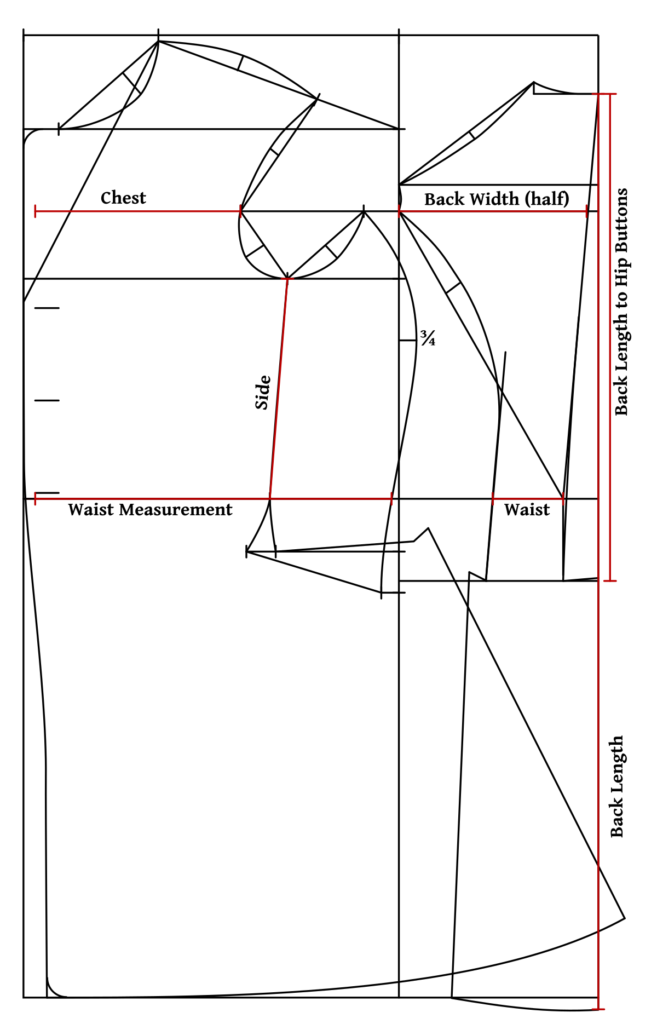
There are a number of measurements you’ll need to take for your coat. I’ve included a chart in which you can right them all down for convenience. Listed out, you’ll need the following measurements:
- Breast (written as half the actual measurement)
- Waist (written as half the actual measurement)
- Total Length
- Back Length to Hip Buttons
- Side
- Chest
- Width of Back
- Sleeve
- Sleeve + Back (optional)
Breast
This is the most important measurement and determines which size of graduated ruler you will use for your draft. Measure around your chest at the fullest point, just under the arms. Take note of the full measurement to choose your ruler size, but the measurement is written down as half of the total, since we are drafting half of the pattern on the paper.

Waist
The waist measurement is taken at the level of the natural waist, about even with the naval. Again this is written as half for use when drafting.
Total Length
Measuring down the center of the back, start at either the base of the collar or at the 7th vertebrae if you don’t have period clothing available (the bony part on the back of your neck). Measure from there, pressing the tape against the hollow of the back, down to the bottom of where you’d like the coat to be. This is mainly a check measurement to compare with what we’ve drafted later on.

Back length to Hip Buttons
Again starting at the base of the collar, measure down the center of the back to the position you’d like the back hip buttons to be, usually a couple of inches below the natural waist. This is another check measurement to compare with the draft.
Side
Put the measuring tape under your armpit, though not too high up, and measure straight down to the waist seam. Yet another check measurement!

Chest
Sometimes when drafting, especially with these older drafting systems, our body’s widths will not be perfectly distributed from front to back. This is a good measurement to take to compare with the front of your draft.
The chest measurement is taken across the fullest part of the chest, from armscye seam to armcye seam.

Width of Back
This is similar to the chest measurement, but taken straight across the back from armscye to armscye at a level just at the bottom of the armpit.

Sleeve
The sleeve can be a little troublesome to take, especially for a beginner, but it’s easy to fix during the fitting process if necessary.
To take the sleeve measurement, stand with your arm extended horizontally, and bend the elbow at 90 degrees. Measure from the armscye along the back of the sleeve, around the elbow, to just past the wrist (sleeves were longer in the 1860s than they are today).
You can also take the same measurement from the center of the back, that way you can compare the two measurements and look for any discrepancies. I’ve included a video demonstrating the two measurements.
How to Use the Measurements
As you’re drafting, take note of the various lines in red, and compare their lengths to the measurements you took. If they’re far off, it indicates something may be wrong, and that you should investigate before moving on and compounding the problem. This can happen especially with larger sizes, above size 46 – 48.
