Category: Unlined Linen Paletot
Collar
The final part of the toile is to add the collar. Since we’re not finishing the outer edges of the collar, you can trim off the 1/2″ seam allowance on the front and top edges. The collar should be rounded at the point but I forgot and added it in later.
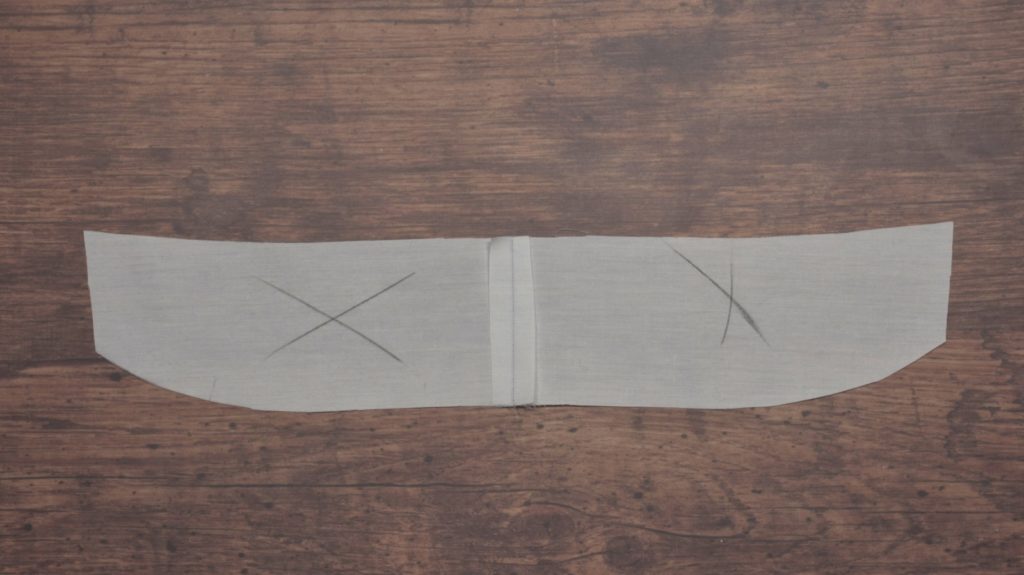
Next, sew the two collar halves together at the center line using a 1/2″ seam allowance.

Press open.
If you haven’t already done so, mark a point along the neck two inches from the front edge.
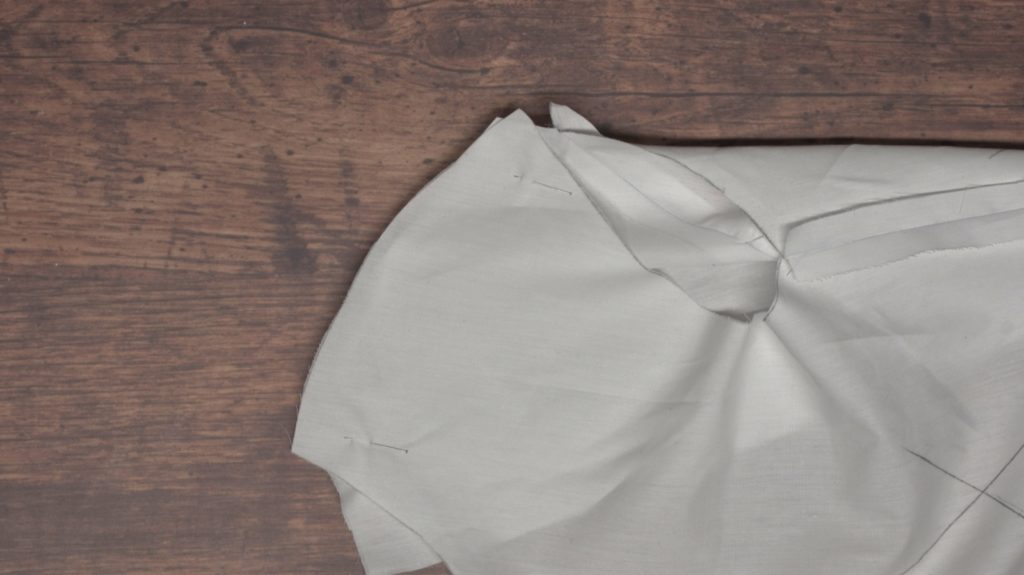
Lay down the coat, right side up, with the neck spread out and facing you.
Lay the collar on top, right sides together, and align the center line of the collar and the coat, pinning in place.
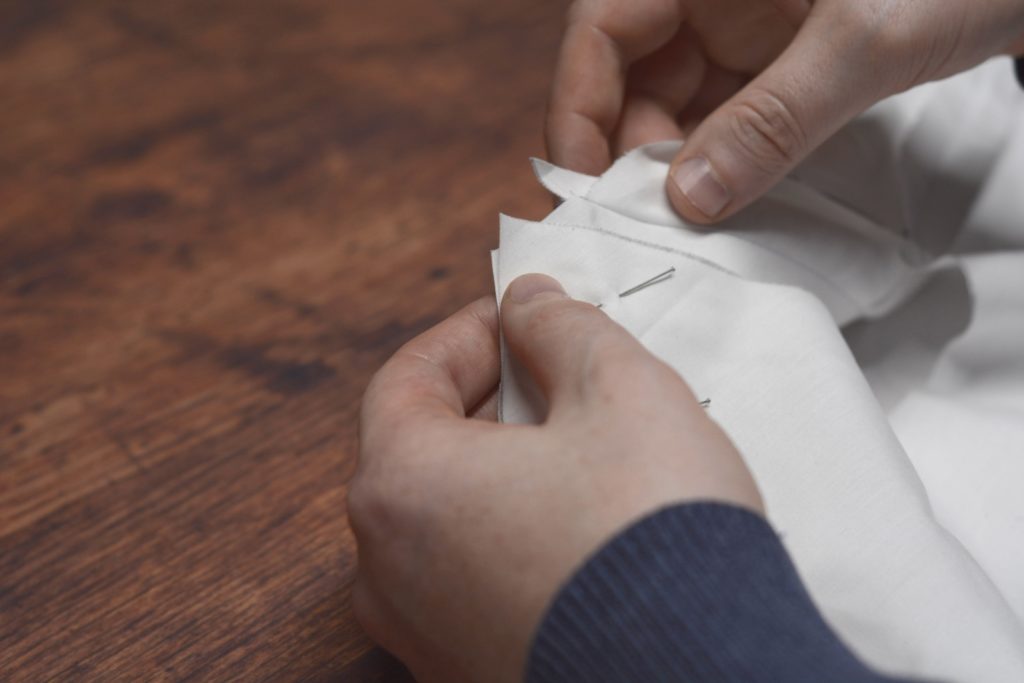
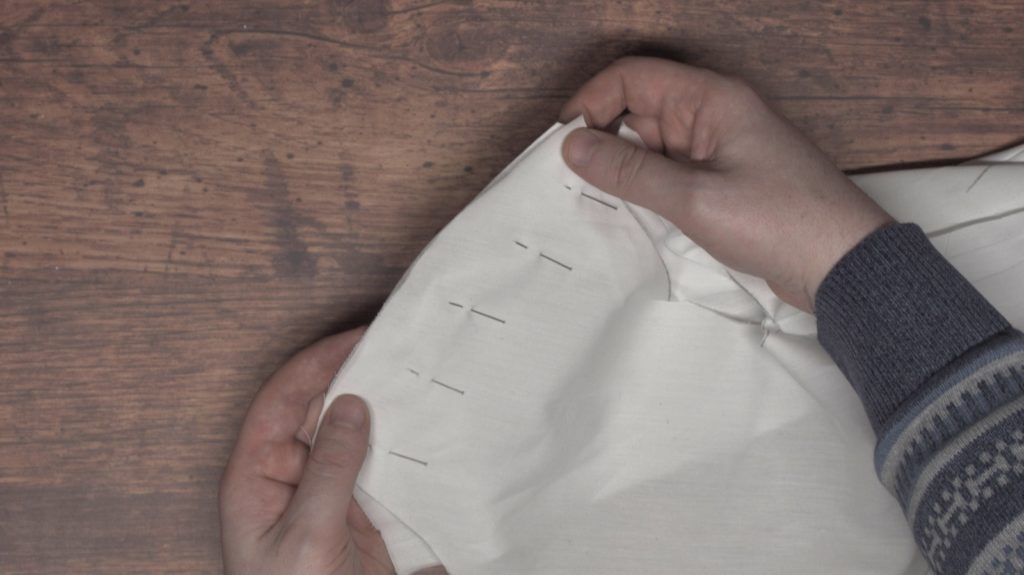
Pin along one half of the collar, working towards the center front of the neck, distributing the fabric as necessary.
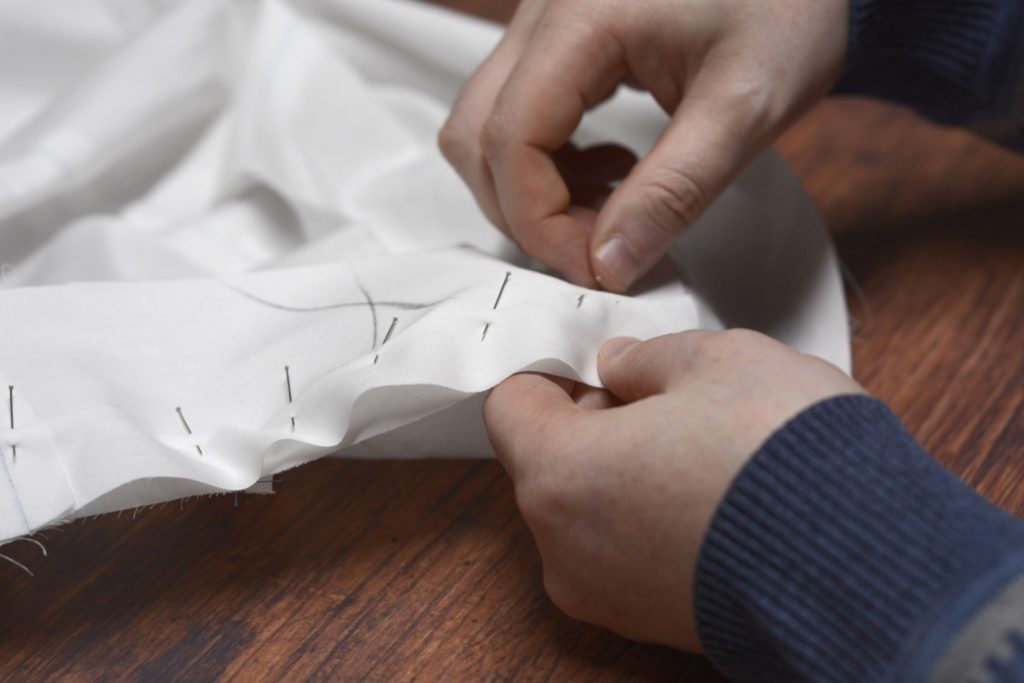
Repeat with the other half of the collar.
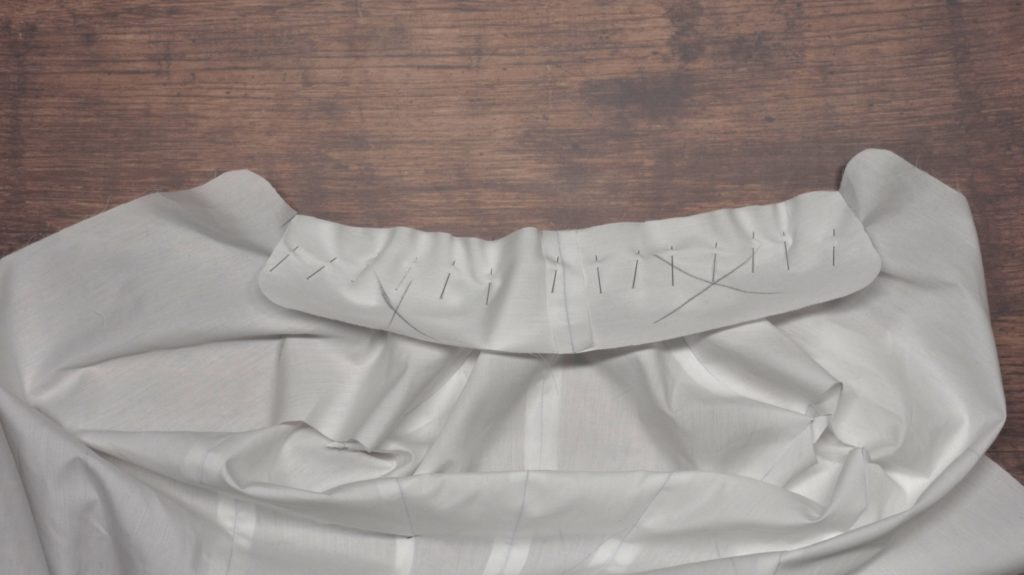
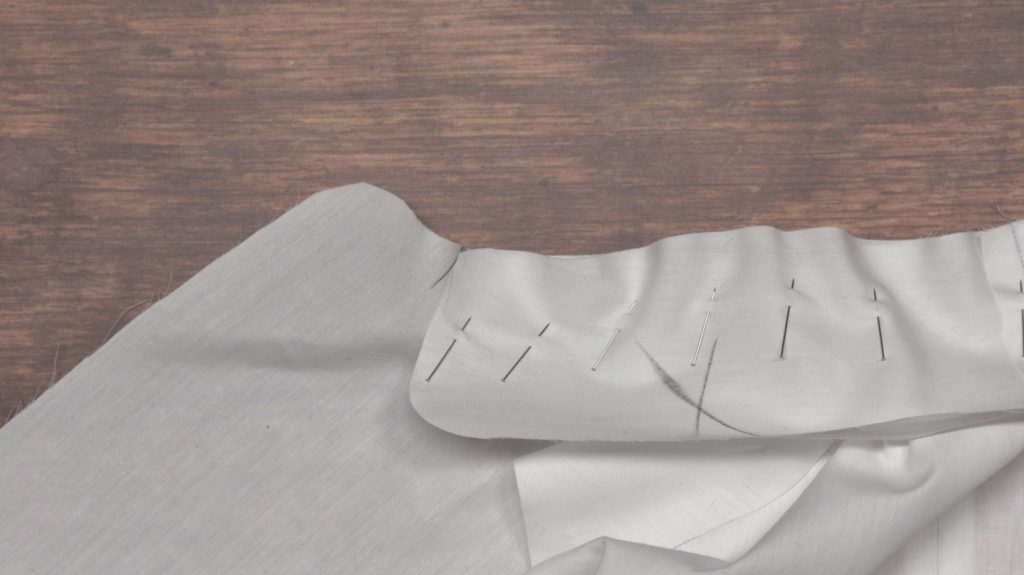
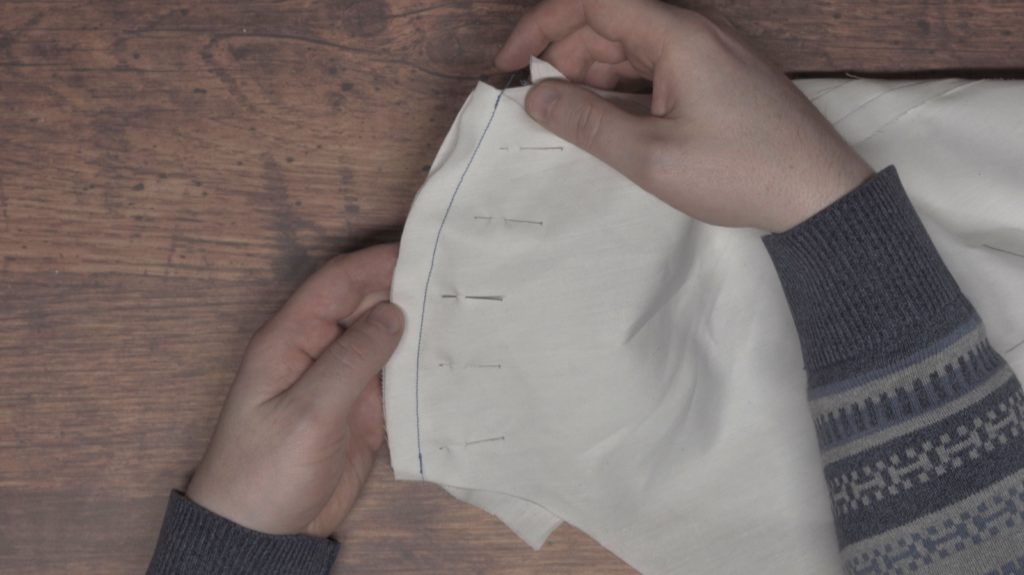
The edge of the collar should line up with the mark on the front of the coat. If the collar is too long or short, make a note of that and adjust the collar pattern accordingly for your next try.
Sew the neck and collar seam from one end to the other.
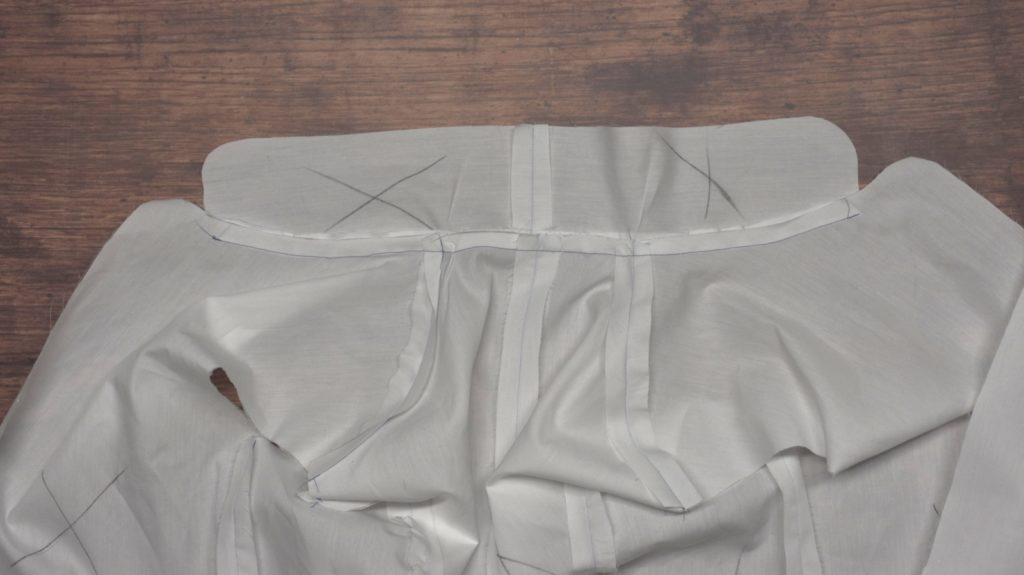
Press the collar up – the seam is not opened here as the others are.
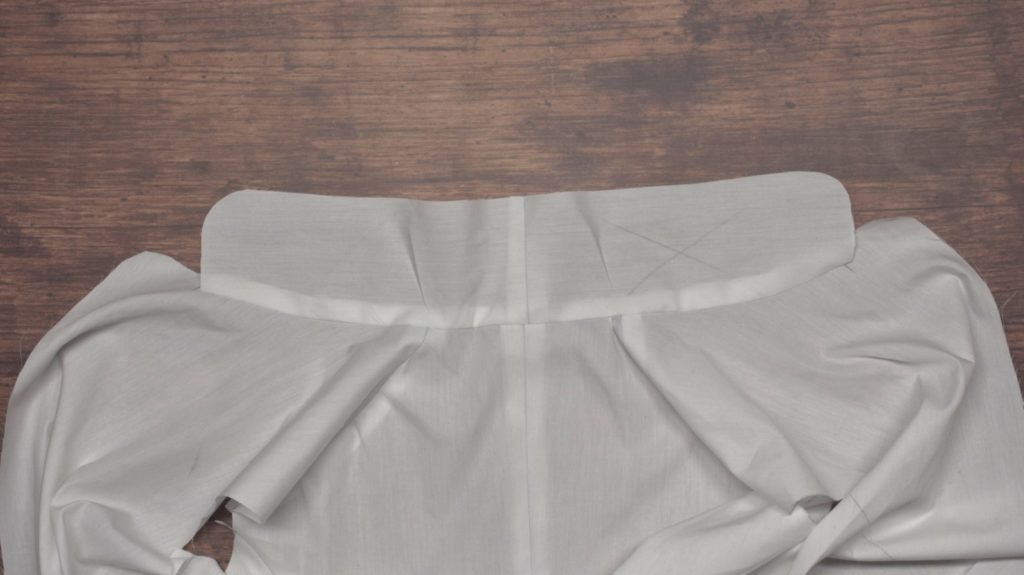
Ideally, the center seams of the collar and the back should line up perfectly, but it’s likely you’ll be a little off, especially since we’re just using pins here.
Center Back Seam
Now that the two halves of the coat are complete, we can join them together at the center back seam.
Place the coat halves right sides together with the center back seam facing you. Pin from the neck down to below the waist seam, just to keep the pleats from moving around while sewing.
I also like to mark the seam lines lines here, as this is the location that the sewing will stop.
Sew from the neck down the center back to the mark you just made using a 1/2″ seam allowance.

Trim on the diagonal on one piece only, to the bottom of the seam. Technically you should do this on the side that will be the wearer’s left side, but it doesn’t really matter for the toile.
Press the center back seam open. Allow the vent on the side that you cut to go through to the right side of the coat.
Here’s the completed vent. You could tack it with a couple of stitches if you wanted to, but I usually just leave it as is for a basic toile.
Shoulders
Now we’ll sew the shoulder seams together. Begin by pinning the shoulder seam at the armscye and at the neck, carefully making sure that the seam lines themselves are aligned.
Then place a pin in the center of the shoulder, distributing any fullness equally on each side.

Place a pin in between each, securing the fullness.
Sew the shoulder seam with a 1/2″ seam allowance.
Finally, press the shoulder seams open using a tailor’s ham.

Here’s what the completed paletot half should look like from the front . . .
. . . and from the back.
The Back
Before attaching the back piece, we need to clip the seam allowance of the skirt section just under 1/2″ from the end of the seam.
Press this little section back open, which will allow the back piece to fit properly against the front.
Now lay the back piece on to the front assembly, right sides together. There’s a process to get everything lined up nicely, so that’s what we’ll do next.
Starting at the center back near the pleats, place a single pin near the waist seam. This basically holds things in position so that we can align the other sections properly.
Then at the top of the seam, near the armscye, align the seam allowances and pin.
Now pin the bottom half of the skirt together.
Now we’ll continue with the upper half of the back seam, which is more difficult because of the deep curves of each piece.
Start by pinning the first two or 3 inches above the waist seam as normal. The exact distance to pin depends on your own pattern and when the curved areas start.
Then gradually pin the rest of the two layers together, working the excess from the side body into the back piece as you go. Sadly, I didn’t photograph this, but if you turn the entire assembly over so that the back piece is underneath, you can let the seam drape over your hand as you pin, allowing the fuller sidebody to more easily be incorporated into the seam.
Don’t be afraid to unpin if necessary and try again. Often I’ll have too much excess by the time I get to the armscye so I’ll have to try over myself.
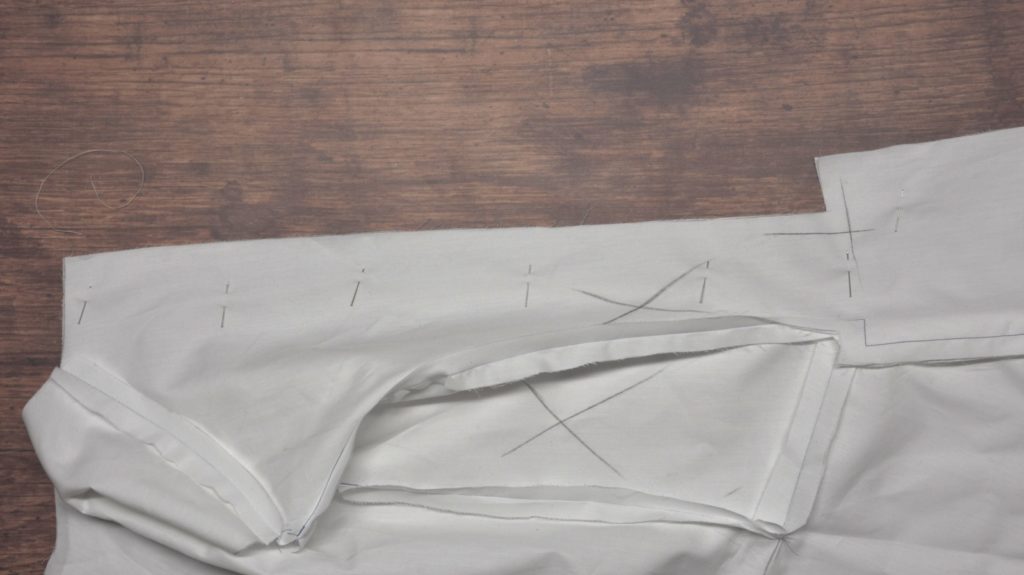
Some more detail of the pinning near the armscye. You can see the excess fabric that has been distributed on the underside.
Another video showing how I pin the upper back seam.
With everything pinned along the back seam, it’s time to sew everything closed. Before beginning, you might want to draw out the seam allowance around the waist section (1/2″) to help you accurately sew. With the back side on top, sew the seam beginning either at the bottom of the skirt, or the armscye, depending upon which half of the coat you are working on.
Sew the ‘stepped’ pleat area as shown, being sure the little piece of seam allowance you clipped earlier is still opened up.
Continue sewing to the armscye. Since the fuller part of the side body is on the bottom, you can use the sewing machine’s feed dogs to naturally help you refine the fabric distribution as you sew.

A video of the sewing process.
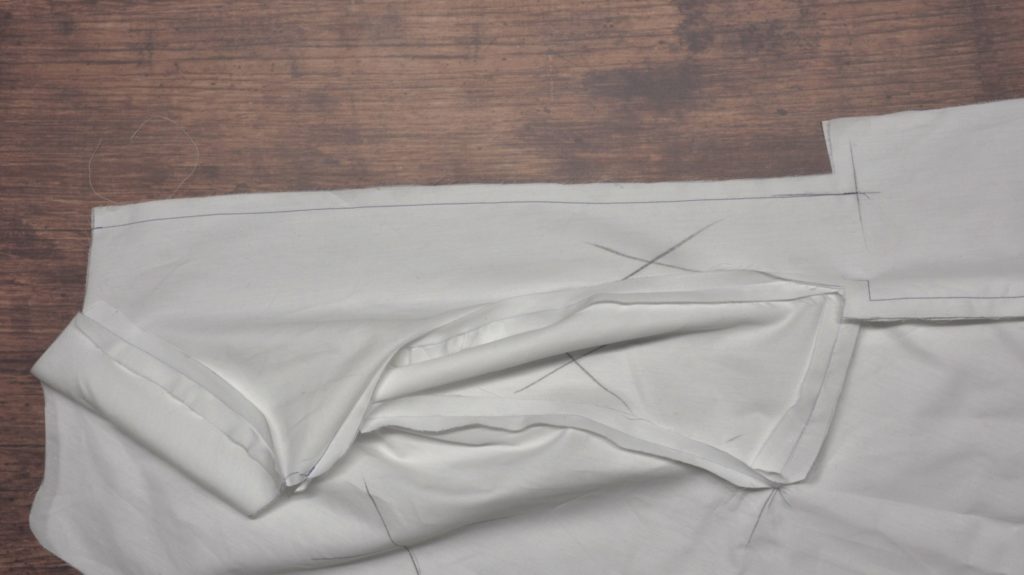
Here’s what the completed seam should look like. Remove all pins at this point.
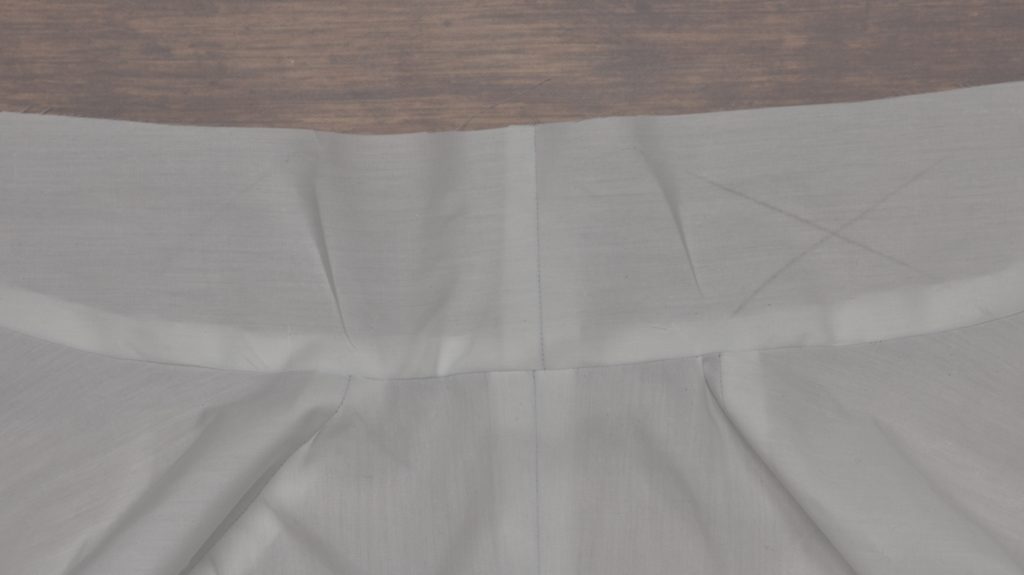
Finally, press the top half of the seam, the curved part, open. At the waist, the pleat should be folded towards the inside and the top inch or so of the pleat pressed as well.
If you look carefully, you can see how the seam allowance of the back has been folded over itself near the waist to allow the pleat to lay in place.
Side Body
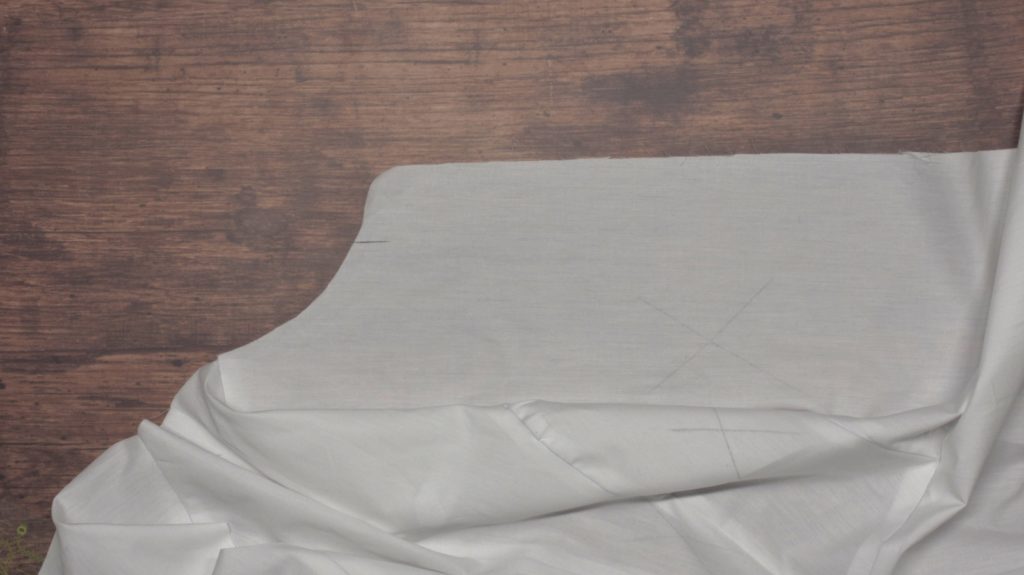
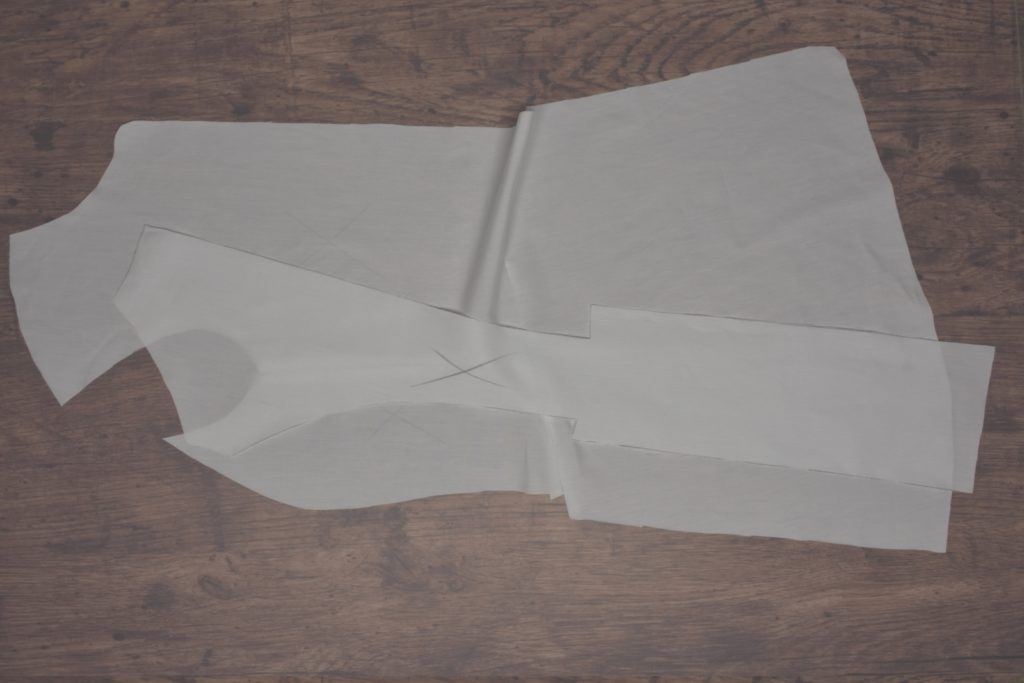
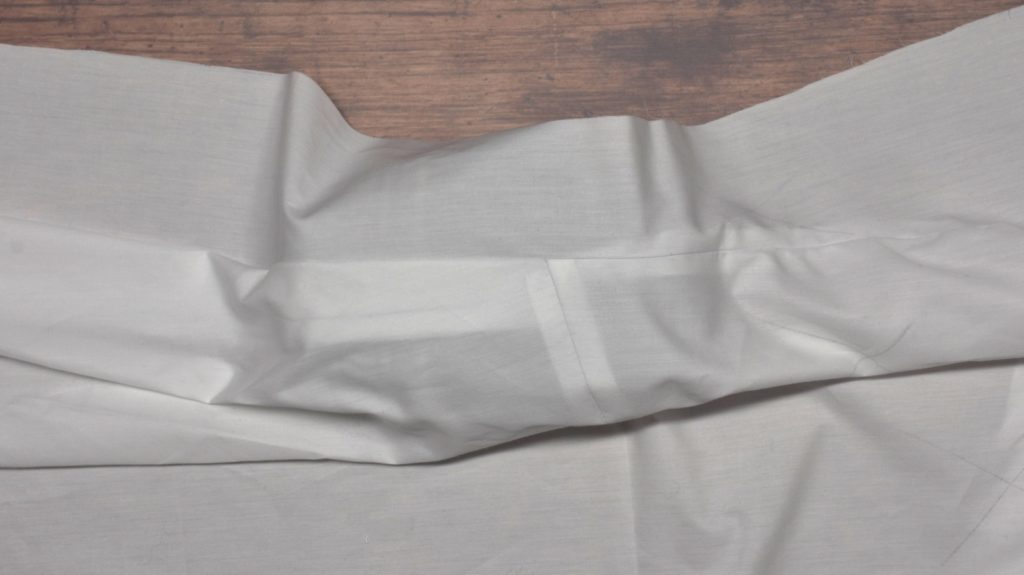
When you are fairly confident with your pattern, use the pattern to cut out the various pieces, two of each, out of cotton muslin for fitting purposes. I like to weigh the pattern pieces down, trace around each with some tailor’s chalk, and then cut, following the inner edge of the chalk line.
At this point, don’t worry about cutting out the sleeves. We’re just trying to get the body fitting well, and the sleeves can be fit to the actual linen coat later on.
In addition to perfecting the fit, this step is also important in learning the steps to coat construction. Better to practice on the cheap fabric before perhaps ruining the good linen! You’ll also notice during this process that I like to keep the two halves of the coat separate for as long as possible. It doesn’t really matter for a lightweight toile like this, but when working on a heavy frock coat, for example, you’ll appreciate keeping the two halves separate.
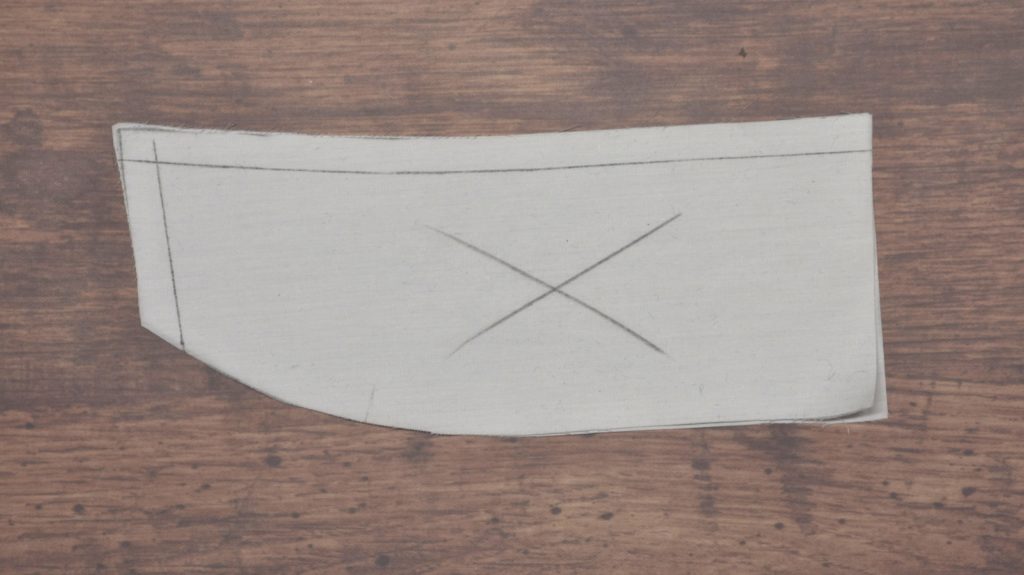
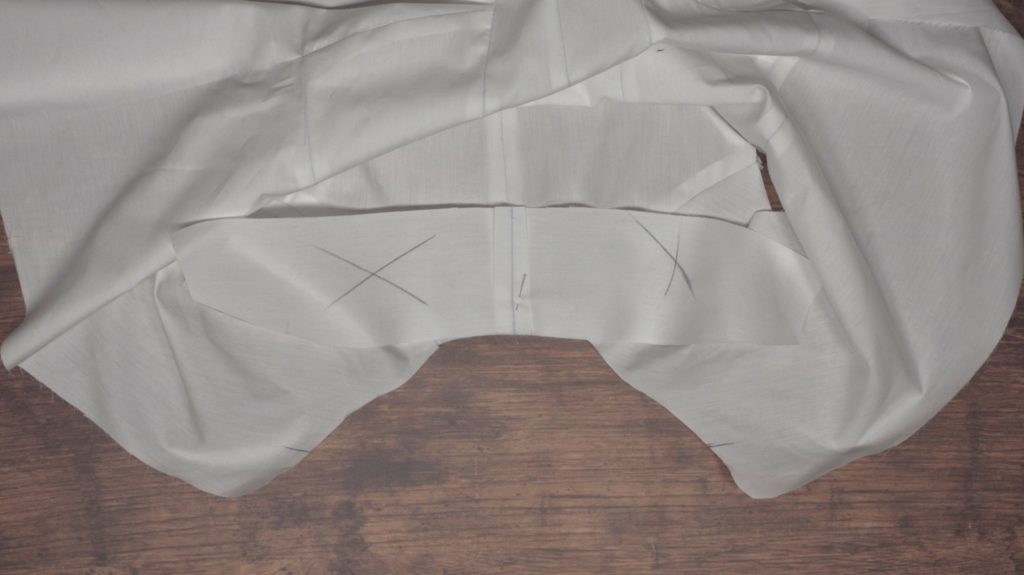
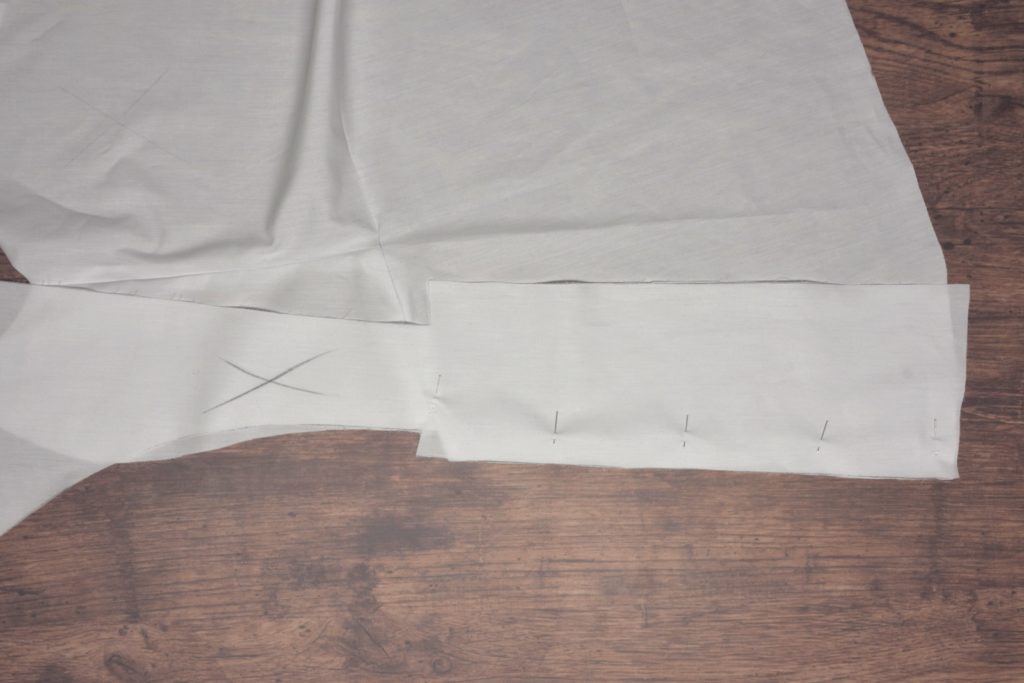
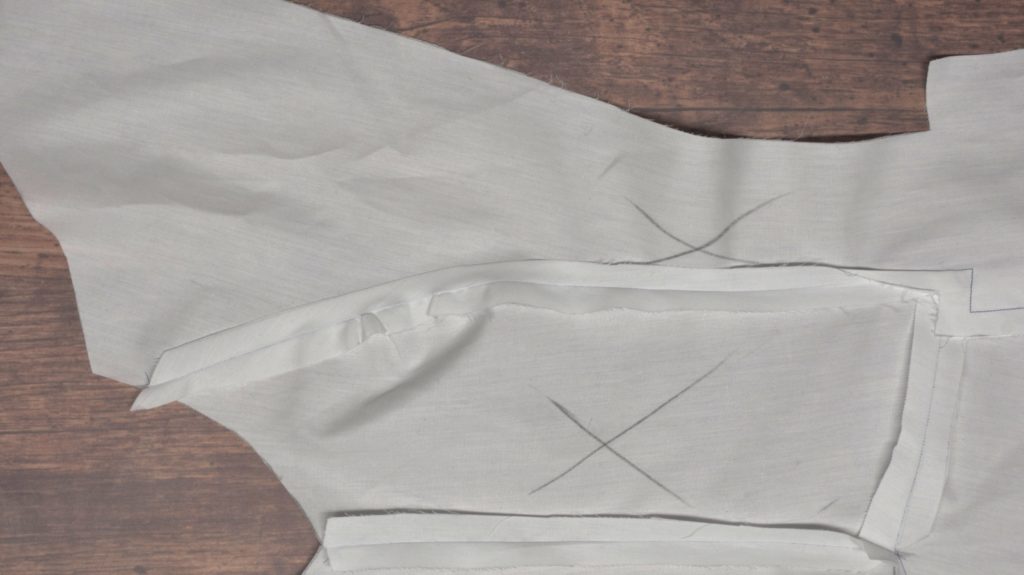
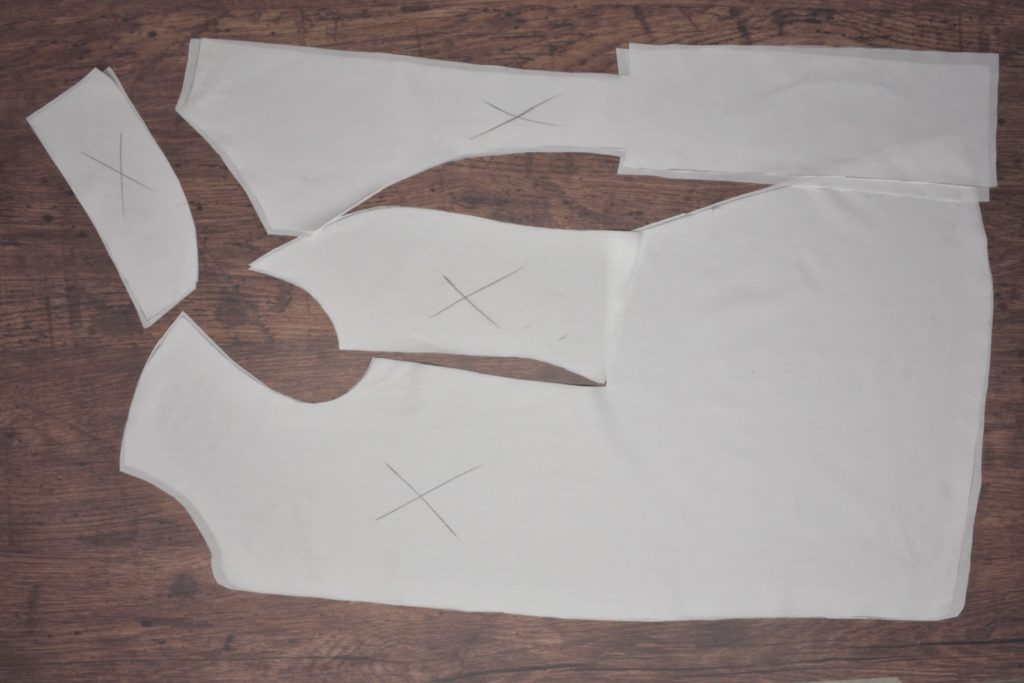
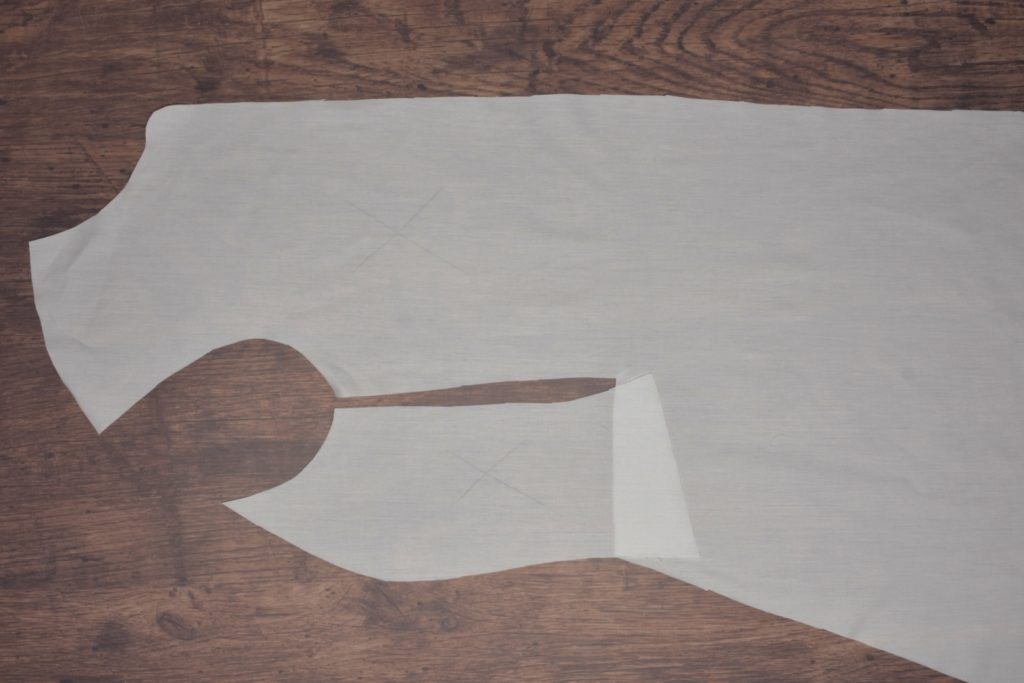
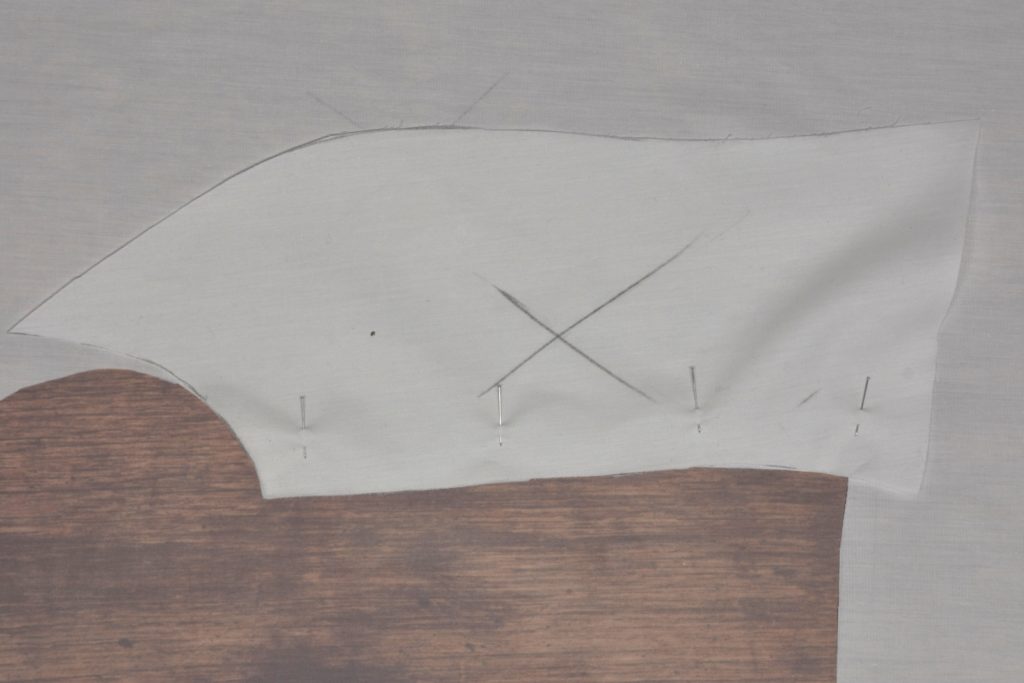
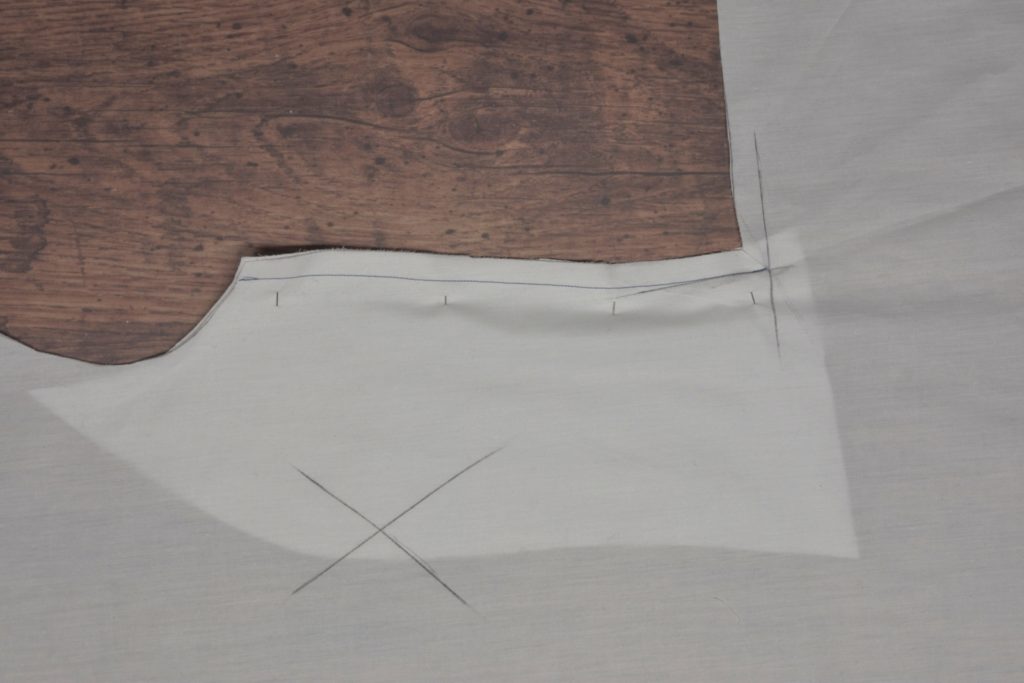
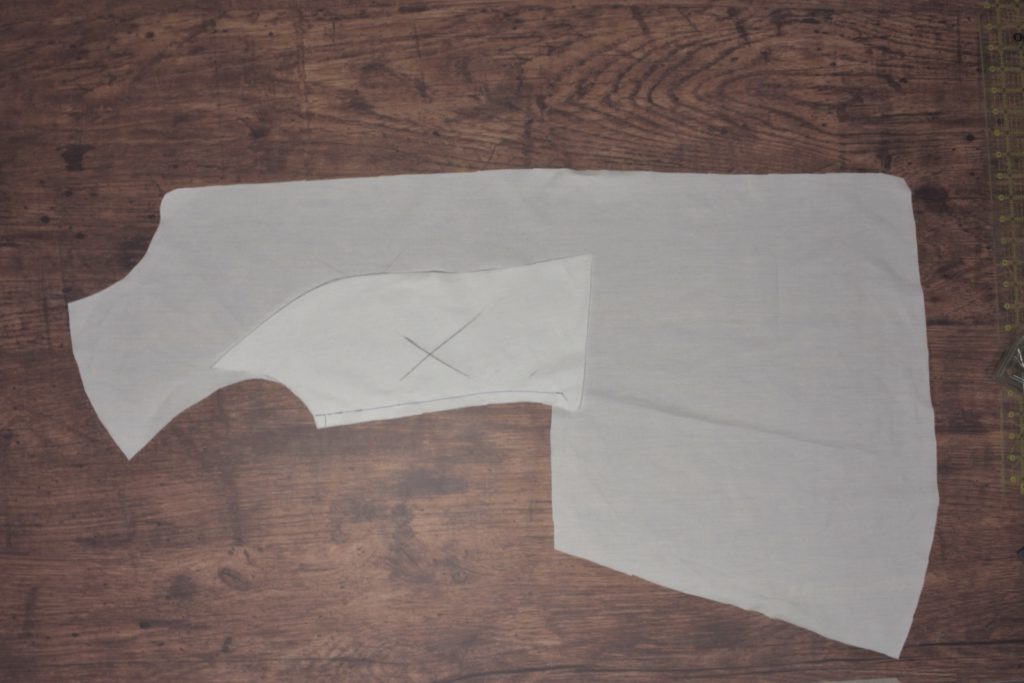
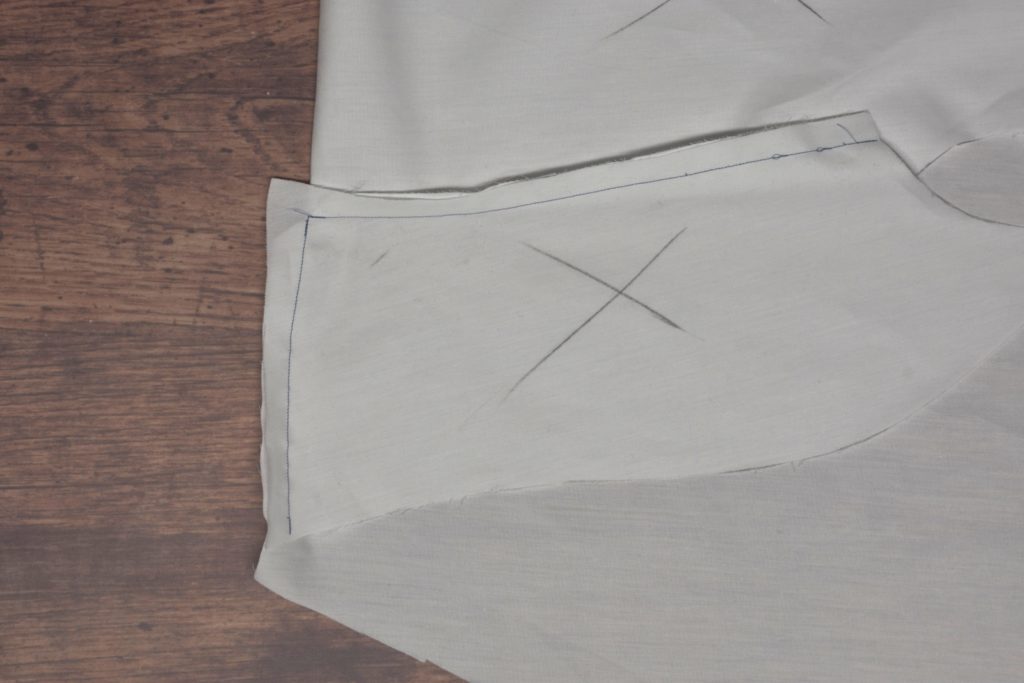
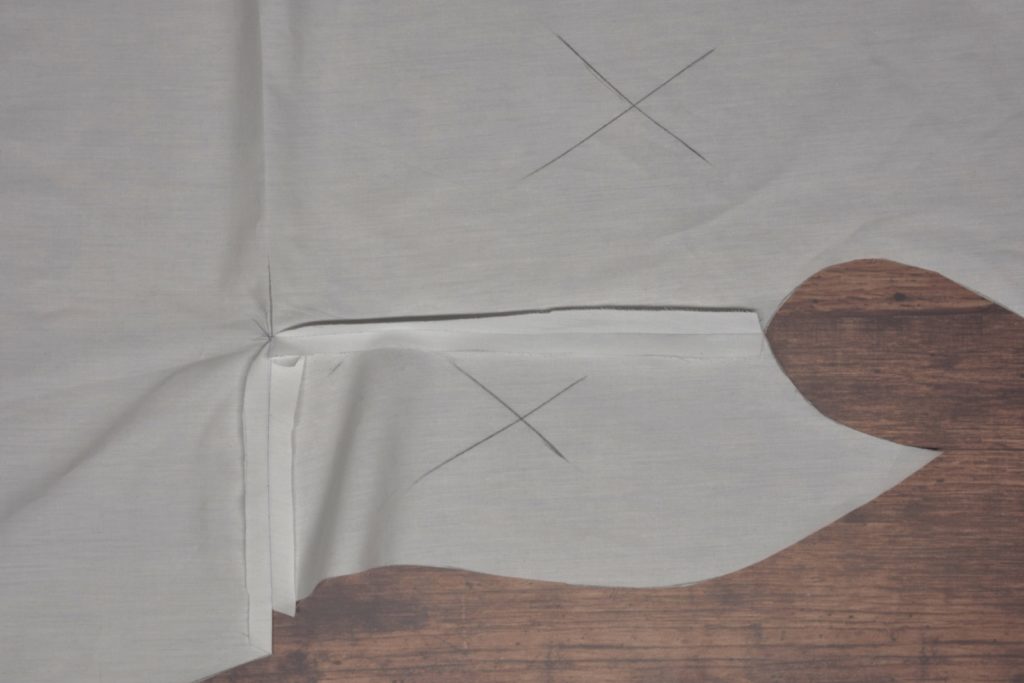
After cutting, mark the wrong sides with an ‘x’ to keep from getting confused during construction.
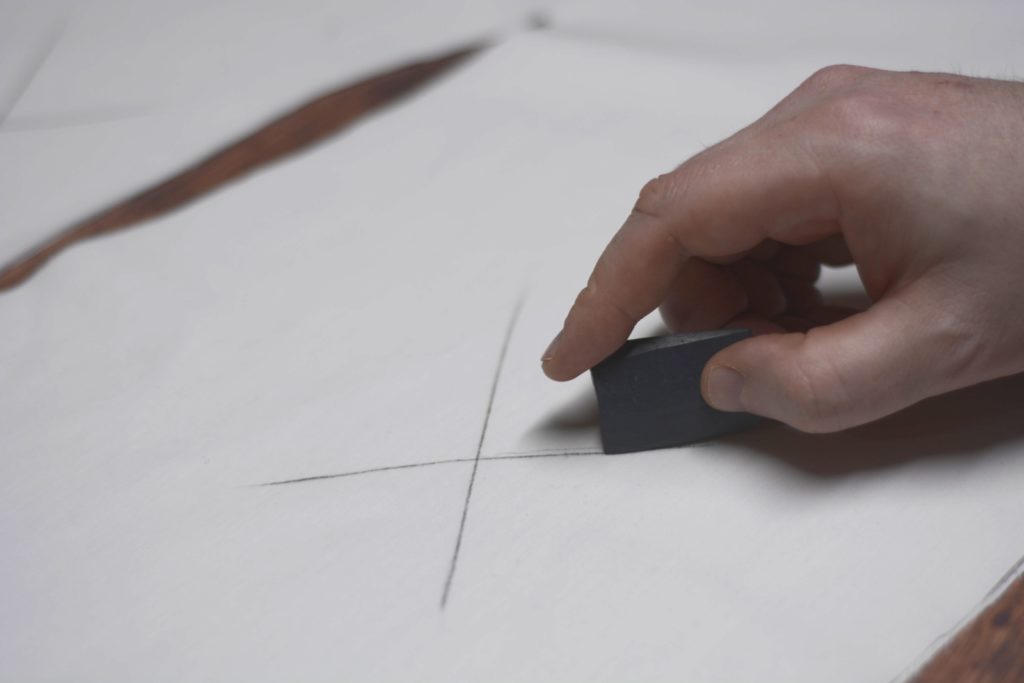
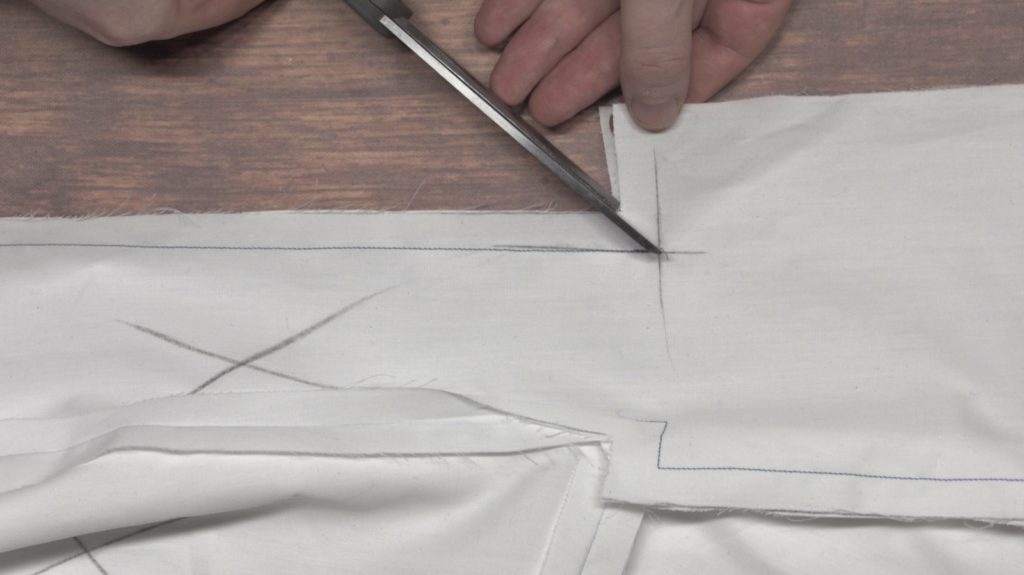
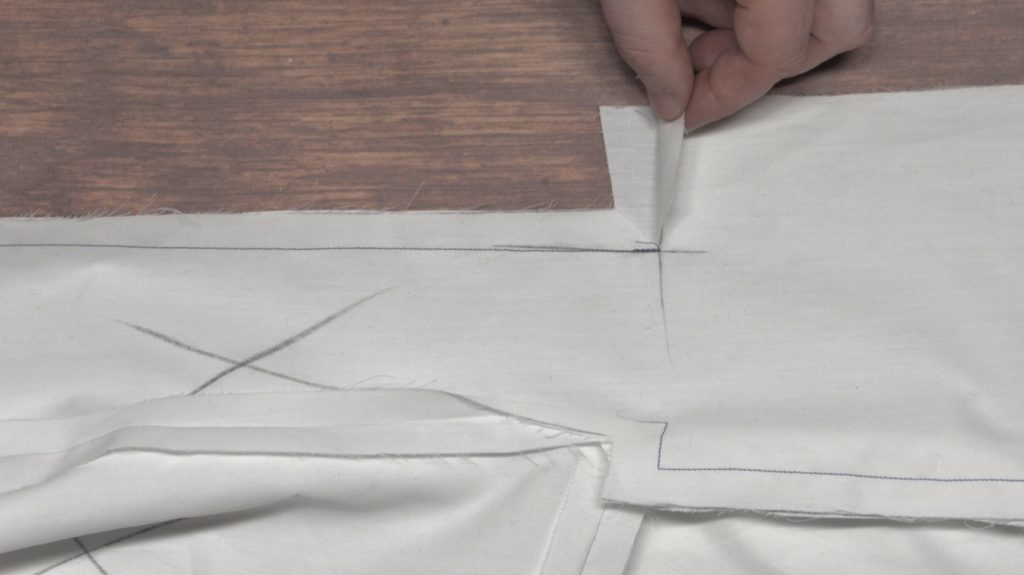
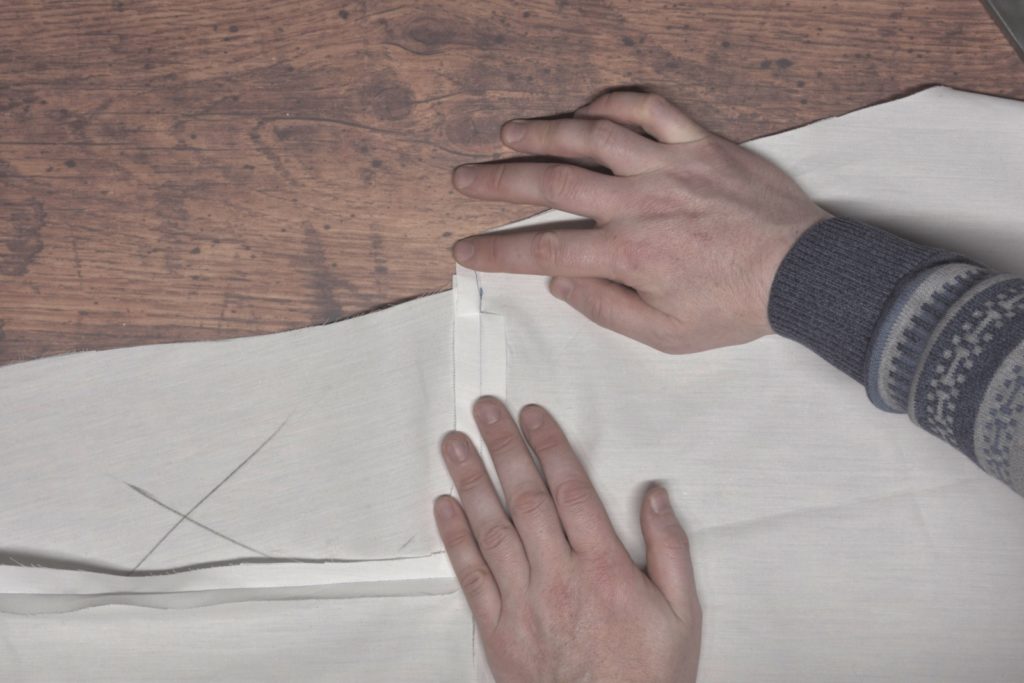
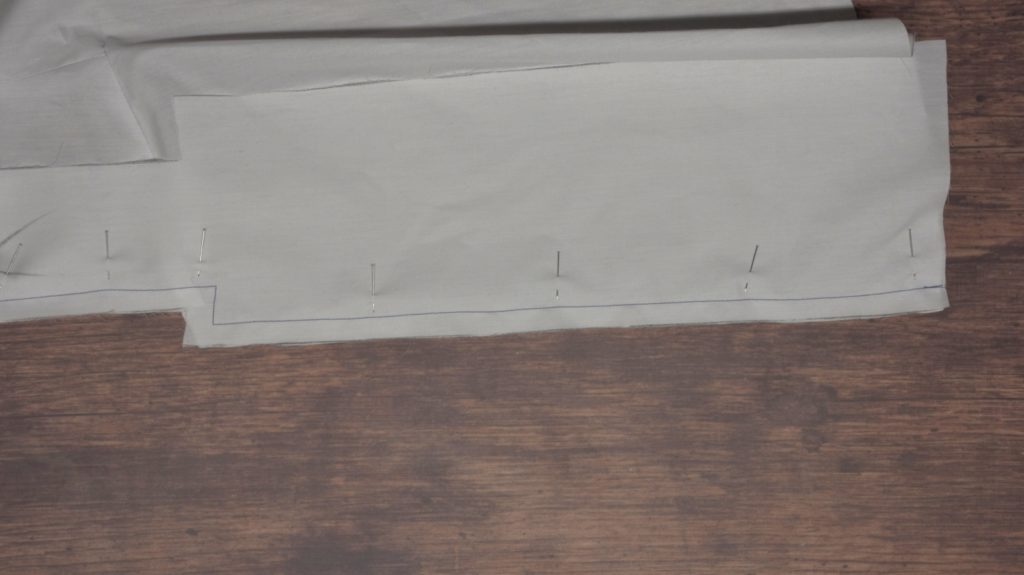
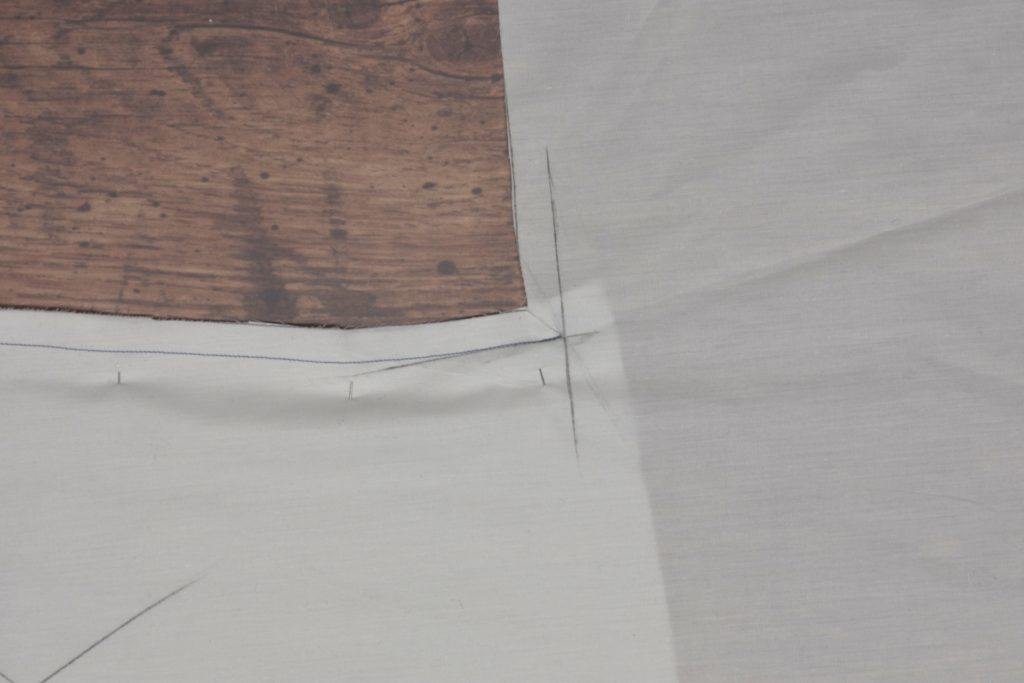
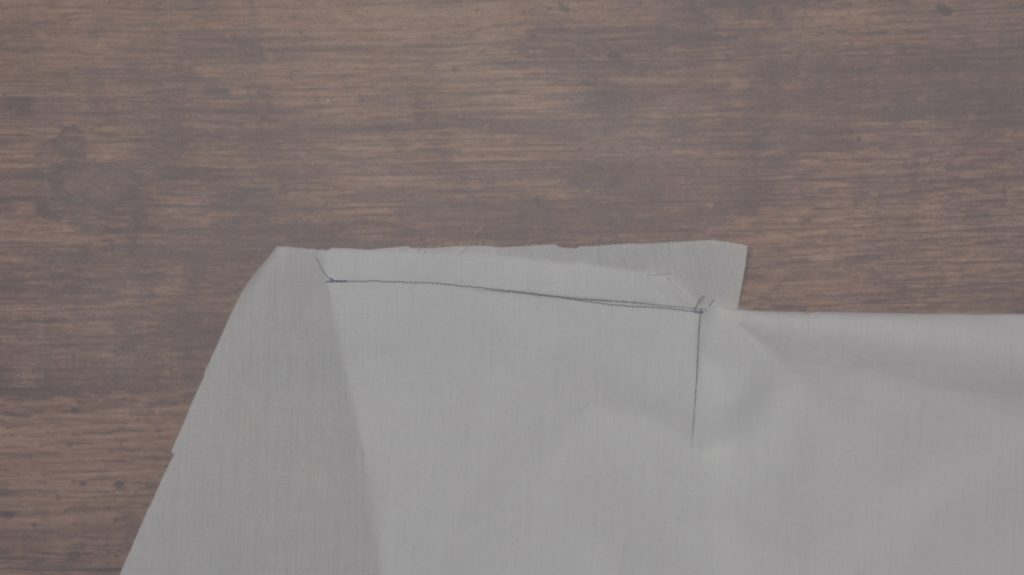
The first thing to do is to carefully mark the 1/2″ seam allowance at the side body / waist seam as shown on the front. Mark this on the wrong side of each front.
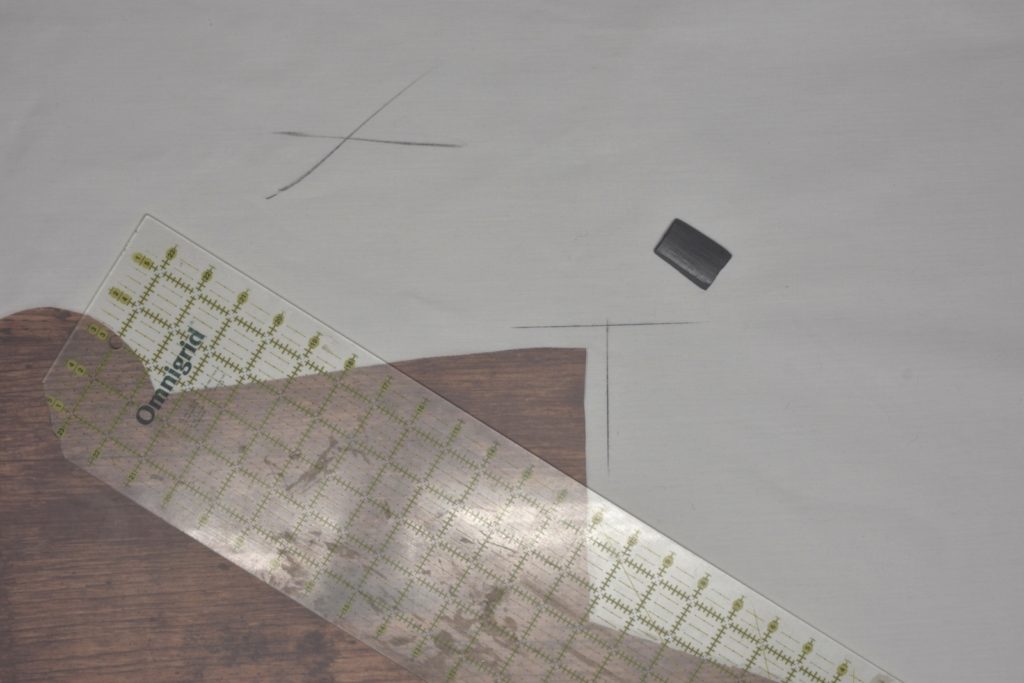
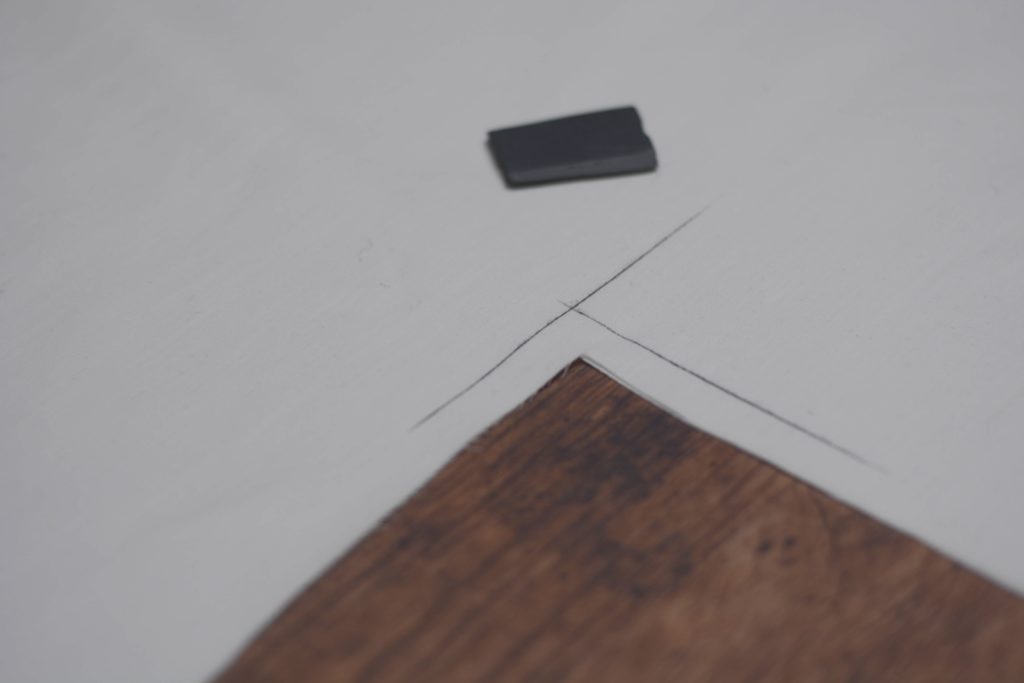
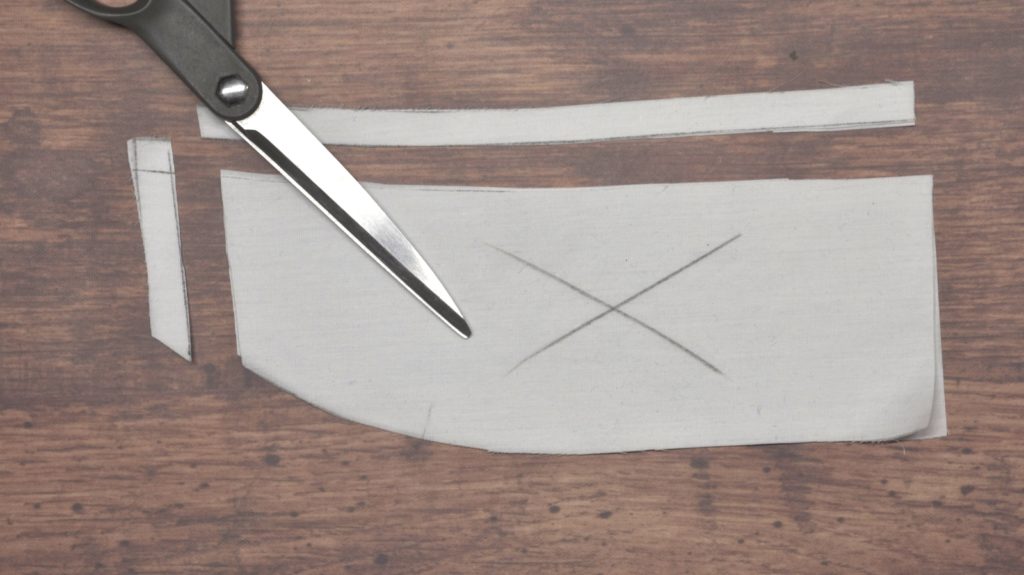
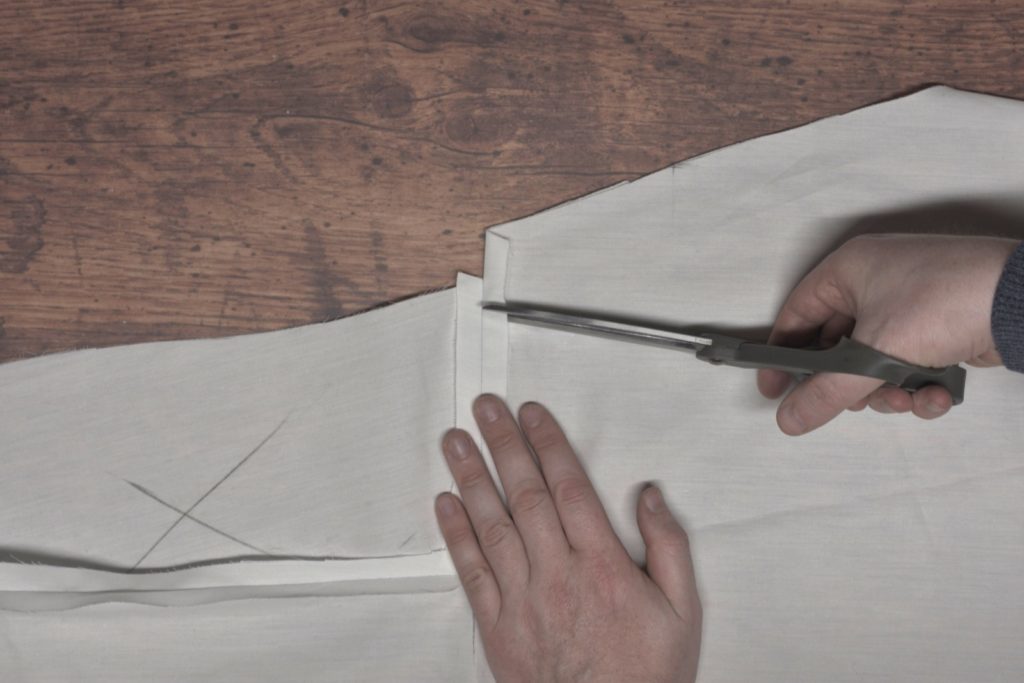
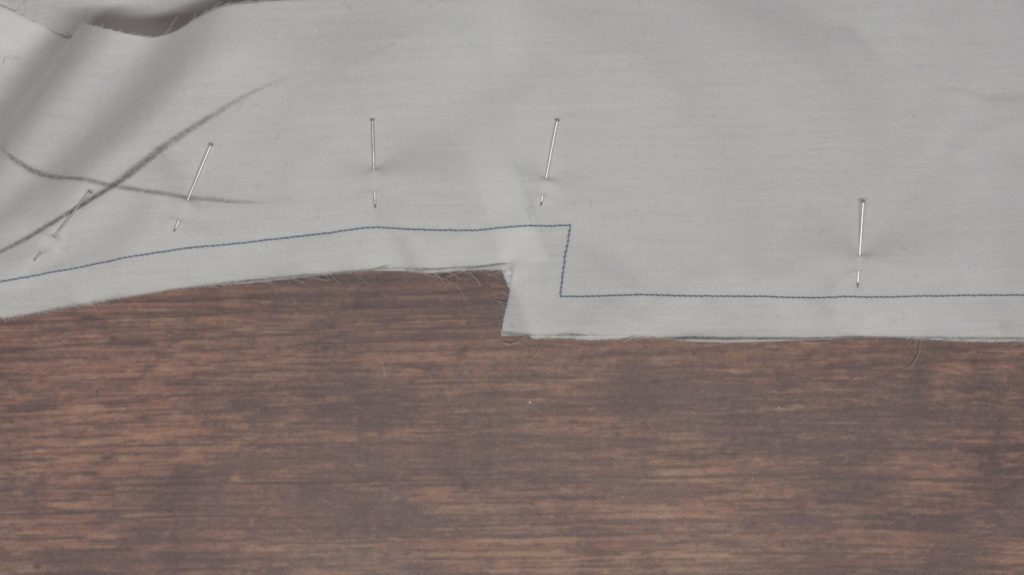
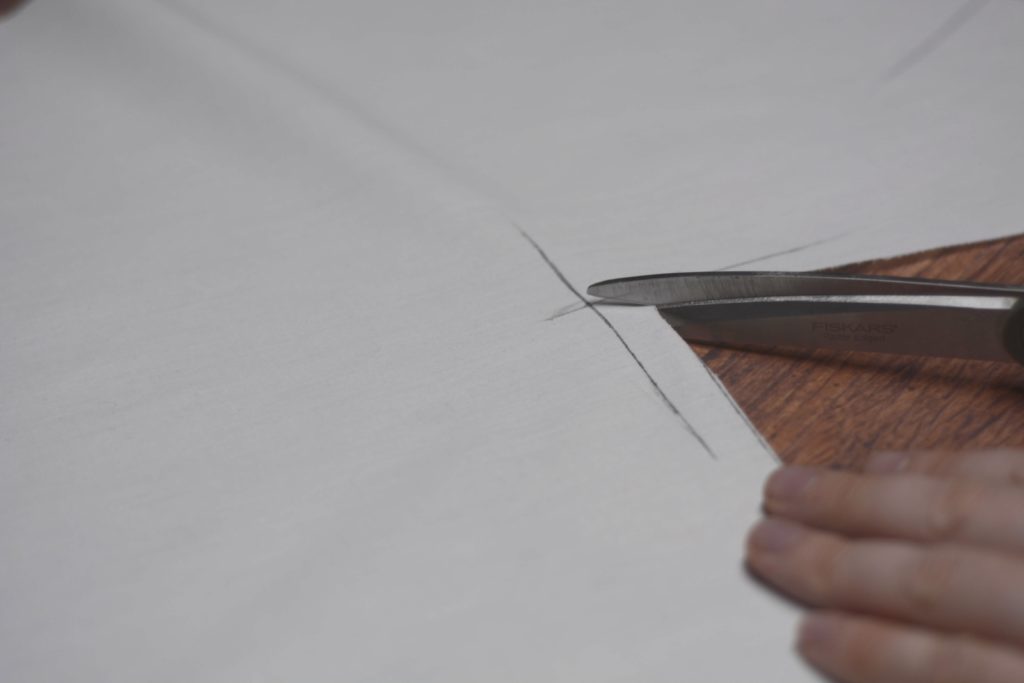
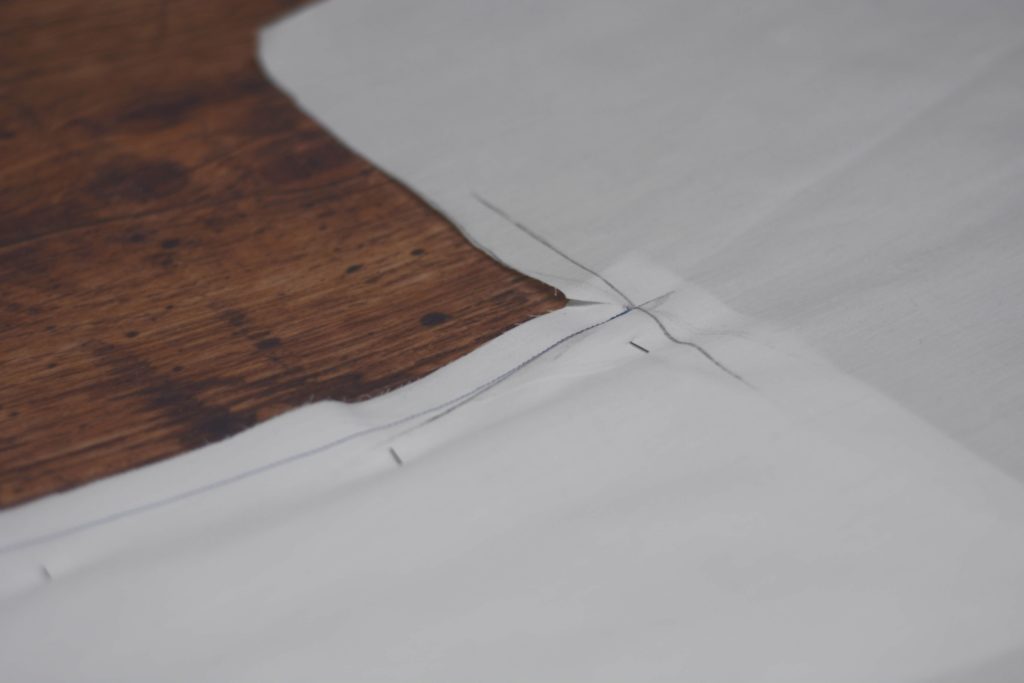
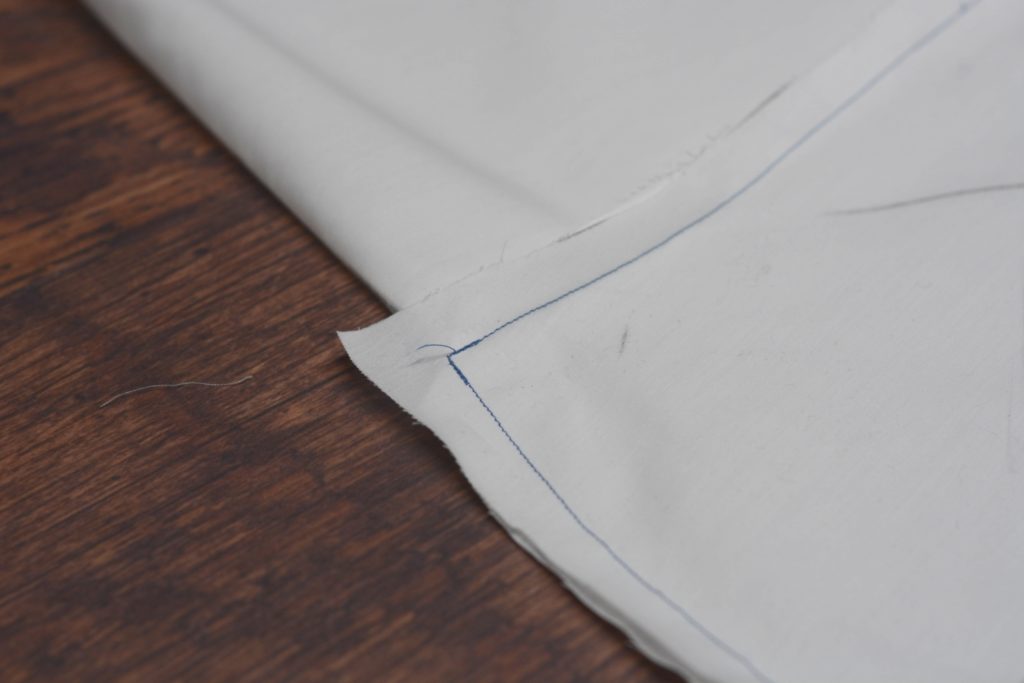
Cut carefully at a 45 degree angle from the corner to the intersection of the seam lines. Repeat for the other half of the coat front.
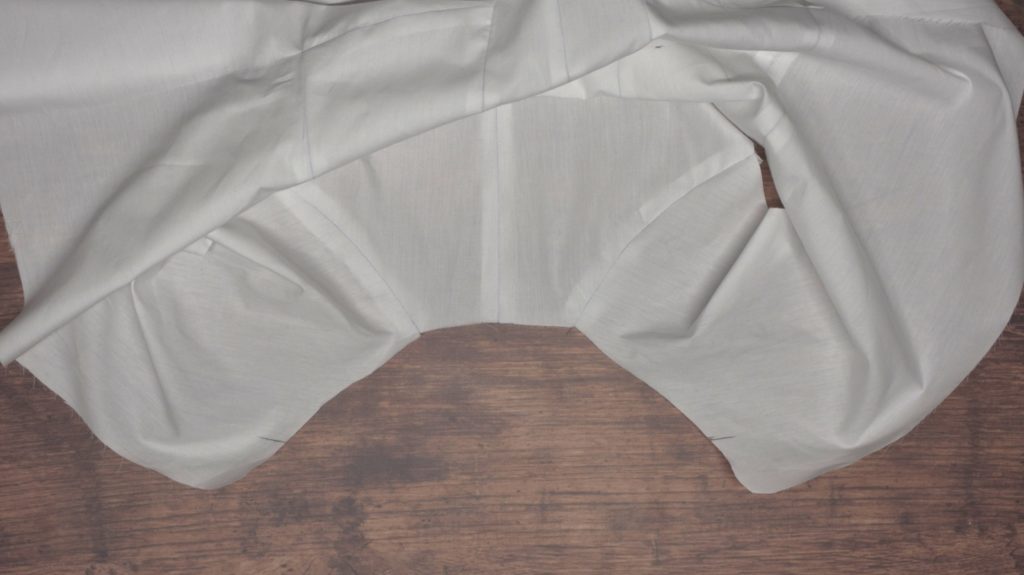
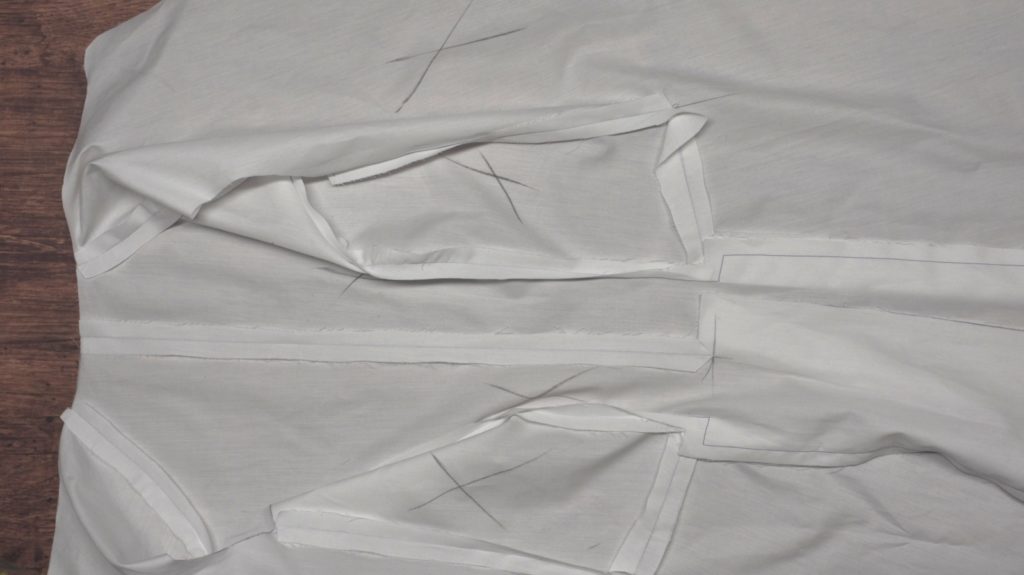
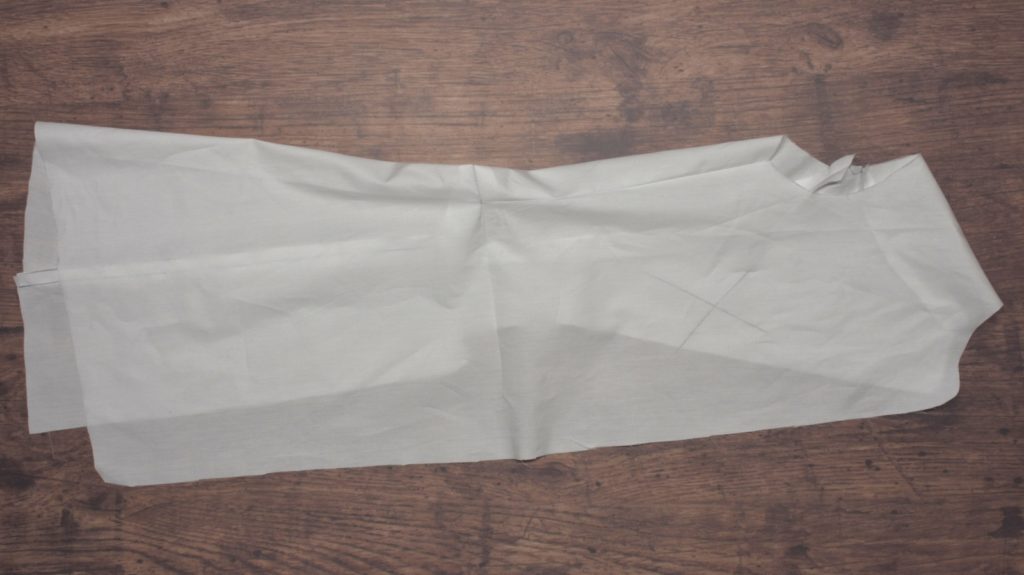
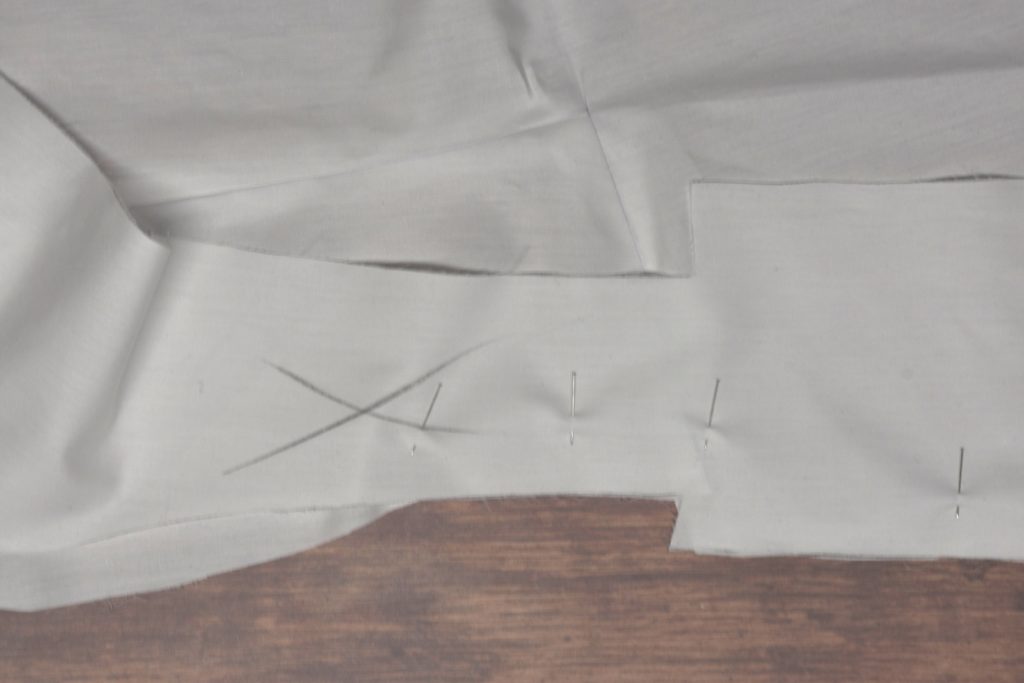
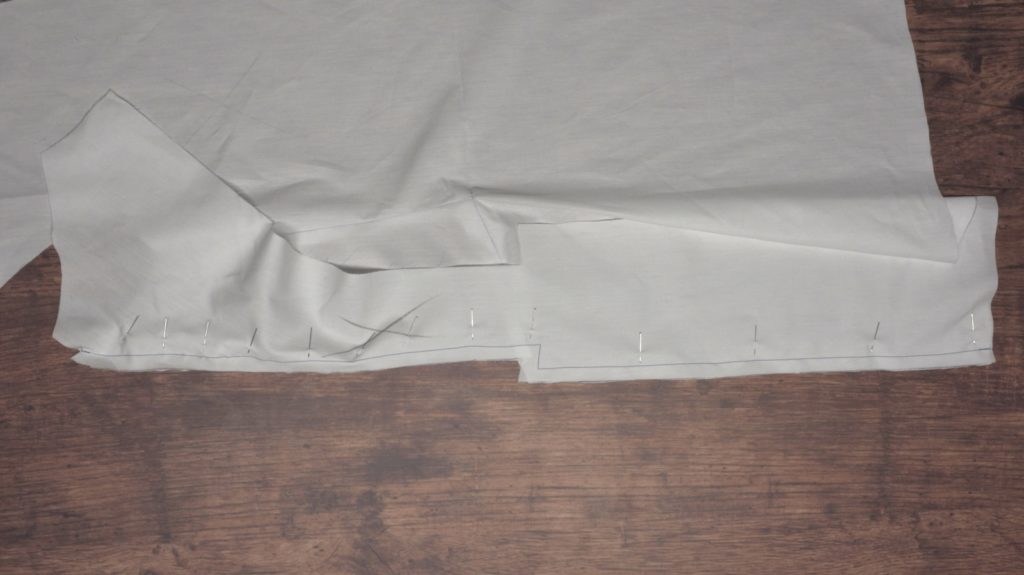
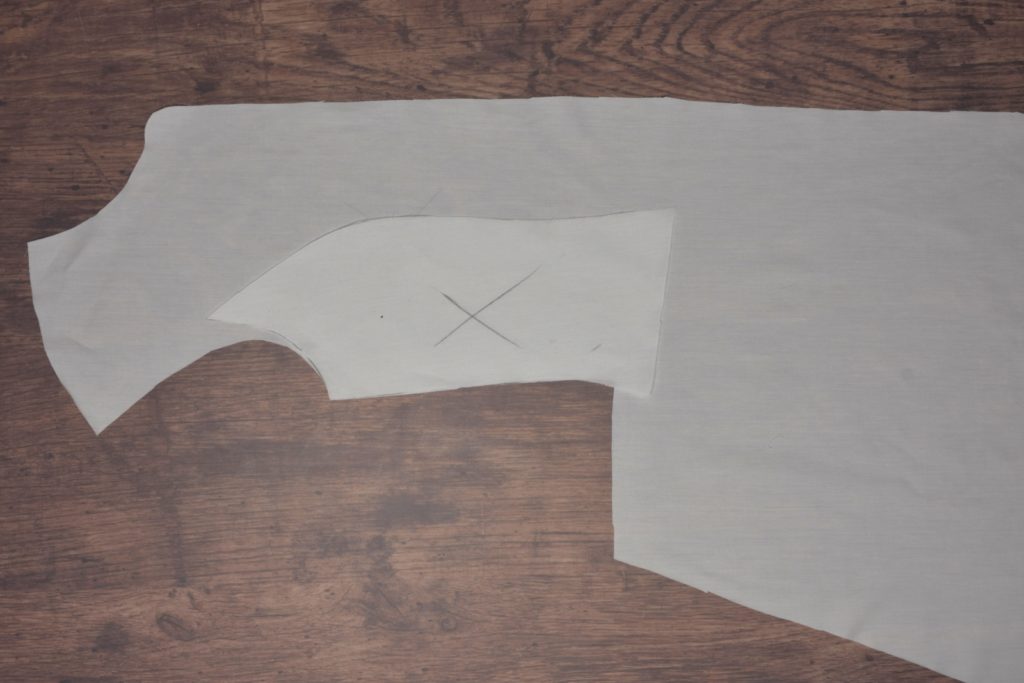
Just for clarity, lay out one forepart and the matching sidebody, right sides up.
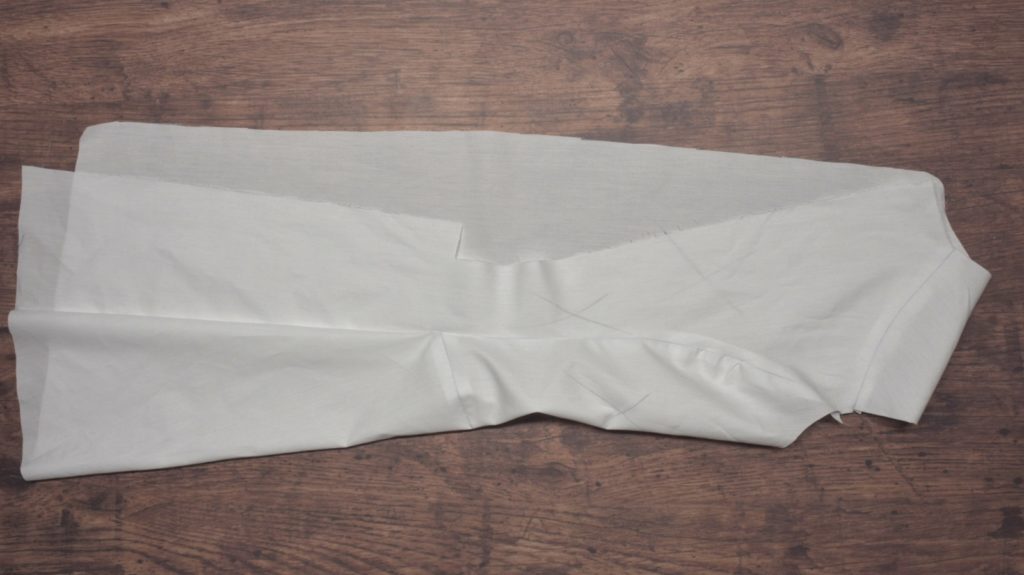
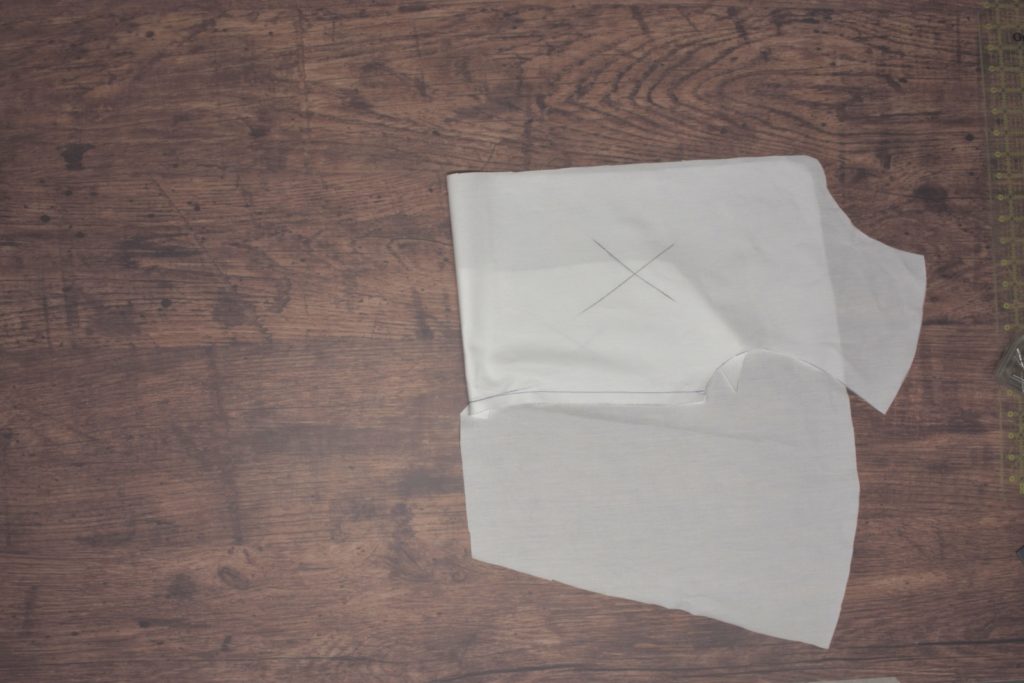
Flip the sidebody into place on top of the forepart, right sides together. Align the top at the armscye, and the bottom of the sidebody should extend 1/2″ below the bottom of that diagonal cut you made.
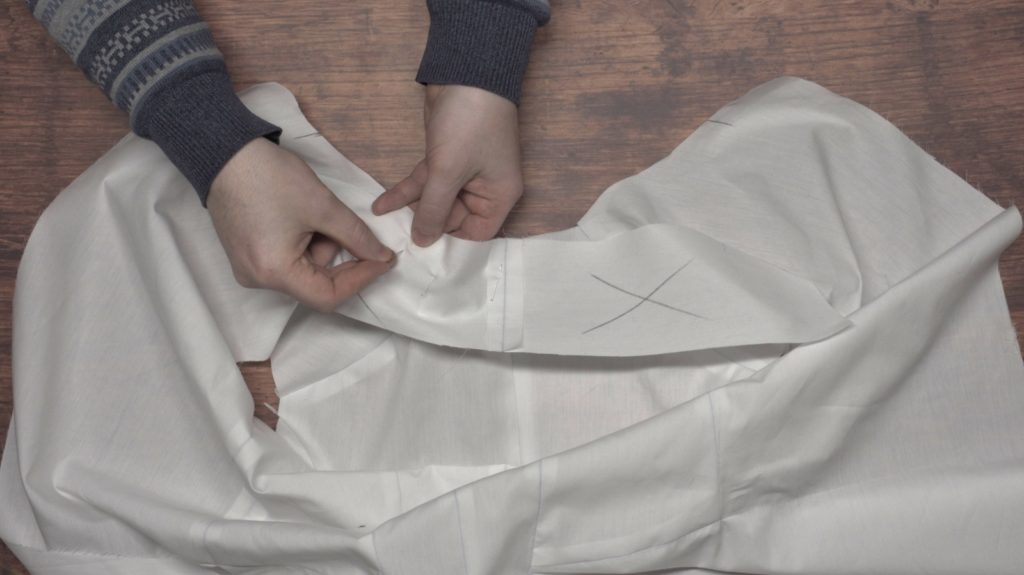
Pin carefully in place, keeping the pins just outside of the 1/2″ seam allowance.
Sew this seam by machine with a half inch seam allowance, from the armscye to the very intersection of those two lines. The more precise you can be here, the better.
Remove the pins.
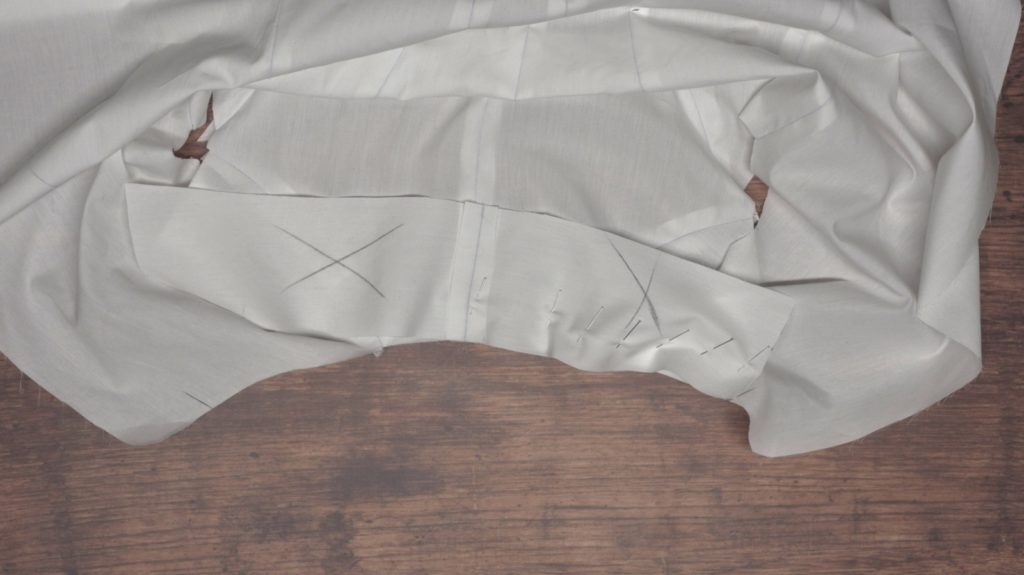
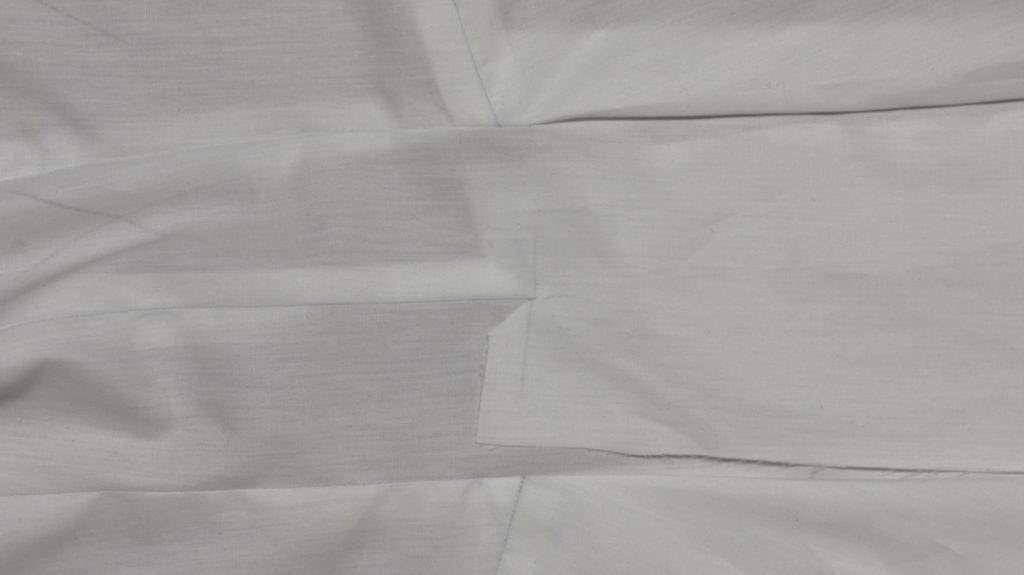
Here you can see how the stitching ends right at that intersection.
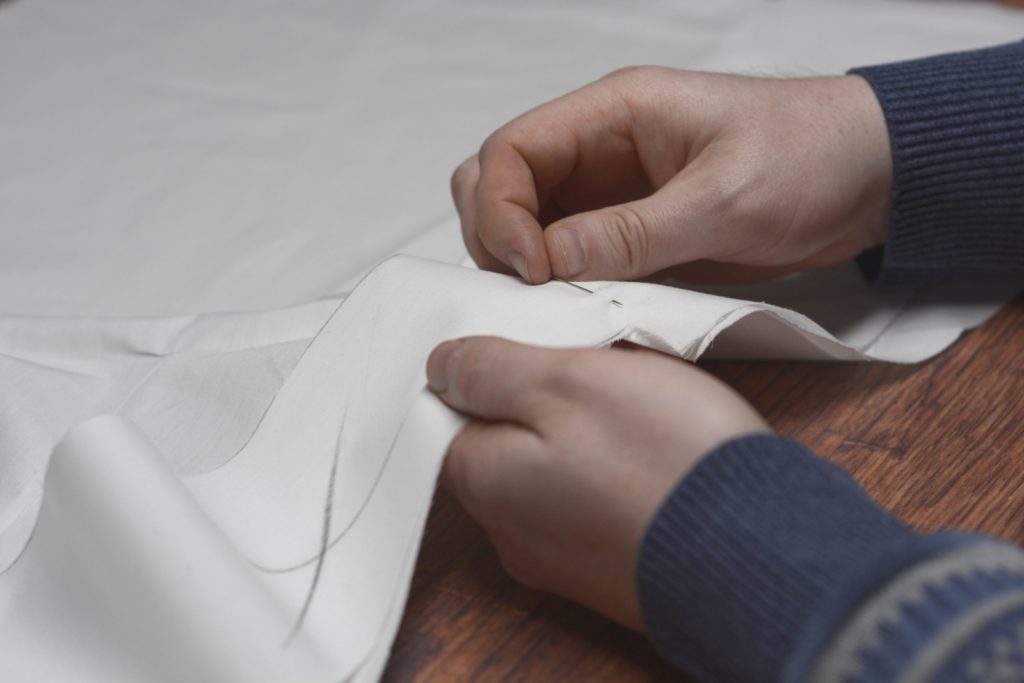
This next step, sewing the waist seam of the sidebody, can be a little confusing at first, so I’ve broken it up into multiple steps for clarity. Here’s a video demonstrating the process.
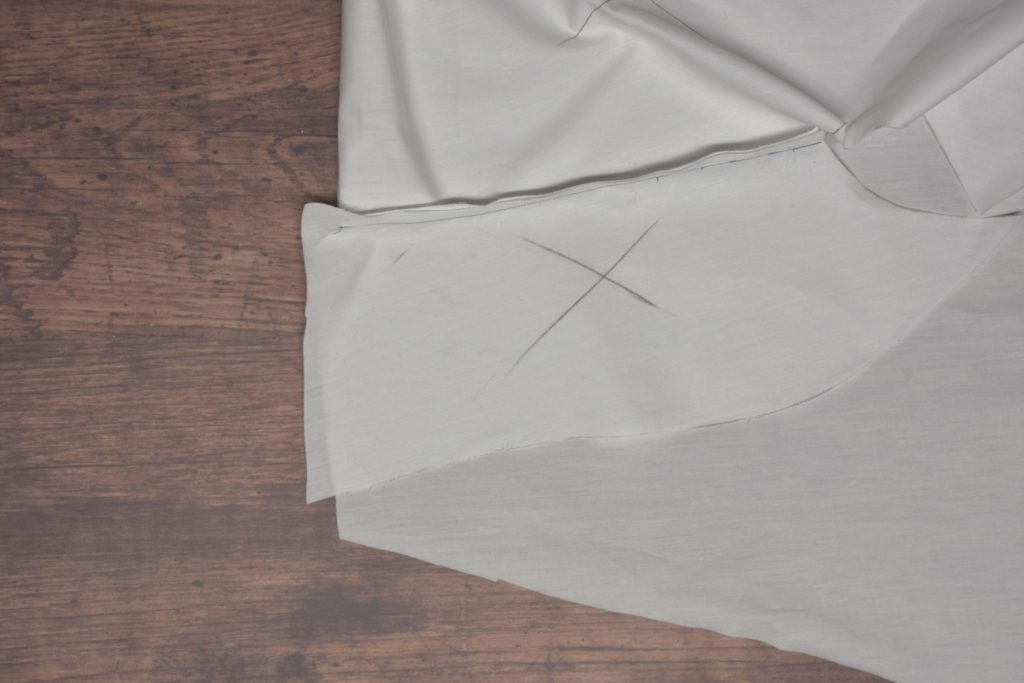
Start with the sidebody and forepart right sides together, as shown.
Fold the entire top half of the front and forepart right sides together, at the level of the waist seam.
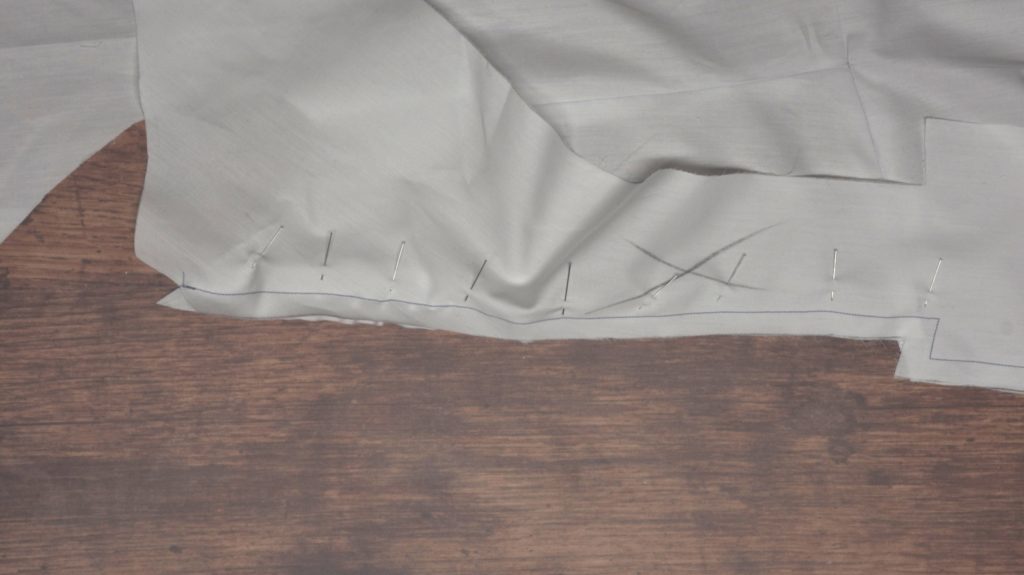
Now reach inside and pull out the sidebody so that the waist seam is aligned, right sides together.

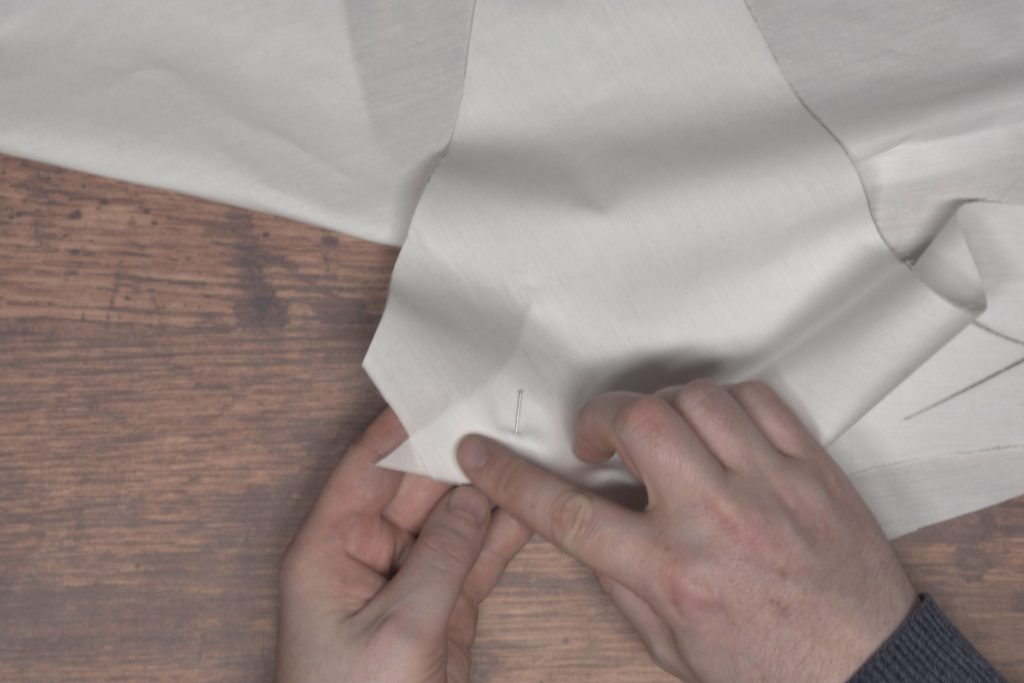
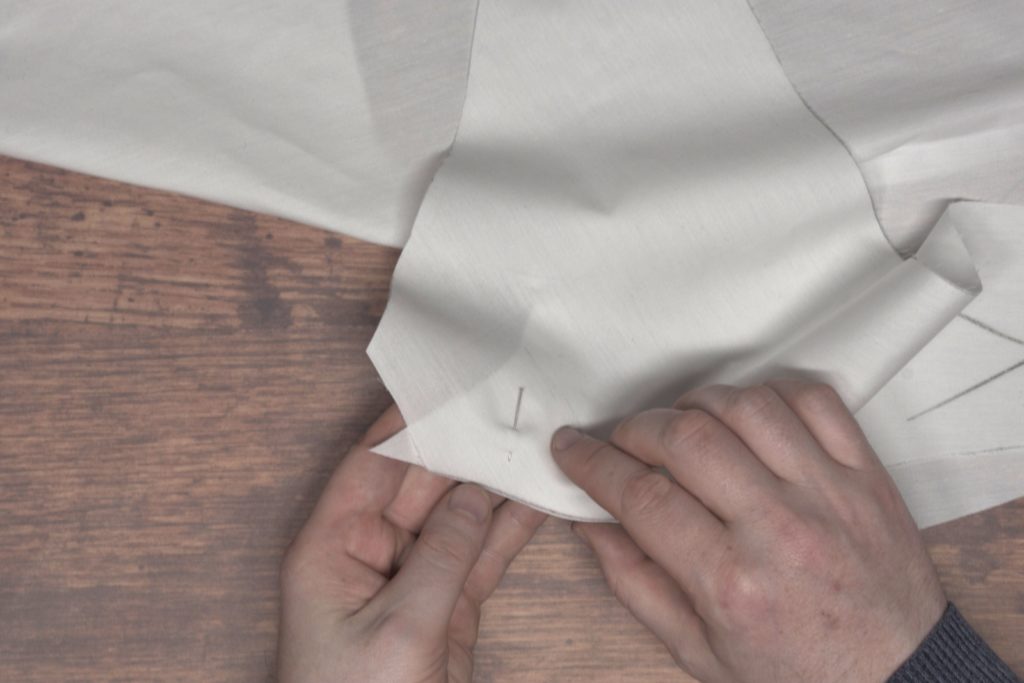
Pin the waist seam together, finessing the fit as you go. Ideally, the two seams should line up perfectly, but sometimes you’ll find the sidebody is slightly longer, perhaps due to stretching or pinning unevenly, so work with what you have.
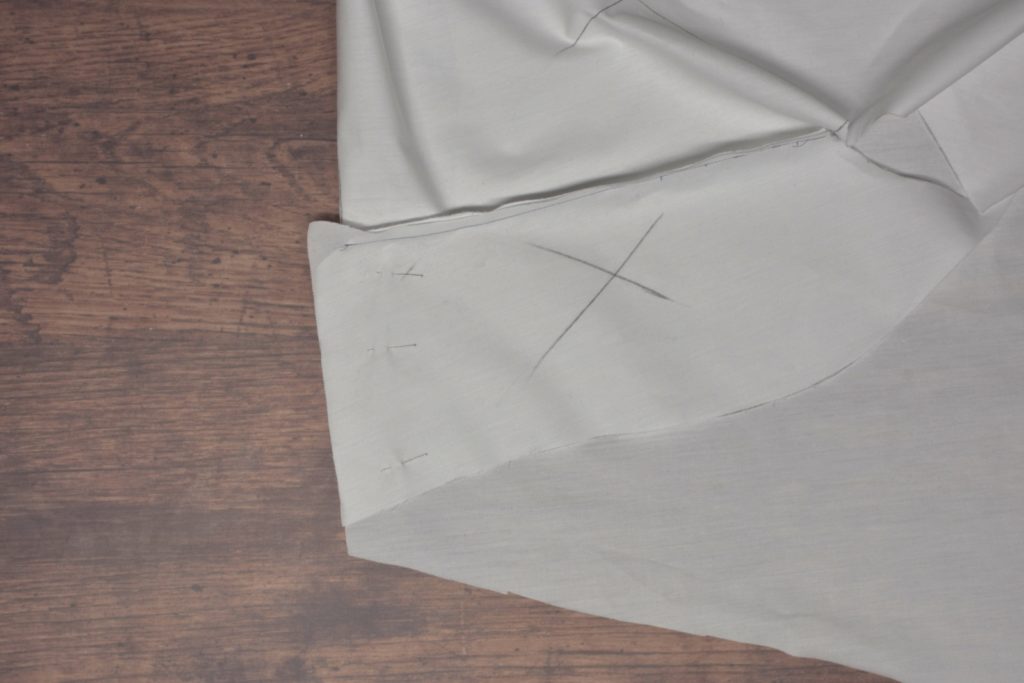
Here’s what happens if the sidebody isn’t properly aligned. You can see it extending more than the 1/2″ seam allowance. I’m not sure what caused it in this case, perhaps holding the fabric differently while pinning, sloppy cutting, or something else.
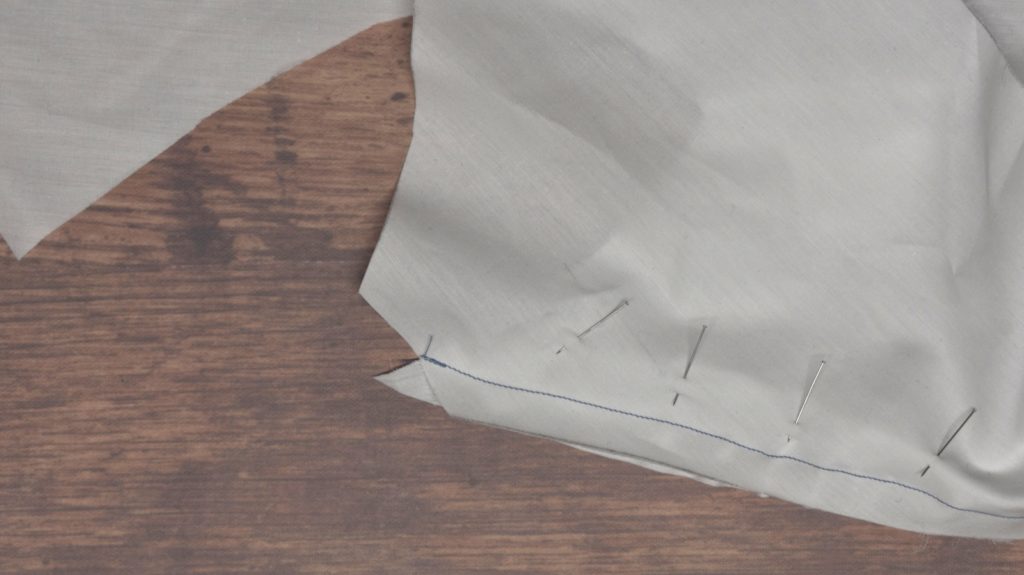
Carefully sew the waist seam of the sidebody using a 1/2″ seam allowance. This row of stitching should also meet at the intersection of the two lines, touching the end of the stitch line from the side seam.
Finally, open everything up and press the seams open.
Drafting the Collar
On to drafting the collar! I recommend not even starting this step until you have made a successfully-fitted toile, as it will only add more complexity to figure out the collar in addition to the usual fitting issues.
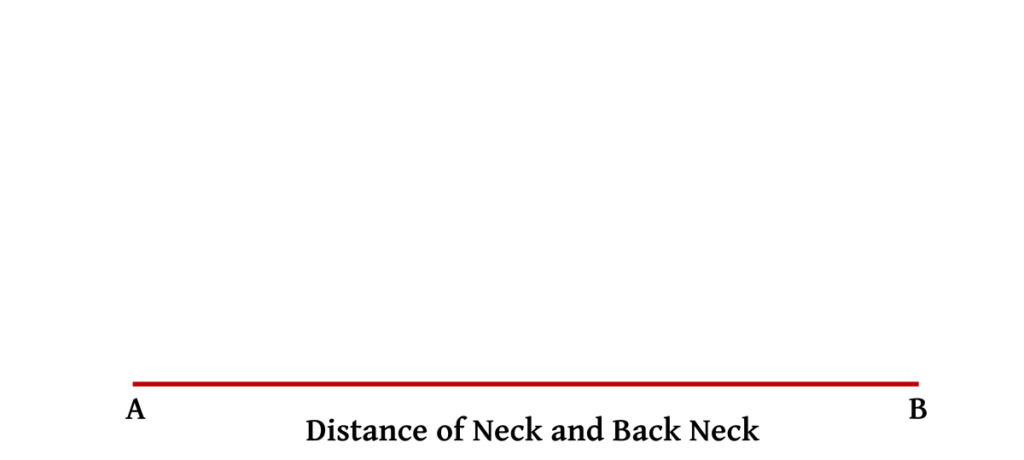
Before drafting, you need to measure the neck of your paletot pattern carefully – I usually stand the tape measure on its side so I can get around the curves more accurately. Measure from the point you made two graduated inches from the front of the coat, along the neck, and the back neck, not including seam allowances.
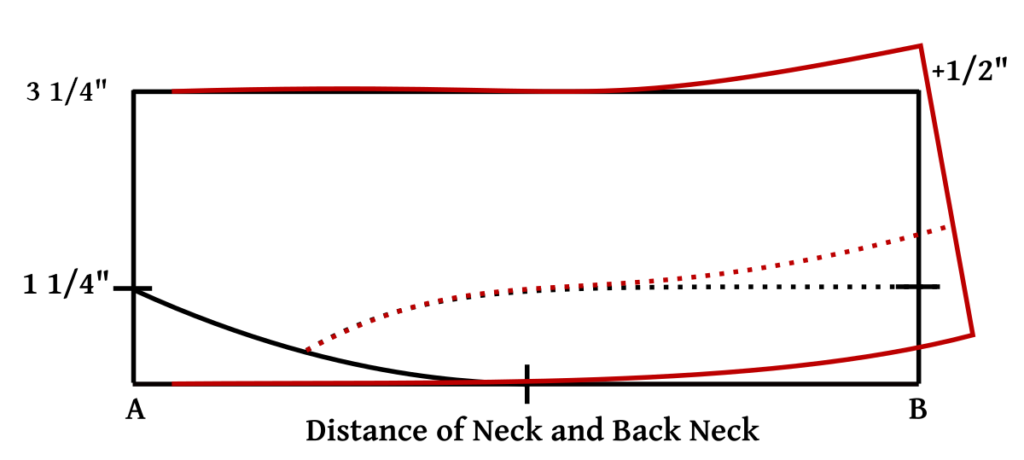
To begin drafting, draw a horizontal line and mark two points on either end equal to the neck measurement you just took.
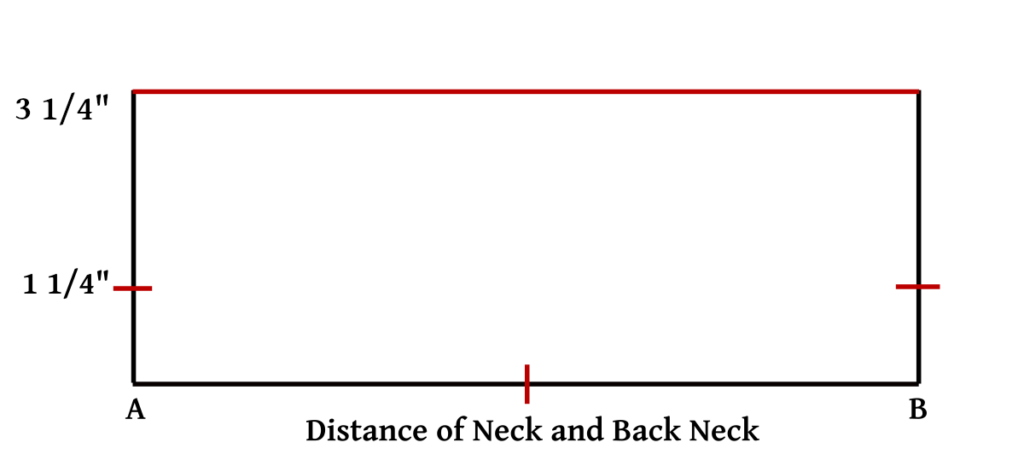
square up at either end and mark the distances 1 1/4″ and 3 1/4″ on each side. You can use graduated inches here, but if you’re making a larger coat size, then I’d advise sticking to normal inches.
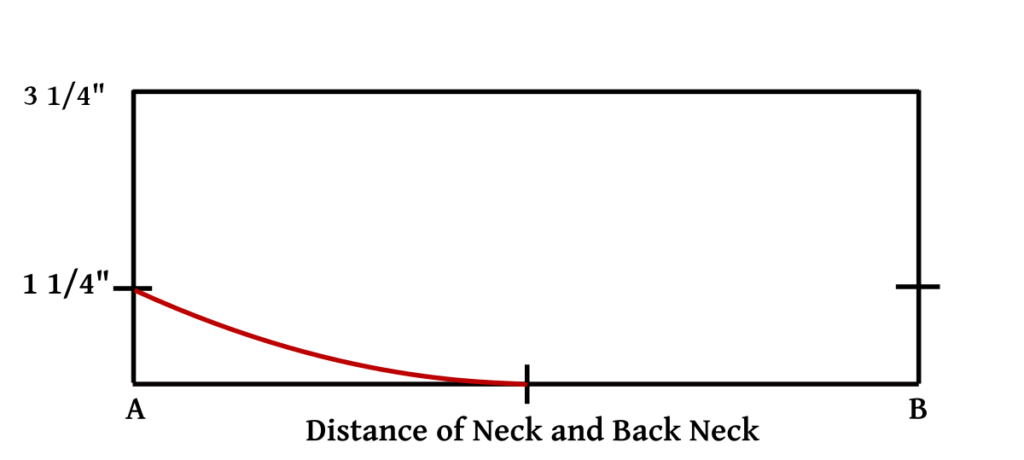
Draw a nice curve from the center bottom to the 1 1/4″ mark.
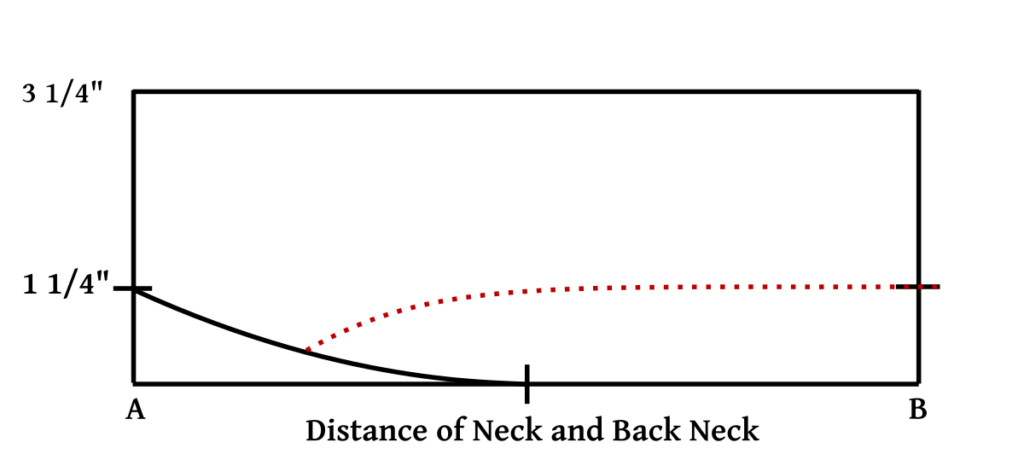
Draw the roll line next, at first parallel to the bottom of the collar, then curving downwards to intersect about halfway between the bottom curve of the collar. Note, I’m just using the dotted line for clarity, use a solid line for your own.
This next step is optional, but I find it gives a better fit to the linen collar, since we won’t be doing any pad stitching for shape as in a normal coat.
First, raise the point on the right from 3 3/4″ to 4 1/4″. Then redraw the top seam of the collar with a curve gradually straightening out near the center.
Next, square down from 4 1/4″ to get the new center line of the collar. We need to square down here in order to prevent getting an ugly ‘v’ shape to the back of the collar. This line should be equal in width to the left line, 3 3/4″.
Finally, redraw the bottom of the collar with another curve.
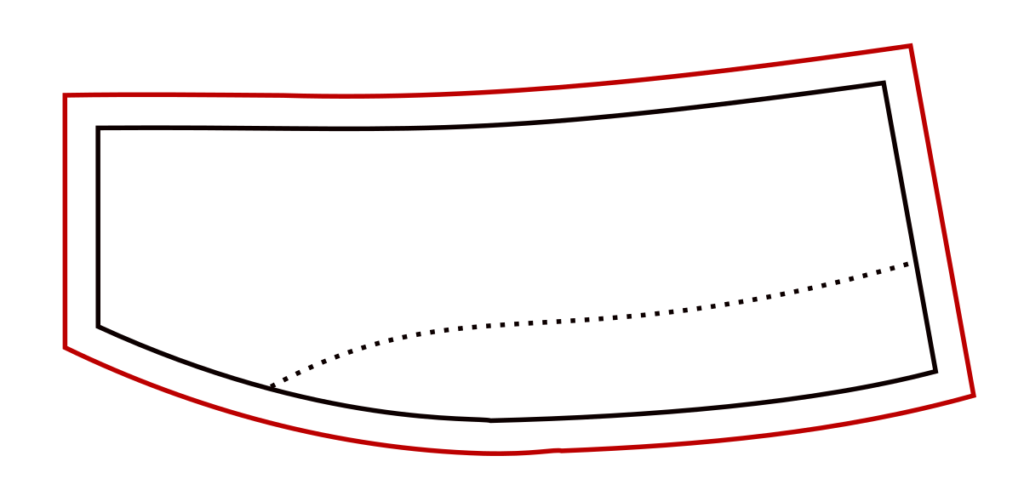
When you are happy with the shape of your collar, add 1/2″ seam allowance all around and cut it out.
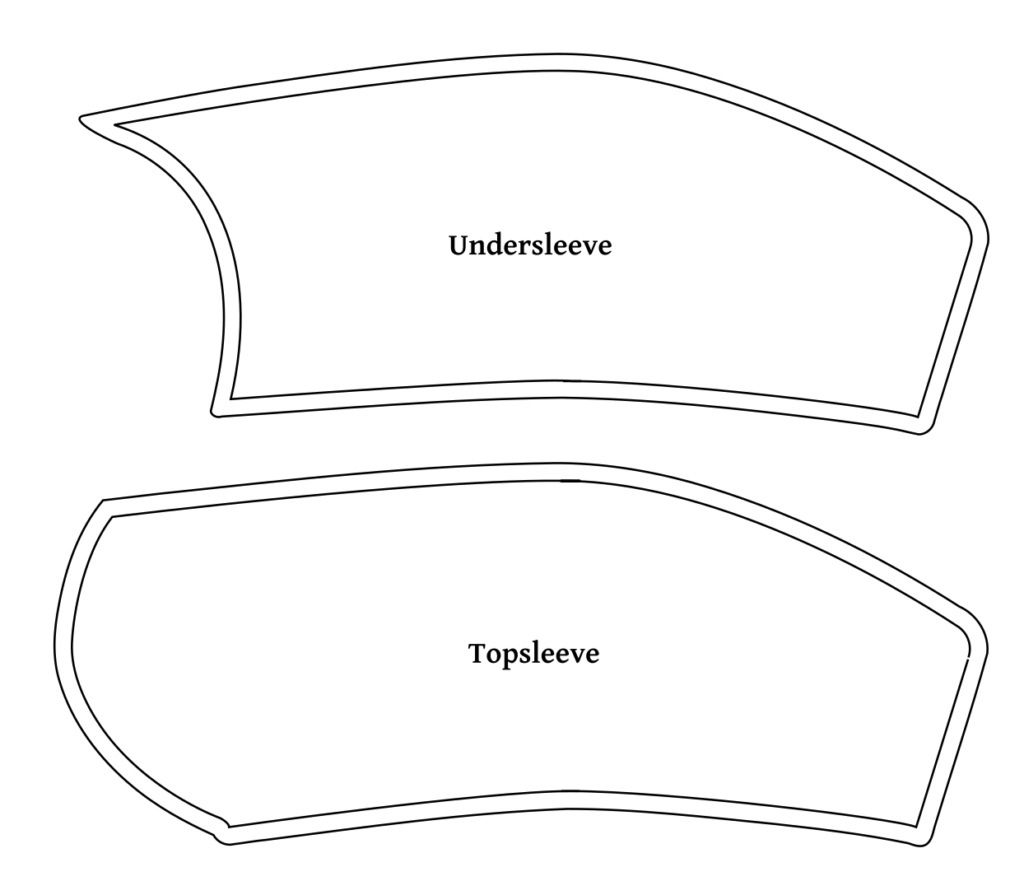
Drafting the Sleeves
I highly recommend not drafting the sleeves until you are happy with the fit of the coat and collar.
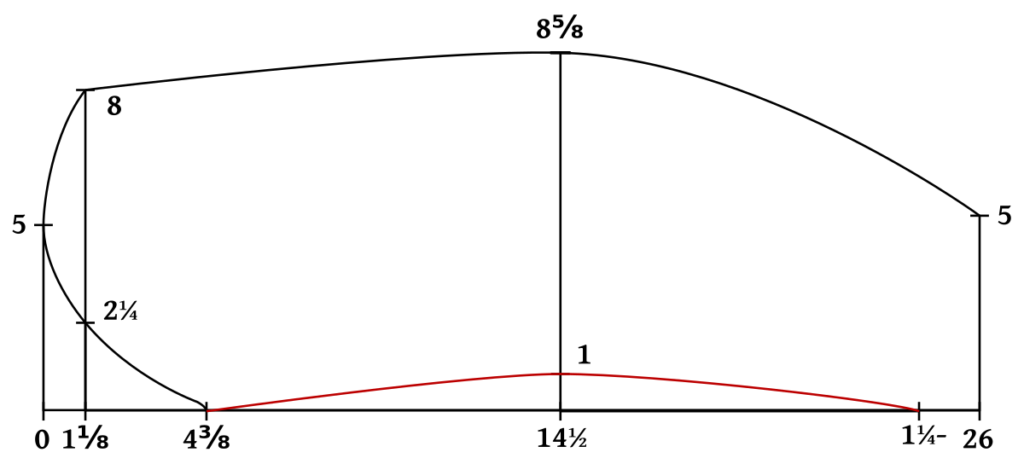
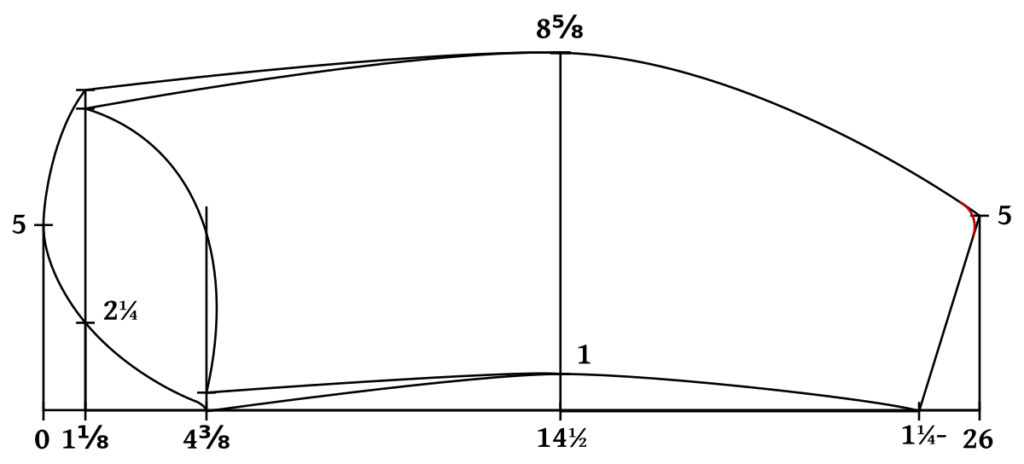
To begin, draw a horizontal line and mark out the following points from 0 with your graduated ruler (according to your breast size still).
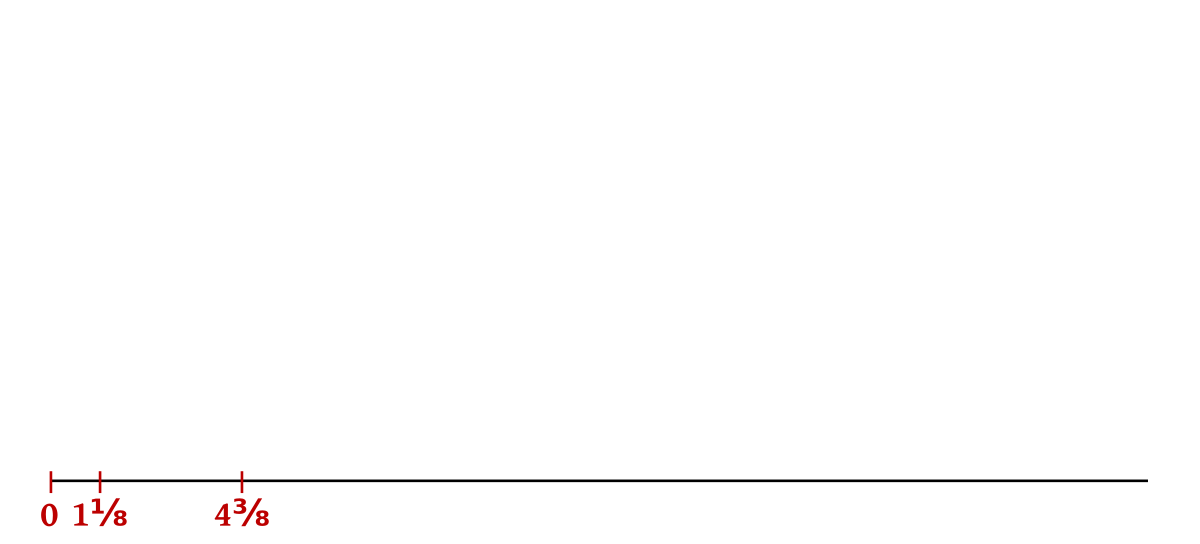
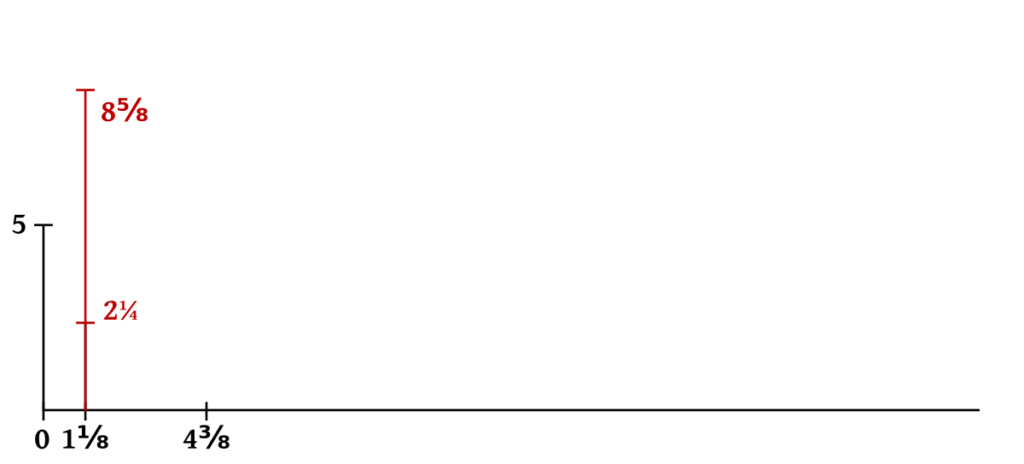
Square up from point 5 graduated inches from point 0. This gives the top of the sleeve head.
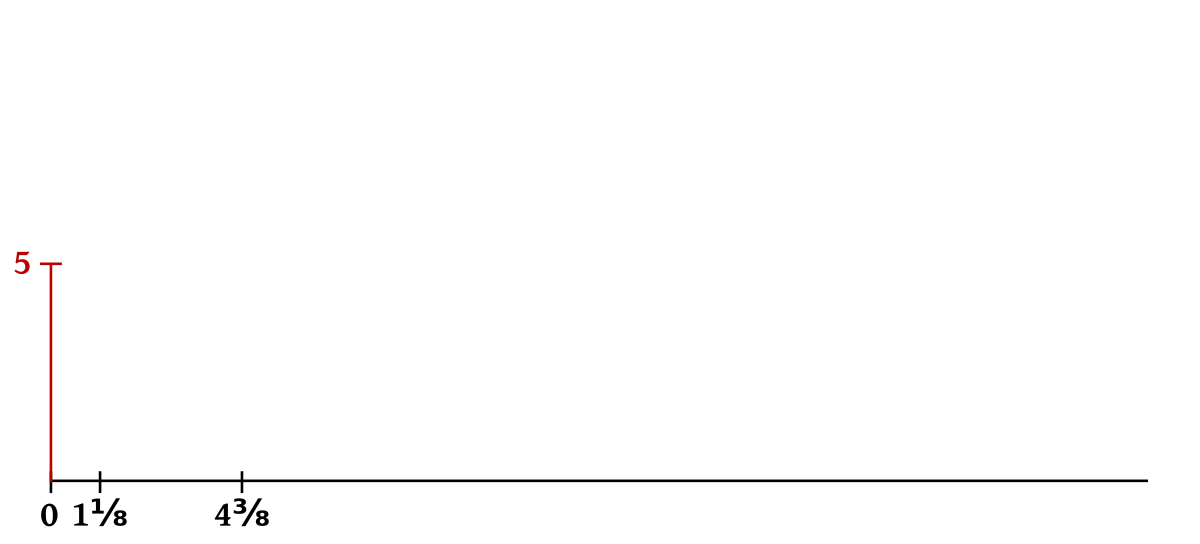
Square up from 1 1/8 and mark the points at 2 1/4 and 8 5/8. This latter number really dictates the width of the sleeve head, so if it ends up too big later, this is the area you’d want to adjust.
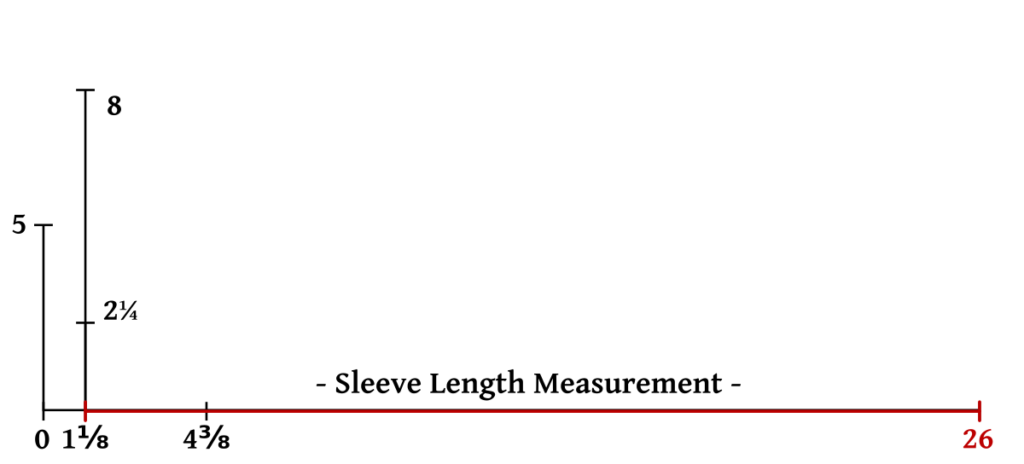
Now mark 26 graduated inches, measuring from the 1 1/8 mark, indicating the length of the sleeve. Definitely compare it to the sleeve measurement you took, and if there is a discrepancy, go with your actual measurement, not the graduated one.
N.B. I made a mistake with the draft and you’ll see point 8 listed in most of the following diagrams. It should indeed be 8 5/8.
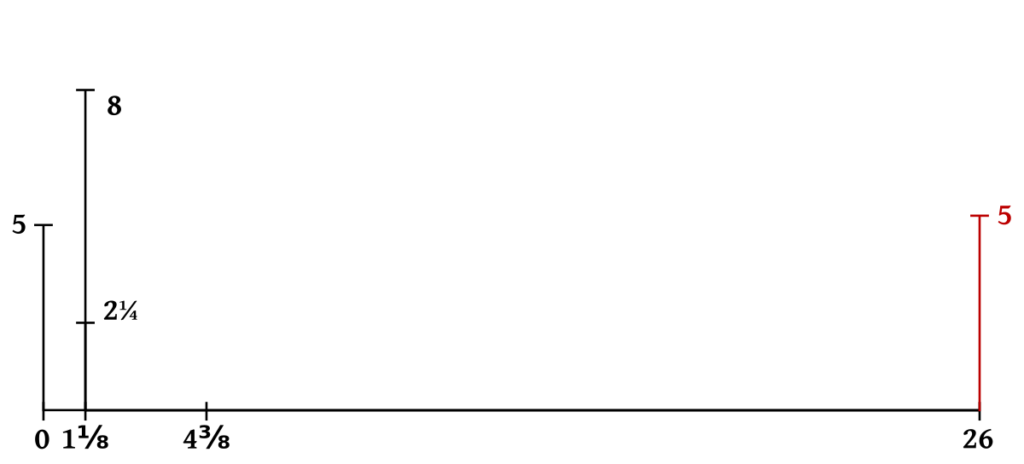
At the cuff end of the sleeve, square up 5 graduated inches for the width of the cuff. Generally, I wouldn’t go more than 5 1/2 regular inches except for the thickest of wrists.
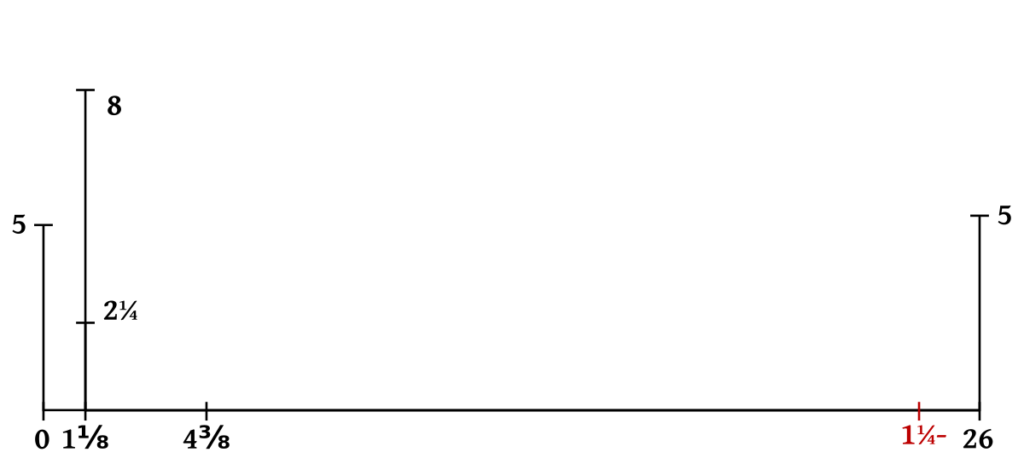
Measuring from the cuff, mark a point at 1 1/4 graduated inches.
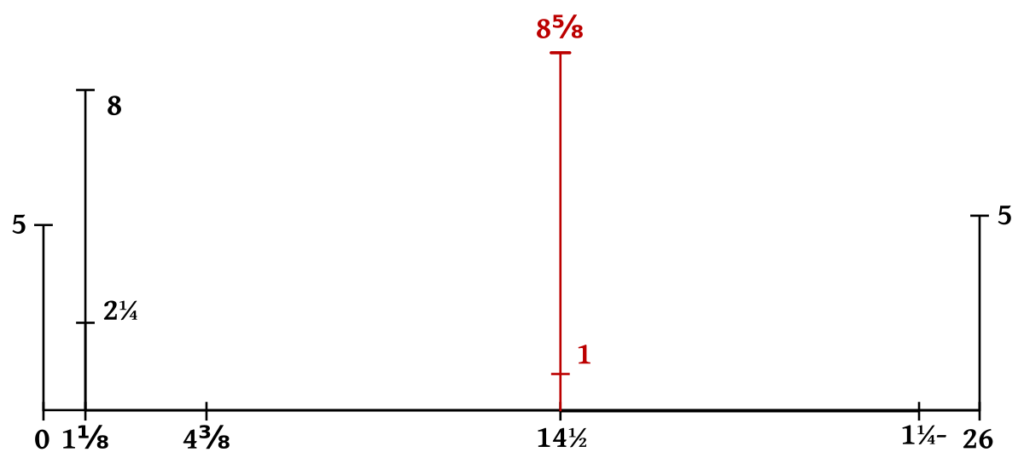
Now for this step, the graduated measure at 14 1/2 is often incorrect, especially if you have used your own sleeve length measurement. Basically, find the center between 1 1/8 and 26 and mark that point.
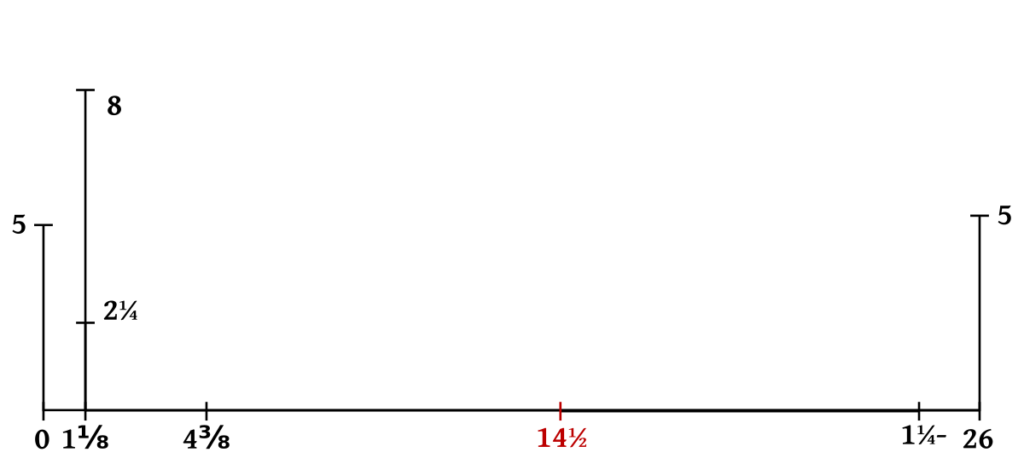
Square up and mark 1 graduated inch for the curve of the sleeve, and while 8 5/8 is recommend, I’d actually go with more of a 9 5/8 for the 1860s period, to give more of that ‘ballooned’ sleeve look. It may take some experimentation on your part to get just the right curve.
Now it’s time to draw in the curves and outlines. Start with the top of the sleeve heard, drawing a nice curve connecting 8 5/8, 5, 2 1/4 to 4 3/8. As your line is approaching 4 3/8, aim a little high and then curve in the opposite direction, kind of like an ‘S’, to make forming the seams later on a bit easier.
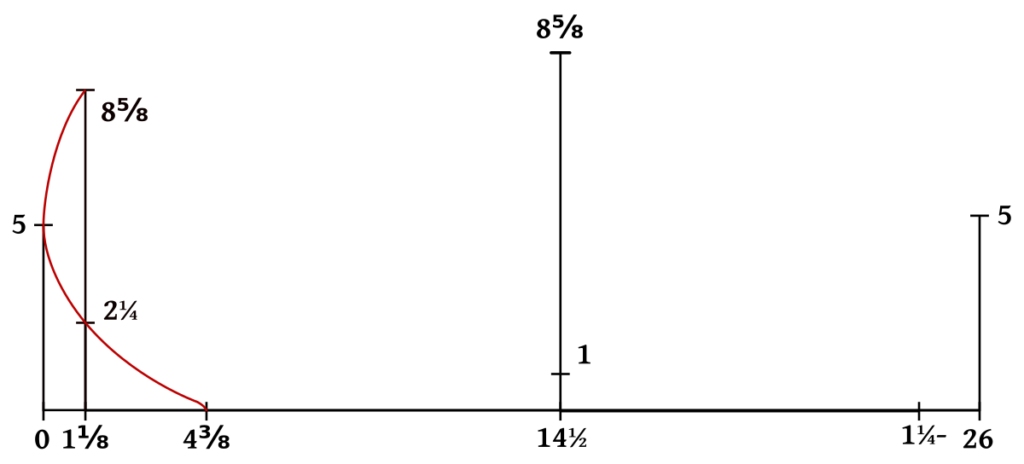
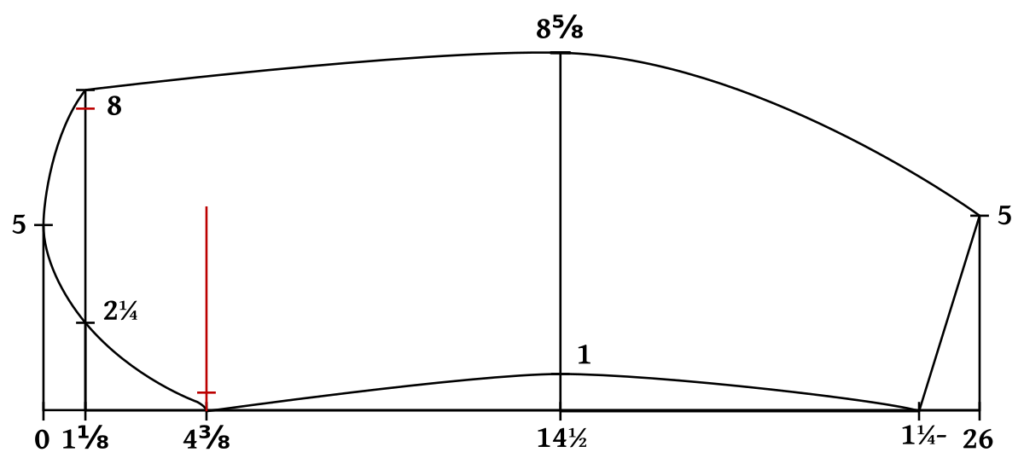
Draw the rear seam for the top sleeve. Again, you may need to adjust the curve at 8 5/8 to make it a little fuller.
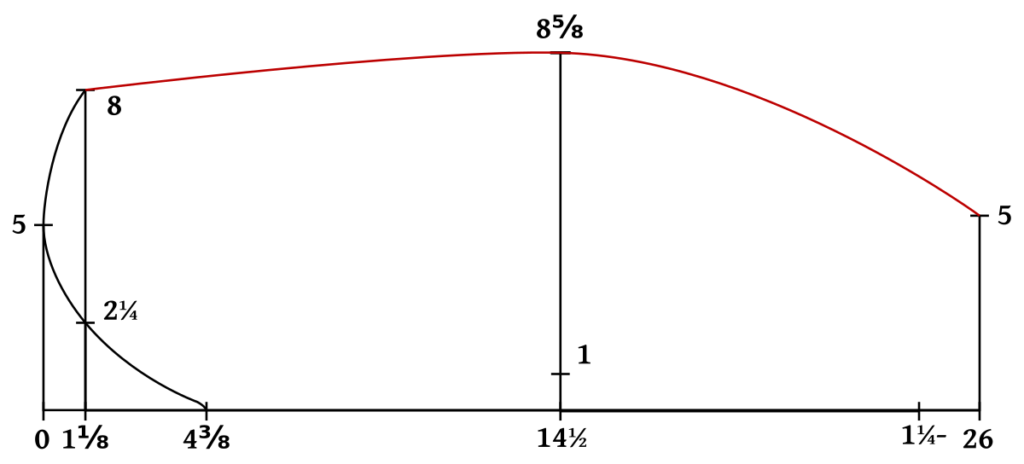
Draw the front sleeve curve from 4 3/8, through 1, to 1 1/4.
Draw the cuff with a diagonal line from 1 1/4 to 5. This completes the top sleeve.

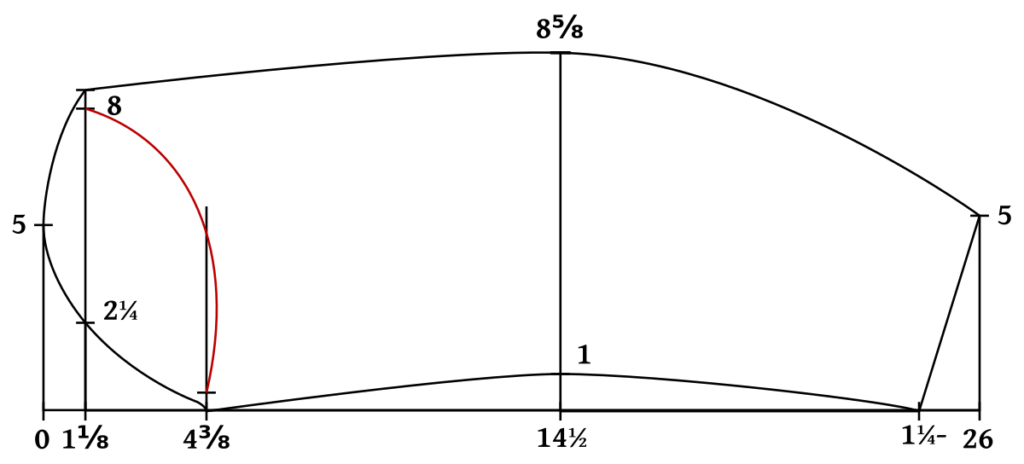
Square up a line from 4 3/8, the length doesn’t really matter much. Mark 5/8 inch down from the point at 8 5/8 (8), and then 3/8 up along this new line from 4 3/8.
Draw a curve for the undersleeve from 8 to 4 3/8, passing by the construction line to a depth of roughly 1/4″, as shown.
Draw a line from point point 8 tapering into 8 and 5/8 to finish the rear undersleeve seam.
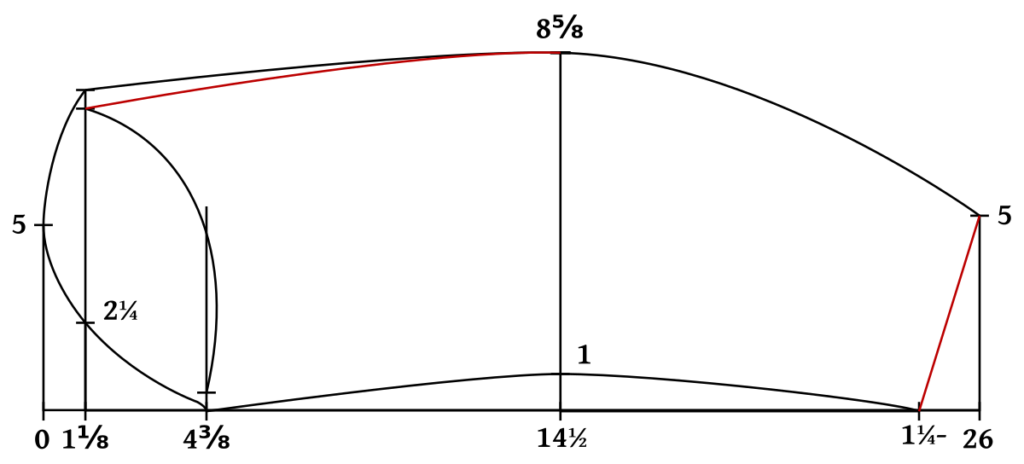
Do the same for the front seam.

Before completing the draft, curve the rear seam at the sleeve cuff at 5 with the same curve you did on the coat neck and hem.
Finally, trace each piece on to a fresh sheet of paper to separate the patterns, and add a 1/2″ seam allowance all the way around.
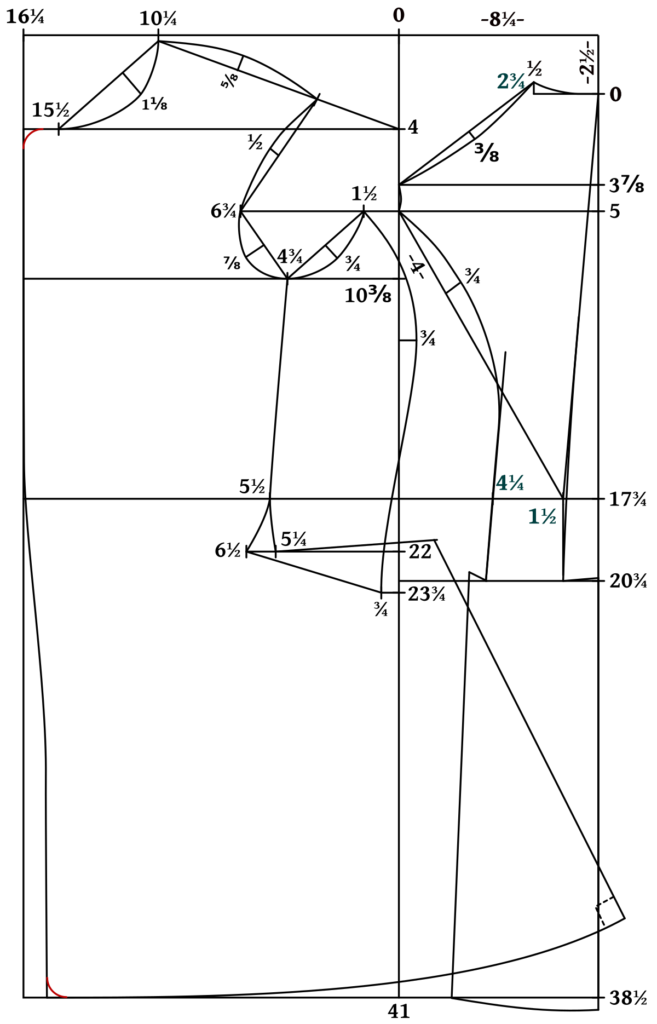
Draft Details
There are just a few details left on the draft before we are ready to cut out a pattern.
The first is adding a roll line to indicate where the lapel begins. On the original coat, this seemed to start about one inch below the chest line or armscye. Connect it to the top of the shoulder point as shown.
Next, add the buttonholes to make finding their position much easier later on. There were three buttonholes on the original. The first should be located 1/2″ below the bottom of the lapel. The bottom should be on the waistline (I put mine a 1/4″ above just so you could see it more clearly. And finally, the third and middle buttonhole should be spaced equidistantly between them. All of the buttonholes should be 1/2″ from the edge.
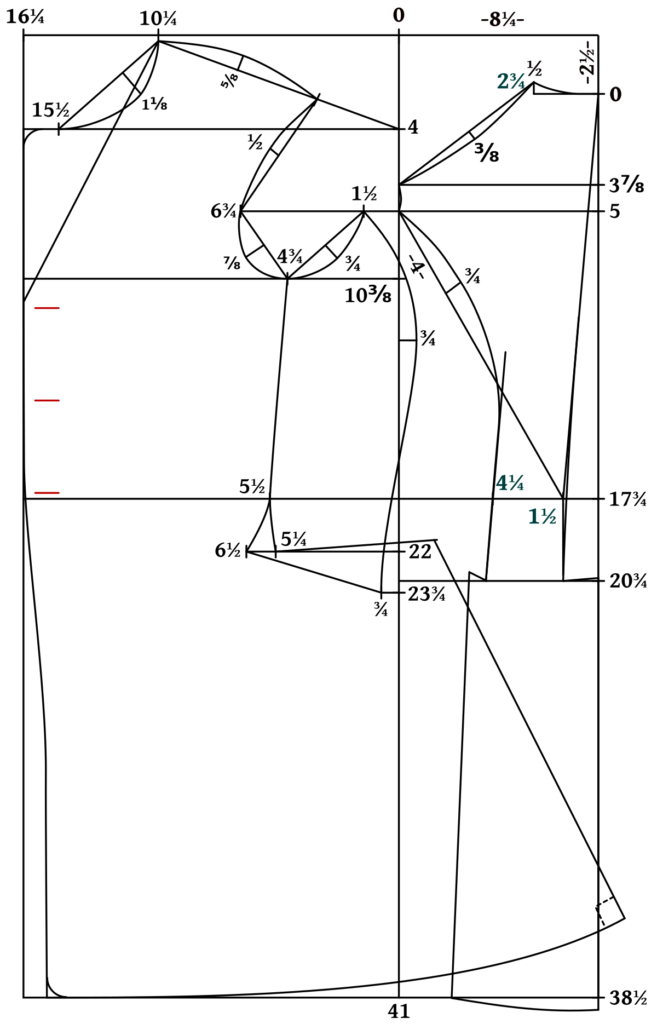
This is not in the original draft, but makes sense and also makes life a lot easier. At the top of the skirt near the back, raise the back point up 3/8″ to match the pleat on the back piece, redrawing the lines as necessary. The total width of this is 7/8 graduated inches like the back.

Another little detail to add is a mark two graduated inches from the center front along the neck line. This indicates the end of the collar, which you’ll measure from later. Transfer this to your fabric pieces when the time comes.
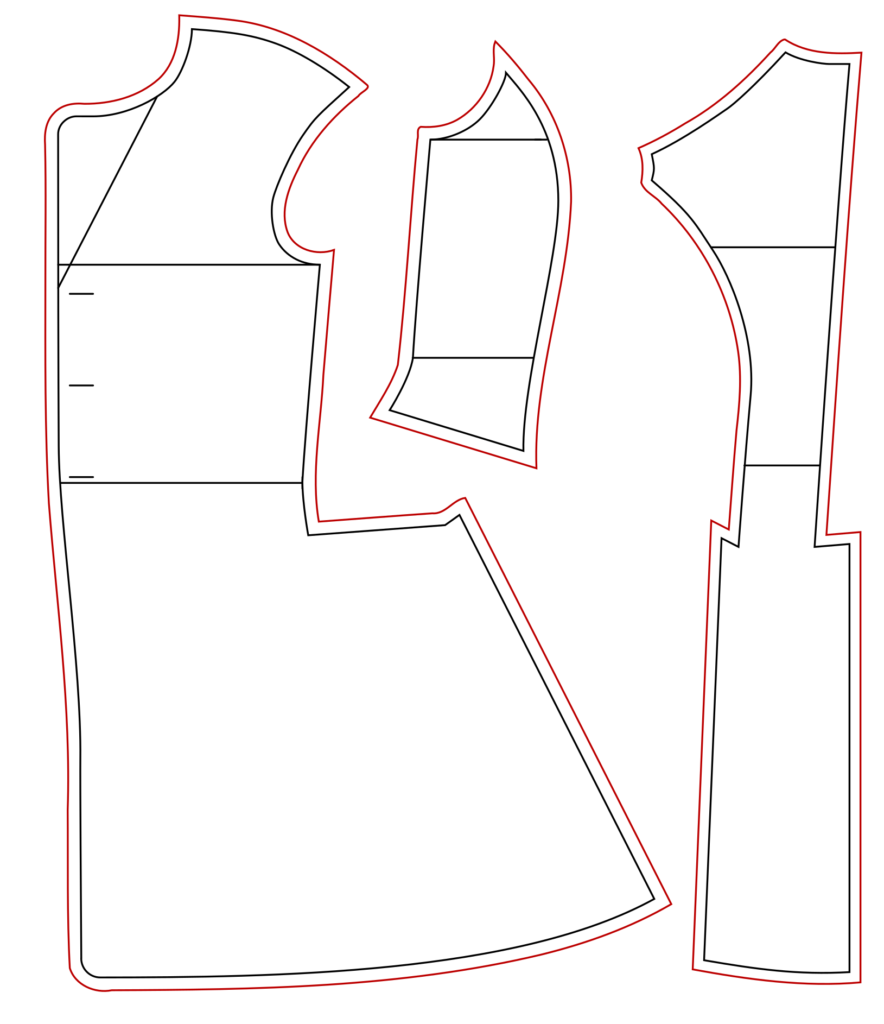
Finally, you may have noticed that all of the pieces are overlapping each other. You’ll need to separate them in order to make them usable. I like to trace out the back and side body onto separate pieces of paper, but you might transfer the front as well in order to preserve the original pattern draft in its entirety for potential alterations later on.
Typically I can see through the paper so I just trace it that way. They also make pattern tracing wheels you could use, or perhaps a light table. Just do what works for you.
After the patterns are traced out, using a quilting ruler, add a 1/2″ seam allowance all the way around each pattern piece. This is necessary for the type of seams we will be using to piece the paletot together.
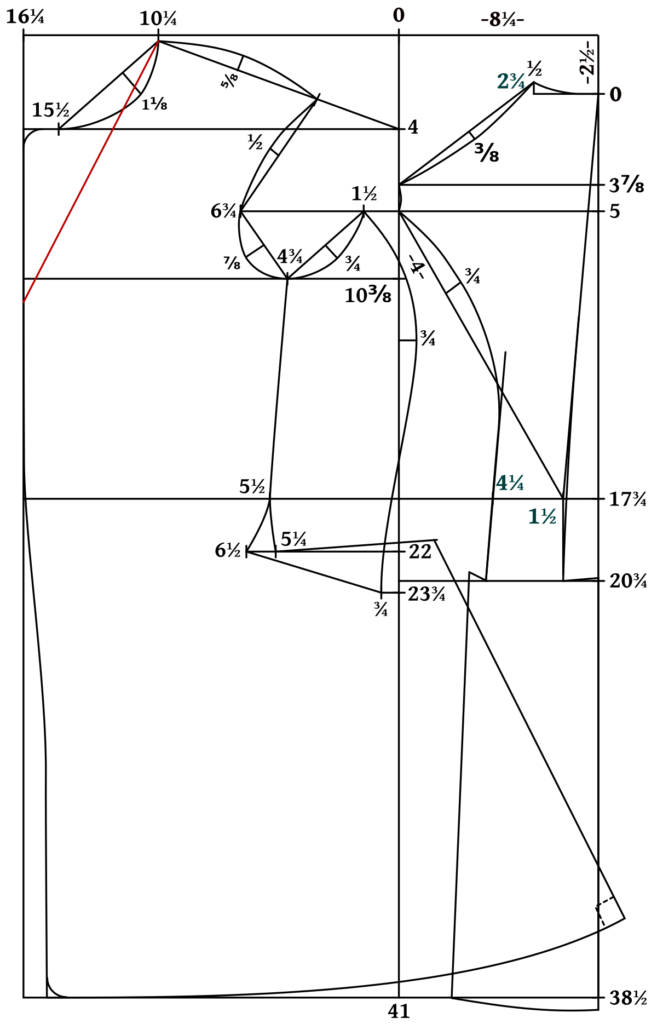
Drafting the Front
Now that the back is complete, we can move on to the front of the draft.
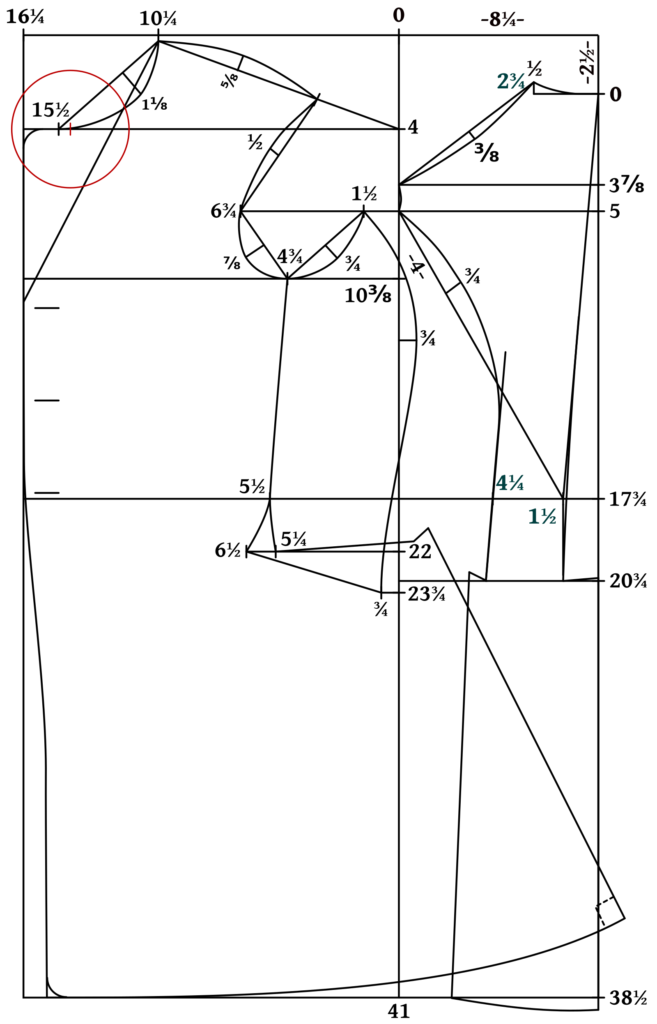
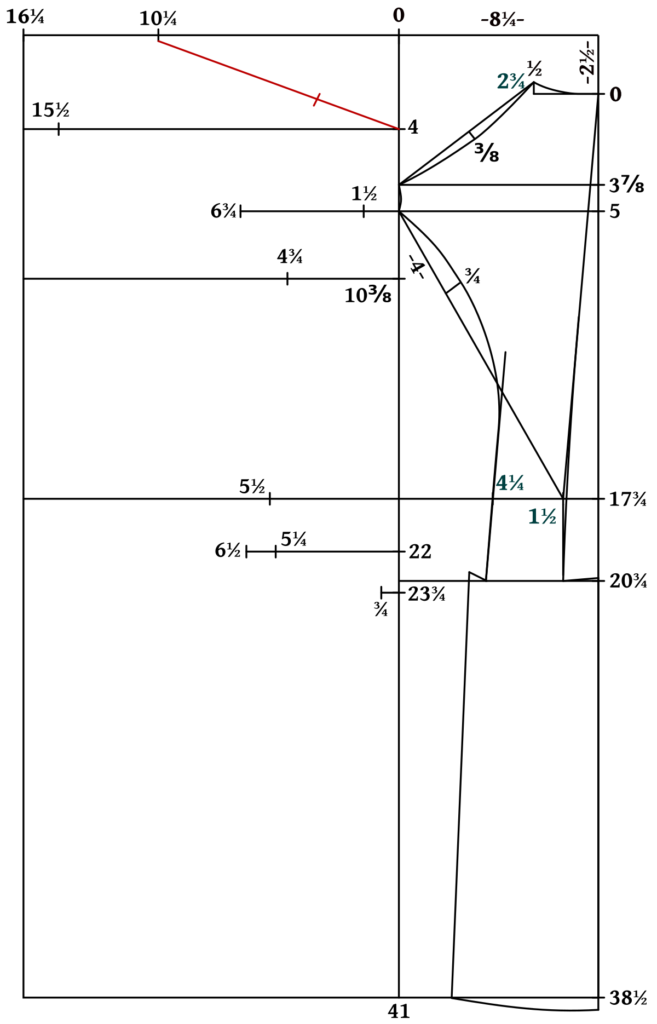
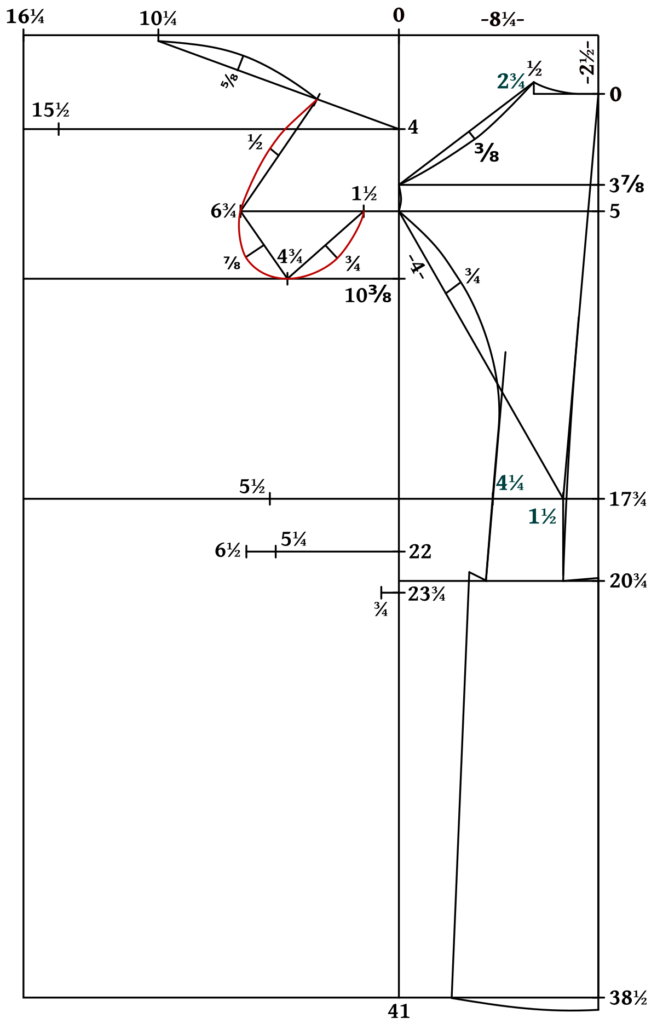
Begin by marking the following on the construction line from 0:
4 for the shoulder angle.
10 3/8 for the bottom of the scye.
22 for the top of the skirt.
23 3/4 for the bottom of the side piece.
This is somewhat of a big step, but just mark one thing at a time down the list:
10 1/4 for the shoulder point. Also square down 1/4″ here (not shown).
15 1/2 for the neck point.
1 1/2 for the top of the side body.
6 3/4 for the armscye width.
4 3/4 for the bottom of the armscye.
5 1/2 for the position of the side seam.
5 1/4 and 6 1/2 for the ‘spring’ at the hips.
3/4 for the bottom of the side body.
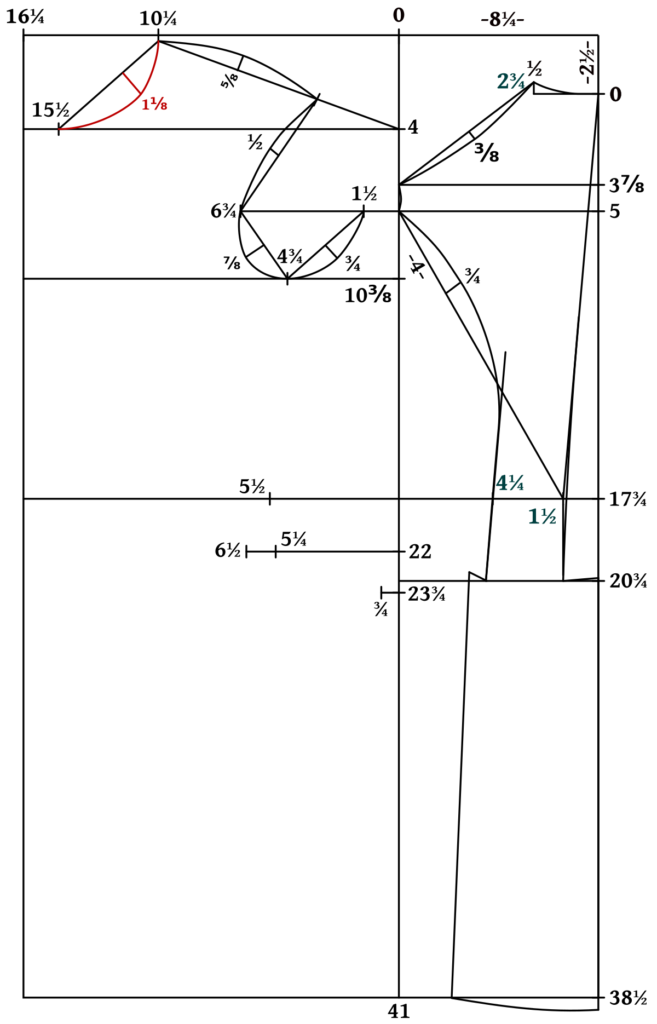
Now draw the construction line for the front shoulder from 1/4 inch below 10 1/4 to 4. Then measure the construction line for the back shoulder and mark the same distance on the front shoulder (from 10 1/4).
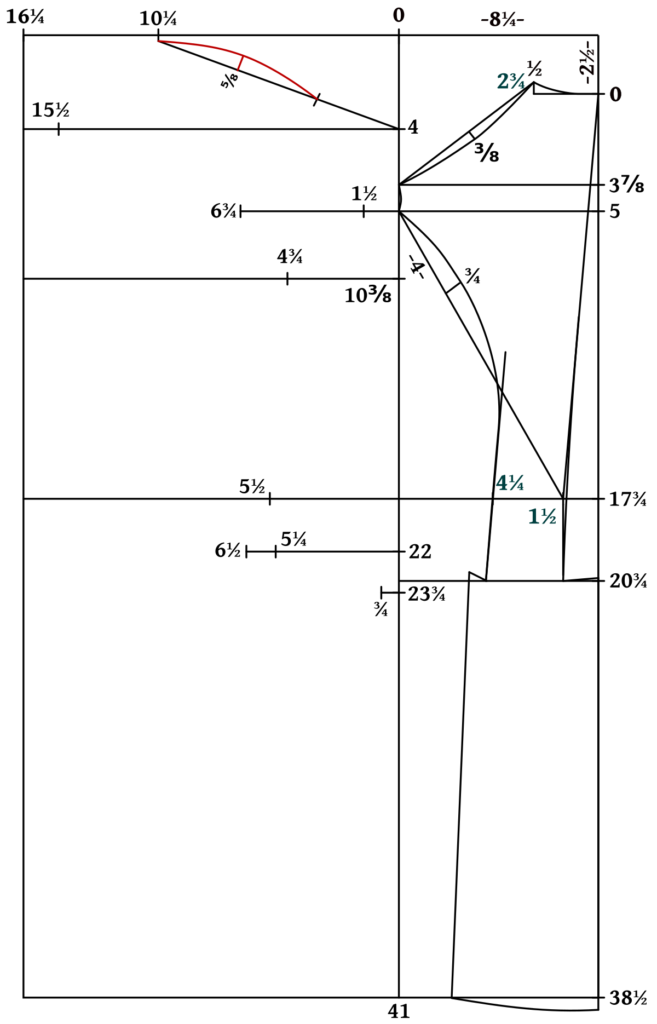
Find the center of the shoulder and square up 5/8. Draw a curve connecting the three points.
Draw construction lines for the armscye as shown.
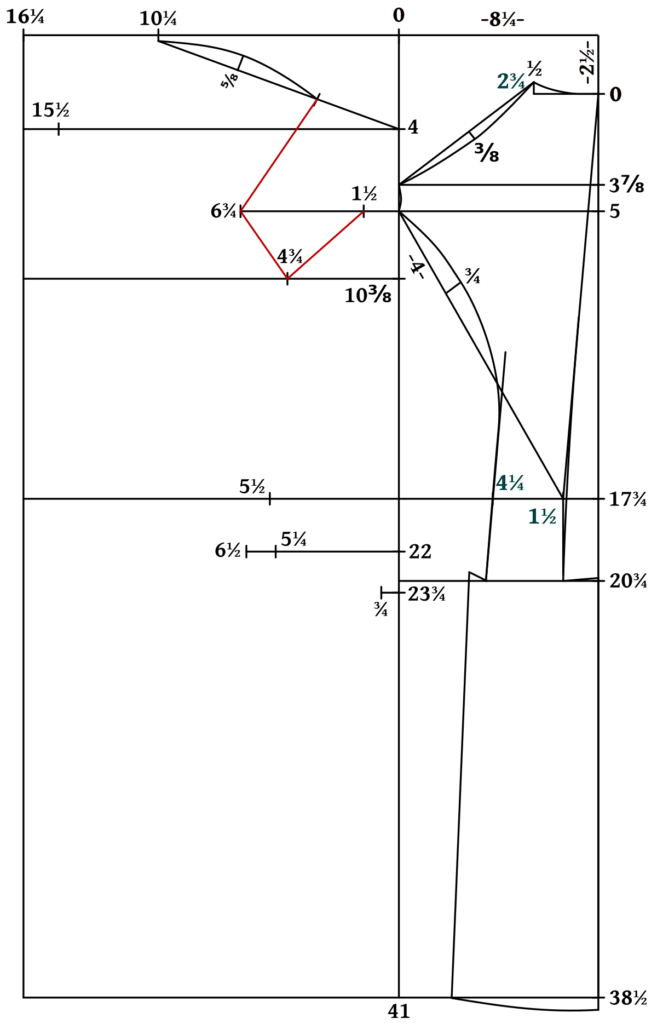
Find the centers of each of the armscyes and square out the distances as follows:
Front armscye: 1/2
Bottom armscye: 7/8
Rear armscye: 3/4
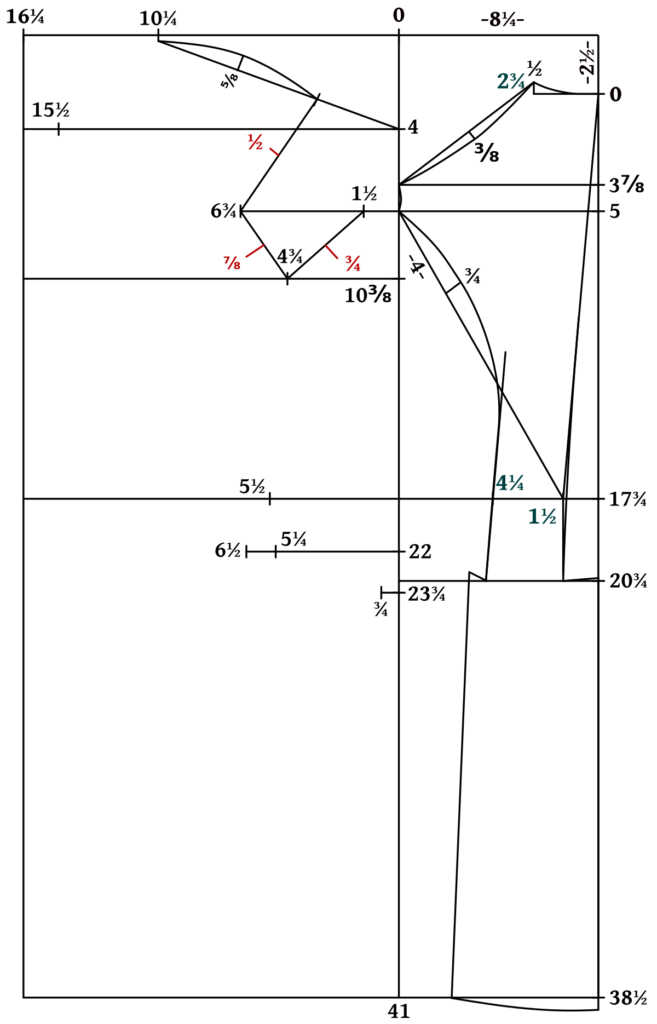
Now draw a graceful, continuous curve around the armscye, connecting the various points as shown.
To find the curve of the neck, make a construction line from 10 1/4 to 15 1/2. Mark 1/3 of the distance from 10 1/4 and square out 1 1/8. Draw a curve connecting the points.
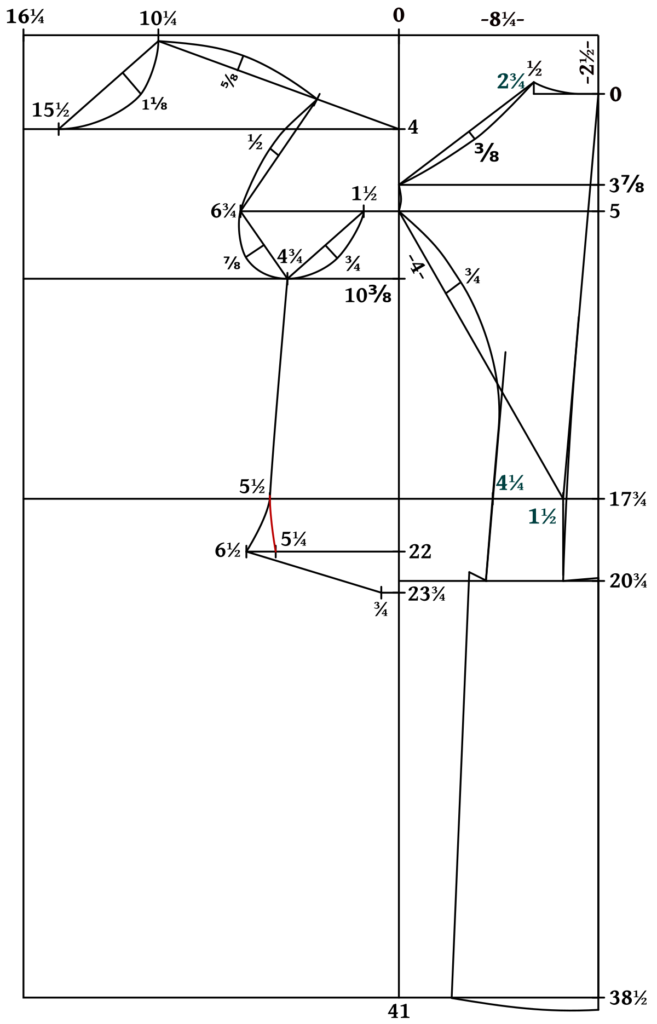
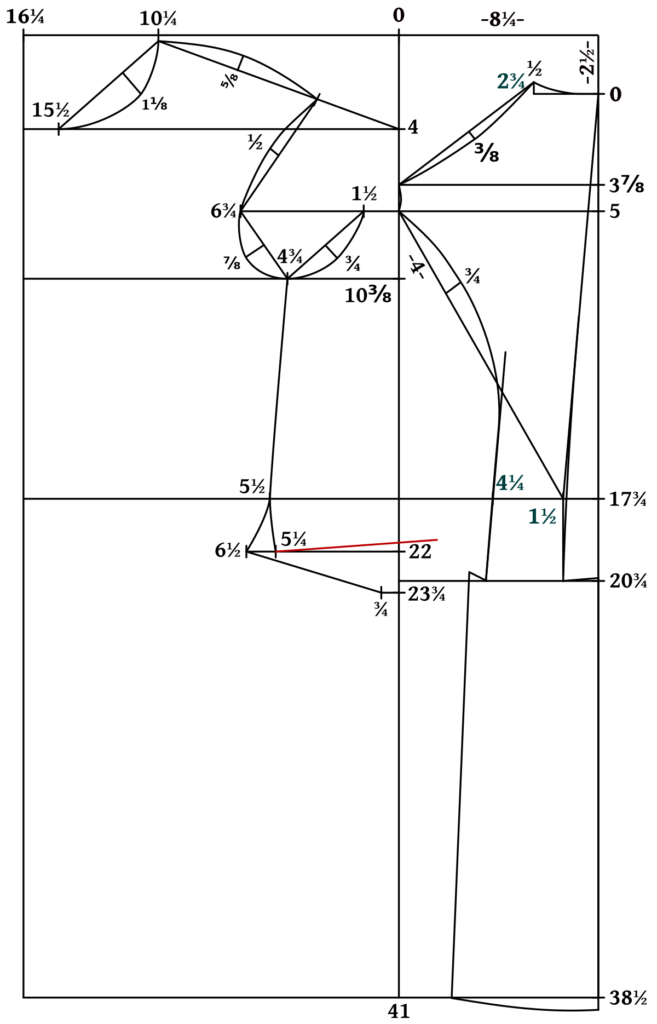
Now it’s time to mark the side seam. Draw a straight line from 4 3/4 to 5 1/2 as shown, gradually curving from 5 1/2 to 6 1/2. Connect 6 1/2 to 3/4 with a straight line for the bottom of the sidebody.
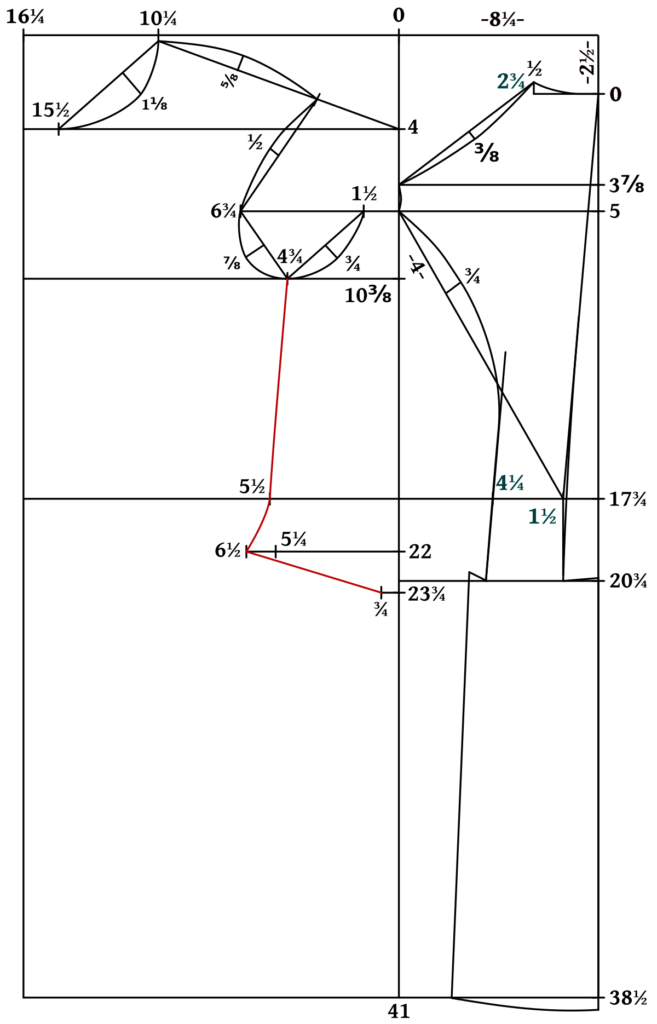
Curve 5 1/2 to 5 1/4 as shown. This gives some spring or room for the hips on the front of the coat.
While we’re at it, now’s a good time to check the length of the side seam from 4 3/4 to 5 1/2 and compare it to the measurement you took. If it’s way off, I’d stick with the measurements from the draft, but feel free to share a photo of your draft and I can take a look.
This next step is a little unclear because Devere, the author of this draft, does not give any measurements for this. Here’s what I like to do:
Draw a line from 5 1/4 towards 22, rising up 1/2 as it crosses the construction line from 0.
For the length, make it the same as the bottom of the side body (6 1/2 to 3/4) plus 3/4 for the back of the pleats.
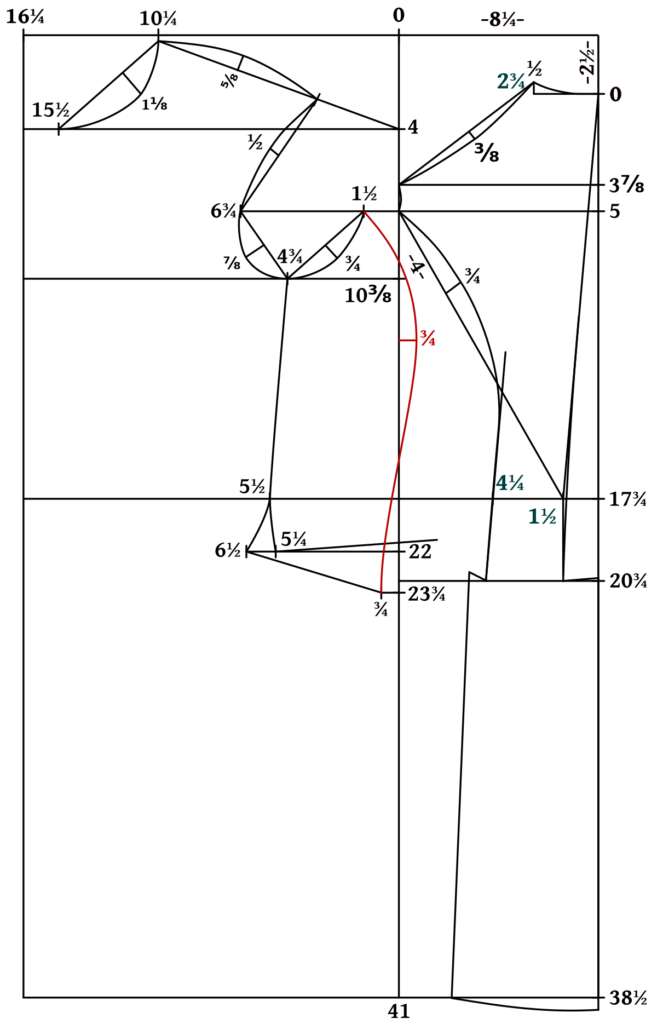
Drawing the curve for the side body takes a little bit of artistry as well as careful calculation. About 2 inches below 10 3/8, square out 3/4. Then draw a curve from 1 1/2 through 3/4 to 3/4 at the bottom. At the bottom, the line should pretty much even out to being completely vertical. This step can take a bit of trial and error but it’s worth the effort.
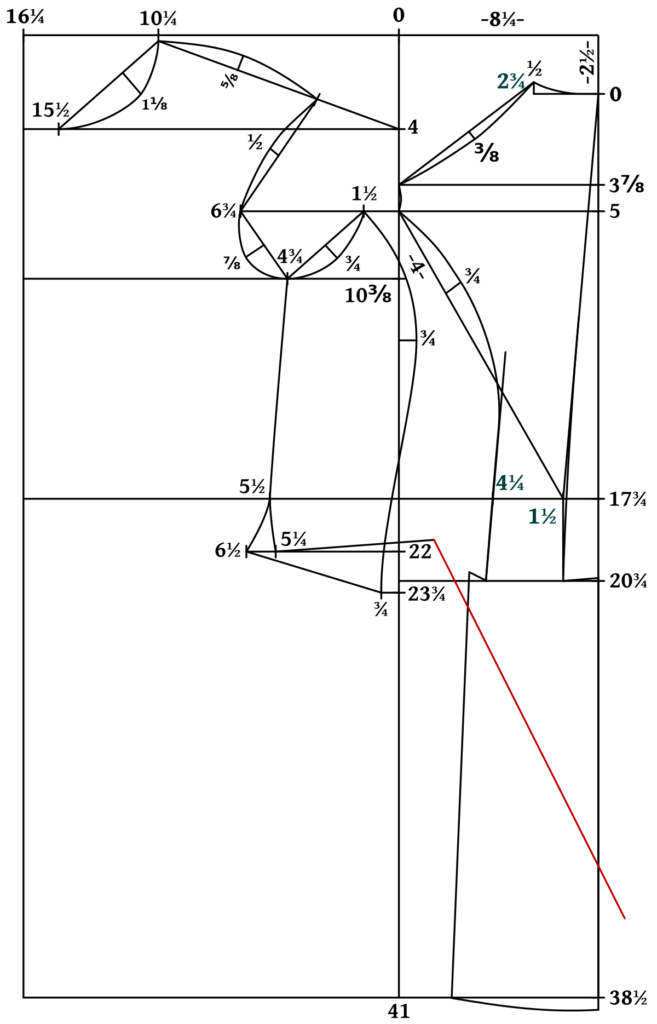
Now draw the line for the back of the skirt. Devere doesn’t give an angle for this, but 30 degrees from vertical is a good starting point. You can widen the angle if you’d like more room in the skirt. This line should be equal in length to the side of the back skirt.
Now draw the bottom of the skirt, starting from horizontal at the front, landing square at the back of the skirt with a nice gentle curve.
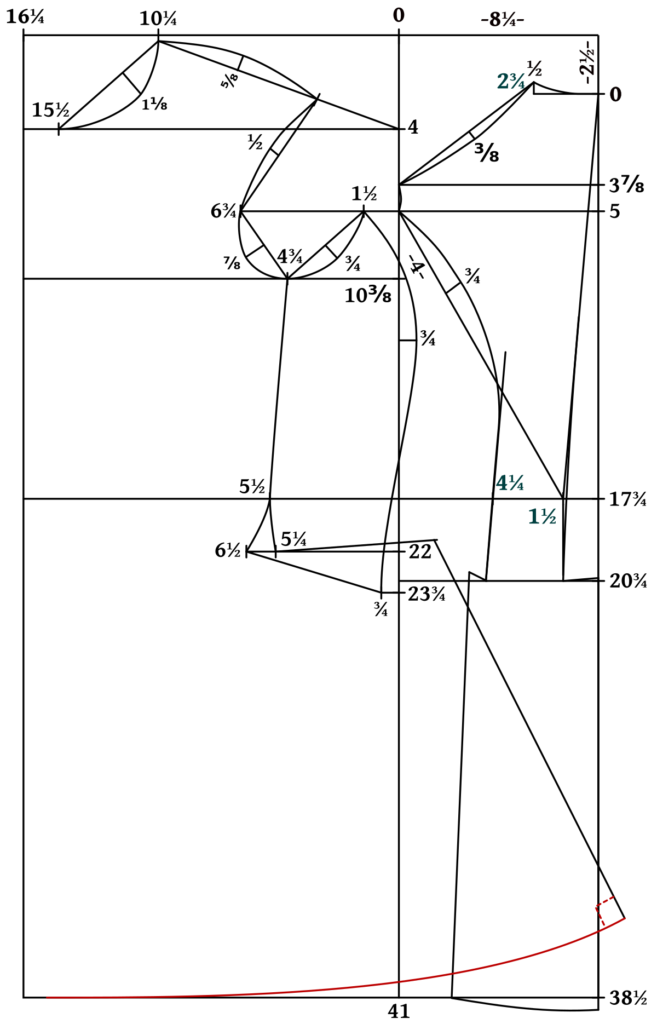
For the front profile, the coat stays along the construction line to the waist. Then it tapers inwards gently to become parallel 1 graduated inch from the front edge.
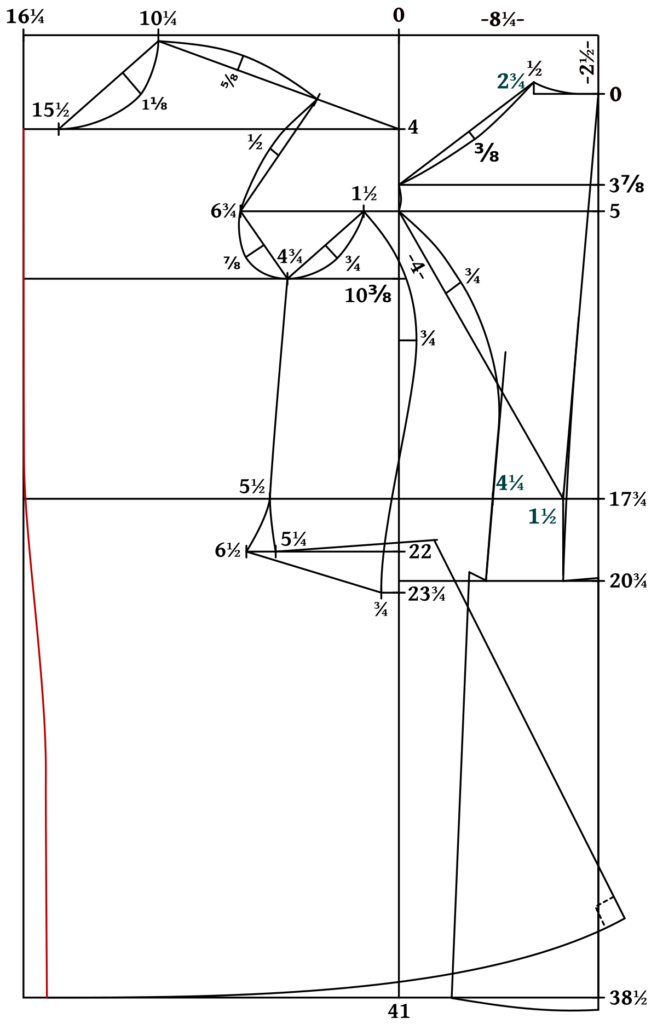
Finally, at the top of the neck, and the bottom front of the skirt, add a bit of a curve to each of the corners. I used a spool of thread about 1 1/2″ in diameter, you could find something similar to help draw your own.
That complete’s the main part of the draft! Next we’ll add a couple of details and then draft the collar, sleeves, and facings.
Drafting the Back
Now that your measurements have been taken, it’s time to get started on the drafting process. You’ll need to clear a space on the table or floor to have enough room for the pattern, which needs roughly a 2 1/2′ by 3 1/2′ sheet of paper for the draft itself, depending on your size of course.
I’ve tried to keep the drafting itself as simple as possible for this course. The first and most important thing to do is choose and print out the appropriate size graduated ruler. Take your full breast measurement, say a 42″ breast, and the corresponding ruler in size 42 is what you will use for the entire draft.
To print out the rulers, you need to make sure your print settings are set to scale at 100%. Otherwise, some printers have a tendency to shrink the printout to fit on the paper, which would of course mess up your draft completely. After printing, compare the size 37 1/2 graduated ruler to a regular ruler, and they should be the same size.
Some of the larger rulers are too big to fit an 8 1/2″ x 11″ paper, so they’ll get cut off. Just work in smaller increments – say you need to measure out 23″, measure 5″+5″+5″+”+3″, for example. It’s a pain but works in a pinch.
As you go along, there are places where you can check your actual measurements against the draft, to look for any gaping errors. I’ll point those places out along the way as we go. All measurements are in the graduated measures, unless otherwise noted.
Finally, use a nice sharp pencil when drafting, so you can easily correct mistakes. Taking care with the details of the drafting process will help the fitting and subsequent steps go a lot more smoothly.
Drafting the Back
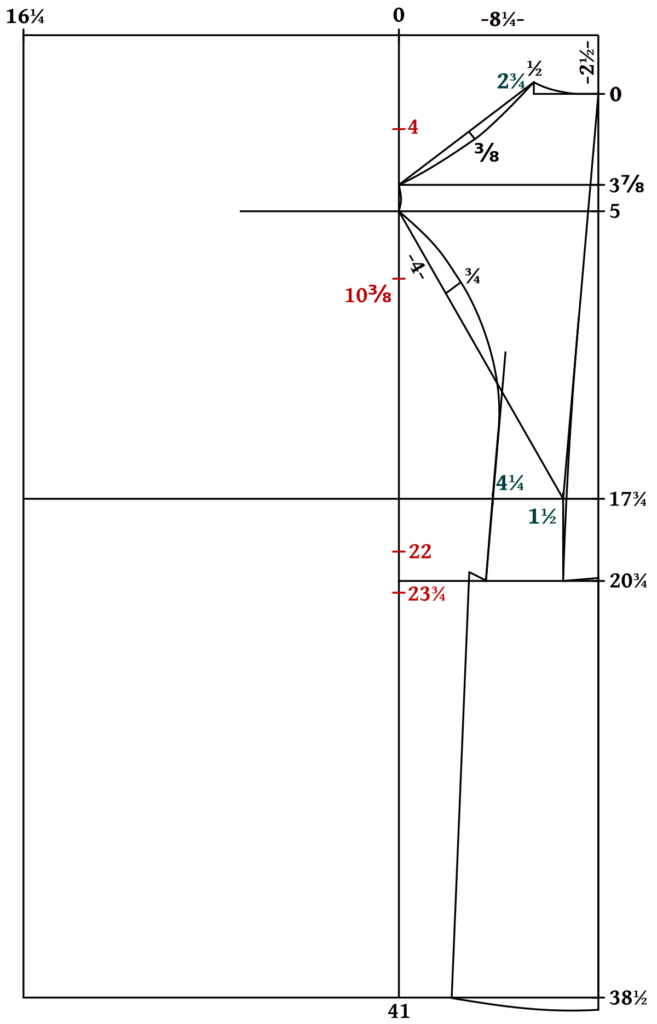
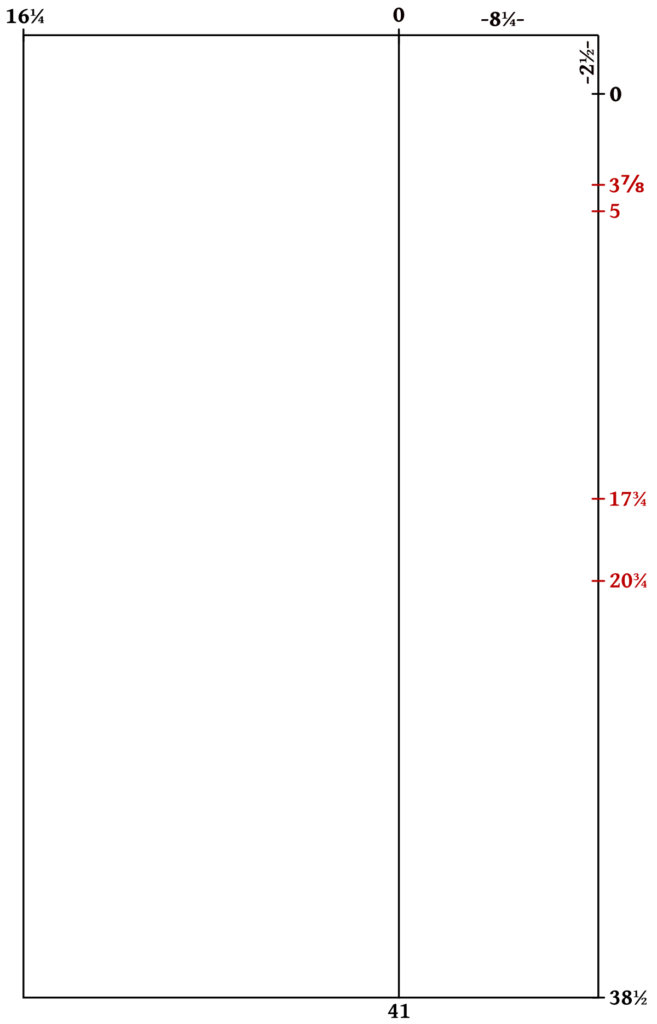
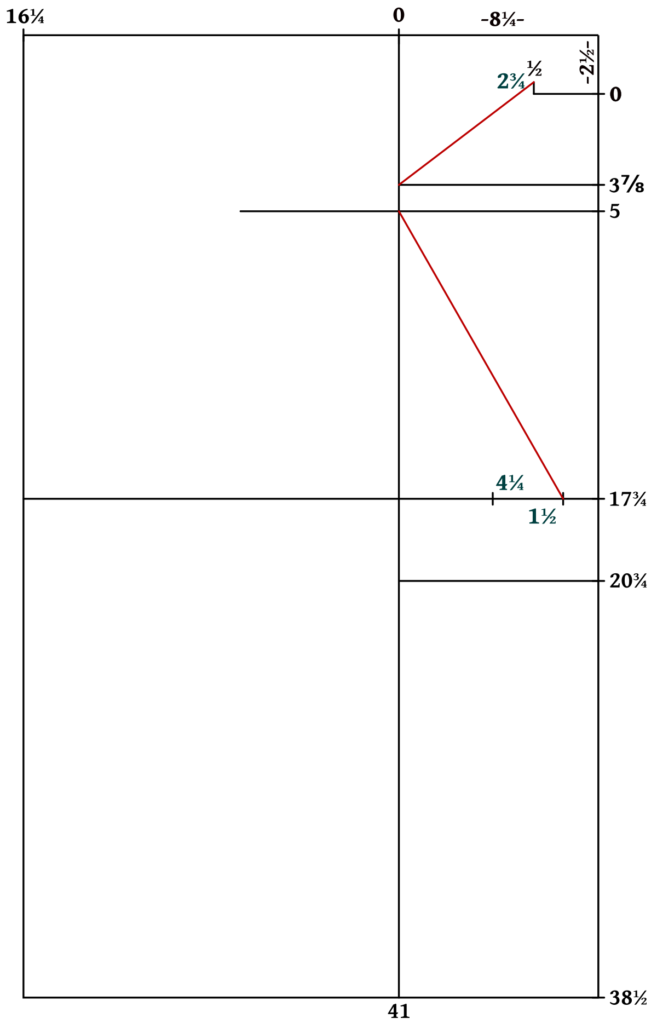
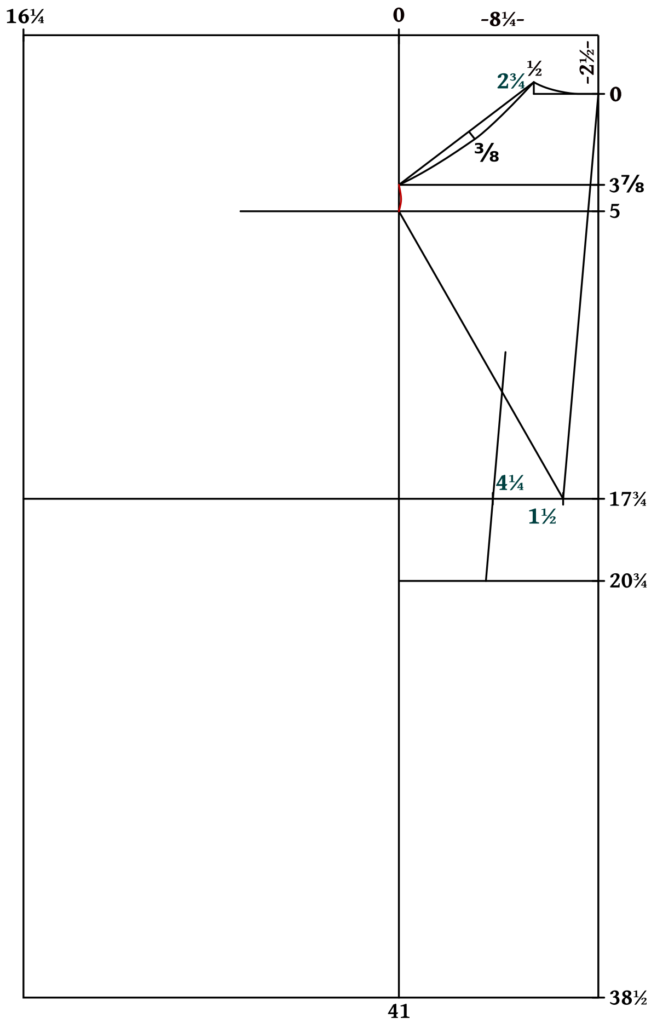
To begin the draft itself, you must first layout what’s called the square. Draw a vertical line down the right side of the paper, connected to a horizontal one at the top. Mark the measurements as shown with your graduated ruler, noting carefully where the 0 points are. There are two 0 points in different locations, which can make things confusing if you forget that later on. All measurements are taken from the 0 points accordingly.
You can compare the distance between 0 and 38 1/2 to the measurement you took for the length of the coat. Feel free to adjust this if you’d like, now’s the best time to alter it!
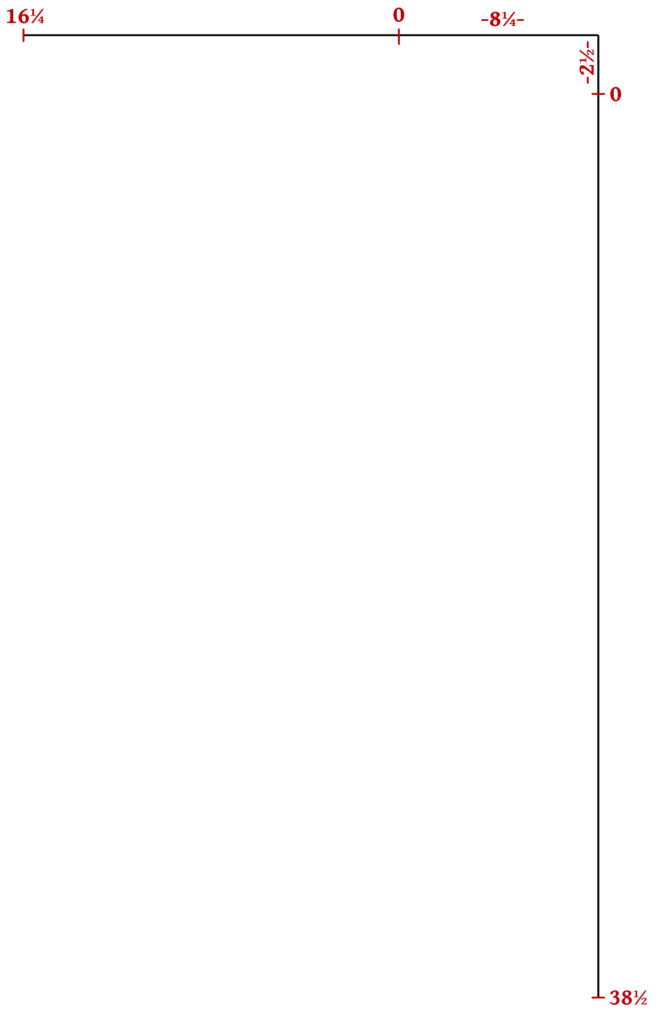
Complete the square as shown, squaring down from 16 1/4 and 0, and across at the very bottom.
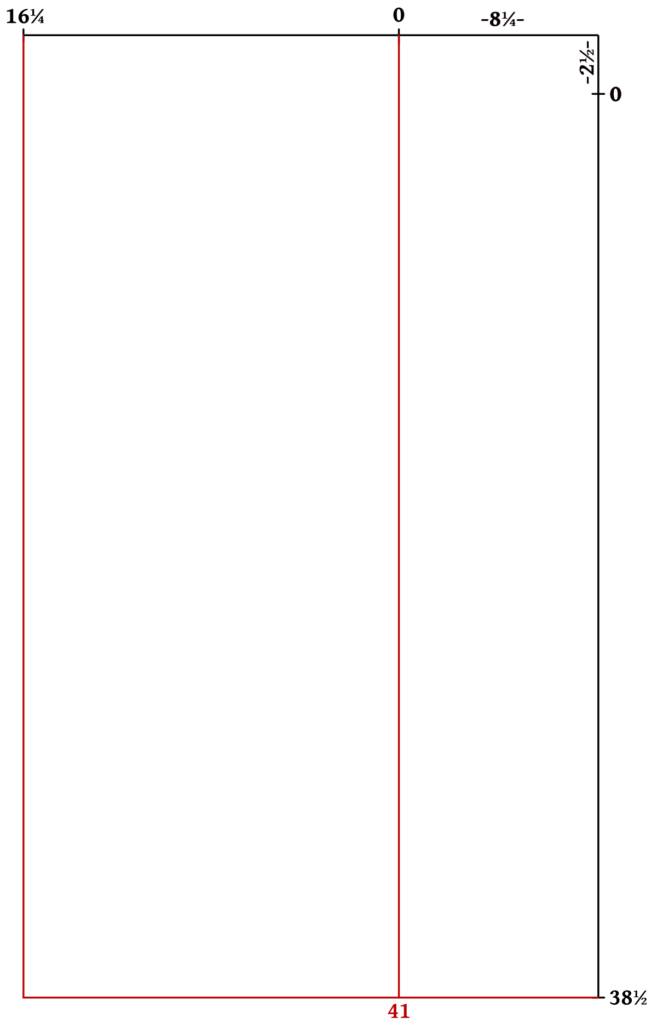
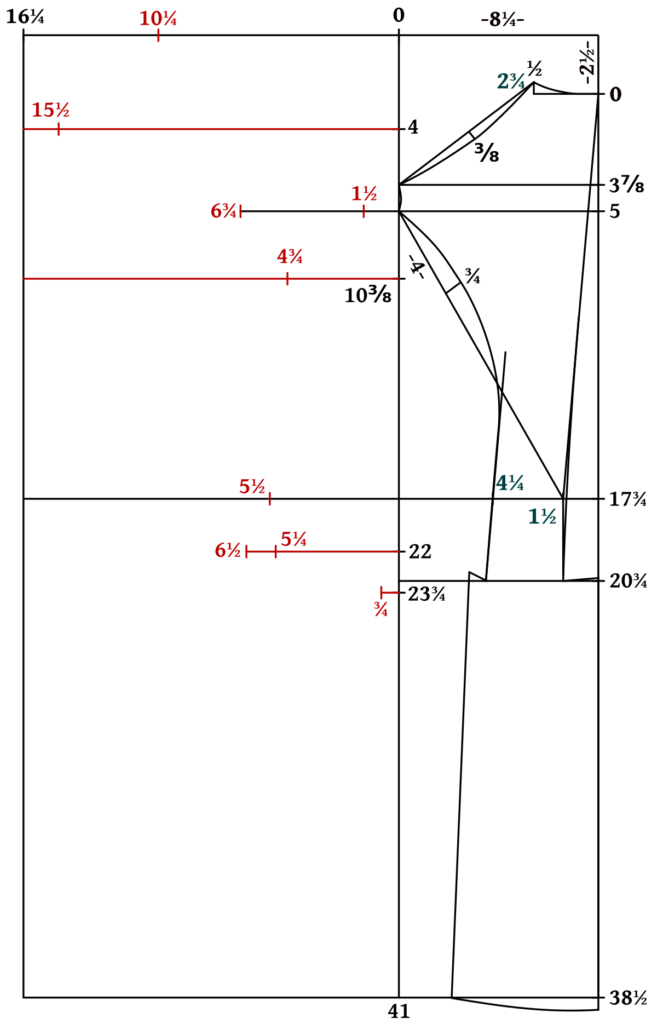
Along the right side, mark the various lengths as shown, being sure to measure from the 0 point, not the top of the square.
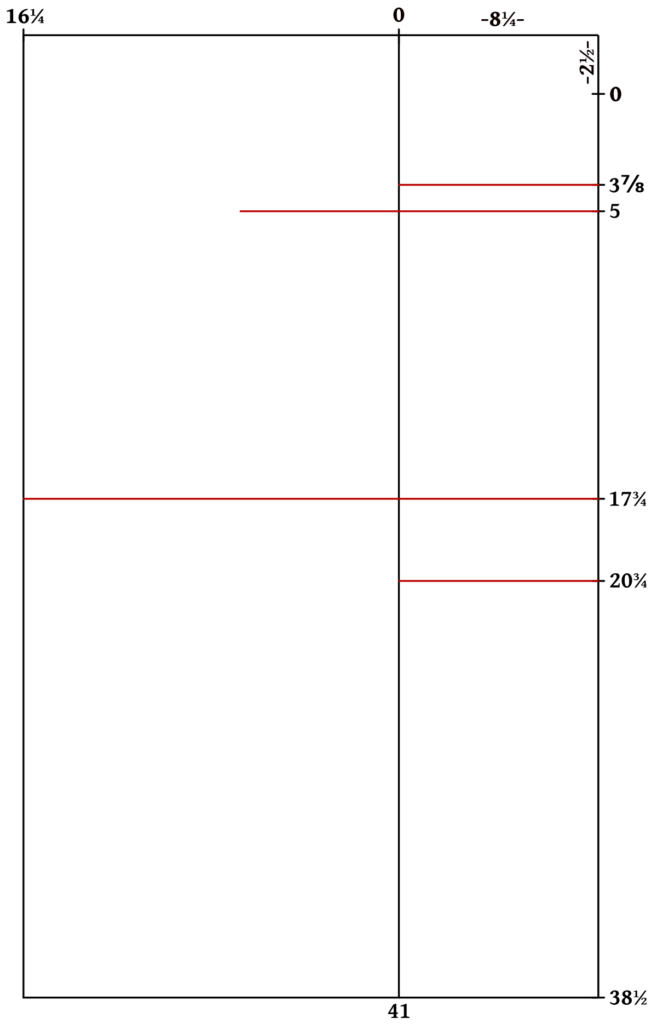
Square out, as tailor’s refer to it, or draw lines perpendicular to the measurements you just marked. At 3 7/8 for the bottom of the shoulder. At 5 for the top of the side seam, extending that past the dividing line a bit. At 17 3/4 extend the line all the way across – this is the waist line. And finally at 20 3/4 for the top of the pleats.
You can compare the distance between 3 7/8 and the construction line from 0 with the Width of Back measurement you took. If something looks way off, stick with the draft, but feel free to about it in the Facebook group and I’ll see if I can figure out what’s up.
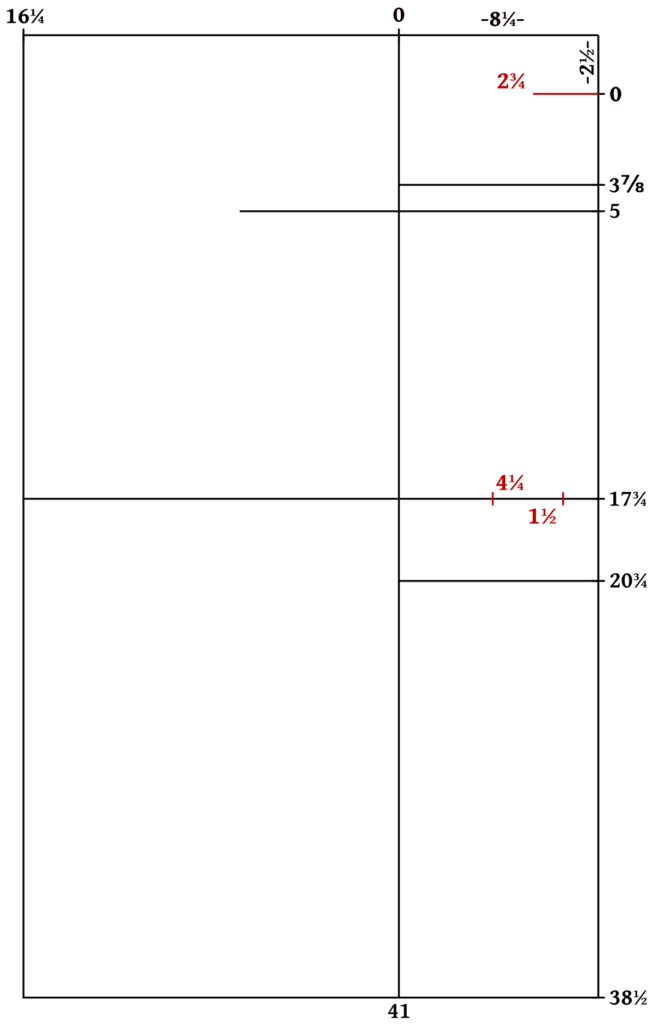
At the 0 mark square out 2 3/4 for the neck.
On the waist line, mark points 1 1/2 and 4 1/4 away from the right construction line. This gives the width of the back at the waist.
At the neck, extend the point up 1/2 inch.
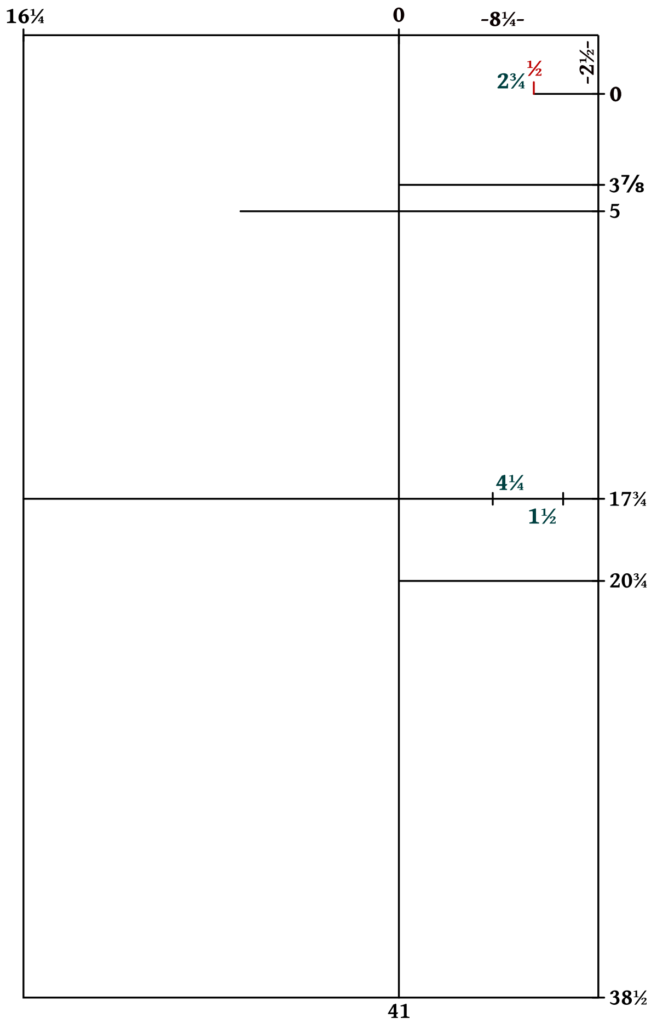
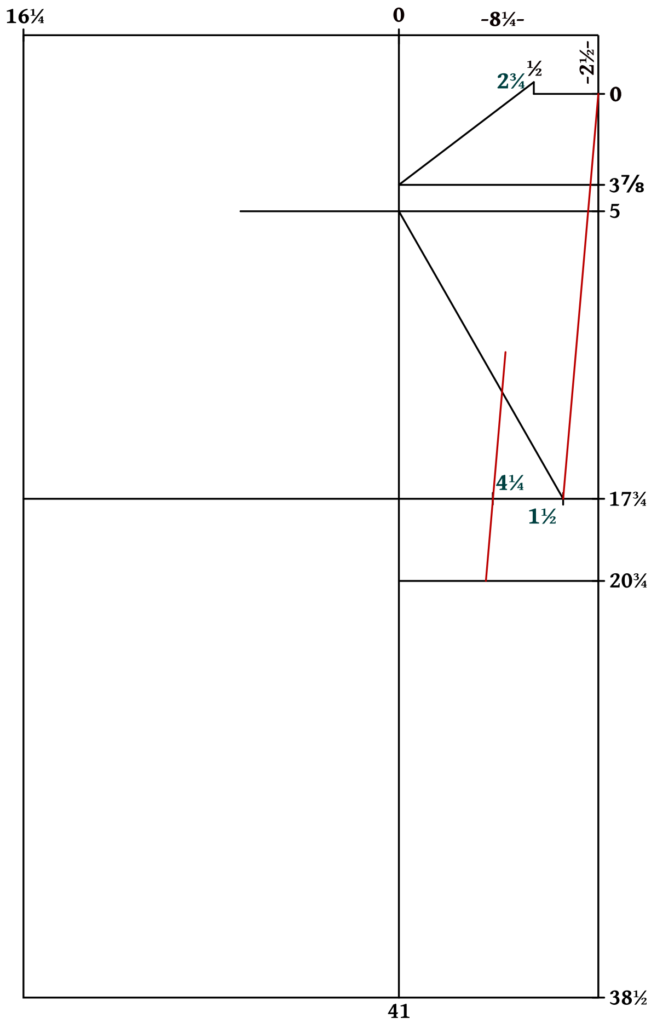
Draw construction lines for the shoulder and side seam as shown.
Draw a line for the center back from point 0 to the 1 1/2 mark at the waist line.
Draw a parallel line to this at the 4 1/4 mark on the waist line, extending up past the side seam construction line, and down to the pleat construction line.
Here’s a good place to compare your actual measurements to the draft using the Back to Hip Buttons measurement. Compare that length to the distance between 0 and 20 3/4. If you’re very good at measuring they should be almost exact, but if your off by up to an inch or so, I’d leave the draft as is and see how it turns out in the fitting.
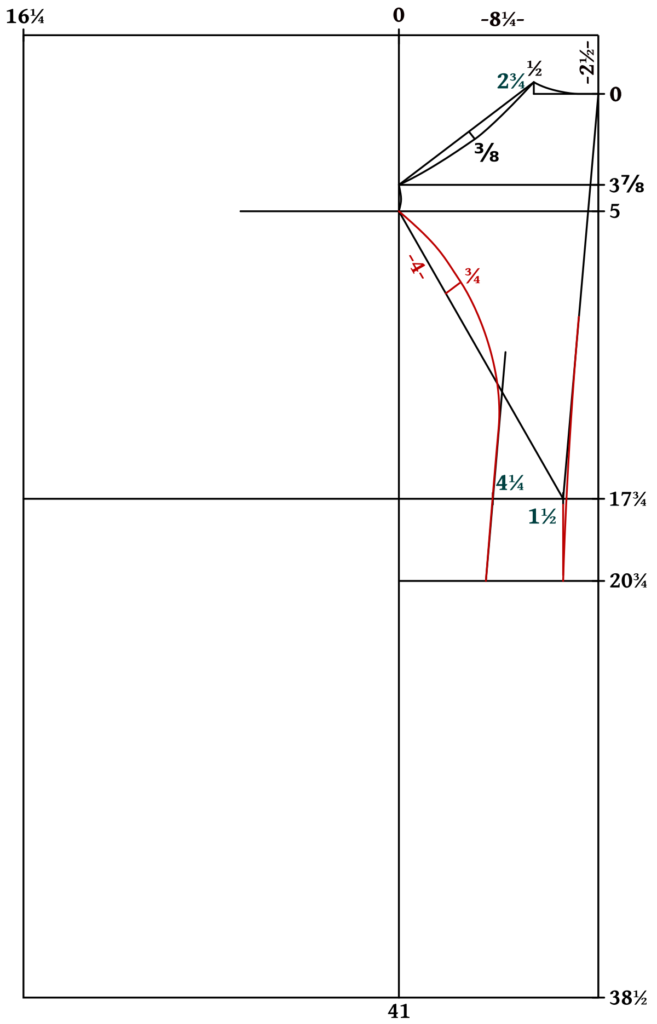
Now we’ll start to draw some of the curves for the back. Find the center of the shoulder construction line. Mark a line inwards 3/8. Connect the three points in a graceful curve, either by hand, using your arm as a sort of compass, or you can use a french curve or a bendable drafting ruler if you have one.
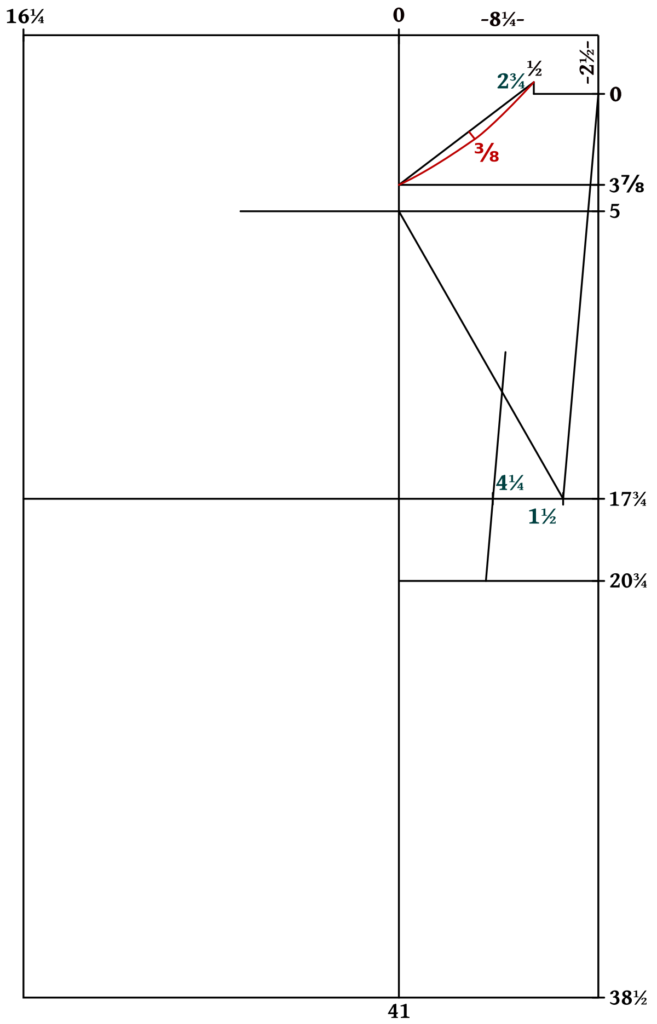
Draw the neck curve as shown.
This is a little hard to see, but right below the bottom of the shoulder, on the middle construction line between 3 7/8 and 5, draw a small curve for the back of the armscye. This should curve in about 1/8 inch.
Along the side seam construction line, measure down 4 as shown. Then square up from there 3/4. Draw a nice curve from the bottom of the armscye down towards that construction line for the back, tapering gradually as you get towards the bottom.
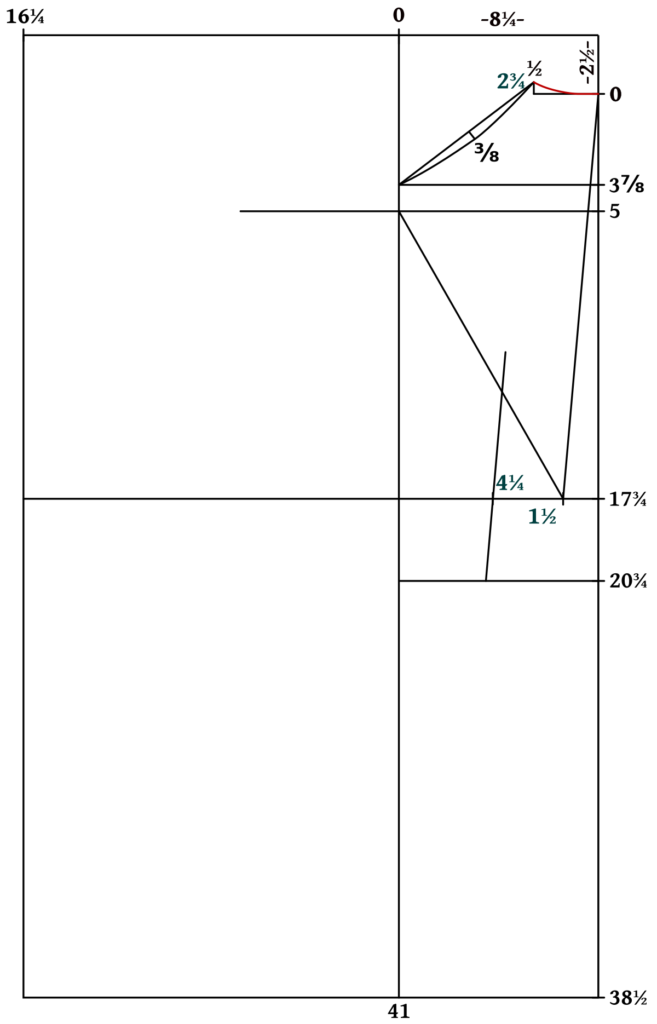
On the other side, the center back, square down from 1 1/2 to the pleat line. Then draw a gentle curve blending the two straight lines of the center back into one.
At the pleat line, on the right side, draw the pleat ‘springing up’ about 1/8 to 1/4 at the center back.
On the left side, spring up about 3/8, and make the line 7/8 total in length.
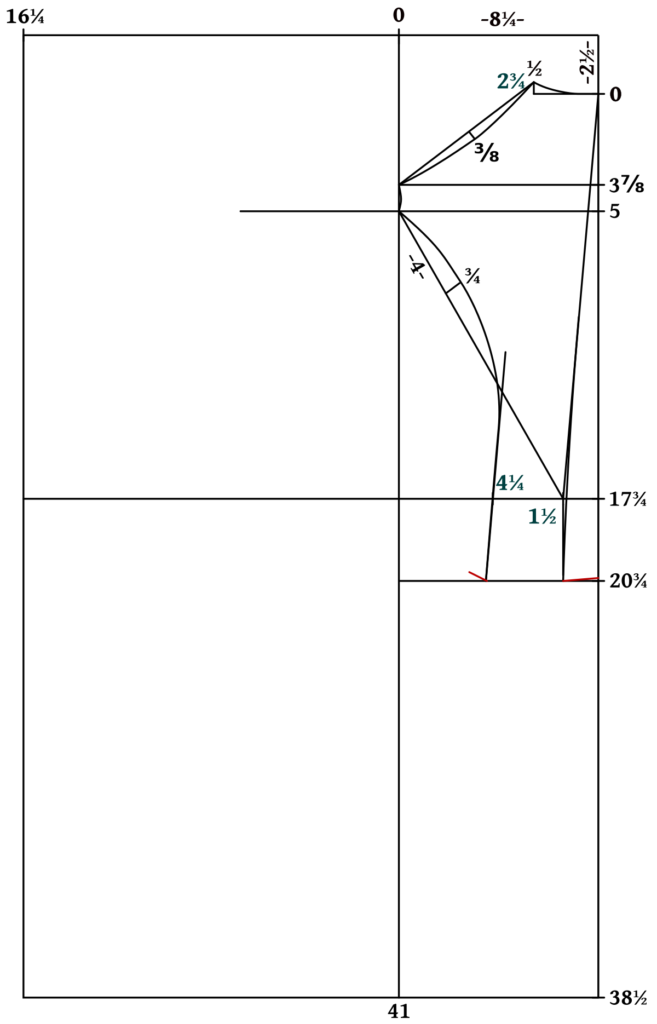
Draw the pleat side of the back skirt as shown. The bottom should be 3/4 wider than the top.
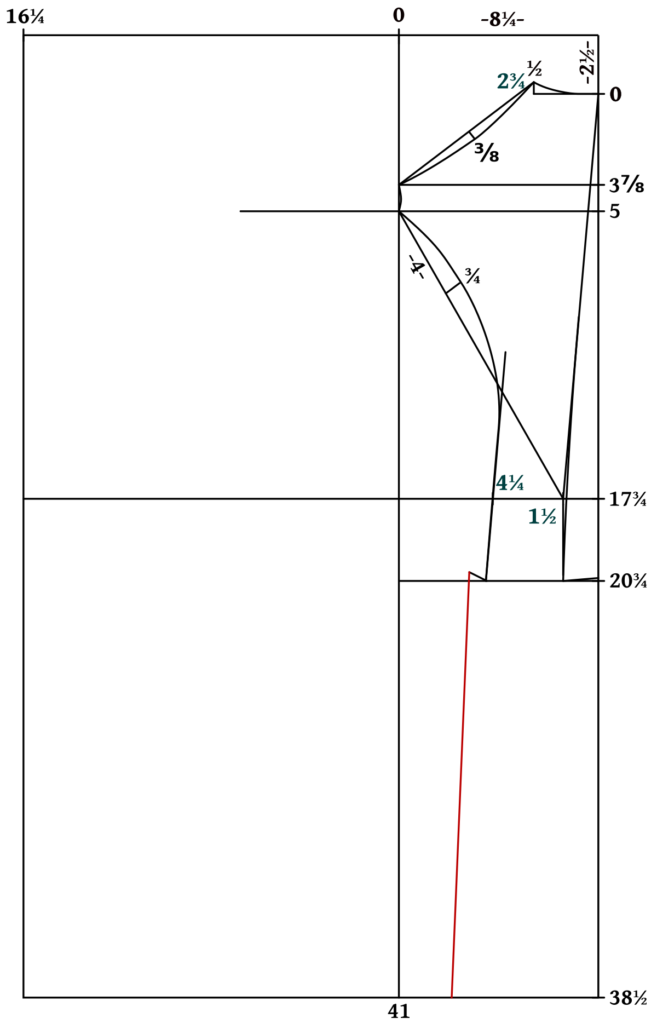
At the very bottom, square out from the pleat side and gradually curve the bottom so that the center back side meets squarely as well. Leaving things not squared leads to unsightly dips in the hem later on.
The back piece continues back upwards to the top of the pleats following the original construction line.
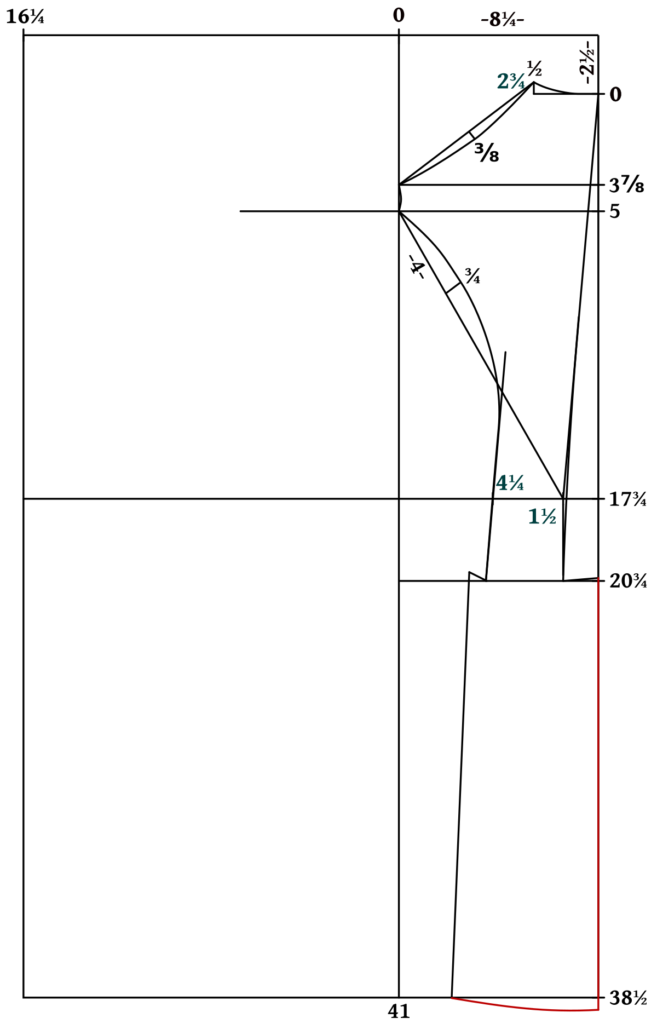
And this completes the draft for the back piece! On to the front now.