Category: Drafting Frock Coats of the 1860s
Drafting the Forepart
With the back construction lines laid out, we will now proceed to drafting the forepart and side body.
C – L
C – L is one-eighth inch more than half the Breast, or 9 ½ graduated inches.

C – M, and B – N
Each are equal to half A – C, or 3 7/8 graduated inches.

N – O and G – Q
Each is 1/12 the Breast, or 1 5/8 graduated inches.

Q – R
One-fourth Breast plus one-half graduated inch, or 5 ¼ graduated inches.

S – T
One-fourth the Breast, or 4 ¾ graduated inches.
S – U
One-third Breast plus one-half graduated inches, or 6 1/2 graduated inches.

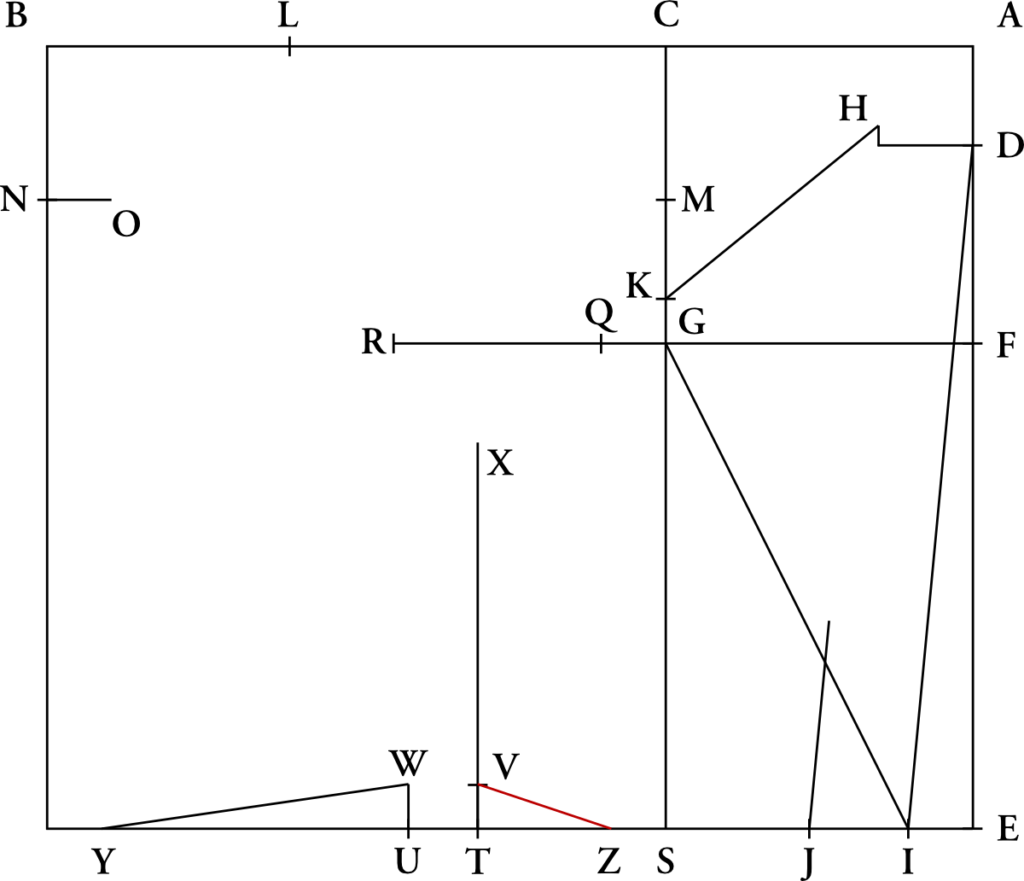
T – V and U – W
One-sixteenth Breast, or 1 1/8 graduated inches.

V – X
Length of Side to measure.

W – Y
One half waist measure (one quarter of the full waist).
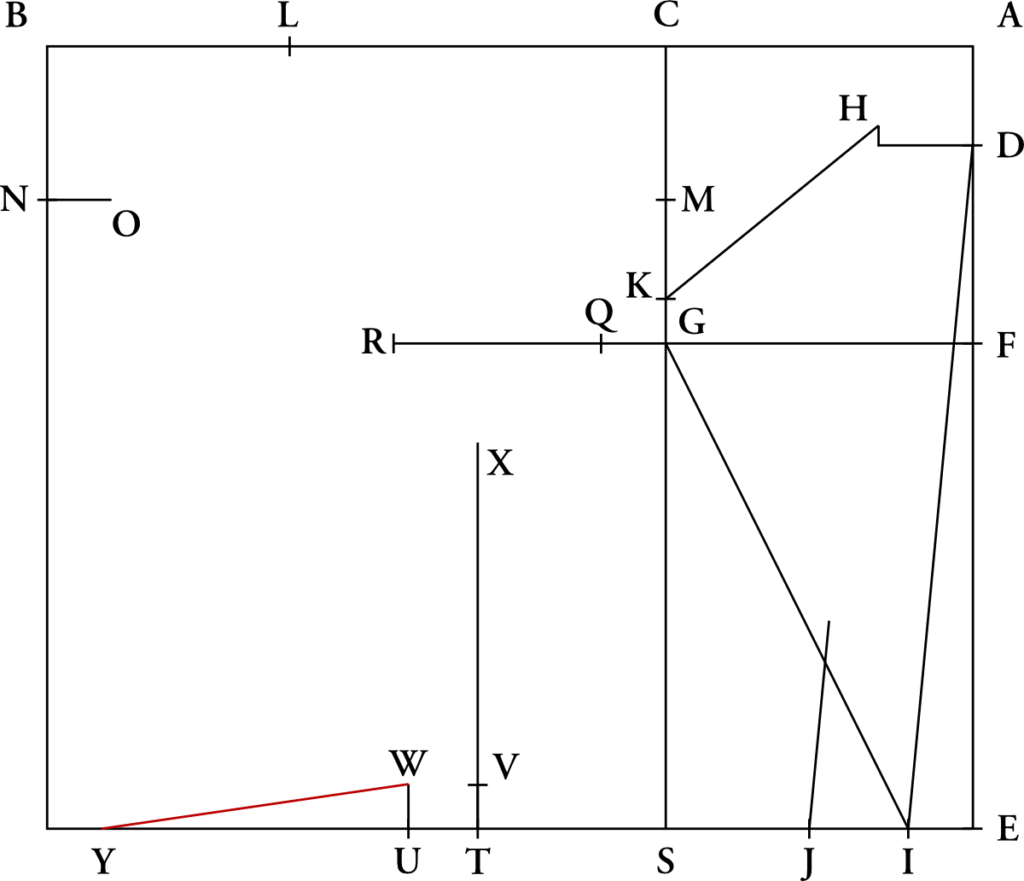
W – Z
Half the waist measure less the width of back at waist. Be sure to measure from W to Z, not V to Z. After you mark the point at Z, then draw the line from V to Z.
Line L – M
Draw a line from L – M, and make L – P the same length as H – K. This ensures the shoulder lines are equal in length to each other.
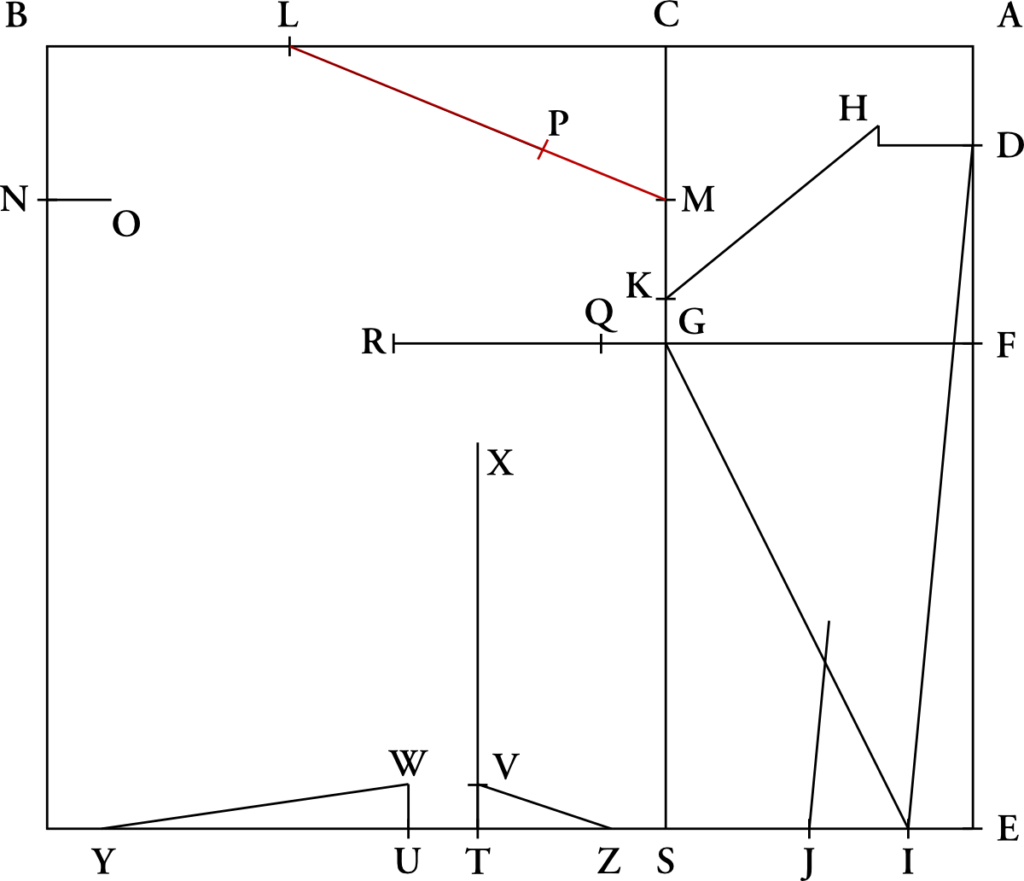
Neck and Armscye
Next draw construction lines for the neck, O – L; the front armscye, P – R; the bottom armscye, R – X; and the rear bottom of armscye, X – Q.

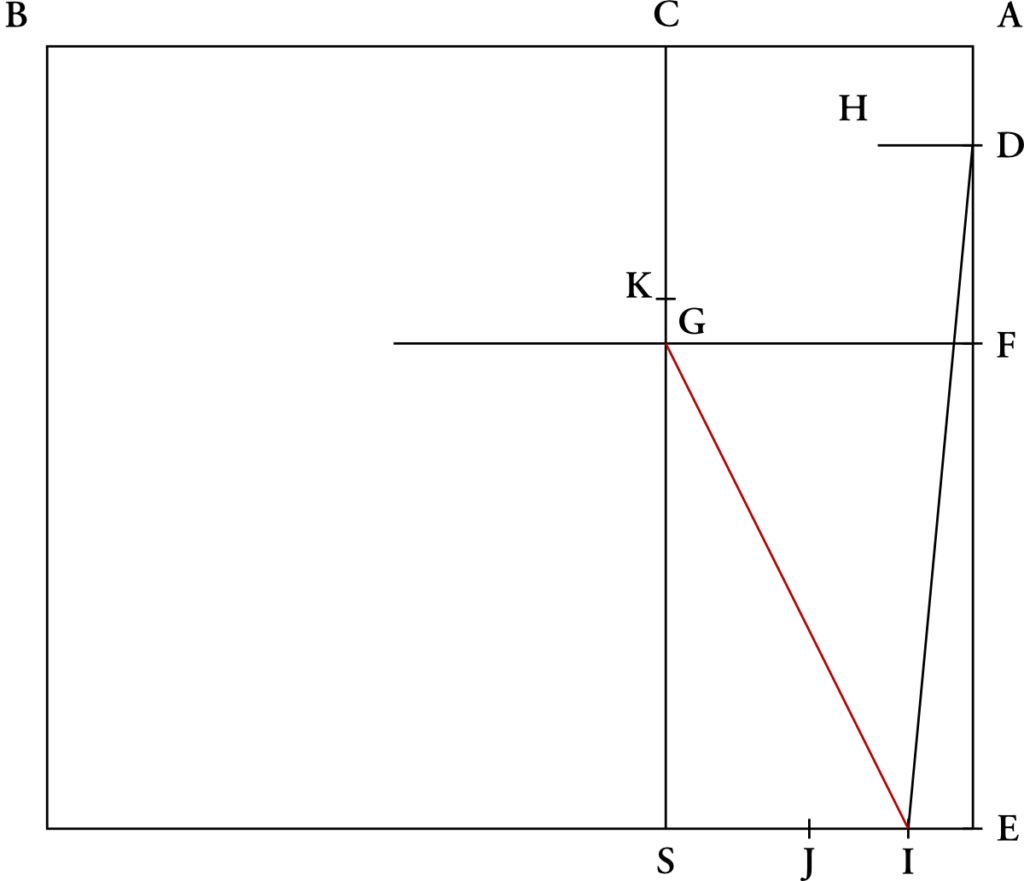
Center Front
To determine the center front, we must first draw a construction line perpendicular to line V – X. Next, draw a line connect O and Y, via the line from X as shown.

Drafting the Back
Now is the time to spread out your drafting paper, weigh it down with some rulers to prevent movement, and actually start drafting. On the following pages we will go step-by-step through drafting the close-fitting wrapper. At the end, you will find a diagram with all steps combined in order to give you a consolidated diagram for drafting.
As you draft, always use a sharp pencil. Remember that neatness and accuracy count. If you’re off by an eight of an inch in the draft, it can set the balance of the garment off. Take your time and make sure you understand each step before you draw it. Please post any questions on the forum.
Feel free to use the spread sheet in place of these instructions. Use the instructions for clarification in that case. Following the instructions is a large scale version of the draft, so that you may see more of the details.
Formation of Squares
Coat drafts are always drafted in what’s called The Square. It’s basically a rectangular box from which the various points are drafted.
A – B
Start out by drawing a horizontal line on the upper half of the paper, from A – B. This should be equal to one-fourth more than the Breast measure (remember, Breast is half of the Chest), or in graduated measures, 23 ½.

A – C
A – C is one-third of A – B, or 7 7/8 graduated inches.
After drafting these points, square down (at right angles) the outside lines of the square, and the construction line of forepart, as shown.

The Back
We’ll now concentrate on drafting the back of the coat.
A – D
A – D is known as the Balance, or difference between the Bust and Curved measures. This is actually the difference between the lengths and forepart.

The balance is very important, as it affects the hang and drape of the finished coat. If you are stooped, this measurement will be smaller, therefore making the back longer. If you are erect, the opposite is true – the balance measurement will be larger, and the back shorter.
If your Bust and Curve measures seem off (and they can be difficult to take), I suggest using the graduated measurement of 2 ½ inches, and adjusting at the first fitting of the wrapper.
D – E
D – E is the length of the back, make it 1 ½ graduated inches less than the curve. If using a graduated measure, it is equal to 17 ¼, but that may change depending on whether the person is short or long-bodied.
D – F
D – F is ¾ of an inch more than a fourth of D – E, or is equal to one-fourth of D – E plus ¾ graduated inch.
Square Lines
Now square lines across from F and E. The line at F crosses the construction line of the forepart at point G, giving the height of the side point. The line at E touches the construction line of the forepart at S, and gives us the completion of the square.

D – H
D – H equals one-eighth of the Breast, or 2 3/8 graduated inches.

E – I
E – I equals one-twelfth of the breast, or 1 5/8 graduated inches.
I – J
I – J is the width of the bottom of back according to fashion. Remember that in the period, the backs were quite narrow, never more than a hand’s width. Devere recommends this to be 2 ½ graduated inches. Unless you have a specific reason, leave it at that.

G – K
G – K is one-sixteenth of the breast, or 1 1/8 graduated inches.

Center Back
At this point, we will draw the center back line by connecting D and I. Just like that game, connect the dots.

Construction Line
This oblique construction line, drawn from G to I, will aid in drawing the curve of the back piece later on.
Construction Line
This construction line is drawn from point J, to a point just above where intersects the oblique line from G to I. Make sure it is parallel to the Center Back line.This line is also used to aid in construction of the back curve.

Height of Back Neck
At point H of line H – D, draw a line square with H – D, rising up one-half a graduated inch.

Back Shoulder Line
Draw a line connecting points K and H.

Devere’s Graduated Rulers
Devere realized this was a tedious way of drafting. Remember, they didn’t have computers or spreadsheets back then. Instead, Devere devised a set of rulers, called Graduated Rulers. The graduated rulers are, “a series of measures, which are successively graduated larger and smaller than the common inch measure, and are used to draft patterns for larger or smaller sizes than the 18 3/4 breast.” What does this mean? Instead of doing those calculations above, you simply choose a correct sized ruler and then draft the pattern as it is in the book.
For example, you are measuring someone and they have a 48 inch chest. You would then go to your set of rulers and choose the one marked size 48 (for a 24 inch breast). If you compared this to a normal inch ruler, you would see that it is a lot larger, yet it still has 12 inches to it.
Where can you get these rulers? In Devere’s time, Devere sold these rulers, for which you can find advertisements in his manual. They came on paper, tapes, or on wooden rulers. Devere has sadly long gone out of business, but luckily, the rulers are not too difficult to make yourself. I’ve saved you that trouble, though.
I have created a set of graduated rulers, sized 34 through 50, for your convenience. They are on 11 x 17 inch paper, so you’ll need to find a print shop to print these. They can usually be printed for a few dollars on nice card stock at stores with print shops such as Staples. They are in Adobe pdf format. When printing from Adobe Acrobat Reader or other readers, be absolutely sure to set Page Scaling to None. If this is not done, your whole set of rulers will be off. After they are printed, I would take a normal inch ruler and compare it to the size 37 1/2 graduated ruler. They should be exactly the same. If they are off, it was printed incorrectly, and you’ll need to check your settings and try again.
The nice thing about these rulers is that you perform absolutely no mathematical calculations, unlike the spreadsheet option. Just pick the ruler that corresponds to your chest size, and use that when drafting.
Since these will be printed on relatively flimsy paper, you should use a regular ruler or tailor’s square to draw your straight lines, and then measure off the distance with the graduated ruler.
Be mindful that not every step calls for a graduated ruler. If you used a graduated ruler for everything, you’ll simply end up with that proportionate draft that we want to avoid. Instead, when a Common Inch is called for, use a normal ruler. When the graduated inch is called for, use the graduated ruler in the size corresponding to your chest.
If you don’t find your sized ruler included, please let me know and I will make one up for you. If you are between sizes, round up to the nearest inch.
Devere’s Formula
One of the more difficult concepts to understand is how Devere varied the size of a pattern. He used a size 18 3/4 breast as the basis for all of his patterns (half of your chest measurement equals the breast measurement), which is equivalent to a 37 1/2 chest. This is called the proportionate model. If you are lucky enough to have a 37 1/2 chest (and the other corresponding measurements are the same), you can draft the patterns as they are straight from the book, with a normal ruler . Unfortunately, very few people fit these measurements, so adjustments have to be made.
Let us suppose we have a gentleman with a 42 inch chest, and want to find the correct balance. On a 37 1/2 inch proportionate model, the balance is 2 1/2. But a 42 inch chest would make that larger. First, you need to find the correct ratio between the 42 inch chest, and the proportionate chest. That would look like this:
42 / 37.5 = 1.12
This number is called the scale factor.
After getting this number, 1.12, we multiply that by the balance measurement (or whichever measurement we need to get):
1.12 * 2.5 = 2.8
Then, it’s a matter of converting that 2.8 decimal into inches. This comes out to somewhere between 2 3/4 and 2 7/8. A combined formula for finding these measurements is as follows:
x = the proportionate measure for which you wish to find the scaled measure.
M = Your whole chest measurement.
x * (M / 37.5) = scaled measurement
While possible to work out these calculations for each measurement in the draft, it is extremely time consuming and prone to error.
One tool to making this easier, is a spreadsheet, which you saw when you wrote down your measurements. On it, you’ll find a chart that’s automatically filled out with numbers as you type in your measurements. What is happening behind the scenes is that the spreadsheet program is calculating all of those measures to your breast size, automatically. To use this spreadsheet for drafting, simply plug in the numbers for each step as called for.
For example, if you are a chest size 40, when asked to draw the line from A to D, you would find that in the spreadsheet, and measure out 25 inches.
As you can see, all of the calculations are done for you and updated as you type in the measurements. If you wish to use the spreadsheet, I advise printing it out after you fill it in, so as not to accidentally change numbers while using it.
Devere’s System of Drafting

We will begin our draft for a frock coat by first drafting a close-fitting wrapper, out of muslin. This is simply a generic frock body, containing the front, side, and back pieces, and is used to work out major fitting issues before you cut out your expensive materials. This close-fitting wrapper is drafted without any fashion features, and is strictly for testing the fit of your coat.
The drafting techniques and wrapper you construct will be applicable to nearly any Civilian frock coat of the period. I advise you save your original pattern after the corrections have been made, as you will find it very useful if you wish to create other coats in the future.
Preparing your Workspace
You will find pattern drafting much more enjoyable if you have a comfortable space to work in. The most important issue is having enough space. You don’t want to have the edges of your pattern crammed up against a counter, or falling off a table, for example. Assuming you do not have a proper drafting table (even I don’t have one), a dining room table makes a perfect drafting surface. Just be careful of the cracks between the table leaves, as the pencil is prone to poking holes in the paper.
Also try to find a good chair. You’ll be sitting in one place for at least an hour, and you do not want to get a sore back. A computer chair can be quite comfortable, and you can swivel to get the best angle for drawing lines.
Lighting is also very important. If you can draft in an area with good sunlight, all the better. The worst situation for drafting is when shadows start forming on the draft, obscuring parts of your draft. Dining room lights are usually fairly bright, making this another good reason to draft at the dining room table.
Devere’s System of Drafting
Louis Devere created a wonderful drafting system, in that it’s fairly simple and accurate to use. In his drafting book, The Handbook of Practical Cutting on the Centre Point System, he laid out a system based on the size of your chest. And as you saw, many measurements started from the centre point on the waist, hence the name Centre Point System.
In the manual, you are instructed to create a proportionate draft, using a system of graduated rulers. For every person, the drafted numbers remain the same, you just change the size of the ruler. A larger person uses a larger ruler, a smaller person uses a smaller ruler.
There is just one problem with this, however. Very few people fit that ‘proportionate’ description. Here is how Devere describes the proportionate man.
“The Well Proportioned Man has his body of medium length, neither long nor short: he is neither thin nor stout at waist: his attitude is upright, neither stooping nor standing extra erect: his shoulders are of moderate size, and are neither high nor low.”
Louis Devere
In actual terms of measurement, Devere’s proportionate figure had a 37.5 inch chest, a 31.5 inch waist, and although not actually stated, probably around a height of 5 feet 8 inches. Think of a young man in his early 20s, with an athletic build, at the pinnacle of physical fitness. This is what Devere’s proportionate man would have looked like.

Let’s assume we are drafting a coat for a large figure, with a 52 inch chest. If we were to use Devere’s proportionate draft, we would end up drafting a coat for someone that’s over 6 1⁄2 feet tall. It’s very rare to find someone that tall with a 52 inch chest.
As you can see, drafting by proportions alone is prone to issues. What is the solution? We use a combination of proportionate measurements, and direct measurements. For example, you’ll find the depth of the armscye with a proportion of the breast, while drafting the side measurement with your direct measurement. This will be made more clear when following the draft.
Measuring for a Coat
Before the first stitch is made, and before the drafting pencil ever touches the paper, measurements must be taken. When measuring, the goal is to obtain as much information about the client’s figure as possible. Since most of my work involves Devere’s Handbook of Practical Cutting, 1866, I’m using his methods of measuring.
Devere’s book is very descriptive in the measurements taken, but in the 1866 version, is lacking in illustrations. It took me a good while to figure out exactly what each measurement involved, and where it was supposed to be taken. Then, a couple of months ago, I came across some illustrations from Journal des Tailleurs, a French tailoring magazine published by Devere in 1858. It contained some beautiful illustrations of how the measurements were to be taken, but of course, had no accompanying text. So what I’ve done is take the text from Devere’s 1866 manual, and combine it with the images from 1858, as well as some diagrams from his 1856 edition. Hopefully that will make it easier for those of you trying to learn how to draft from his book.
The First Series

Devere broke the measurements into three groups, or series, of six measurements each. The First Series comprises the sizes and lengths, and shows at once whether the man is Long or Short-Bodied, Stooping or Extra-Erect, Thin or Stout Waisted.
No. 1, Breast
This measure is taken on the Waistcoat, under the coat, as shown on figure blank. Place the tape horizontally, raising it up as high as possible under the arms, without raising it at the chest, and hold the tape with the thumb and forefinger of each hand. The tape must first be drawn very tight, and afterwards be loosened as the client breathes, so as to obtain the size of this part with the greatest accuracy. In writing it down we must only put the half; for instance, 18 ¾ inches for 37 ½ &c.
This measure indicates the graduated measure, to use in the draft. It is 18 ¾ in proportionate men.
No. 2, Waist
This measure is also taken under the coat: it goes round the body on a level with the hollow above the hips, see figure blank, and it should be taken rather easy. Like the breast measure, it is only written down as half the length taken; say 15 ¾ for 31 ½ inches.
This measure, by comparison with the breast, shows if the waist is thin or stout. In the proportionate man it is 15 ¾ or 3 less than the breast.

To mark the Centre Point
First button the coat, and press the body with the side of hand, just above the hips, to find the level of the hollow of waist, which is usually about 1 inch above the top of hip bone; make a short chalk mark horizontally at this level. Next place the brass end of the tape at the middle of back, on the same level as the chalk mark, and measure by the scale on the tape, the distance of the Centre Point from the middle of back, according to the size of waist; making a short chalk mark downwards at this distance, which with the first chalk mark will form a cross. The middle of this Cross is the Centre Point.
N.B. – If the client is wearing a loose-fitting coat, such as the paletot or a jacket, the fronts must be drawn together, or laid over, and fastened by pins or by a tape tied round the waist, so as to have the garment perfectly tight-fitting at the back, and over the hips. This being done, the Centre Point can be marked with as much accuracy as if the customer was wearing a dresscoat, and this is one great advantage of our especial System of Measurement.
Sadly, we don’t have access to Devere’s special rulers to find the Centre Point. So we have to use the formula of taking 2/5 of the Breast or 1/5 of the full chest and using that number to find the centre point. For example, a 35 inch chest measured all the way around would be 7 inches to the centre point. So find the center of the back at the waist level and measure 7 inches around to find the Centre Point.

No. 3, Curve
Take the Bust and Curve part of the Tape, slip the eyelet-hole at the end of it over the head of the pin, and hold it there; the eyelet-hole must be exactly at the top of the back seam: then with the other hand carry the tape perfectly straight to the Centre Point, crossing the side seam near the middle, and not letting the tape be either very tight or too slack.
No. 4, Bust

Continue to hold the end of the tape at the top of back seam, and with the other hand pass the tape over the shoulder in front of the arm, close to the front of the scye, letting the clients arm hang down in its natural position; draw the tape very tight, to flatten any creases there may be at the front of arm, and carry it direct to the Centre Point.
Now as the Curve and Bust measures both start from the top of back (a point which is always fixed and certain), and proceed to the Centre Point which is also fixed and certain for all sizes and structures; the difference between these two measures must, it is evident, show the exact difference that there ought to be, between the lengths of back and forepart.
In a Proportionate man, the difference between these measures is 2 ½: it is less than this for stooping men, and more for Extra-erect men.
No. 5, Side

Pass a pencil or penholder through the loop at the end of tape, and hold it tight under the arm (the arm must not be raised up, but should lay close to the body). Then measure the length to the Centre Point, so as to ascertain exactly, the distance between this point and the bottom of scye.
This measure serves to rule the depth of the bottom of scye, and shows the degree in which it must be hollowed out below the side point. In proportionate men it is 8 ½, and is usuallyabout half the length of back to natural waist. It is longer for extra erect men, and for small or high shoulders; and less for stooping men, and for large or low shoulders.

No. 6, Depth of Scye
This measure, shown on figure blank, starts from the same place as Bust, but instead of proceeding to the centre point, it stops at the level of the bottom of scye. To ascertain this level exactly, place a pencil or a penholder horizontally under the arm of the client, and measure down to the top of pencil. This measure must be taken very tight. The only use of this measure is to control or prove the accuracy of the two last measure. The depth of scye and side are really only the bust measure, taken in two parts, and if added together should produce the same quantity: for example in the proporionate structure:
The depth of Scye is          12 ¾
And the side is                8 ½
Which is equal to the Bust    21 ¼
When these measures do not agree in this manner, there is evidently an error in one of them, and they must be measured over again.
Second Series
The Second Series, gives the measurement of all the parts which vary according to Fashion, or the taste of the client; such as the place of the hip buttons, the length of skirt, the size of sleeve, etc.

Unfortunately, I was unable to find such clear images for the secondary series. These will have to be drawn out by hand or edited from existing examples like the image above.
No. 7, Length of Back to Hip Buttons
Taken from the back neck, to the level of the top of back plaits. This measure is of course variable according to Fashion.
No. 8, Length to Bottom of Skirt
This is merely a continuation of the preceding measure, which is carried on from the notch to the bottom of skirt: its length is variable according to Fashion, taste, or the height of the client.
Nos. 9 and 10, Width of Back, and Length of Sleeve
These measures are taken in the usual way; first raising the arm square with the body and bending it at the elbow. Then take the tape and place the end in the middle of back, opposite the hind arm seam; measure first the width of back, according to fashion or the style of coat required; and then continue the measure along the seam of the sleeve to the wrist. By deducting the width of back from the whole length, we obtain the true length of sleeve with great exactness.
The width of back is usually about 7 ½ graduated inches, for all sizes and structures, and the length to wrist is 32 ½ inches in the proportionate man; which, deducting the back 7 ½, leaves 25 for the real length of the sleeve. The length of arm is subject to great variation: it will however as a general rule, be found in proportion to the height of the man.
No. 11, Elbow Width
Taken according to Fashion, or the wishes of the customer.
No. 12, Wrist
Measured tight, medium, or loose, as required. This measure, as well as the Elbow, should be written down as half, because it is only the half-measure that is used in drafting.
Supplementary Series
The supplementary Series is always to be taken, whenever there is much deviation from the proportionate structure. This Series of measures gives the exact form and position of the arm-hole: it shows whether the chest is round or flat, and the shoulder blades flat or prominent; whether the shoulder is high or low, large or small.
No. 13, Back Stretch

Taken across the back, at the level of the bottom of back scye. When we are taking this measure as part of the Supplementary Series, its accuracy becomes of great importance, and we have first to notice whether the coat the client is wearing, has the seam of the scye at its proper place. If it is a Paletot or Paletot Jacket, the back stretch will probably be too wide; if he has on a close-fitting coat of the old fashioned English cut, (in which the armhole is very large), it will be too narrow. The true width of back stretch, should be two-fifths of the breast measure, and this proportion should but rarely be deviated from. It may however, be 3/8 more than this, for very stooping men, and 3/8 less for extremely erect ones.
No. 14, Diameter of Arm

This measure gives the distance between the side point and the front of scye, and we obtain it by taking the tape between the thumb and forefing of each hand: then extend the other fingers square, those of one hand touching the front arm, those of the other hand touching the back of arm, and with the eye make the length of tape equal to the real diameter of arm.
This measure is 5 ¼ in the proportionate structure. It may be ½ inch more or less, according as the shoulders are large or small, forward or backward, but never exceeds this limit of variation.
No. 15, Front of Scye

To take this measure we pass a pencil through the loop and hold it against the front of arm with the thumb and forefinger of one hand; then pass the Tape under the arm, and carry it on with the right hand, as to touch the middle seam of the back at the level of the bottom of back stretch.
In the proportionate man, the front of scye is 12 ¾, or equal to the back stretch 7 ½. And diameter 5 ¼, added together.
It is important that the three last-named measures, Nos. 13, 14 and 15, should be taken with the greatest care and accuracy; and the student should practice taking them on the same man for some little time, and observe if the measures taken at different times are always alike. We generally find that there is at first, a tendency to take the diameter too small, and the front of scye too long.
By the examination and comparison of these three measures, we can see at once what is the degree of round required to be given to the side seam. In most cases, perhaps 70 out of very 100, the degree of roundness required is that indicated on plate 4, fig. 1. But there are men whose structures vary in this point: some have the back round and the shoulder blades very prominent, while others have the back very flat and the blade bones h ardly indicated.
Now in the proportionate man, we have seen that;
The back stretch                      7 ½
Added to the diameter                 5 ¼
Is equal to the front of Scye         12 ¾
But if the man had a very round back, we should not find this calculation correct, because, while neither the back stretch nor the diameter would at all vary, the l ength of the front of scye would increase, because this measure passes over the prominence of the shoulder blades: we should then find:
The Back Stretch                      7 ½
The Diameter                          5 ¼
And the Front of Scye 13 ¼, instead of 12 ¾
Showing that half inch more round than usual, is required on the side seam of forepart.
For a flat back, for an inverse reason, the front of scye will be found less, than the back stretch and diameter added together, and less round must be given to the side seam.
No. 16, Chest

To take this measure well, hold the tape with the thumb and forefinger of each hand, and place the ends of the fingers against the front of each arm. We thus obtain the whole width of chest, which must be halved before writing it down. This measure is 8 ½ in the proportionate structure, or 1 more than the width of back stretch. It will be shorter or longer, according as the shoulder is forward or backward, or the chest flat or prominent.
No. 17, Slope

The use of this measure, is to show the degree of slope required to be given to the top of shoulder. The manner of taking it is shown by fig. 5 S. Pass the pencil through the loop at the end of tape; place one end against the side of neck, and hold the pencil horizontally with one hand; then with the other hand measure the distance between the pencil and the top of shoulder.
The slope is 2 in the proportionate structure, but it may vary to 2 ¾ for very low or sloping shoulders, or decrease to 1 ½, 1, or even ½ an inch, for very high shoulders. We hardly ever find shoulders more sloping than 2 ¾, and even this degree is not often met with. High shoulders are more frequently found, though they never have less slope than ½ an inch, except in cases of deformity. Some men have one shoulder higher than the other, and for these the measures of both shoulders must be taken.
No. 18, Round of Scye
Measured round the armhole in the usual way, and serving to show whether the shoulders are large or small: it is therefore useful in some cases, as a guide for the slope of shoulder. It also may be used in the draft of sleeve. It is usually about 2 ¼ less than the breast measure in the proportionate structure: if there is a greater difference than this, the shoulder is small, if a less it is large.
In applying this measure to the pattern to prove the size of the armhole, care must be taken to deduct about ¾ of an inch for the stretching in front of the scye.
How to Write Down the Measures (Traditional Method)
We have now described the complete series of measures which we consider necessary, and we have, at the bottom of plate 4 shown on fig. 7 the manner in which, when taking these measures, we write them down in three distinct lines, each containing one series.

In the first line we put first the Breast and Waist; then Curve, Bust, Side, and Depth of Scye.
In the Second line. Length to the hip buttons, ditto to the bottom of skirt, then Width of back, Length of wrist, Width of Elbow and Wrist.
In the Third line (when this series is taken), we put Back stretch, Diameter, Front of Scye, Chest, Slope and Round of Scye.
The first series must always be taken in every case. The second series may be taken or not, as preferred. The Third series should always be taken, whenever it is seen that there is any great deviation from the proportionate structure.
Be aware that that diagram above is from the 1856 edition, while I’m using the 1866 edition for my measurements. That’s why the numbers are not aligned with my measurement numbers.
A More Modern Method
Provided with the files you downloaded is an OpenOffice or Mircosoft Excel Spreadsheet file. Your task now is to take the measurements, and record them into that spreadsheet.
As you fill in the numbers, you’ll find the bottom half of the spreadsheet fills in with numbers. This will be extremely useful inthe next section of the class, drafting your custom pattern.
If you have any errors, or have trouble figuring out a measurement, please let me know!