Author: James Williams
Ironwork
Before you do any sewing, you must do a little ironwork. Ironwork involves stretching or fulling (shrinking) the fabric in certain areas, and is part of what sets tailoring apart from other methods of sewing, such as dress making. We will go into more detail of this when we do the ironwork on the actual wool, but for now, just follow along.
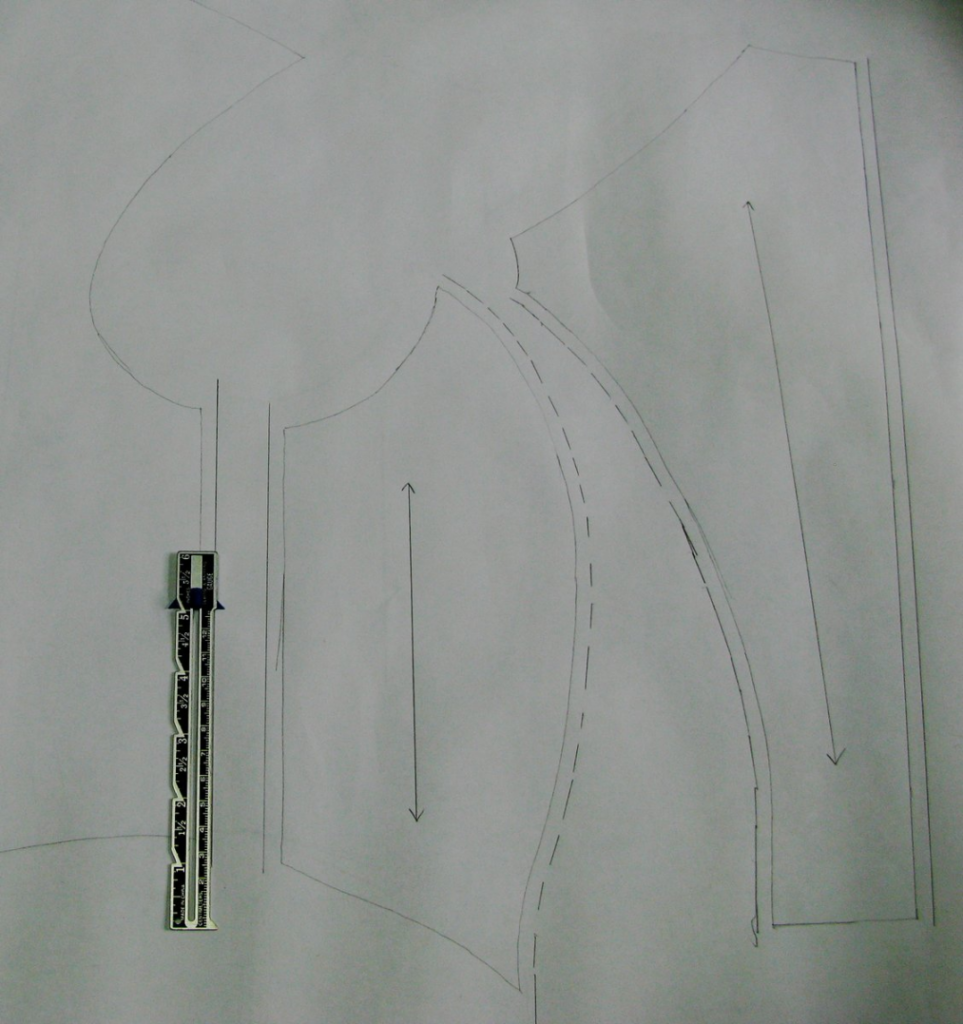
The areas to stretch are marked in the photo with hash marks. We will refrain from any fulling for now, as cotton does not shrink well with the iron. When stretching, both pieces of fabric should be together, so as to ensure the pieces are stretched the same amount. When stretching the cotton muslin, don’t pull too hard. A very slight pressure is all that is necessary.
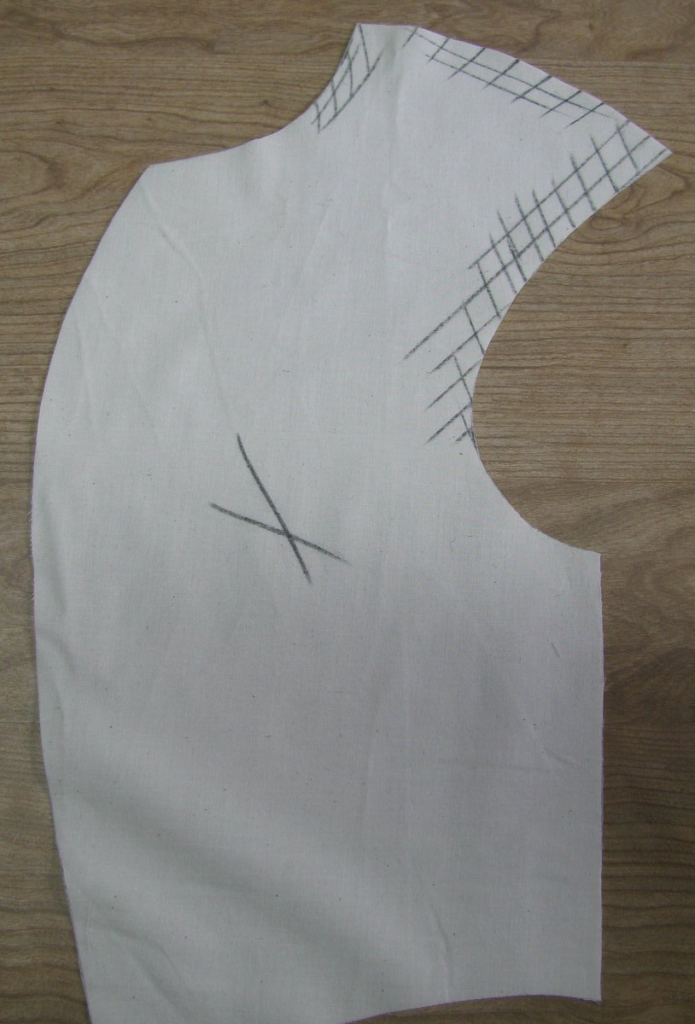
Begin with stretching the armscye, about 3⁄4 of an inch. Hold the fabric by the shoulder point and pull the fabric with the iron. Next, give a good stretch to the top of the shoulder seam, about 1⁄2 inch total. Finally, carefully stretch the neck starting just at the hollow near the top.
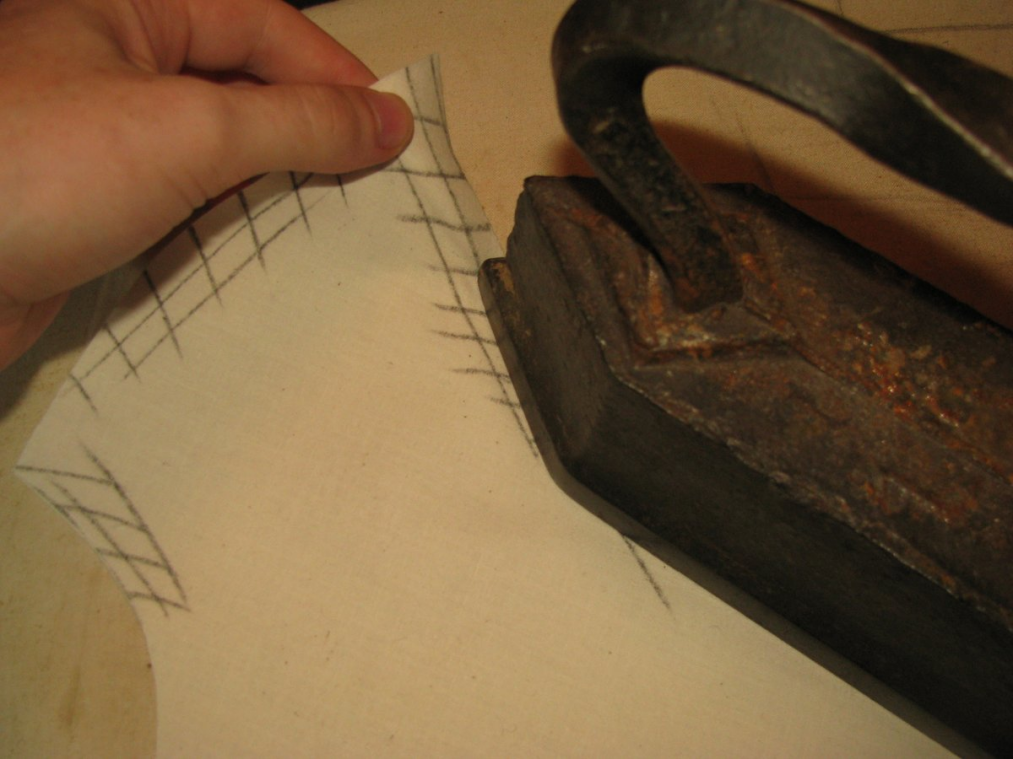
The results are shown in the following photograph. You can see a convex shape has been formed over the shoulder and scye.
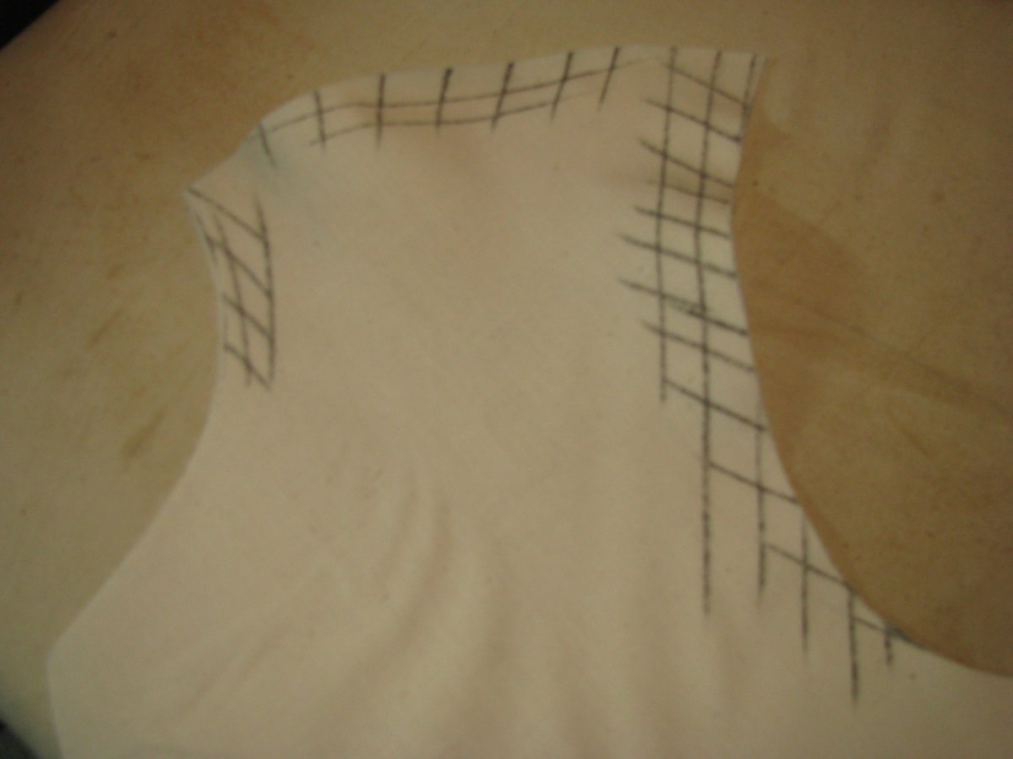
This ironwork has the effect of helping impart shape into your garment, as well as helping to provide a better fit. Linen and cotton are not workable with the iron, however, so we will be learning how to take that into account.
Striking the Pattern
After the pieces are cut out, it’s time to lay them out on your muslin fabric.
Make sure the fabric is smooth and free of wrinkles, and that the selvage edges are aligned, or at least parallel. The fabric should be doubled, not in a single layer. You will cut through two layers at once. Place each pattern piece on the fabric, being sure to align the plumb lines on each with the warp, or lengthwise grain. This helps the garment to hang properly.
Instead of using pins to hold the pattern pieces in place, you should use pattern weights of some kind. While these are available for sale, I find it easier to use what I have around. Rulers, scissors, books and other heavy items are perfect for this. Then take your black tailors chalk, making sure it is sharp (a pair of old scissors is good), carefully trace around the pattern with a think chalk line. Mark an X on each piece of fabric, so you can figure out which is the right side later on.
When every piece has been traced, it is time to cut. When cutting, you should cut on the inside of the chalk mark, as the chalk adds a bit of width, which would throw off the fit. Do not snip the scissors entirely closed as you cut, rather cut until the scissors are only near the end. This helps you to cut a nice clean line.
After cutting, mark the other side with an X as well.
Seam Allowances
There are several schools of thought about Devere and seam allowances. Some add 1⁄2 an inch around every seam, except 1⁄4 for the armscye. The issue with this method is that it makes the coat much less fitted.
The other extreme is adding no seam allowances at all. I’ve tried this several times and have found that major adjustments were then needed for the pattern, as it had become too small.
Devere gives clues to his preferences on seam allowances. From his 1866 manual, he states:
“In cutting out the garments in the cloth, it must be borne in mind that the seams are not to be allowed for. All the allowances requisite for the various seams, are given to the pattern by our systems of drafting, without any calculation.”
However, in his 1856 manual, he has this to say about seam allowances:
“When using the measures to draft any pattern whatever, there are certain differences to be made in the measures according as the parts of the coat corresponding to each of them are stretched hard or taken in, and also if these parts must fit tight or loose. As a general rule, for woolen cloths we allow for the seams in the length of the cloth and not in the width, because cloth is nearly always elastic in the way of the woof, and often stretches more than is required for the seams.”
I generally follow his suggestions from the 1856 manual. I add seam allowances to the side seam, the curved seams, and the center back. I do not add a seam allowance at the shoulder seam, which I’ll explain in much greater detail in a later module.
To add the seam allowances, you’ll need your seam gauge. I like to line the seam up along the length of the ruler, using the slit in the middle for alignment. I then use the centimeter side to draw a seam allowance. It’s slightly less than 1⁄4 inch, but when you trace out the fabric with fabric, it ends up being just right.
Add 1/4 inch seam allowances to the following:
- Side Seam of Front
- Side Seam of Side Body
- Curved Seam of Side Side Body
- Curved Seam of Back
- Center Back
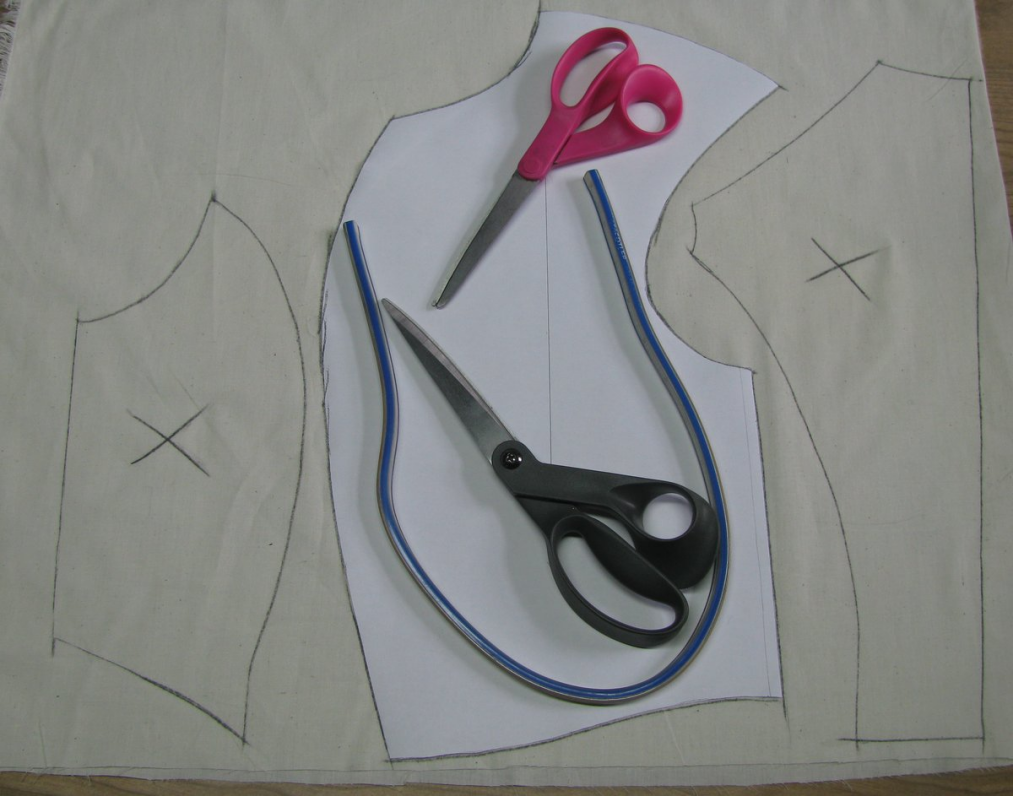
After you’ve added the seam allowances, you ma•y cut out each piece carefully, using paper scissors. Don’t use your good scissors or you will dull them!
Note that the seam allowance method given here is applicable to all types of frock coats, including those made of wool. By creating a base pattern like this, properly fitted, you will not be as limited in the future.
Transferring the Pattern
Going from a draft to a usable pattern is a relatively straightforward process. Notice there are three pieces to the pattern. The front and side pieces are separated by the line X – V, and of course the back. It is highly recommended to preserve this original draft, and make a copy to cut out for use in sewing.
There are two methods I’ve used for transferring the pattern to new paper. The first is to lay the draft onto a new sheet of pattern paper, and carefully run over the seams with a pattern tracing wheel. The spokes on the wheel will poke through to the new sheet of paper. At this point, you then connect the dots and you have your new pattern pieces.
Make sure that you separate the side and front pieces when you trace. Simply move the draft over a few inches after you’ve traced one piece, then trace the other. This is to give you space to draw in seam allowances.
Another method is to put the draft on the bottom, and the new sheet of paper on top. If your paper is on the thinner side, you can see through to the bottom, and simply trace the pattern out. You can also use a light table if you have one. This is actually my preferred method, but do what you are more comfortable with. Again, make sure the side and front pieces are separated before tracing.
Finalizing the Pattern
It is now time to begin the process of turning your draft into a wearable garment. In this module, you will learn how to add seam allowances, cut the pattern pieces, and cut out and construct the a toile for the upper body of the coat. This toile has two purposes: one is to check the pattern for fit before using your expensive fabrics; and two, to familiarize yourself with the proper frock coat body construction techniques.
Marking Up and Truing the Pattern
Before you transfer your pattern, there are several things you should do beforehand. The first is to mark the plumb line on each piece of the pattern. Simply draw a line parallel to your construction lines as shown. It may be helpful to add an arrows as a reminder to pay attention to them.
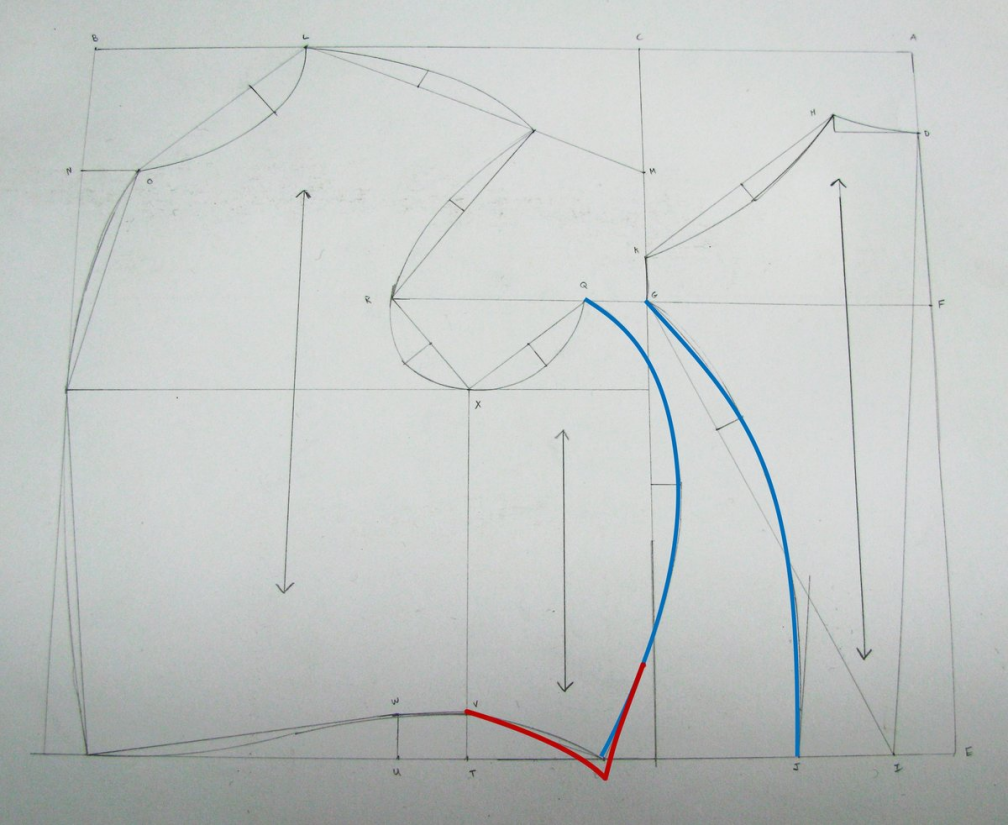
Next, you must measure the side seam of the back, and compare it to the curved seam of the side body,both shown in blue. The side piece should be about 1⁄4 to 1⁄2 inches longer than the back piece, for aid in construction. If you don’t ensure this, you will have problems putting the coat together later.
To do this, simply move the point Z down the specified amount, square with the bottom construction line, as shown in the red. Then redraw the bottom and curved seams of the side piece, as shown.
Now is also a good time to check the other seams for issues, for example comparing the width of the shoulder seams, or comparing various widths and lengths to your own measurements.
Adding the Curves
We’re almost done – it’s now time to draw the curves. I strongly advising using French curves for these, as you’ll get a more accurate and flowing line.
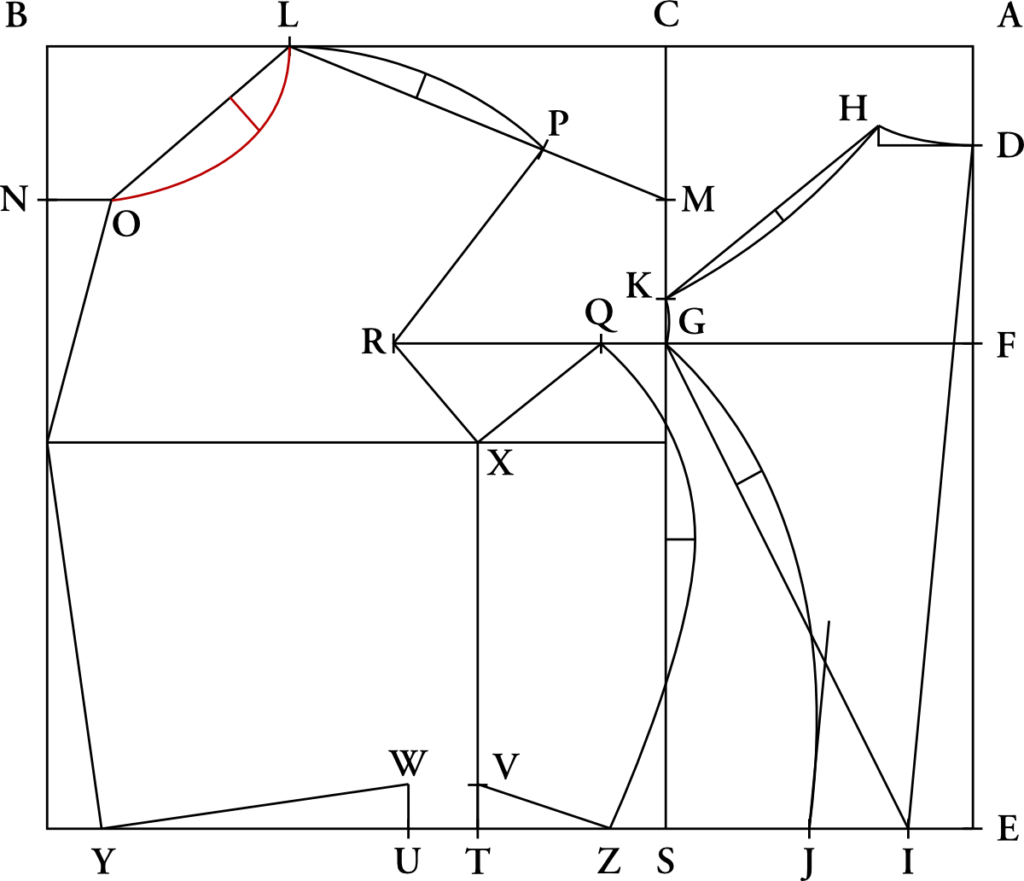
Back Neck
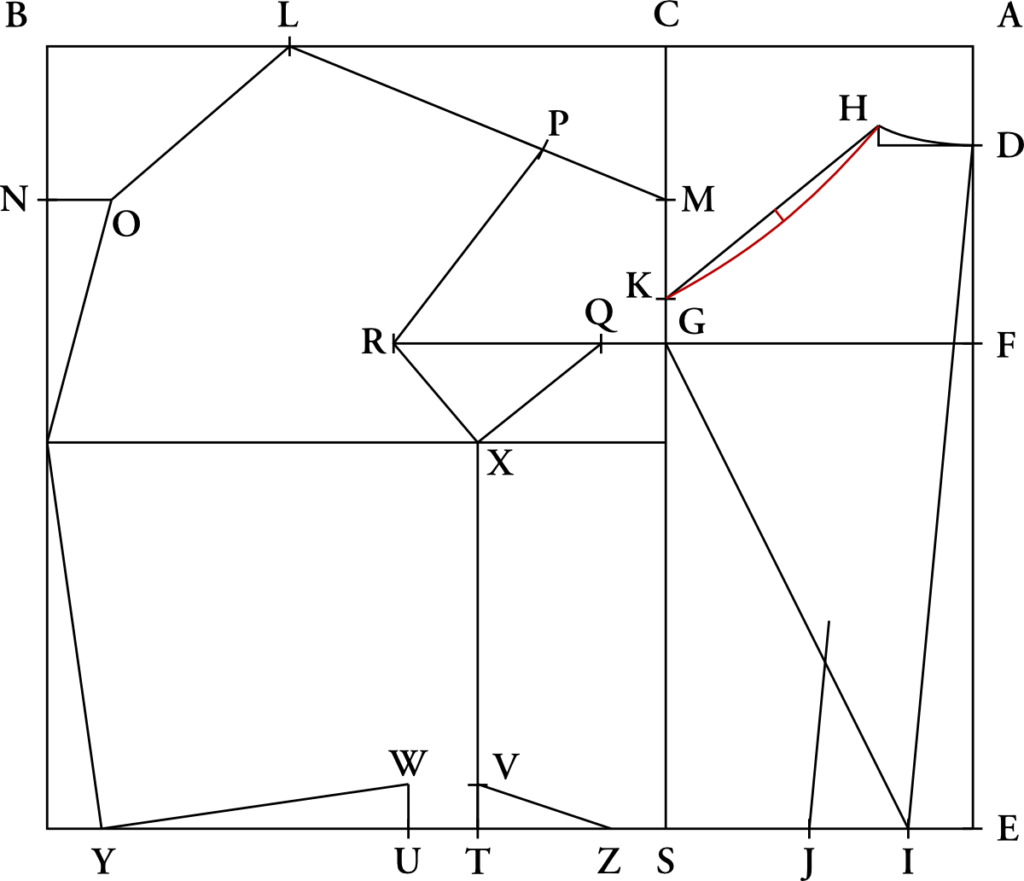
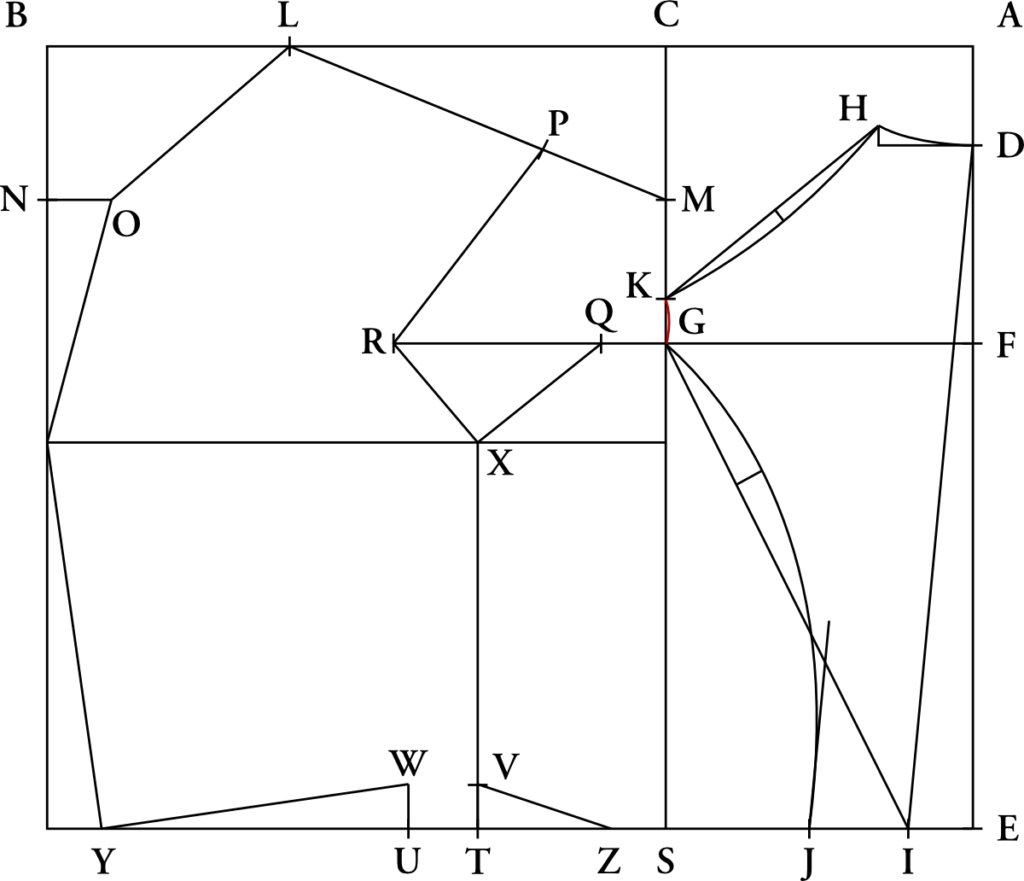
Draw a smooth curve connecting point H to Point D.

Shoulder Seam Hollow
The following method is used to find most of the following curves. Start by measuring line H – K, and finding the center point. Next, square down 3/8 graduated inches. Finally, draw a nice curve connecting K to the point we just found, ending at point H.
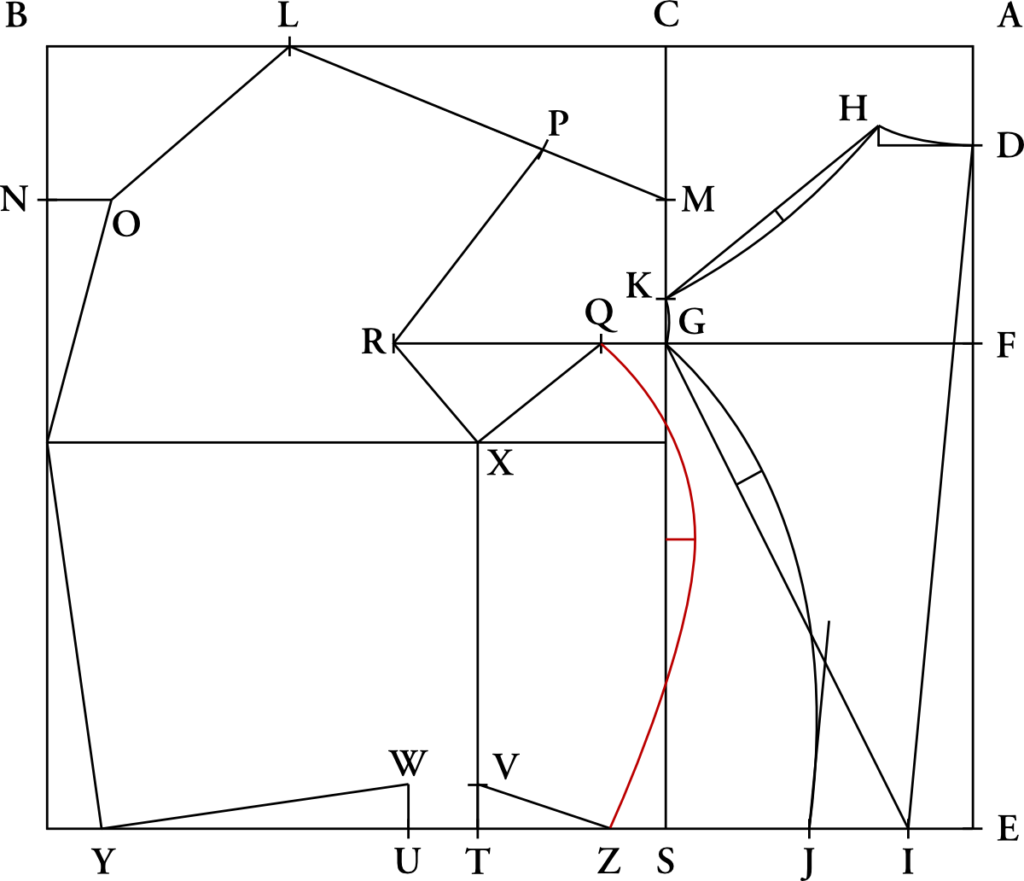
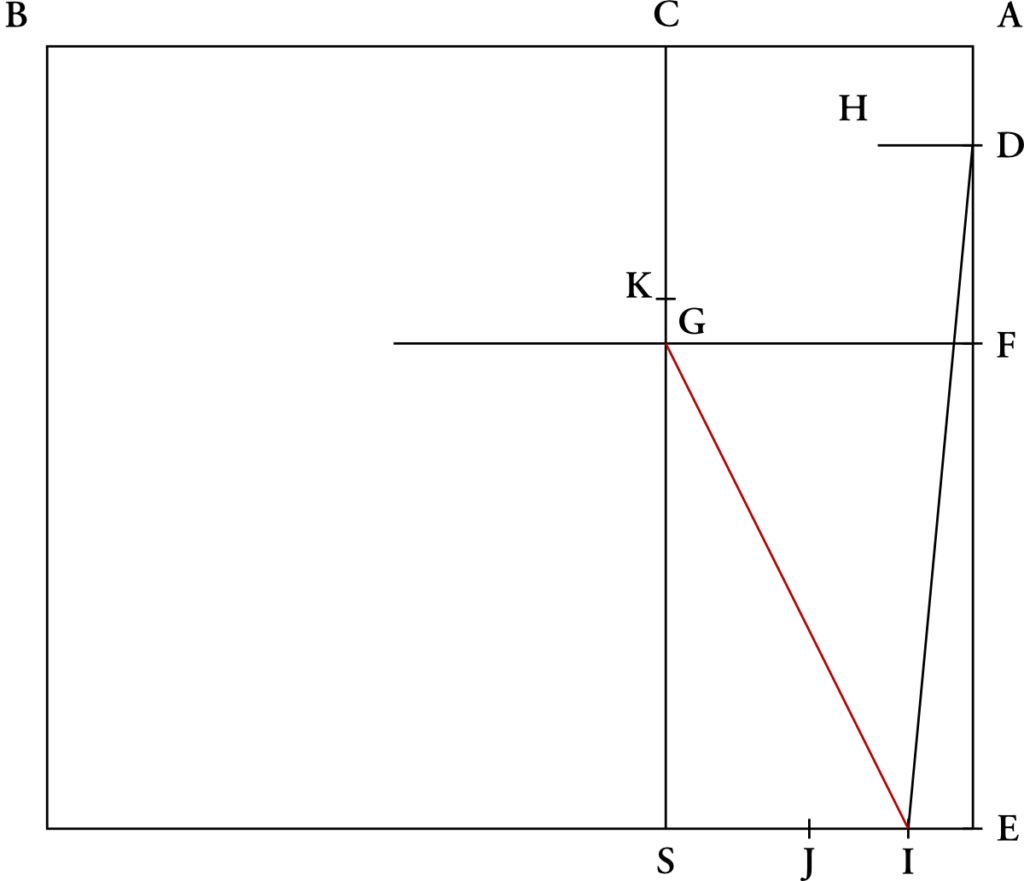
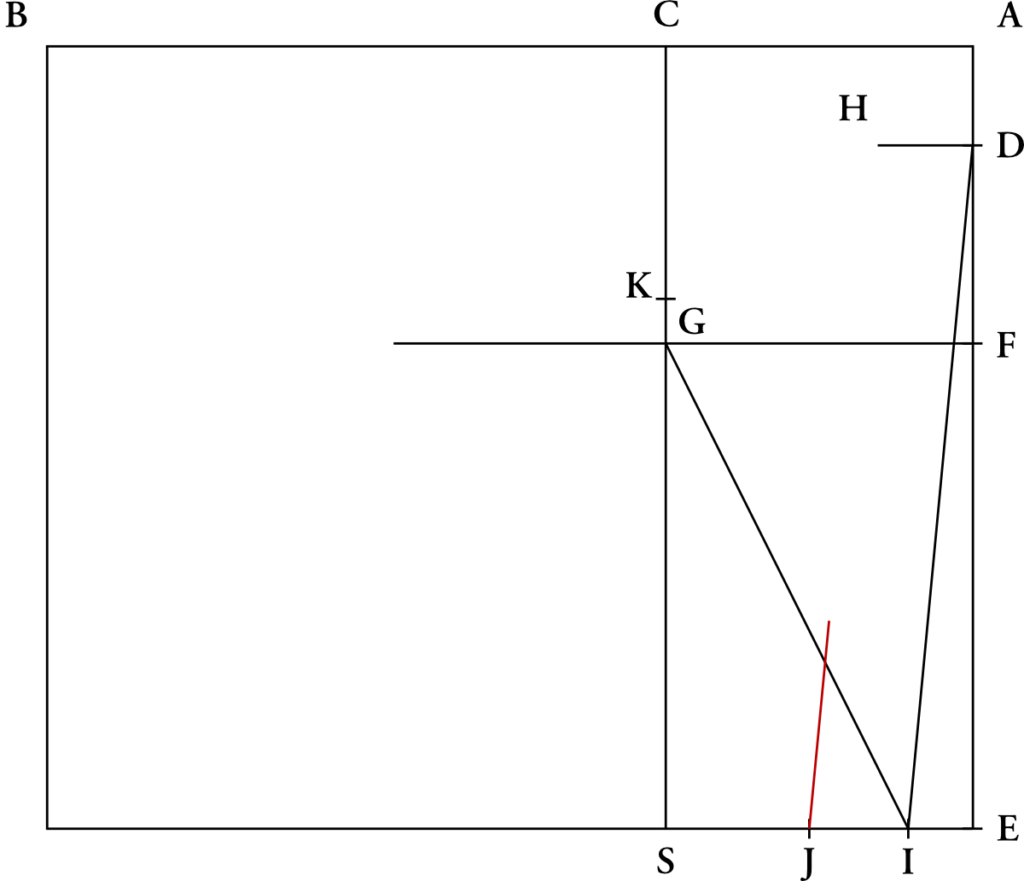
Side Seam Hollowing
To find this curve, we must first measure 4 graduated inches on the oblique line from point G. At this point, square up 3/4 graduated inch. This is where the curve will have the greatest hollow.Draw a curve from point G, through the point you just found, to point J. The short construction line you made will aid in drawing the bottom half of the curve. The curved line should stay to the left of this line.

Back Armscye
From G to K, draw a slight curve. There are no straight lines on the human body, so adding the curve here makes this seam a little more harmonious.
Side Body Seam
I generally find this seam the trickiest to draw. Devere is vague about the exact placement. To begin, I measure down 5 graduated inches from point G, towards S, and square out 3/4 of a graduated inch.Draw the curve from point Q, through the point you just made, almost straightening out until you arrive at point Z. This curve should pass a little above the construction line from point X.Remember that a lot of these curves depend on your artistic sense, as well. They will not look exactly like this draft, as everyone has different measurements.
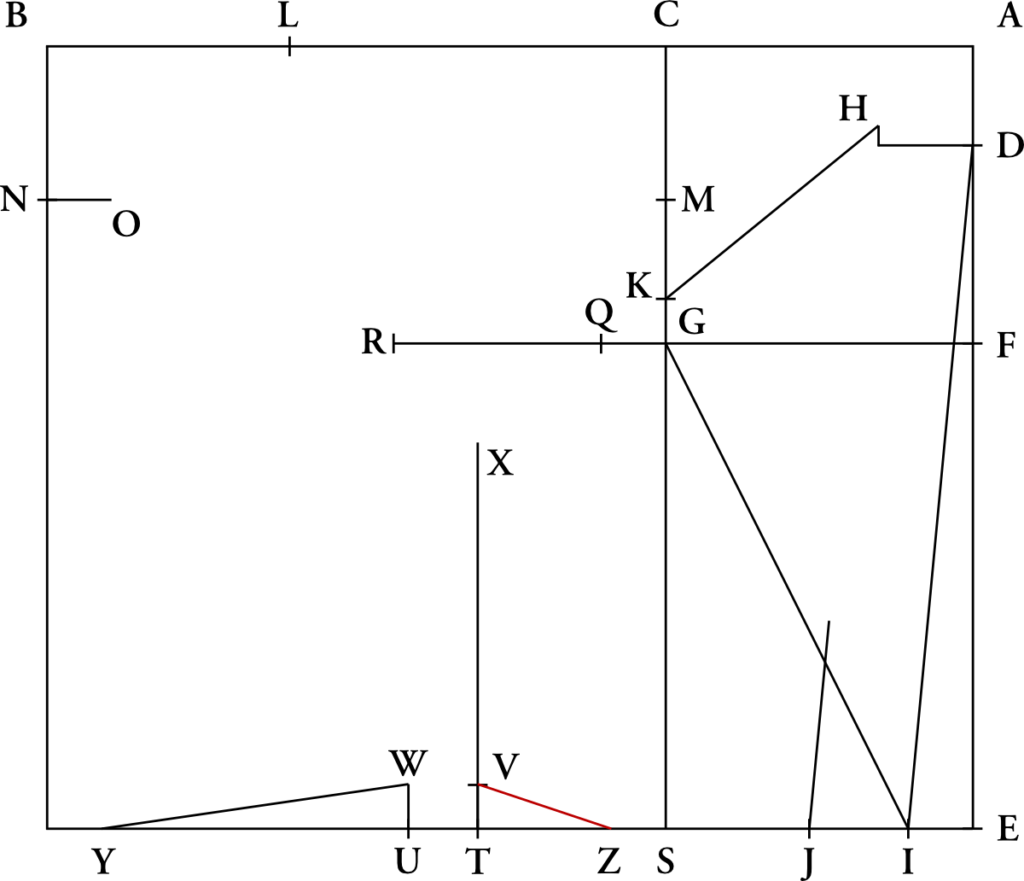
Shoulder Seam Roundness
Find the center between points L and P, and square up 5/8 of a graduated inch.Draw the curve, connecting points L, the point you just drew, and point P.
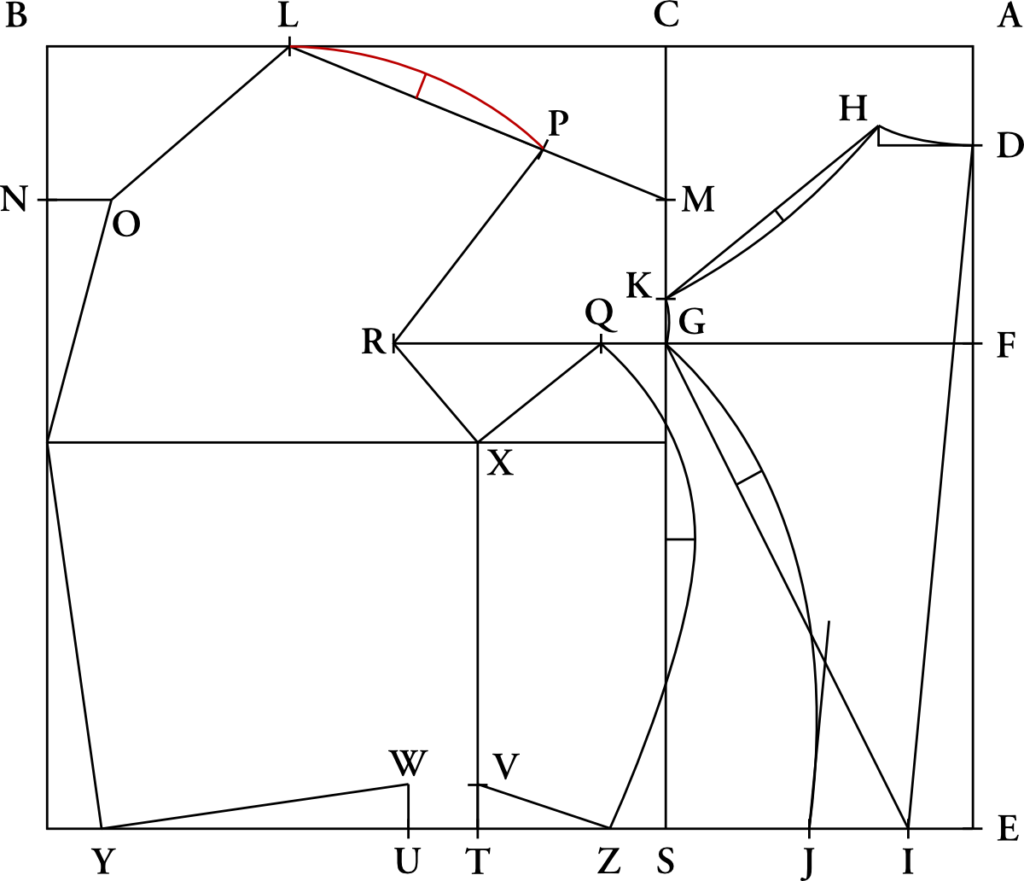
Neck Curve
For the neck seam, divide the line from L to O into three parts (here is where the tailor’s square comes in handy). Starting from the shoulder, mark one third in, and square a line off from this point measuring 1 1/8 graduated inches in length. Draw the curve from point L, through this point, ending at point O.
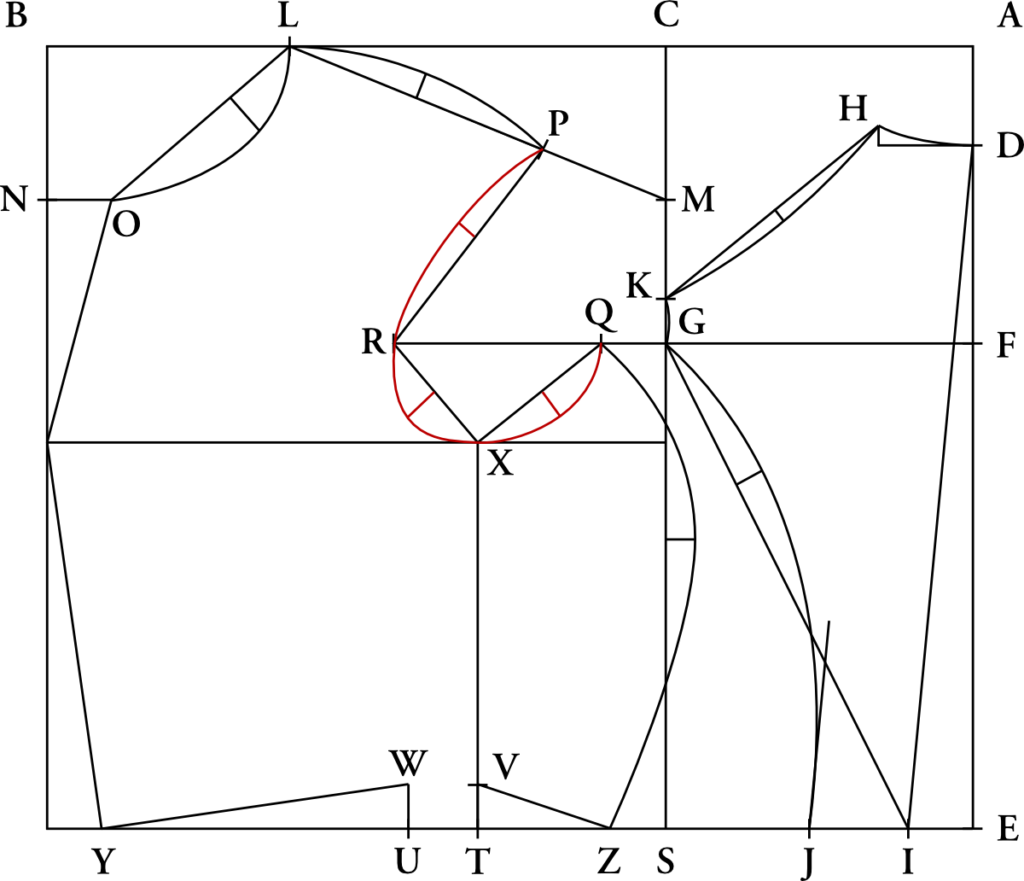
Armscye
We’ll combine the following three steps into one since you are hopefully catching on by now. At the Center of P – R, hollow in 1/2 graduated inch for the front of scye.
At the center of line R – X, hollow in 7/8 graduated inch for the bottom of scye.
At the center of line X – Q, hollow in 3/4 graduated inch for the rear bottom of scye. These curves should all flow harmoniously into each other, with nice smooth intersections.
Waist Seam
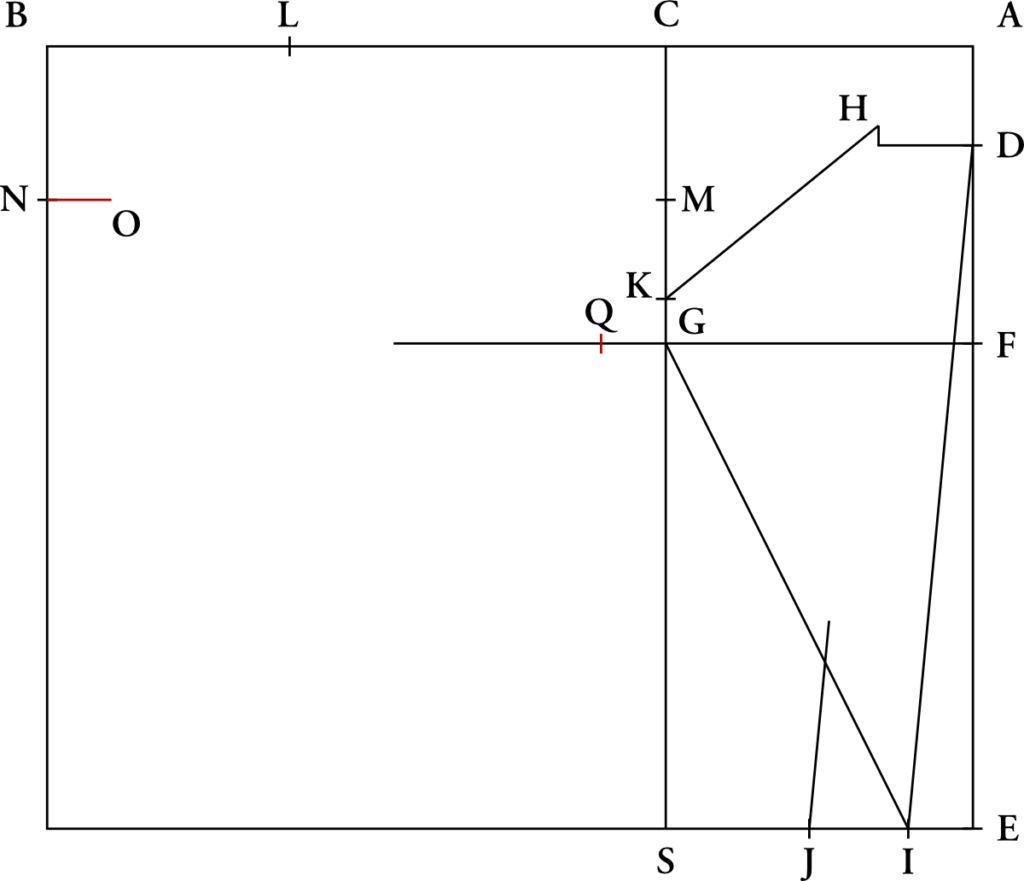
At the bottom of the waist seam, connect points Y, W, V, and Z in a nice curve as shown. Study the larger size draft at the end for a clearer view. Note the hollowing of the waist at the side piece.

Center Front
Finally, draw a single curve connecting point O to the chest line from X, to Y at the waist line. A hip curve is very useful for this.

Congratulations, you have completed the draft for a close-fitting wrapper. Below is a diagram of the pattern edges. Seam allowances will be dealt with in the next module.
At this time, please post your draft on the forum, so we can discuss and figure out any problems you may be having. Next, we will begin constructing the muslin wrapper, and discussing the many fitting issues that can occur.
Drafting the Forepart
With the back construction lines laid out, we will now proceed to drafting the forepart and side body.
C – L
C – L is one-eighth inch more than half the Breast, or 9 ½ graduated inches.

C – M, and B – N
Each are equal to half A – C, or 3 7/8 graduated inches.

N – O and G – Q
Each is 1/12 the Breast, or 1 5/8 graduated inches.
Q – R
One-fourth Breast plus one-half graduated inch, or 5 ¼ graduated inches.

S – T
One-fourth the Breast, or 4 ¾ graduated inches.
S – U
One-third Breast plus one-half graduated inches, or 6 1/2 graduated inches.

T – V and U – W
One-sixteenth Breast, or 1 1/8 graduated inches.
V – X
Length of Side to measure.
W – Y
One half waist measure (one quarter of the full waist).
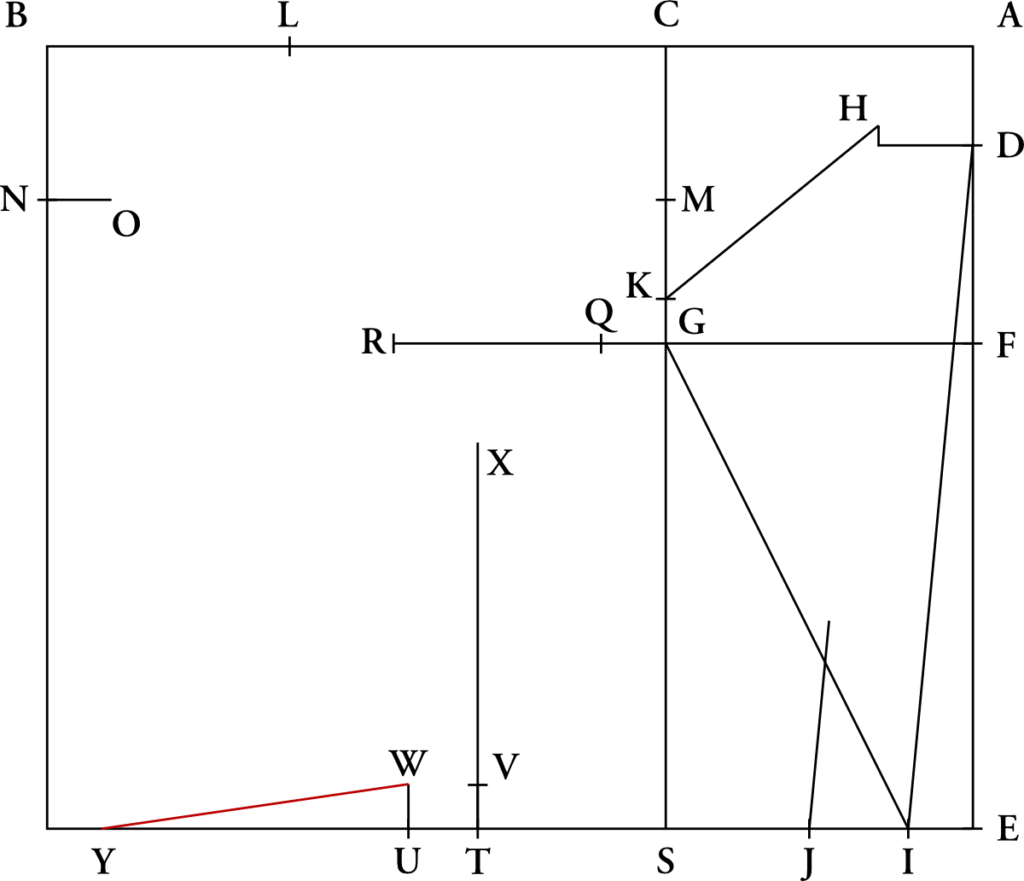
W – Z
Half the waist measure less the width of back at waist. Be sure to measure from W to Z, not V to Z. After you mark the point at Z, then draw the line from V to Z.
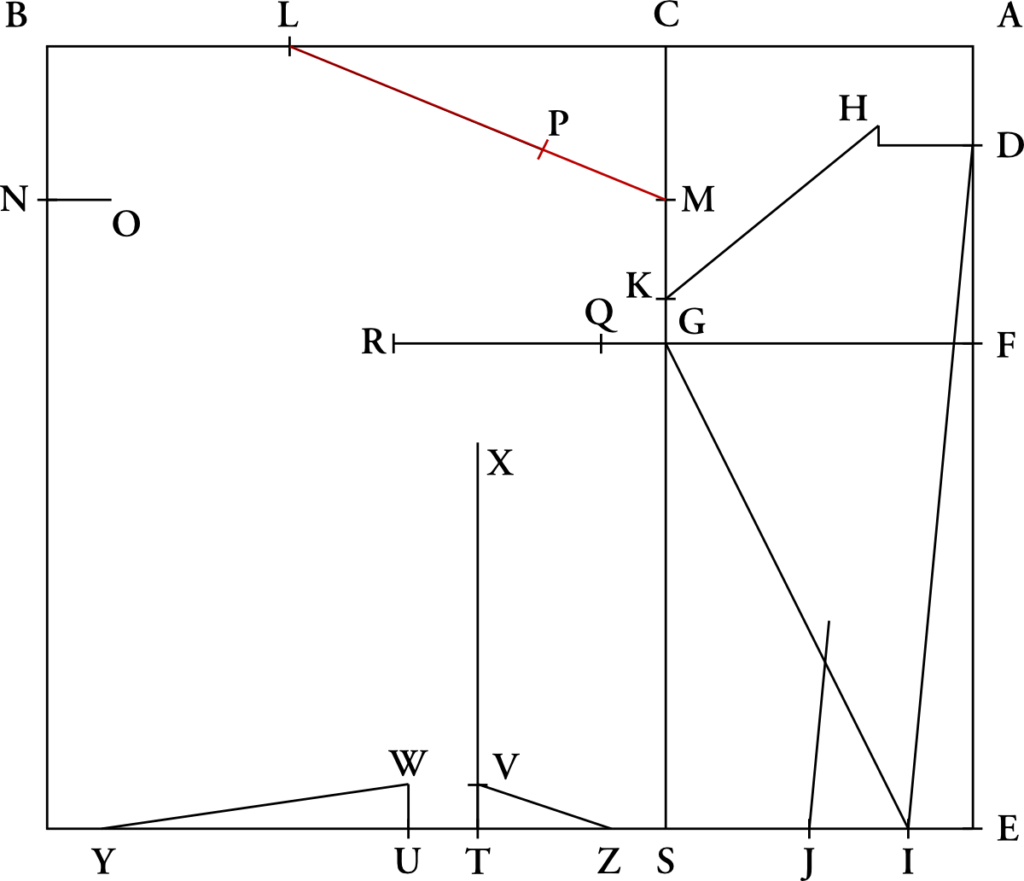
Line L – M
Draw a line from L – M, and make L – P the same length as H – K. This ensures the shoulder lines are equal in length to each other.
Neck and Armscye
Next draw construction lines for the neck, O – L; the front armscye, P – R; the bottom armscye, R – X; and the rear bottom of armscye, X – Q.

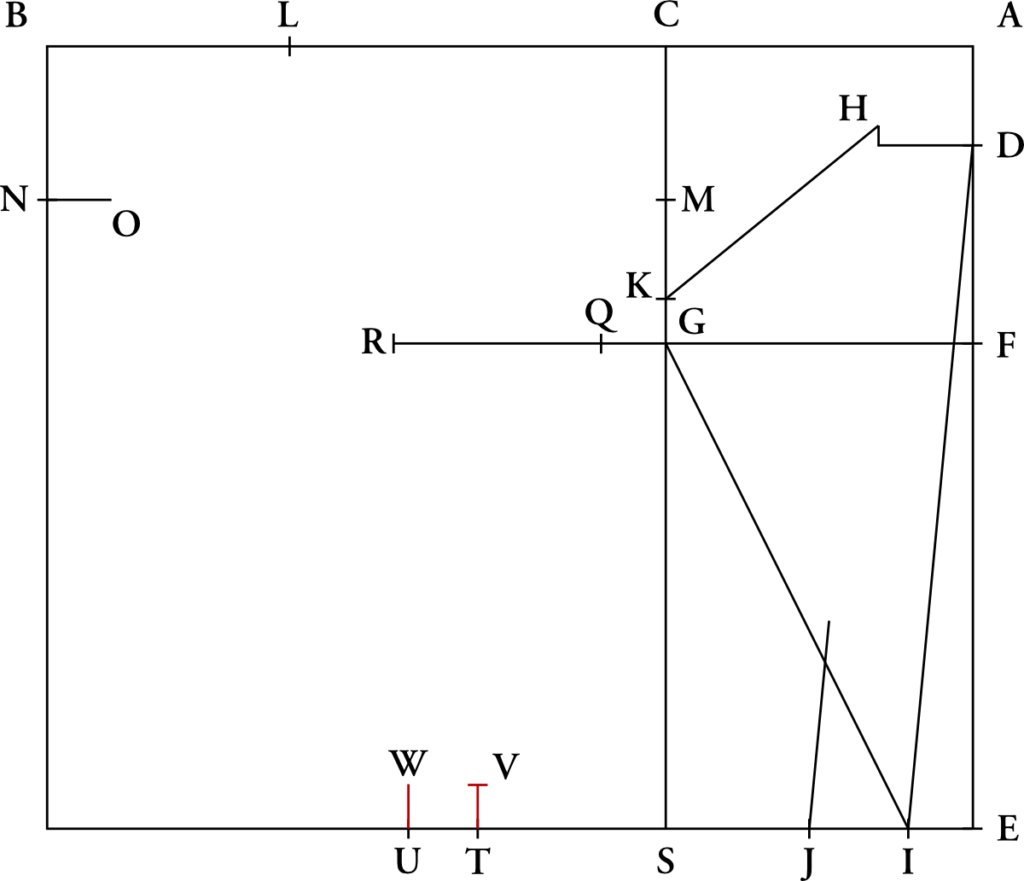
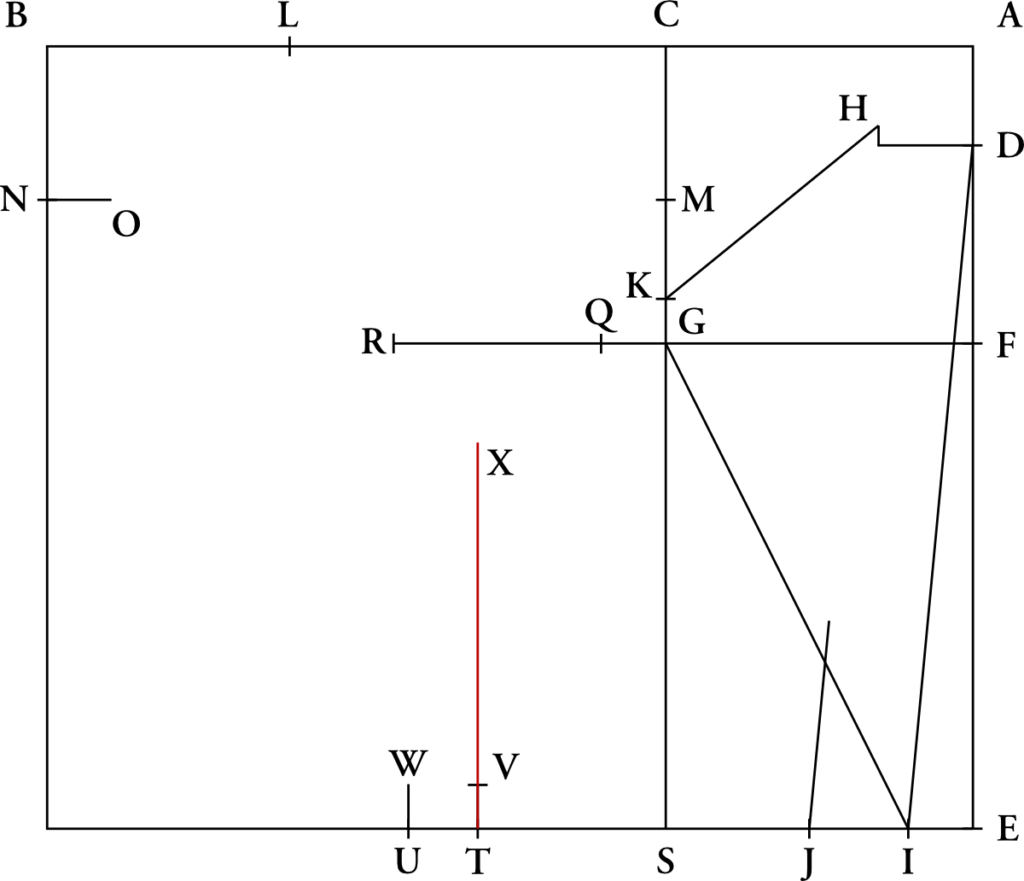
Center Front
To determine the center front, we must first draw a construction line perpendicular to line V – X. Next, draw a line connect O and Y, via the line from X as shown.

Drafting the Back
Now is the time to spread out your drafting paper, weigh it down with some rulers to prevent movement, and actually start drafting. On the following pages we will go step-by-step through drafting the close-fitting wrapper. At the end, you will find a diagram with all steps combined in order to give you a consolidated diagram for drafting.
As you draft, always use a sharp pencil. Remember that neatness and accuracy count. If you’re off by an eight of an inch in the draft, it can set the balance of the garment off. Take your time and make sure you understand each step before you draw it. Please post any questions on the forum.
Feel free to use the spread sheet in place of these instructions. Use the instructions for clarification in that case. Following the instructions is a large scale version of the draft, so that you may see more of the details.
Formation of Squares
Coat drafts are always drafted in what’s called The Square. It’s basically a rectangular box from which the various points are drafted.
A – B
Start out by drawing a horizontal line on the upper half of the paper, from A – B. This should be equal to one-fourth more than the Breast measure (remember, Breast is half of the Chest), or in graduated measures, 23 ½.

A – C
A – C is one-third of A – B, or 7 7/8 graduated inches.
After drafting these points, square down (at right angles) the outside lines of the square, and the construction line of forepart, as shown.

The Back
We’ll now concentrate on drafting the back of the coat.
A – D
A – D is known as the Balance, or difference between the Bust and Curved measures. This is actually the difference between the lengths and forepart.

The balance is very important, as it affects the hang and drape of the finished coat. If you are stooped, this measurement will be smaller, therefore making the back longer. If you are erect, the opposite is true – the balance measurement will be larger, and the back shorter.
If your Bust and Curve measures seem off (and they can be difficult to take), I suggest using the graduated measurement of 2 ½ inches, and adjusting at the first fitting of the wrapper.
D – E
D – E is the length of the back, make it 1 ½ graduated inches less than the curve. If using a graduated measure, it is equal to 17 ¼, but that may change depending on whether the person is short or long-bodied.
D – F
D – F is ¾ of an inch more than a fourth of D – E, or is equal to one-fourth of D – E plus ¾ graduated inch.
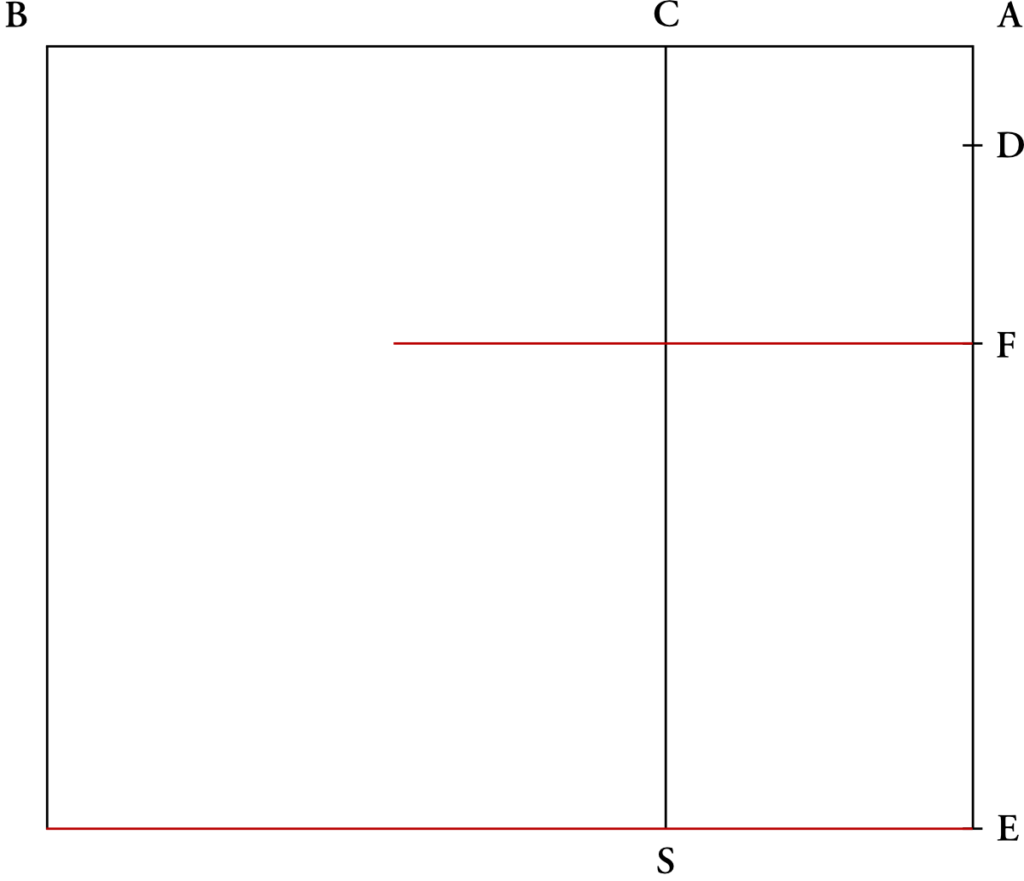
Square Lines
Now square lines across from F and E. The line at F crosses the construction line of the forepart at point G, giving the height of the side point. The line at E touches the construction line of the forepart at S, and gives us the completion of the square.
D – H
D – H equals one-eighth of the Breast, or 2 3/8 graduated inches.

E – I
E – I equals one-twelfth of the breast, or 1 5/8 graduated inches.
I – J
I – J is the width of the bottom of back according to fashion. Remember that in the period, the backs were quite narrow, never more than a hand’s width. Devere recommends this to be 2 ½ graduated inches. Unless you have a specific reason, leave it at that.

G – K
G – K is one-sixteenth of the breast, or 1 1/8 graduated inches.

Center Back
At this point, we will draw the center back line by connecting D and I. Just like that game, connect the dots.

Construction Line
This oblique construction line, drawn from G to I, will aid in drawing the curve of the back piece later on.
Construction Line
This construction line is drawn from point J, to a point just above where intersects the oblique line from G to I. Make sure it is parallel to the Center Back line.This line is also used to aid in construction of the back curve.
Height of Back Neck
At point H of line H – D, draw a line square with H – D, rising up one-half a graduated inch.

Back Shoulder Line
Draw a line connecting points K and H.

Devere’s Graduated Rulers
Devere realized this was a tedious way of drafting. Remember, they didn’t have computers or spreadsheets back then. Instead, Devere devised a set of rulers, called Graduated Rulers. The graduated rulers are, “a series of measures, which are successively graduated larger and smaller than the common inch measure, and are used to draft patterns for larger or smaller sizes than the 18 3/4 breast.” What does this mean? Instead of doing those calculations above, you simply choose a correct sized ruler and then draft the pattern as it is in the book.
For example, you are measuring someone and they have a 48 inch chest. You would then go to your set of rulers and choose the one marked size 48 (for a 24 inch breast). If you compared this to a normal inch ruler, you would see that it is a lot larger, yet it still has 12 inches to it.
Where can you get these rulers? In Devere’s time, Devere sold these rulers, for which you can find advertisements in his manual. They came on paper, tapes, or on wooden rulers. Devere has sadly long gone out of business, but luckily, the rulers are not too difficult to make yourself. I’ve saved you that trouble, though.
I have created a set of graduated rulers, sized 34 through 50, for your convenience. They are on 11 x 17 inch paper, so you’ll need to find a print shop to print these. They can usually be printed for a few dollars on nice card stock at stores with print shops such as Staples. They are in Adobe pdf format. When printing from Adobe Acrobat Reader or other readers, be absolutely sure to set Page Scaling to None. If this is not done, your whole set of rulers will be off. After they are printed, I would take a normal inch ruler and compare it to the size 37 1/2 graduated ruler. They should be exactly the same. If they are off, it was printed incorrectly, and you’ll need to check your settings and try again.
The nice thing about these rulers is that you perform absolutely no mathematical calculations, unlike the spreadsheet option. Just pick the ruler that corresponds to your chest size, and use that when drafting.
Since these will be printed on relatively flimsy paper, you should use a regular ruler or tailor’s square to draw your straight lines, and then measure off the distance with the graduated ruler.
Be mindful that not every step calls for a graduated ruler. If you used a graduated ruler for everything, you’ll simply end up with that proportionate draft that we want to avoid. Instead, when a Common Inch is called for, use a normal ruler. When the graduated inch is called for, use the graduated ruler in the size corresponding to your chest.
If you don’t find your sized ruler included, please let me know and I will make one up for you. If you are between sizes, round up to the nearest inch.
Devere’s Formula
One of the more difficult concepts to understand is how Devere varied the size of a pattern. He used a size 18 3/4 breast as the basis for all of his patterns (half of your chest measurement equals the breast measurement), which is equivalent to a 37 1/2 chest. This is called the proportionate model. If you are lucky enough to have a 37 1/2 chest (and the other corresponding measurements are the same), you can draft the patterns as they are straight from the book, with a normal ruler . Unfortunately, very few people fit these measurements, so adjustments have to be made.
Let us suppose we have a gentleman with a 42 inch chest, and want to find the correct balance. On a 37 1/2 inch proportionate model, the balance is 2 1/2. But a 42 inch chest would make that larger. First, you need to find the correct ratio between the 42 inch chest, and the proportionate chest. That would look like this:
42 / 37.5 = 1.12
This number is called the scale factor.
After getting this number, 1.12, we multiply that by the balance measurement (or whichever measurement we need to get):
1.12 * 2.5 = 2.8
Then, it’s a matter of converting that 2.8 decimal into inches. This comes out to somewhere between 2 3/4 and 2 7/8. A combined formula for finding these measurements is as follows:
x = the proportionate measure for which you wish to find the scaled measure.
M = Your whole chest measurement.
x * (M / 37.5) = scaled measurement
While possible to work out these calculations for each measurement in the draft, it is extremely time consuming and prone to error.
One tool to making this easier, is a spreadsheet, which you saw when you wrote down your measurements. On it, you’ll find a chart that’s automatically filled out with numbers as you type in your measurements. What is happening behind the scenes is that the spreadsheet program is calculating all of those measures to your breast size, automatically. To use this spreadsheet for drafting, simply plug in the numbers for each step as called for.
For example, if you are a chest size 40, when asked to draw the line from A to D, you would find that in the spreadsheet, and measure out 25 inches.
As you can see, all of the calculations are done for you and updated as you type in the measurements. If you wish to use the spreadsheet, I advise printing it out after you fill it in, so as not to accidentally change numbers while using it.