Month: February 2023
Drafting the Forepart
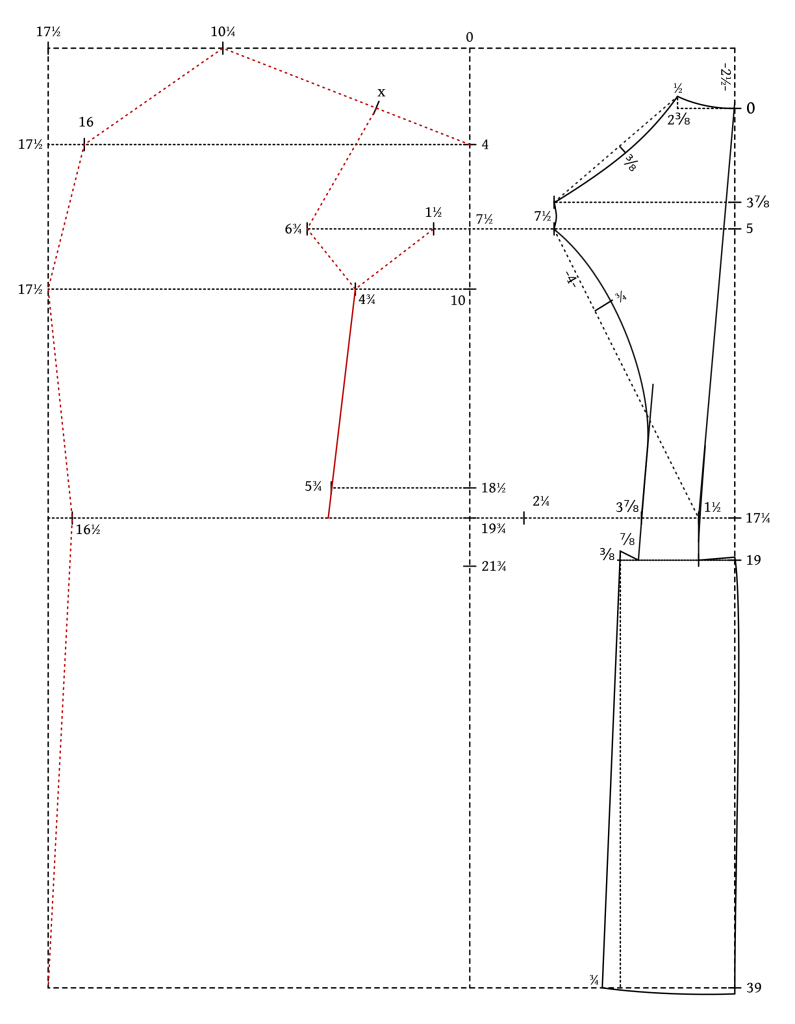
Moving now onto the forepart draft, square a line down from 0. This can be anywhere to the left of the back piece depending on how much room you have on your paper – I moved it over a bit to make things a little clearer.
Square down from 0 the following points:
- 4 graduated inches from 0 for the shoulder angle and neck point.
- 7 1/2 graduated inches from 0(this should already be marked from the back and hopefully correspond) for the armscye width.
- 10 graduated inches from 0 for the bottom of the armscye and width of the chest.
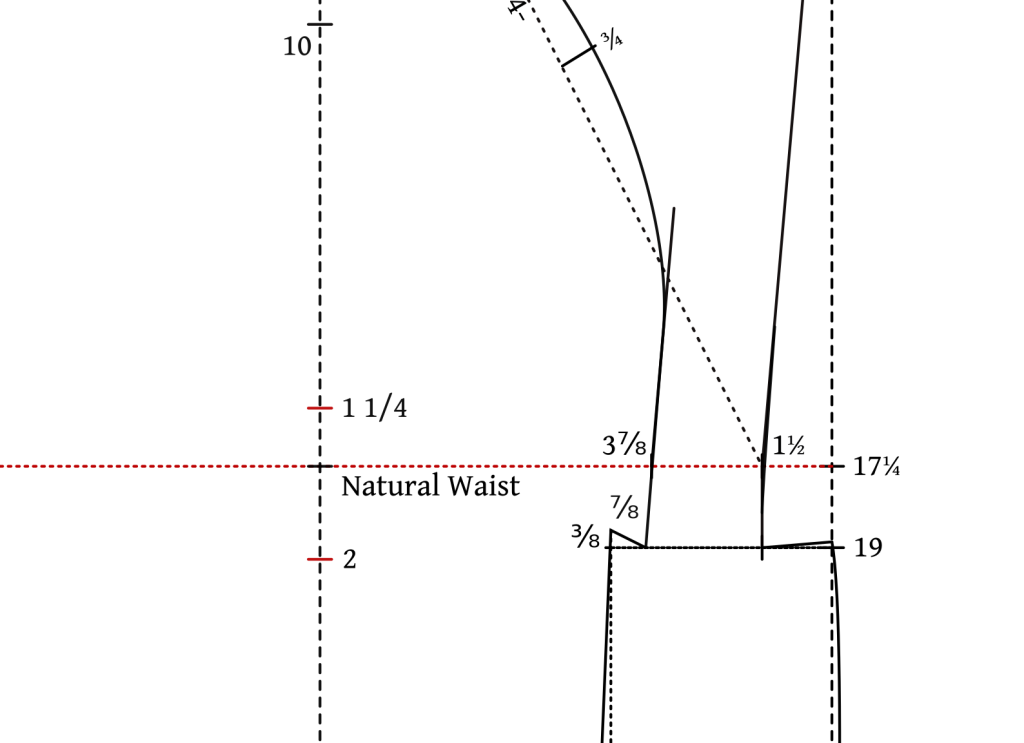
These next points can be followed if you kept the 17 1/4 graduated inches for the natural waist length – if you altered that to correspond to your actual measurement skip this section and follow the next diagram. These points help form the side body.
- 18 1/2 graduated inches from 0.
- 19 3/4 graduated inches from 0 should already be marked from the back.
- 21 3/4 from 0 for the bottom of the side body.
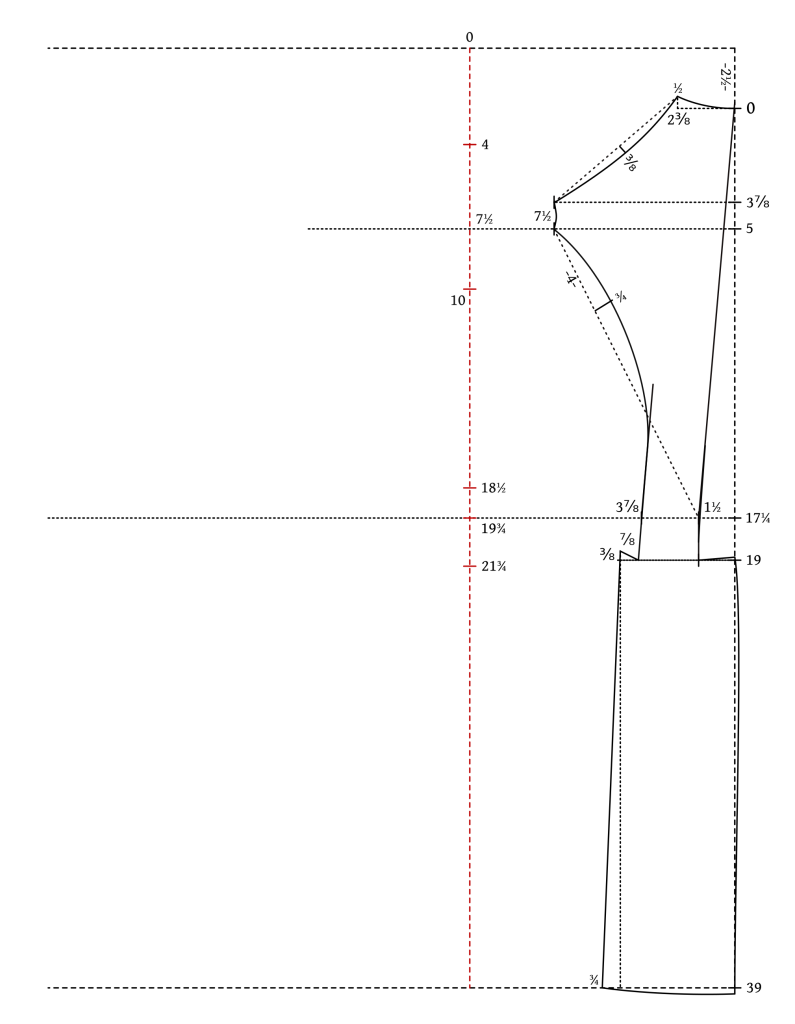
If you did alter the waist length, simply measure out the following points from the natural waist line instead. This should help ensure all the lengths agree with each other.
- Measure up 1 1/4 graduated inches.
- Measure down 2 graduated inches.
Square out and mark the following widths:
- 10 1/4 graduated inches from 0 for the shoulder point.
- 17 1/2 graduated inches from 0 for the overall width. Square down from 17 1/2.
- 16 graduated inches from 4 for the neck point. This may be altered later to adjust the width of the lapels.
- 1 1/2 graduated inches from 7 1/2 for the side body point.
- 6 3/4 graduated inches from 7 1/2 for the width of the armscye.
- 4 3/4 graduated inches from 10 for the bottom of the armscye. Square this line all the way across.
- 5 3/4 graduated inches from 18 1/2 for the bottom of the side body seam.
- 16 1/2 graduated inches from 19 3/4 for the waist opening.
- In the opposite direction on this same line, measure 2 1/4 graduated inches from 19 3/4.
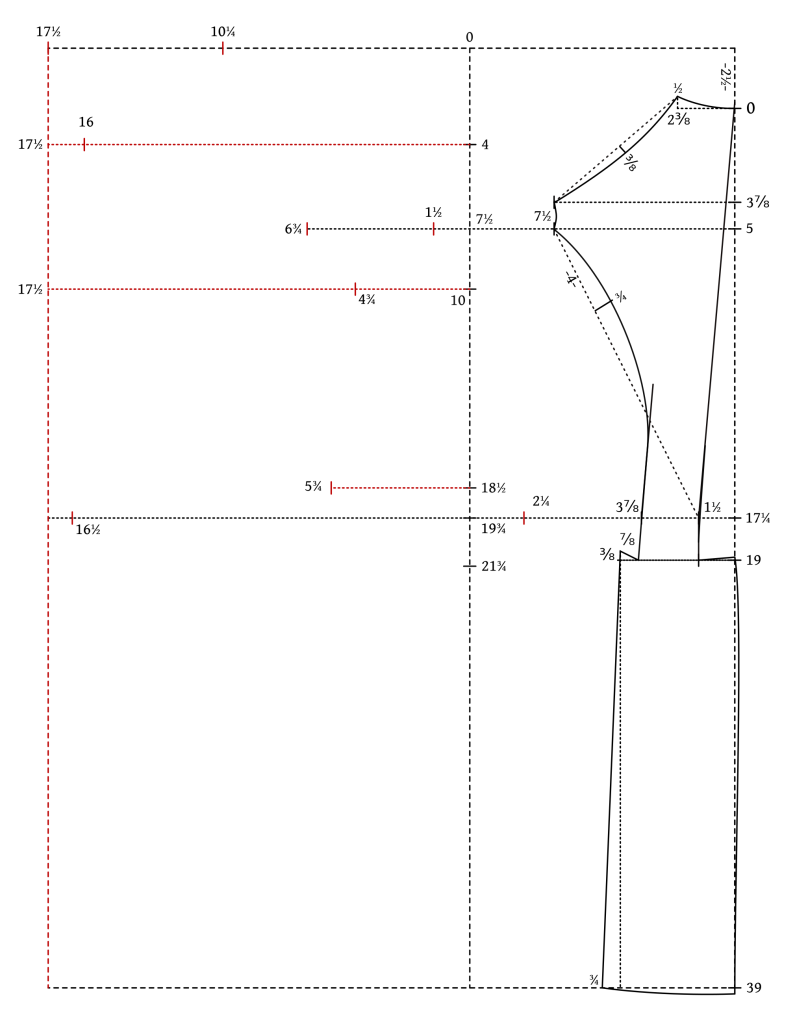
Now we’ll draw some more construction lines to aid in drawing the various curves. Draw lines from:
- 10 1/4 to 4 for the shoulder seam.
- Measure the back shoulder seam from 7 1/2 to 1/2 (along the straight construction line). Apply this exact measurement from 10 1/4 to find X.
- 16 to 10 1/4 for the neck seam.
- X to 6 3/4 to 4 3/4 to 1 1/2 for the armscye.
- 16 to 17 1/2 to 16 1/2 to the bottom corner of the draft for the front of the coat.
- 4 3/4 to 5 3/4 for the side seam. Continue the line through 5 3/4 to the waist line to aid in drawing out the curves in the next step.
Square out the following lines to find the depths of the curves:
- First find one-third of the distance from 10 1/4 towards 16. Square in 1 1/8 graduated inches.
- From the center of 10 1/4 to X, square out 5/8 of a graduated inch.
- From the center of X to 6 3/4, square in 1/2 of a graduated inch.
- From the center of 6 3/4 to 4 3/4, square in 7/8 of a graduated inch.
- From the center of 4 3/4 to 1 1/2, square in 3/4 of a graduated inch.
- On the main construction line from 0, measure 4 graduated inches below 7 1/2. Square out 3/4 of a graduated inch.
- At the bottom of the side seam from 4 3/4 to 5 3/4, where it intersects the waist line, mark 1/2 of a graduated inch on either side. You could extend this to 3/4 if you find you need a bit more room.
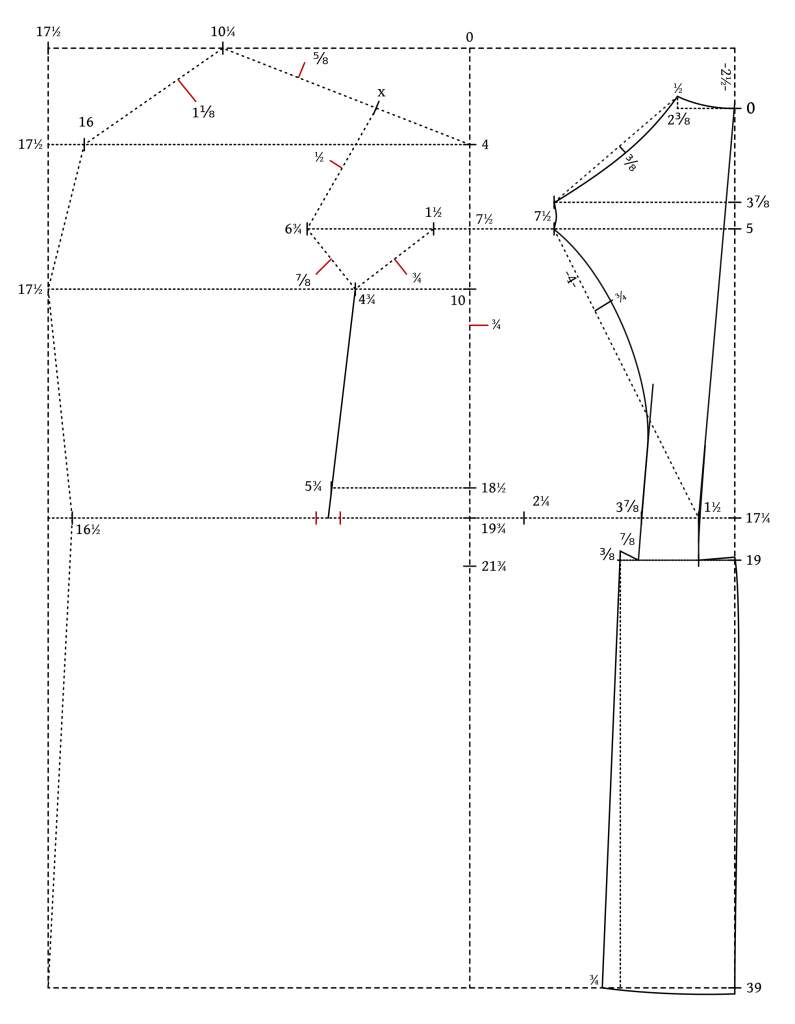
Now draw the following curves.
- Shoulder seam from 10 1/4 through 5/8 to X.
- Armscye from X through 6 3/4 — 4 3/4 — to 1 1/2.
- Neck seam from 10 1/4 through 1 1/8 to 16.
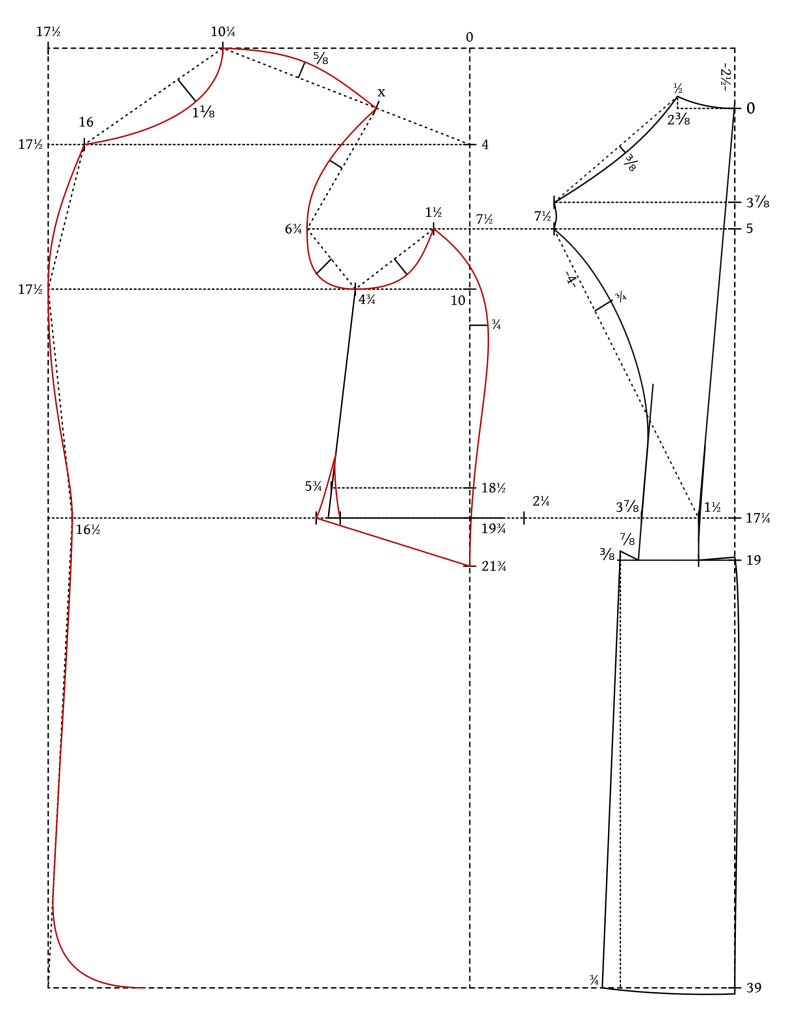
- Shape the front edge with a graceful curve from 16 through 17 1/2 and 16 1/2. The curve reverses direction at the waist.
- Draw the side body seam from 1 1/2 through 3/4 to 21 3/4. It’s a compound curve again and kind of reverses direction just above 18 1/2, though it’s not actually running through points 18 1/2 and 19 3/4.
- At the bottom of the side seam, an inch or so above 5 3/4, draw to curves to the points on the waist line to help spring out the waist and make room for the hips. This is a little confusing as the curve on the left is for the side body and the curve on the right is for the forepart.
- Complete the bottom of the forepart by drawing a straight line from the left point beneath 5 3/4 to 21 3/4.
- Finally, for the curved bottom edge at the center front, measure equal distances from the main intersection – I did 4 graduated inches. The draw a curve as shown. Using a plate or something round can be helpful here.
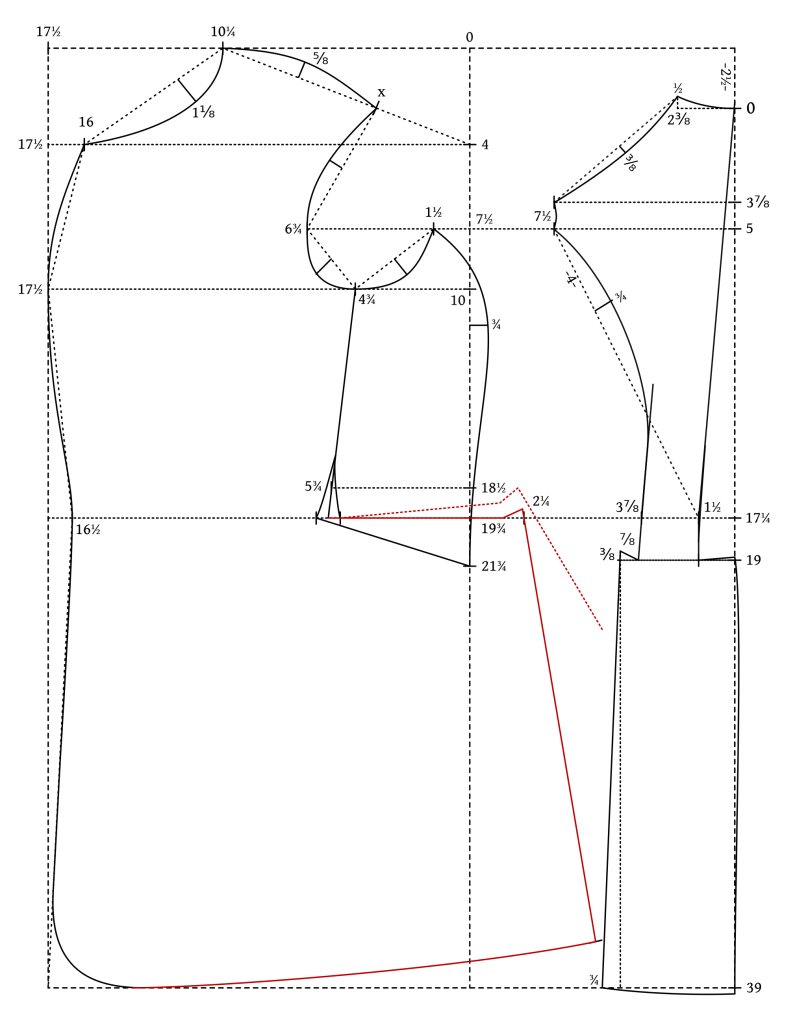
To finish off the main part of the draft, we’ll finish up the front skirt.
- Draw a line from the bottom of the side seam where it curves to the right (it’s along the waistline so it’s technically already drawn) to 2 1/4.
- Spring up the last 7/8 of the line by 3/8 graduated inches as shown to match the spring in the back waist.
- Draw a line down from 2 1/4 at a similar angle to that shown – about 30 degrees from vertical is a good starting point. Make this line the same length as the corresponding seam on the back skirt. You’ll probably get some overlap of the forepart onto the back but it’s nothing to worry about – easy to copy each piece onto a separate sheet of paper.
- If you want or need more fullness in the skirt you can raise that first skirt line up by about 1/2 graduated inch and spring out the back skirt seam even more as necessary.
- Finish up the draft by drawing a very slightly curved seam along the bottom edge of the skirt. It should be at 90 degrees to the back of the skirt and taper gracefully into the curve at the center front.
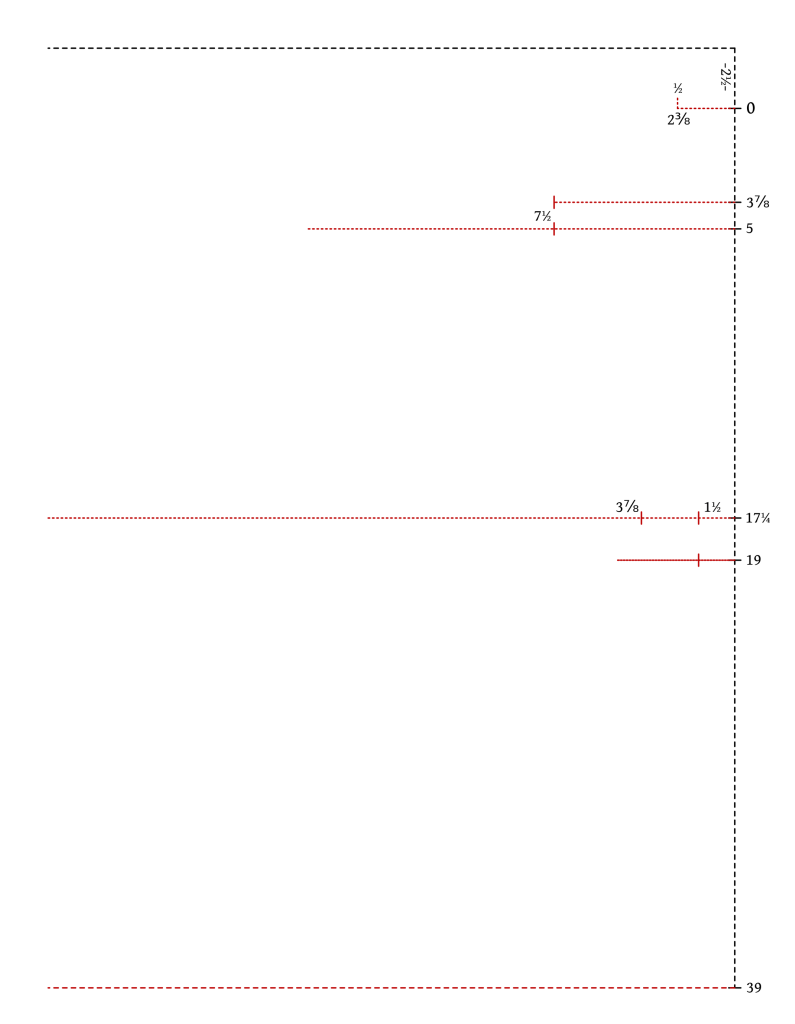
Drafting the Back
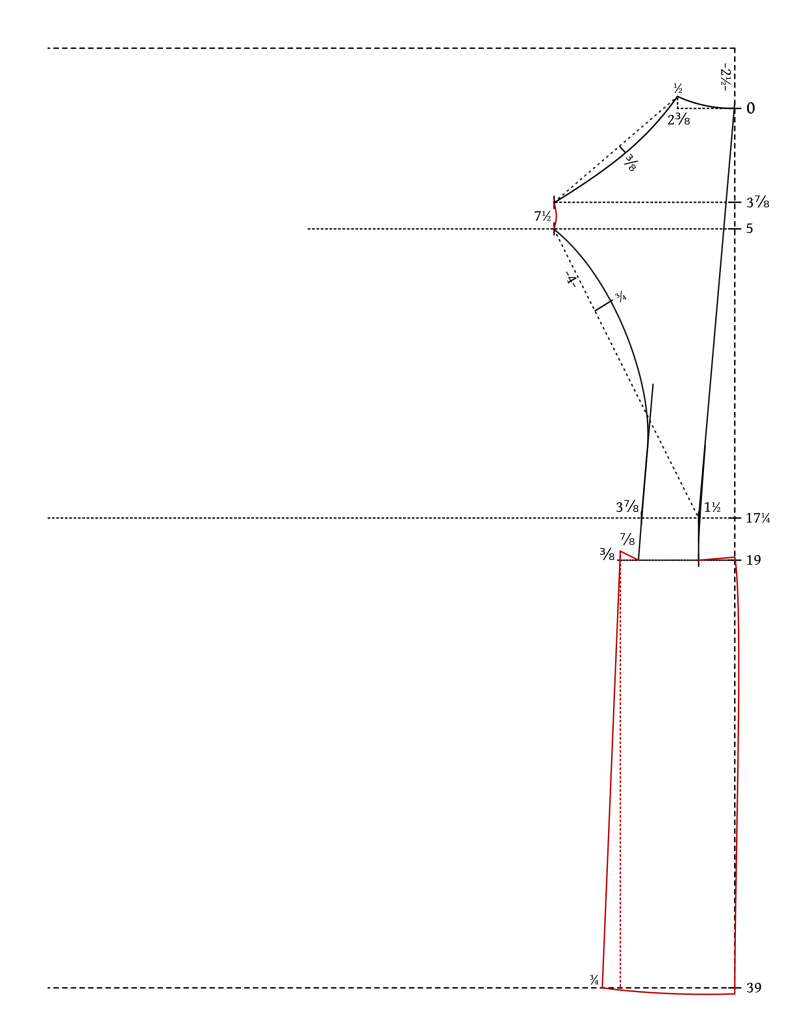
We’ll begin drafting, as usual, with the back of the coat. First, draw a square horizontally and vertically. This should be wide enough to fit the coat and the a little longer than the total length, but of course you can simply extend the lines if necessary later on.
All measurements should be in graduated inches, corresponding to your chest size, unless otherwise noted. Also, I’m using dashed lines here to denote construction lines but in practice I just use a solid pencil line for everything.
From the intersection, measure 2 1/2 graduated inches down and mark 0. The back lengths are all measured from this 0 point rather than the intersection.
- 3 7/8 graduated inches from 0 for the rear shoulder point.
- 5 graduated inches from 0.
- 5 graduated inches from 0.
- 17 1/4 graduated inches from 0 for the natural waist. I highly recommend checking this to your actual measurement in inches just to compare the two.
- 19 graduated inches from 0 for the dropped waist common during the 1860s.
- 39 graduated inches from 0 for the total length of the jacket. Devere gives 39 here but it’s quite likely too long, especially for larger chest sizes, so use your actual measurement here.

Now we’ll square lines across from each of those points and mark the following distances.
- 2 3/8 graduated inches from 0. Then square up 1/2 graduated inches as shown for the back shoulder/neck point.
- 7 1/2 graduated inches from 3 7/8 for the width of back.
- 7 1/2 graduated inches from 5 for the bottom of the armscye. This line also forms the front armscye so you can extend it further as shown.
- 1 1/2 and 3 7/8 graduated inches from 17 1/4 for the back width of the waist.
- 1 1/2 graduated inches from 19.
- Square across from 39 for the bottom of your draft.
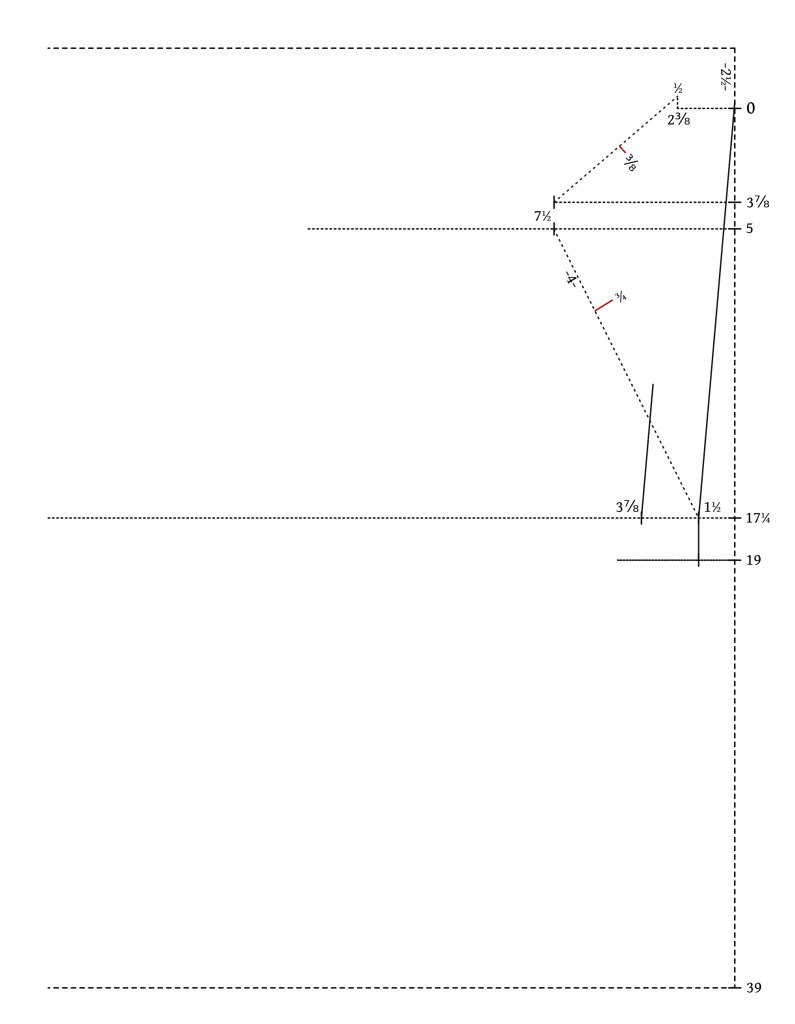
Now we’ll add some construction lines to make drawing the curves a little easier.
- Draw a line from 0 to 1 1/2, extending it straight down to the line at 19. This forms the center back with a slight amount of ‘spring’ below the waist.
- Draw a line parallel to the line from 0 – 1 1/2, from 3 7/8. This is more of a guide for forming the back curve but does form the other side of the back at the waist.
- Back near the top, draw a line from the 1/2 mark to the top 7 1/2 mark for the shoulder curve.
- From the lower 7 1/2 to 1 1/2, draw a line to aid in drawing the back curve.

These next two small lines give the depths of each curve.
- Find the center of the shoulder seam and square a line inwards 3/8 of a graduated inch.
- On the line from 7 1/2 – 1 1/2, measure 4 graduated inches from 7 1/2 and square inward 3/4 of a graduated inch.
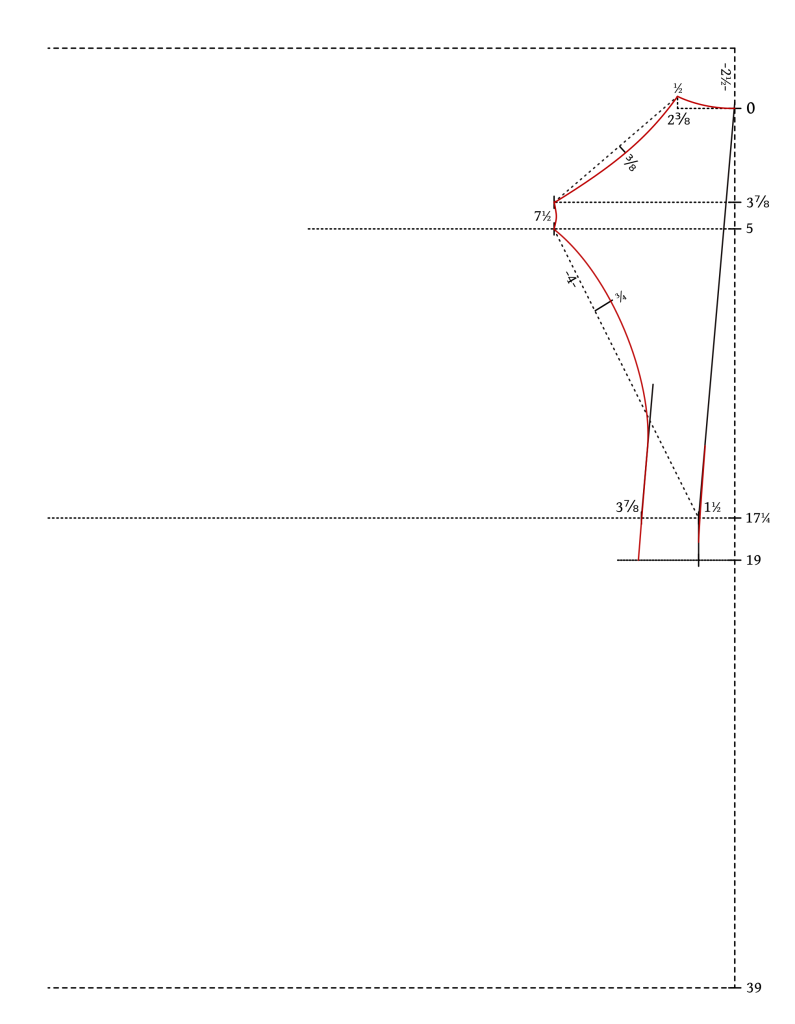
With the construction lines drawn, we can add in the curves now.
- From 1/2 – 0 draw a curve for the back neck.
- Draw a curve from 7 1/2 through 3/8 to 1/2 for the shoulder seam.
- From 7 1/2 to 7 1/2 draw a very slight curve for the back of the armscye.
- From the lower 7 1/2 through 3/4 to through 3 7/8, draw a curve, straightening the curve as it hits the construction line and continuing straight to line 19.
- Finally, add a very shallow curve at 1 1/2 near the waist just to soften the angle a little.
Finally, we’ll finish up the back piece with the skirt area.
- At the top of the skirt near 19, ‘spring out’ the top about 1/8 of a graduated inch at 19.
- From 19 to 39, give a very slight curve, deeper near the top half, to the center back of the skirt. When the back skirt is made up, it will give the appearance of being a straight line, ideally, as it goes over the curve of the seat.
- Again at line 19 at the side seam area, mark a line at line 19, 7/8 of a graduated inch past the construction line coming from 3 7/8. Also spring up here 3/8 of a graduated inch.
- Measure the width of the skirt at line 19. Add 3/4 of a graduated inch to the bottom width of the skirt at 39.
- Redraw the side of the skirt from 3/8 to 3/4 as shown.
- Finally, draw a slight curve to the bottom, ensuring that the angle at 3/4 is at 90 degrees, as well as at 39.