Month: January 2021
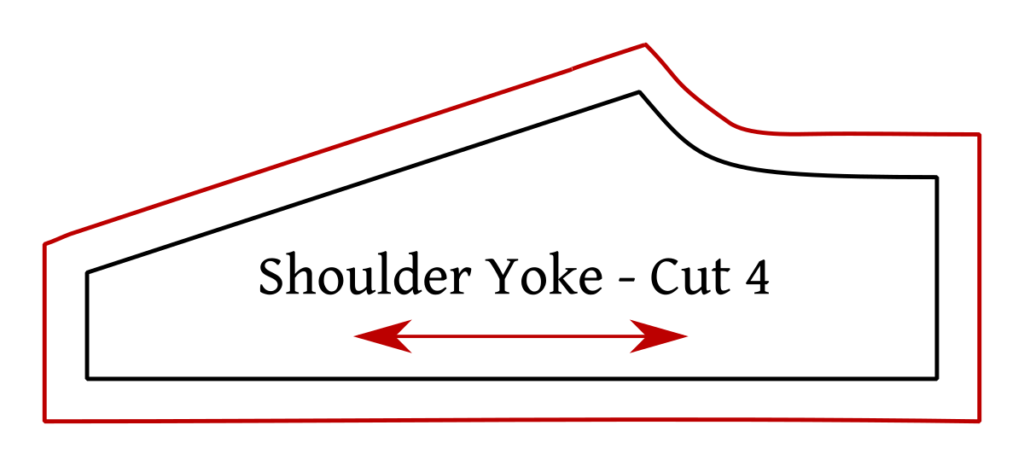
Drafting the Yoke
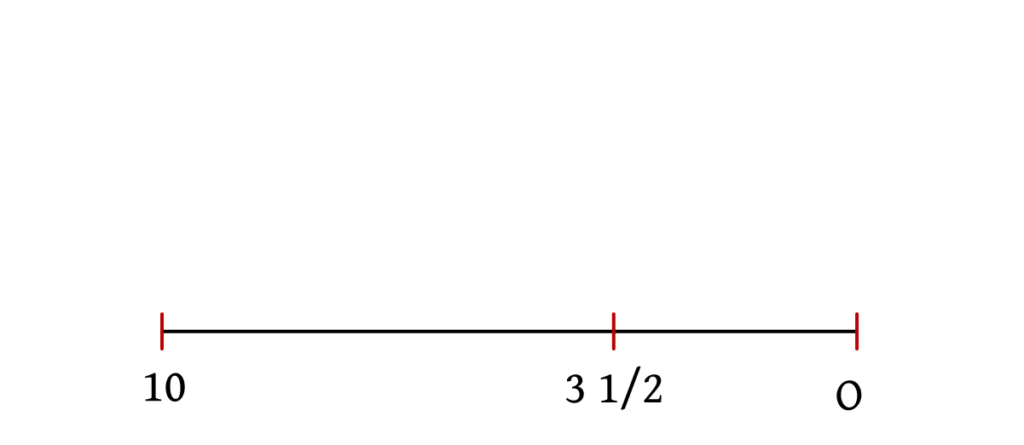
To draft the yoked back, first draw a horizontal line, marking off the following points with your graduated ruler.
- 0
- 3 1/2
- 10
Depending on your size, you can shorten the width of the yoke by moving point 10 to the right an inch or two as necessary. You could also adjust the position of the neck at 3 1/2, but that is an advanced operation.
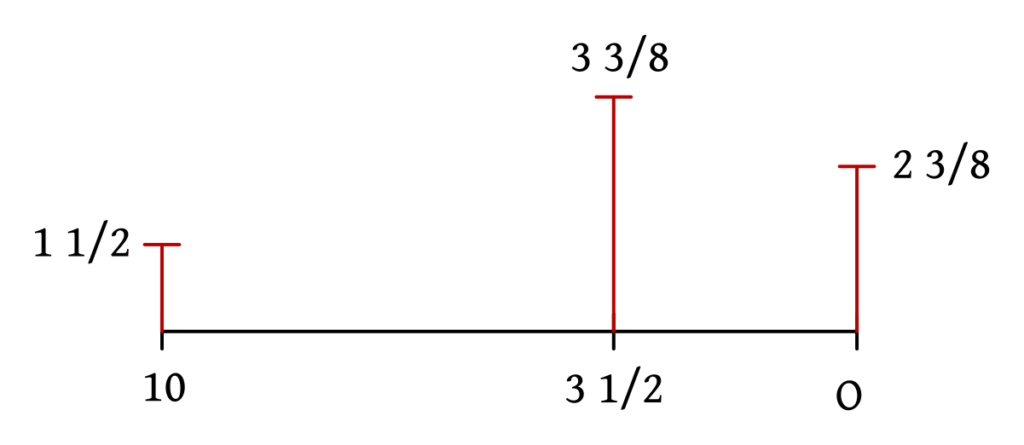
Next square up the following points to get the heights of the various points:
- 2 3/8 from 0
- 3 3/8 from 3 1/2
- 1 1/2 from 10
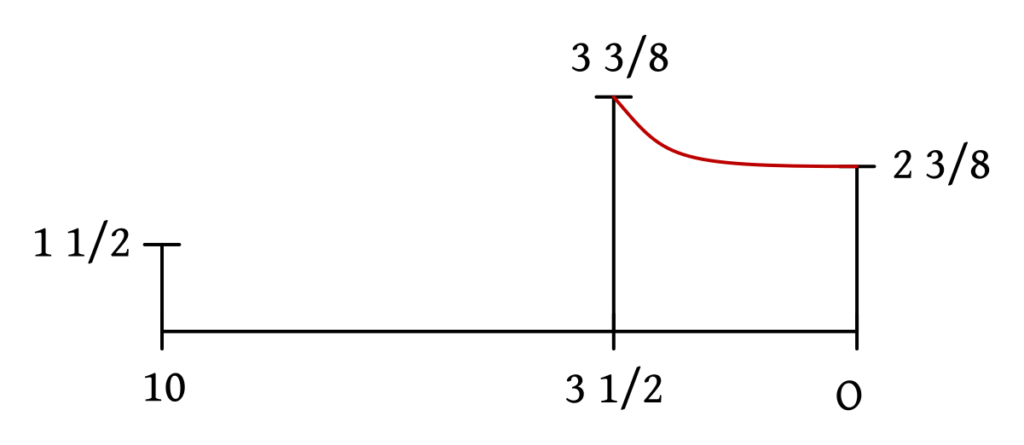
Now draw in the curve of the back neck. This should be pretty much horizontal from point 2 3/8, then curve somewhat sharply up to point 3 3/8.
Lastly, draw the shoulder seam from point 1 1/2 to 3 3/8 with a straight line.
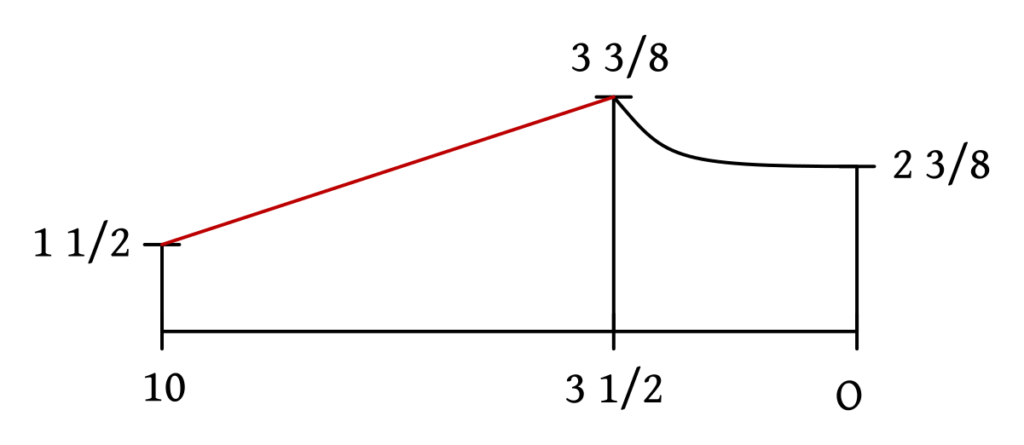
Finally, add a 1/2″ seam allowance all the way around the shoulder yoke. You’ll cut four of these from the fabric, as two are used for the lining pieces.
Your Progress
[columns gutter=”0″]
[col]
1 | Draft the yoke. | |
2 | Draft the collar. | |
3 | Draft the cuffs |
[/col]
[col align_text=”center, middle”]
[/col]
[/columns]
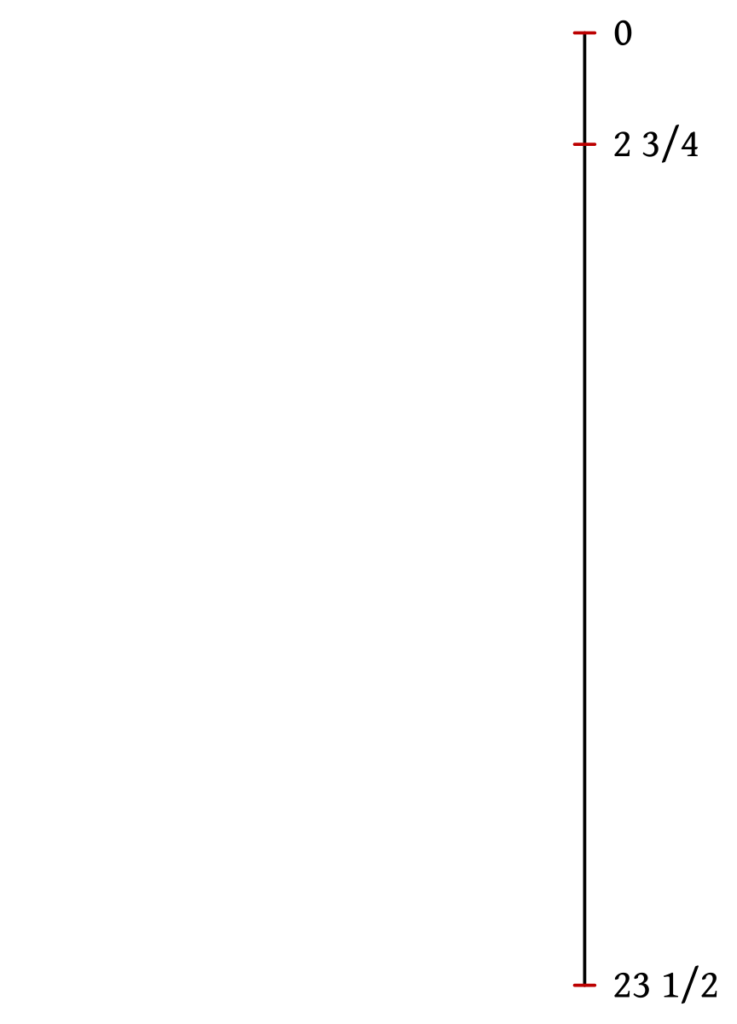
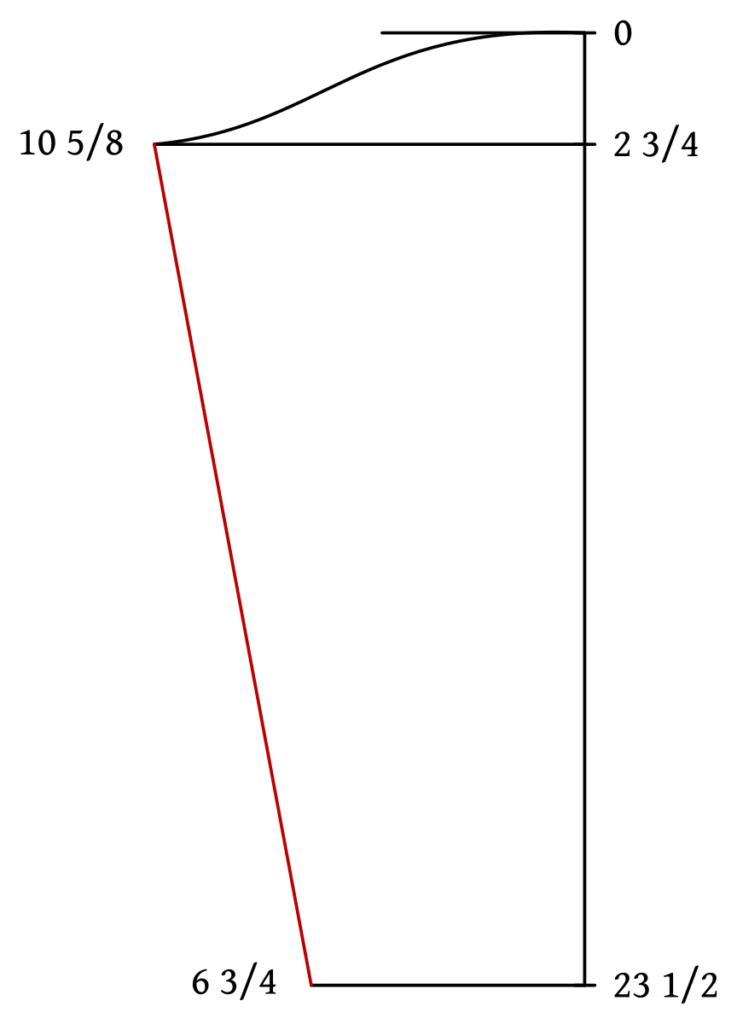
Drafting the Shirt Sleeves
Drafting the sleeves is a very simple matter. Start with the usual vertical construction line, marking the following points with your graduated ruler:
- 0
- 3 2/4
- 23 1/2
For larger sizes, you can compare the length of the sleeve from 0 to 23 1/2 to your actual measurements, and shorten as necessary.
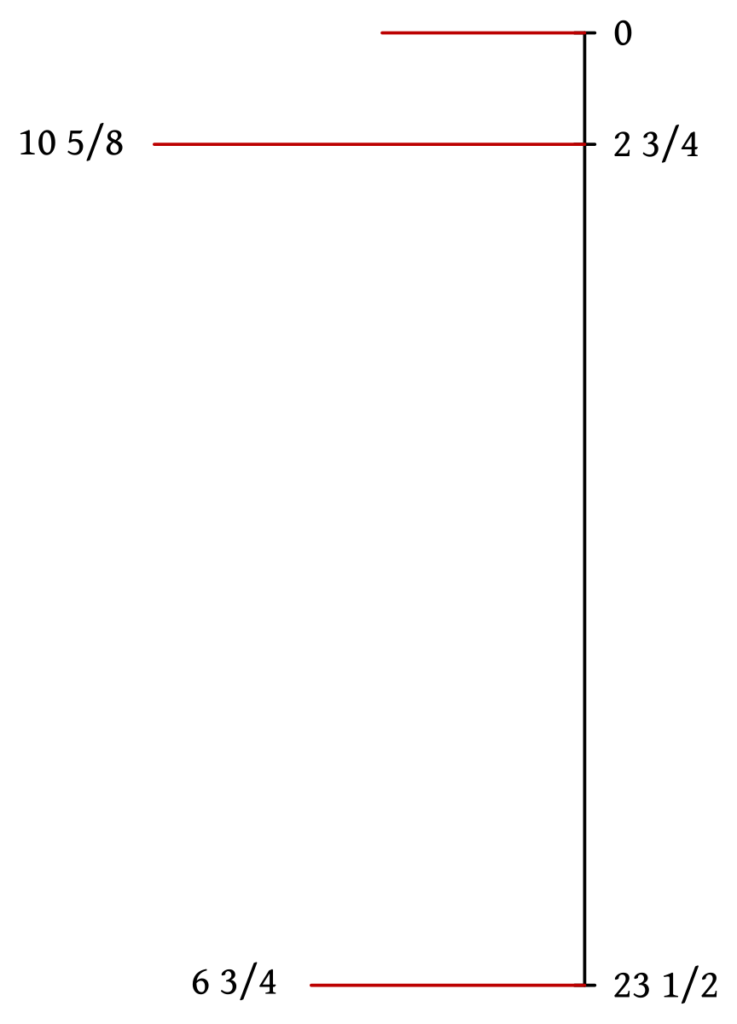
Square out from each of the points as follows:
- From 0 is just a construction line for the sleeve head, 2 or 3 inches works well.
- 10 5/8 from 2 3/4
- 6 3/4 from 23 1/2
Points 10 5/8 and 6 3/4 dictate the width of the sleeve. For the average size of 37 1/2″ chest, it’s already over 20 inches in diameter, so for larger sizes I recommend reducing the width at these points as necessary.
Now draw the sleeve head curve as shown. At 0 it follows the construction line for an inch or so, before falling into a gentle ‘S’ curve through to point 10 5/8.
You should measure the length of the sleeve head with a tape measure and compare it to the diameter of the armscye. The sleeve will definitely be a lot larger, but excessively large sleeve heads get more difficult to fit into the armscye.
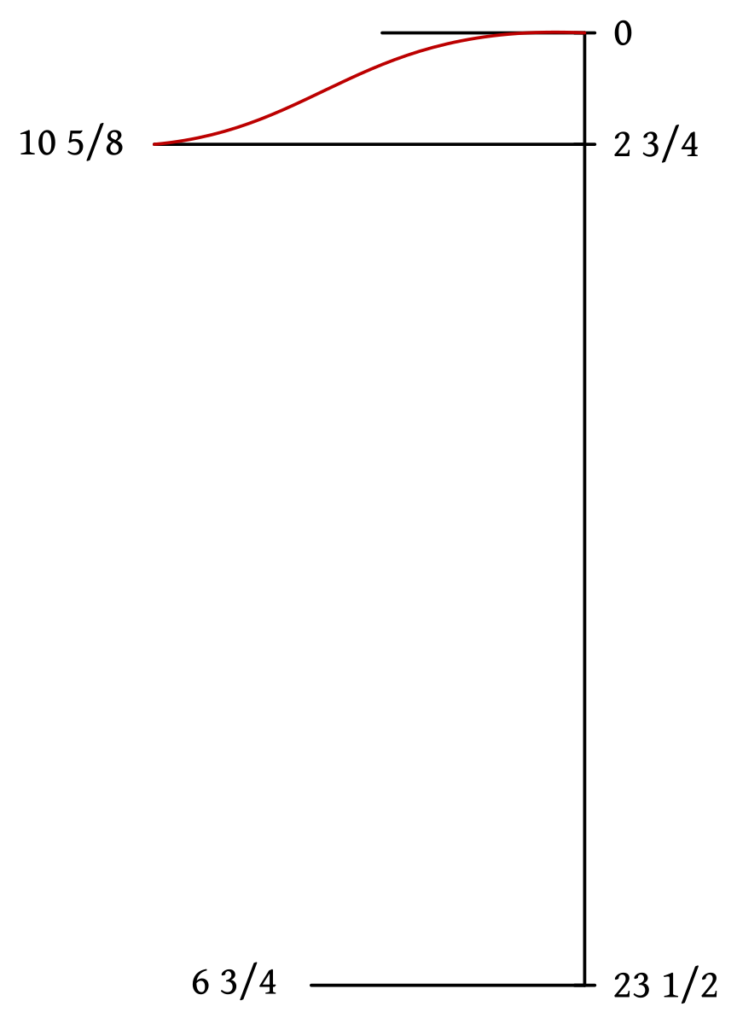
Finally, draw in the sleeve seam from 10 5/8 to 6 3/4. This completes the sleeve draft.
Now add a 1/2″ seam allowance along the sleeve head, the diagonal sleeve seam, and the cuff. The horizontal edge of the sleeve is cut on the fold.

Your Progress
[columns gutter=”0″]
[col]
1 | Draft the sleeves. |
[/col]
[col align_text=”center, middle”]
[/col]
[/columns]
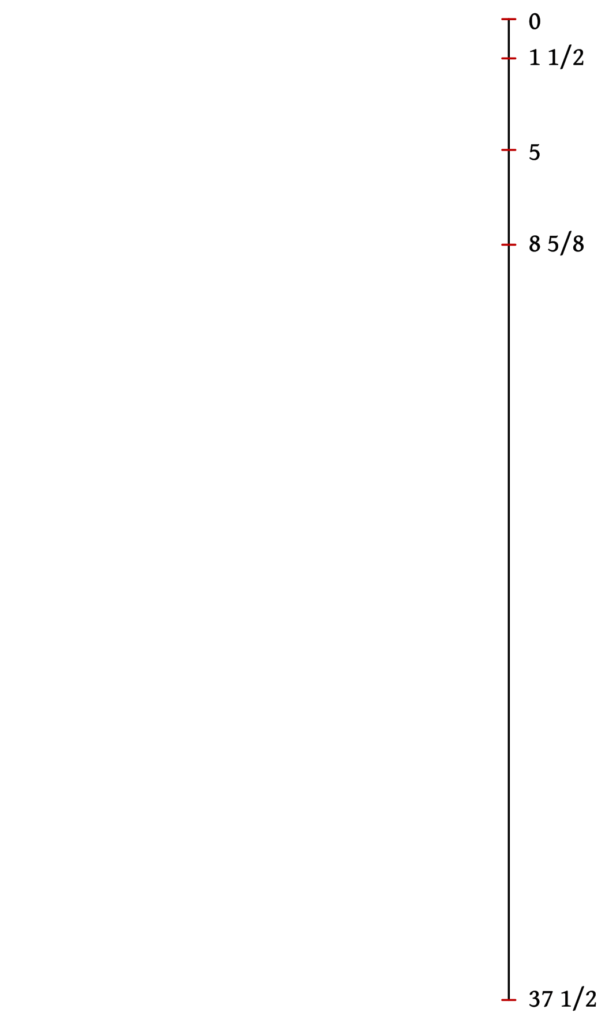
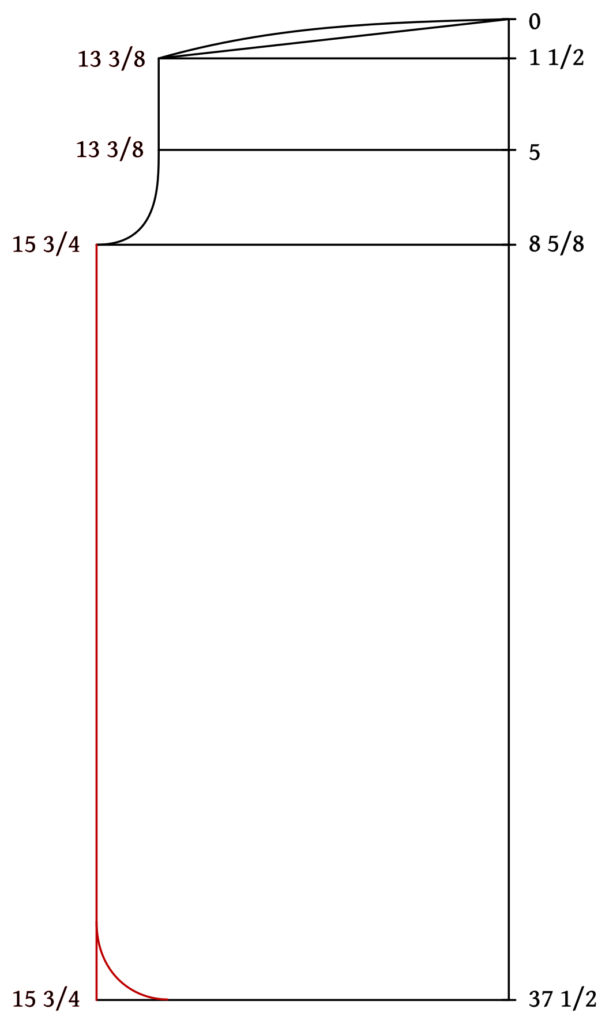
Drafting the Shirt Back
The draft for the shirt back starts in much the same way, with a vertical construction line. Mark out the following points starting with zero:
- 0
- 1 1/2
- 5
- 8 5/8
- 37 1/2
If you shortened the length of the front, you’ll want to do the same for the back length. It should be about 3 to 5 inches longer than the front ideally.
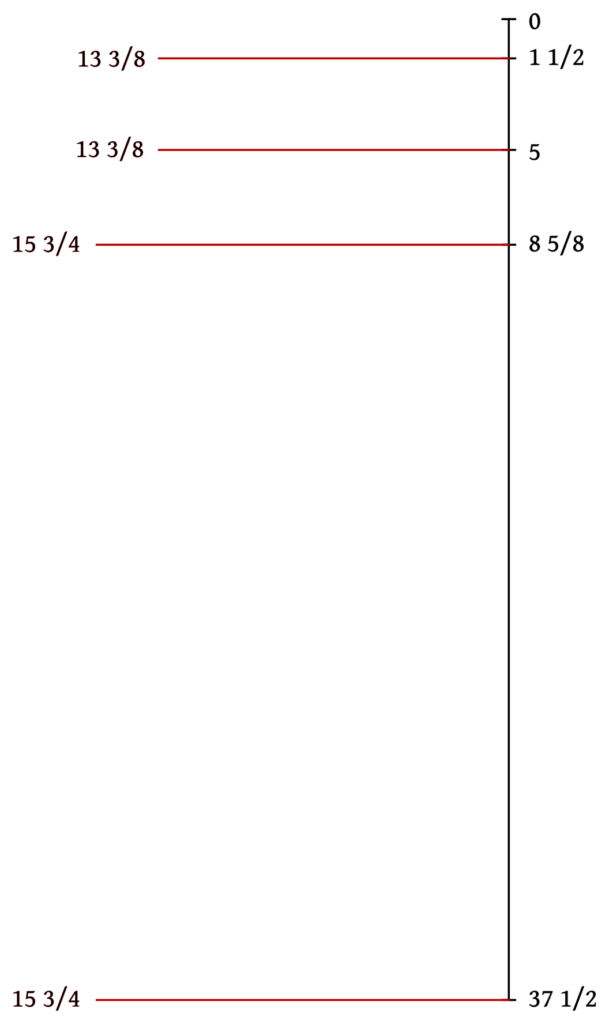
Square out the following lines and points:
- 13 3/8 from 1 1/2
- 13 3/8 from 5
- 15 3/4 from 8 5/8
- 15 3/4 from 37 1/2
Begin drawing in the curves with the top edge. This is not actually the shoulder, but the bit below the shoulder, which will be gathered into the shoulder yoke.
I drew a construction line from 0 to 13 3/8, followed by a curve, almost perpendicular to 0 gently sloping into point 13 3/8.
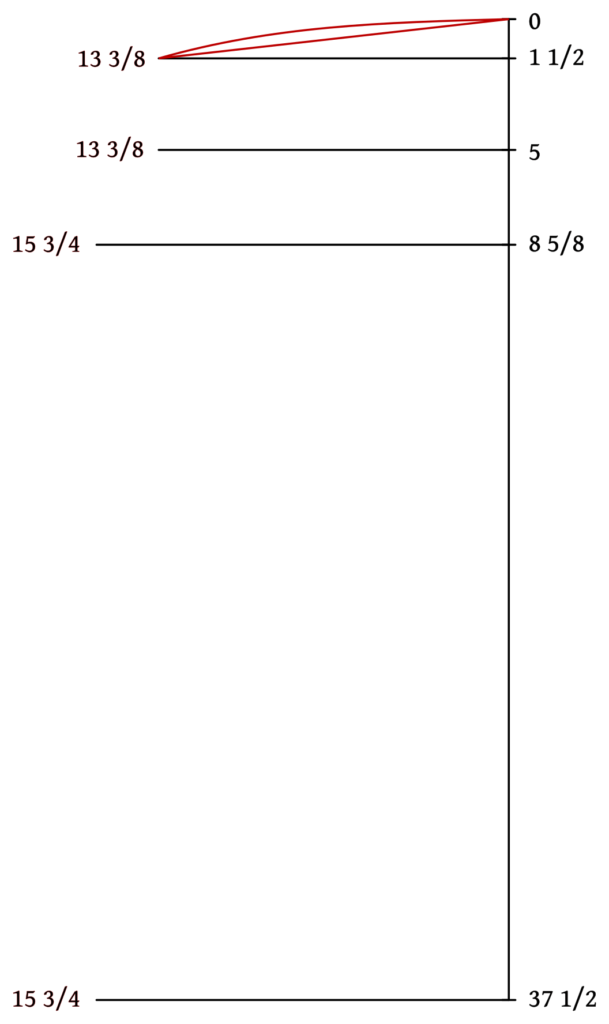
Next, draw the back armscye, starting with a vertical line from 13 3/8 to 13 3/8, curving deeply into 15 3/4.

Finally, draw the side seam, curving into the bottom hem as you did on the front draft.
One last alteration to the shirt body: if you are a larger size and find the back is just going to end up ridiculously large, you can remove a couple of inches from the center back as shown. Redraw the curve in the shoulder area as necessary.
I’d advise drafting the shoulder yoke in the next step before doing this alteration, however.
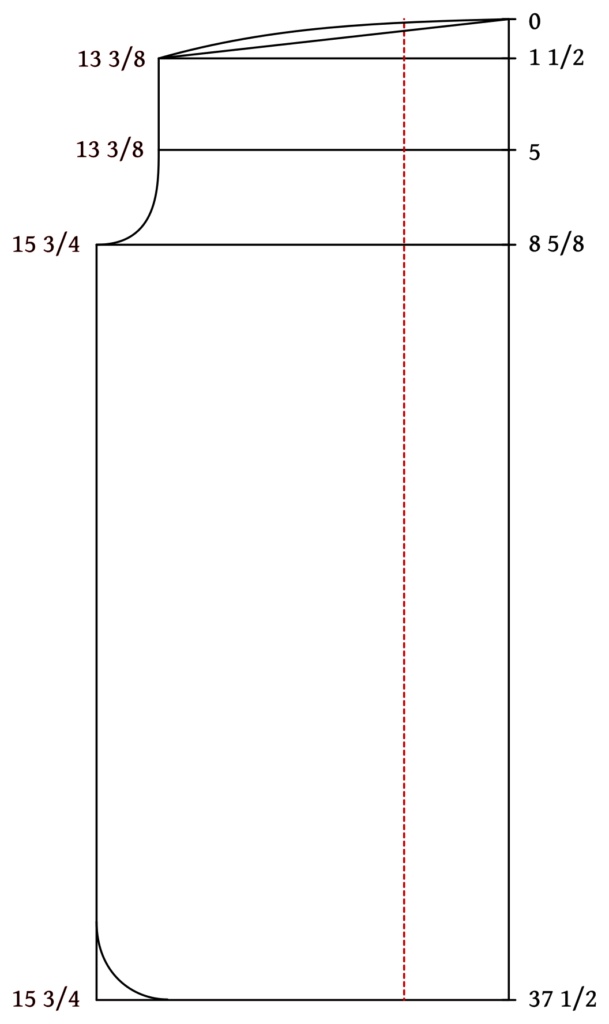
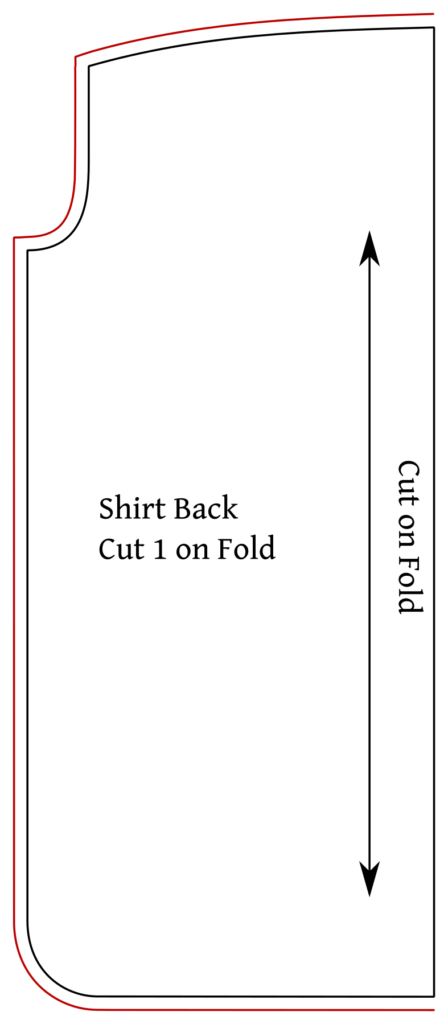
Finally, add seam allowances around the shoulder, armscye, side seam, and hem. The center back is left without a seam allowance and will be placed on the fold of the fabric.
Your Progress
[columns gutter=”0″]
[col]
1 | Draft the shirt back. |
[/col]
[col align_text=”center, middle”]
[/col]
[/columns]
Drafting the Shirt Front
Before you begin with the drafting, you’ll need to print out a set of graduated rulers (or at least your correct-sized ruler) to use for the draft. These are based on those used by Louis Devere in his drafting manual and allow you to scale a pattern up or down to the approximate size of the person.
Your ruler sized is based directly on your measurement. So if you’re a 42″ chest, choose a size 42 ruler, and so on. This measure is used for the entire draft. You can then use a regular measuring tape to check for fitting issues, which I’ll explain as we go along.
When printing out the rulers, the most important thing is to print them at 100%, else the scale and your draft will be off. If you have to print on regular 8 1/2 x 11 paper (as I usually do), the ends of the rulers will be cut off, so just use the bit you have and measure things out in multiples of 5 or whichever is easiest for you.
I’m drafting on a roll of poster paper, 36″ wide, that I got from Hobby Lobby. You may be able to find similar rolls at Staples, Amazon, and other such stores, or you could use something like the back side of wrapping paper.
You’ll also need a longer straight edge such as a tailor’s square, yard stick, or quilting ruler, and a sharp pencil.
Drafting the Front
Begin by drawing a vertical line on the right side of the paper (you may need to work sideways to get everything to fit).
Mark the top of the line as 0. From this 0 point, mark out the following distances along the line using your graduated ruler:
- 2
- 2 3/8
- 6 1/4
- 8 5/8
- 19 5/8
- 33 1/2
Note
This is the first area in which you can double check the length with a regular tape measure. Sometimes, if you are a larger size than around a 42 – 44″ chest, the proportions start to be thrown off substantially. For an extreme example, imagine someone who has a 60″ chest and is only 5 feet tall. If you left the draft as is, the bottom of the shirt would most likely be touching the floor, at least!
So take the Length measurement you took in the last lesson and compare it to the actual length between points 0 and 33 1/2. If there is a large difference you’ll want to adjust it accordingly by raising point 33 1/2 to where it corresponds with your length measurement.
With larger sizes, other things such as the armscye depth at 8 5/8 may also be off, so please send me a message if you need help so I can get you straightened out before things get too out of place!
Next, ‘square out’, or draw lines at right angles to the original line, at each of the points you just marked out. Then measure the following distances on each of the squared out lines:
- 7 1/2 from 0
- 3/4 from 2
- 10 5/8 from 2 3/8
- 2 3/8 from 6 1/4
- 15 3/4 and 10 5/8 from 19 5/8
- 15 3/4 from 33 1/2
With the numbers all plotted out, it’s time to draw in the curves. You can do this free hand, or use something like a French curve or bendable drafting ruler to get the curves you like.
First, draw in the armscye from 3/4 through 2 3/8 down to 8 5/8 as shown.
Draw in the shoulder seam now. I like to first draw a straight line from 7 1/2 to 3/4, then follow that with the curved seam line itself, in order to more accurately tell how deeply I am curving the line. Devere doesn’t give an exact depth to the curve, so something like 1/2″ should work well in most cases.
Next is the neckline, with a construction line drawn first from 7 1/2 to 10 5/8. The curve should be drawn rather deeply, it’s almost vertical at 7 1/2, and the last bit closer to 10 5/8 follows the horizontal line for almost 2 inches.
Draw a vertical line from 10 5/8 to 10 5/8. This gives the front edge of the opening placket.
Draw one more vertical line at 15 3/4 for the center front edge of the shirt – this will actually be placed on the fold of the fabric later on.
Here is another area where you can adjust the fit if necessary for larger sizes. On a sized 37 1/2 chest, where the graduated ruler is equal in size to a regular inch ruler, the shirt at the bottom is 31 1/2″ across the front, over 60 inches around if you include the back! So it is very roomy (and comfortable). If you are a larger size however, this can get unwieldy, so you may want to move the front edges at 15 3/4 and 10 5/8 at the neck back slightly.
Every case is different, so if you think you might need to do this, please take a photo of your draft as well as your self and send those to me so I can advise on a more individual basis.
The last bit of the draft’s curves is at the bottom of the side seam. Make a small curve here – mine started at about 3 inches from point 33 1/2 on either end. You could also use a can or plate here, anything that fits and is pleasing to your eye.
Draw a line parallel to the 10 5/8 line, about 1″ to 1 1/8″ inch away, depending on your size and preferences.
This next line is quite important, as we’ll be cutting various pieces based on this line later on. It is made parallel to the original construction line and should be placed about 1″ to 1 1/2″ in from the shoulder point. This forms the outer edge of the pleated front area.
Finally, draw in the desired pleat width parallel to the other lines. The spacing of the pleats is up to you – I’ve done 1″ and 1/2″ sized pleats in the past. Half inch pleats and smaller tends to get very tedious so I do recommend a larger pleat if this is your first attempt at a pleated front. The smaller pleats are also a pain to press!
The pleats should be spaced equally from the front placket area. As you can see, the outer pleat closest to the armscye is a lot smaller – you can either leave it, as it’s not very noticeable in the finished shirt, or move that outer line outwards to make all of the pleats equal in size.
Just a note, the pleats we’re drawing on this pattern are just to get an idea of what our chosen pleat size will look like. We’ll draft out the actual pleated section later on.
Finally, one last adjustment you may wish to make for the depth of the plackets themselves. I’m not sure, but I think the original draft was meant for wear with a very low cut dress waistcoat, so the placket is very long if you leave it at 19 5/8 depth.
Instead, you can apply your opening measure from the neck to the desired placket opening depth and adjust the heights of the various lines involved as necessary. Here’s what that might look like.
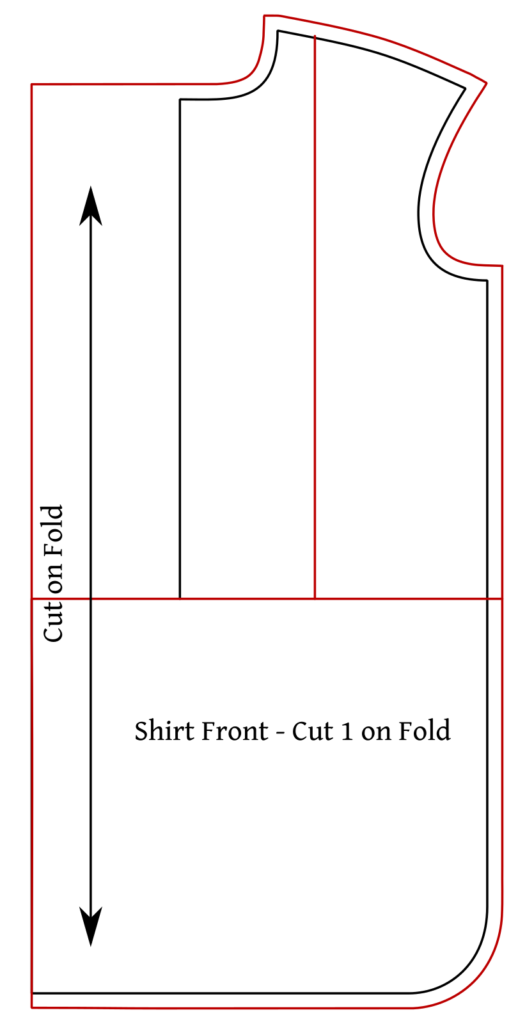
All that’s left to do is add a 1/2″ seam allowance, using a quilting square or similar device, around the neck area, shoulder, armscye, side seam, and bottom hem.
Rather than add a seam allowance to the front, which will be cut on the fold, continue the front seam vertically as well as extend the neck seam allowance horizontally until the two meet. The front edge will be cut on the fold of the fabric, and this makes certain steps a little more manageable.
Finally, make sure the bottom edge as well as the outer edge of the pleats is marked on the pattern. These need to be transferred to the fabric later on.
Shirt Measurements
The shirt pattern we are using is from Devere’s Gentleman’s Monthly Magazine of Fashion, July 1859, and is cut extremely loose in the fit. It’s not quite an ‘on the square’ shirt as there are some refinements to the shoulder and neck area, but it’s close. If you’re of a size greater than around 40 – 42″ chest, you should take the extra measurements and compare them to the shirt to ensure you do not create a balloon of a shirt.
When measuring, you or the person being measured should wear a dress shirt or period shirt ideally.
Breast
Measure around the fullest part of the chest. This measurement is written down as half for the sake of the draft. So a 38″ chest becomes 19″ when drafting. This measurement also determines the size of graduated ruler you should use for drafting.
N.B. The shirt is so unfitted that no waist measurement is necessary.

Neck
The neck should be taken fairly tightly around the neck, including the collar (stand it up). When you’re drafting, compare the neck size of the draft to your measurement to make sure you’re on the right track.
Length
Taken from the back, measure from the base of the collar down to the desired length. The draft we are using produces a very long shirt as was the style, and so if you are a larger size, it’s quite possible your shirt will touch the floor if you do not adjust the measurement! Ideally should be a few inches above the knees.
Back Width

This is basically a check measurement to ensure the back of the shirt does not become too wide. While the shirt has 4 – 6 inches of ease in the back shoulder area, if you are a larger size this will end up too wide. Measure from armpit to armpit (not under, just to the armpit) across the back.
Sleeve
The sleeves are more difficult to measure due to the looseness of the shirt – they don’t end at the same point as on a coat. So stand with your arm and elbow both held at 90 degrees, and measure from your armpit along the back of the arm to just past the wrist. Then compare with your draft as necessary.
Opening
To help determine the depth of the pleats at the front, measure from the bottom of the collar at the neck to the desired opening of the pleats. Generally, I like to make my pleats end at about 3″ below the opening or top button of my waistcoat. If you don’t yet have a waistcoat, just estimate where you’d like it to open and then add the 3″ to that.
There may be some other measurements that are of use in very rare cases, but these should certainly cover most drafts. If you need any help or have any questions, please post your questions in the support forum!